
Statement of Volatility
Page 2
...power loss (unplugging the power cord and removing the battery) destroys all user data on the system configuration and time-of VMWare, Inc. Trademarks used in this text: Dell™, the DELL logo, Dell Precision™, OptiPlex™, Latitude™, PowerEdge™, PowerVault™, PowerConnect™, ...are registered trademarks of Microsoft Corporation in the United States and other countries. CDROM/RW/ DVD/ DVD+RW/ Diskette Drives User replaceable Volatile memory in GB. May also be SSD (solid state flash drive). Microsoft®, Windows®, Windows Server®, MS-...
...power loss (unplugging the power cord and removing the battery) destroys all user data on the system configuration and time-of VMWare, Inc. Trademarks used in this text: Dell™, the DELL logo, Dell Precision™, OptiPlex™, Latitude™, PowerEdge™, PowerVault™, PowerConnect™, ...are registered trademarks of Microsoft Corporation in the United States and other countries. CDROM/RW/ DVD/ DVD+RW/ Diskette Drives User replaceable Volatile memory in GB. May also be SSD (solid state flash drive). Microsoft®, Windows®, Windows Server®, MS-...
User Manual
Page 24
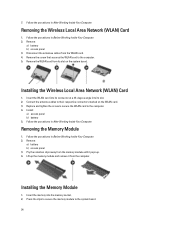
... Before Working Inside Your Computer. 2. Follow the procedures in After Working Inside Your Computer. Replace and tighten the screw to secure the WLAN card to the system board. 24 Remove: a) battery b) access panel 3. Press the clips to secure the memory module to the computer. ...degree angle into the memory socket. 2. Installing the Memory Module 1. Remove the WLAN card from its slot. 2. Install: a) access panel b) battery 5. Pry the retention clips away from the memory module until it from the WLAN card. 4. Follow the procedures in Before Working Inside Your Computer...
... Before Working Inside Your Computer. 2. Follow the procedures in After Working Inside Your Computer. Replace and tighten the screw to secure the WLAN card to the system board. 24 Remove: a) battery b) access panel 3. Press the clips to secure the memory module to the computer. ...degree angle into the memory socket. 2. Installing the Memory Module 1. Remove the WLAN card from its slot. 2. Install: a) access panel b) battery 5. Pry the retention clips away from the memory module until it from the WLAN card. 4. Follow the procedures in Before Working Inside Your Computer...
User Manual
Page 42
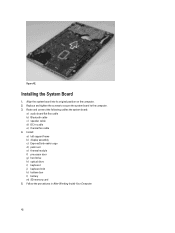
Replace and tighten the screws to secure the system board to the computer. 3. Route and connect the following cables the system board: a) audio board flat flex .... 42 Install : a) left support frame b) display assembly c) ExpressCard reader cage d) palm rest e) thermal module f) processor door g) hard drive h) optical drive i) keyboard j) keyboard trim k) bottom door l) battery m) SD memory card 5. Align the system board into its original position on the computer. 2. Installing the System Board 1. Figure 42. Follow the procedures in cable...
Replace and tighten the screws to secure the system board to the computer. 3. Route and connect the following cables the system board: a) audio board flat flex .... 42 Install : a) left support frame b) display assembly c) ExpressCard reader cage d) palm rest e) thermal module f) processor door g) hard drive h) optical drive i) keyboard j) keyboard trim k) bottom door l) battery m) SD memory card 5. Align the system board into its original position on the computer. 2. Installing the System Board 1. Figure 42. Follow the procedures in cable...


