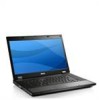
Setup and Features Information Tech Sheet
Page 2
The computer turns on the fan when the computer gets hot. Latitude E5410 - Do not store your Dell computer in the air vents. Restricting the airflow can damage the computer or cause a fire. Back View 1 2 3 11 10 7 89 6 5 4 1 docking alignment mark 2 power and ... into, or allow dust to accumulate in a low-airflow environment, such as a closed briefcase, while it is normal and does not indicate a problem with the fan or the computer. Fan noise is running.
The computer turns on the fan when the computer gets hot. Latitude E5410 - Do not store your Dell computer in the air vents. Restricting the airflow can damage the computer or cause a fire. Back View 1 2 3 11 10 7 89 6 5 4 1 docking alignment mark 2 power and ... into, or allow dust to accumulate in a low-airflow environment, such as a closed briefcase, while it is normal and does not indicate a problem with the fan or the computer. Fan noise is running.

Setup and Features Information Tech Sheet
Page 4
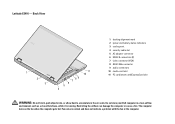
The computer turns on the fan when the computer gets hot. Fan noise is running. Back View 1 2 3 4 12 11 8 9 10 7 6 5 1 modem connector (optional) 2 docking alignment mark 3 power and battery status indicators 4 cooling vent 5 security cable slot 6 AC ... into, or allow dust to accumulate in a low-airflow environment, such as a closed briefcase, while it is normal and does not indicate a problem with the fan or the computer. Do not store your Dell computer in the air vents. Restricting the airflow can damage the computer or cause a fire. Latitude E5510 -
The computer turns on the fan when the computer gets hot. Fan noise is running. Back View 1 2 3 4 12 11 8 9 10 7 6 5 1 modem connector (optional) 2 docking alignment mark 3 power and battery status indicators 4 cooling vent 5 security cable slot 6 AC ... into, or allow dust to accumulate in a low-airflow environment, such as a closed briefcase, while it is normal and does not indicate a problem with the fan or the computer. Do not store your Dell computer in the air vents. Restricting the airflow can damage the computer or cause a fire. Latitude E5510 -
Service Manual
Page 23
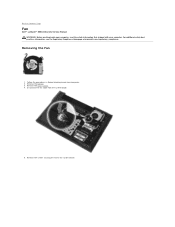
Back to the system board. For additional safety best practices information, see the Regulatory Compliance Homepage at www.dell.com/regulatory_compliance. Remove the access panel. 4. Remove the screws securing the fan to Contents Page Fan Dell™ Latitude™ E5510 Discrete Service Manual WARNING: Before working inside your computer, read the safety information that shipped with your computer. Remove the battery. 3. Removing the Fan 1. Disconnect the fan cable from the system board. 5. Follow the procedures in Before Working Inside Your Computer. 2.
Back to the system board. For additional safety best practices information, see the Regulatory Compliance Homepage at www.dell.com/regulatory_compliance. Remove the access panel. 4. Remove the screws securing the fan to Contents Page Fan Dell™ Latitude™ E5510 Discrete Service Manual WARNING: Before working inside your computer, read the safety information that shipped with your computer. Remove the battery. 3. Removing the Fan 1. Disconnect the fan cable from the system board. 5. Follow the procedures in Before Working Inside Your Computer. 2.

Service Manual
Page 24
Lift up the fan and remove. Replacing the Fan To replace the fan, perform the above steps in reverse order. Back to Contents Page 6.
Lift up the fan and remove. Replacing the Fan To replace the fan, perform the above steps in reverse order. Back to Contents Page 6.

Service Manual
Page 31
Remove the battery from the computer. 4. Loosen the screws securing the heat sink to Contents Page Heat Sink Dell™ Latitude™ E5510 Discrete Service Manual WARNING: Before working inside your computer, read the safety information that shipped with your computer. Back ... from the computer. 3. Lift up the heat sink at www.dell.com/regulatory_compliance. For additional safety best practices information, see the Regulatory Compliance Homepage at an angle and remove it from the computer. 5. Remove the fan from the computer. Follow the procedures in Before Working Inside Your...
Remove the battery from the computer. 4. Loosen the screws securing the heat sink to Contents Page Heat Sink Dell™ Latitude™ E5510 Discrete Service Manual WARNING: Before working inside your computer, read the safety information that shipped with your computer. Back ... from the computer. 3. Lift up the heat sink at www.dell.com/regulatory_compliance. For additional safety best practices information, see the Regulatory Compliance Homepage at an angle and remove it from the computer. 5. Remove the fan from the computer. Follow the procedures in Before Working Inside Your...

Service Manual
Page 50
... Remove the palm rest from the computer. 3. Remove the screw securing the daughter board to Contents Page Modem Daughter Card Dell™ Latitude™ E5510 Discrete Service Manual WARNING: Before working inside your computer, read the safety information that shipped with your computer. For additional safety...Remove the battery from the computer. 15. Remove the heat sink from the computer. 10. Back to the system board. Remove the fan from the computer. 11. Remove the system board from the computer. 6. Remove the hard drive from the computer. 18. Remove the ...
... Remove the palm rest from the computer. 3. Remove the screw securing the daughter board to Contents Page Modem Daughter Card Dell™ Latitude™ E5510 Discrete Service Manual WARNING: Before working inside your computer, read the safety information that shipped with your computer. For additional safety...Remove the battery from the computer. 15. Remove the heat sink from the computer. 10. Back to the system board. Remove the fan from the computer. 11. Remove the system board from the computer. 6. Remove the hard drive from the computer. 18. Remove the ...
Service Manual
Page 55
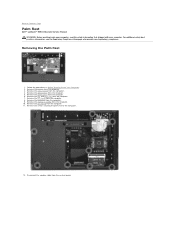
Back to the computer. 12. Remove the fan and heat sink from the computer. 11. Remove the LED ...the keyboard from the computer. 5. For additional safety best practices information, see the Regulatory Compliance Homepage at www.dell.com/regulatory_compliance. Remove the access panel from the computer. 3. Remove the battery from the computer. 4. Remove the...Remove the screws securing the palm rest to Contents Page Palm Rest Dell™ Latitude™ E5510 Discrete Service Manual WARNING: Before working inside your computer, read the safety information that shipped with your ...
Back to the computer. 12. Remove the fan and heat sink from the computer. 11. Remove the LED ...the keyboard from the computer. 5. For additional safety best practices information, see the Regulatory Compliance Homepage at www.dell.com/regulatory_compliance. Remove the access panel from the computer. 3. Remove the battery from the computer. 4. Remove the...Remove the screws securing the palm rest to Contents Page Palm Rest Dell™ Latitude™ E5510 Discrete Service Manual WARNING: Before working inside your computer, read the safety information that shipped with your ...
Service Manual
Page 60
Back to Contents Page Adding and Replacing Parts Dell™ Latitude™ E5510 Discrete Service Manual Battery Access Panel LED Cover WLAN Card Memory Coin-Cell Battery Hard Drive Optical Drive Keyboard Memory Card Fan Heat Sink Processor LED Board Display Assembly Display Bezel Display Panel, Bracket and Hinges Display Camera Palm Rest Fingerprint Reader Speakers Bluetooth Board System Board Modem Daughter Card Back to Contents Page
Back to Contents Page Adding and Replacing Parts Dell™ Latitude™ E5510 Discrete Service Manual Battery Access Panel LED Cover WLAN Card Memory Coin-Cell Battery Hard Drive Optical Drive Keyboard Memory Card Fan Heat Sink Processor LED Board Display Assembly Display Bezel Display Panel, Bracket and Hinges Display Camera Palm Rest Fingerprint Reader Speakers Bluetooth Board System Board Modem Daughter Card Back to Contents Page

Service Manual
Page 61
... from the computer. 6. Lifting straight up, remove the processor from the computer. 5. Back to Contents Page Processor Dell™ Latitude™ E5510 Discrete Service Manual WARNING: Before working inside your computer, read the safety information that shipped with your computer. Removing ... Processor 1. Follow the procedures in Before Working Inside Your Computer. 2. Remove the fan from the computer. Remove the access panel from the computer. 4. For additional safety best practices information, see the Regulatory Compliance Homepage at www.dell.com/regulatory_compliance.
... from the computer. 6. Lifting straight up, remove the processor from the computer. 5. Back to Contents Page Processor Dell™ Latitude™ E5510 Discrete Service Manual WARNING: Before working inside your computer, read the safety information that shipped with your computer. Removing ... Processor 1. Follow the procedures in Before Working Inside Your Computer. 2. Remove the fan from the computer. Remove the access panel from the computer. 4. For additional safety best practices information, see the Regulatory Compliance Homepage at www.dell.com/regulatory_compliance.

Service Manual
Page 71
...Remove the LED cover from the computer. 9. Remove the screws that secure the system board to Contents Page System Board Dell™ Latitude™ E5510 Discrete Service Manual WARNING: Before working inside your computer, read the safety information that shipped with your computer. Remove ...the access panel from the computer. 10. Remove the fan from the computer. 5. Remove the heat sink from the computer. 16. Remove...
...Remove the LED cover from the computer. 9. Remove the screws that secure the system board to Contents Page System Board Dell™ Latitude™ E5510 Discrete Service Manual WARNING: Before working inside your computer, read the safety information that shipped with your computer. Remove ...the access panel from the computer. 10. Remove the fan from the computer. 5. Remove the heat sink from the computer. 16. Remove...


