Quick Reference Guide
Page 6
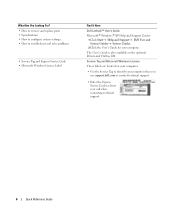
... Service Code • Microsoft Windows License Label Find It Here Dell Latitude™ User's Guide Microsoft® Windows® XP Help and Support Center 1 Click Start→ Help and Support→ Dell User and System Guides→ System Guides. 2 Click the User...'s Guide for your call when contacting technical support. 6 Quick Reference Guide Service Tag and Microsoft Windows License These labels are located on the optional Drivers and Utilities CD. What Are You Looking For? • How to remove and replace parts...
... Service Code • Microsoft Windows License Label Find It Here Dell Latitude™ User's Guide Microsoft® Windows® XP Help and Support Center 1 Click Start→ Help and Support→ Dell User and System Guides→ System Guides. 2 Click the User...'s Guide for your call when contacting technical support. 6 Quick Reference Guide Service Tag and Microsoft Windows License These labels are located on the optional Drivers and Utilities CD. What Are You Looking For? • How to remove and replace parts...

Quick Reference Guide
Page 22
... are running the test. Performs a thorough check of tracing the problem quickly. NOTE: The Service Tag for the selected device. The Dell Diagnostics obtains configuration information for all devices attached to your computer or all devices from the Drivers and Utilities CD, remove the CD. ...click the applicable tab described in the following table for more and requires you cannot resolve the error condition, contact Dell (see "Contacting Dell" in your part. This test typically takes 10 to select a test based on your computer. Lists the most common symptoms encountered and...
... are running the test. Performs a thorough check of tracing the problem quickly. NOTE: The Service Tag for the selected device. The Dell Diagnostics obtains configuration information for all devices attached to your computer or all devices from the Drivers and Utilities CD, remove the CD. ...click the applicable tab described in the following table for more and requires you cannot resolve the error condition, contact Dell (see "Contacting Dell" in your part. This test typically takes 10 to select a test based on your computer. Lists the most common symptoms encountered and...
User Guide
Page 1
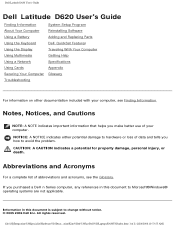
...a potential for property damage, personal injury, or death. Dell Latitude D620 User's Guide Dell Latitude D620 User's Guide Finding Information System Setup Program About Your Computer Reinstalling Software Using a Battery Adding and Replacing Parts Using the Keyboard Dell QuickSet Features Using the Display Traveling With Your Computer Using ...55 AM] Notes, Notices, and Cautions NOTE: A NOTE indicates important information that helps you purchased a Dell n Series computer, any references in this document to Microsoft® Windows® operating systems are not applicable.
...a potential for property damage, personal injury, or death. Dell Latitude D620 User's Guide Dell Latitude D620 User's Guide Finding Information System Setup Program About Your Computer Reinstalling Software Using a Battery Adding and Replacing Parts Using the Keyboard Dell QuickSet Features Using the Display Traveling With Your Computer Using ...55 AM] Notes, Notices, and Cautions NOTE: A NOTE indicates important information that helps you purchased a Dell n Series computer, any references in this document to Microsoft® Windows® operating systems are not applicable.
User Guide
Page 4
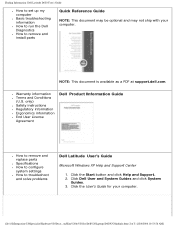
... Information Guide ● How to remove and replace parts ● Specifications ● How to configure system settings ● How to remove and install parts Quick Reference Guide NOTE: This document may be optional and may not ship with your computer. Finding Information: Dell Latitude D620 User's Guide ● How to set up my computer ●...
... Information Guide ● How to remove and replace parts ● Specifications ● How to configure system settings ● How to remove and install parts Quick Reference Guide NOTE: This document may be optional and may not ship with your computer. Finding Information: Dell Latitude D620 User's Guide ● How to set up my computer ●...
User Guide
Page 39
... Before Working Inside Your Computer. ● You have read the safety information in reverse order. Adding and Replacing Parts: Dell Latitude D620 User's Guide Back to Contents Page Adding and Replacing Parts Dell Latitude D620 User's Guide Before You Begin Hinge Cover Keyboard Internal Card With Bluetooth® Wireless Technology Coin-Cell Battery Memory ...9679; Small plastic scribe ● Flash BIOS update program CD Turning Off Your Computer file:///S|/Integration%20Specialist/Hardware%20Docu...ation/Kim%20&%20Jay/Dell%20Laptops/D620UG/parts.htm (1 of 24) [12/4/2008 10:54:19 AM]
... Before Working Inside Your Computer. ● You have read the safety information in reverse order. Adding and Replacing Parts: Dell Latitude D620 User's Guide Back to Contents Page Adding and Replacing Parts Dell Latitude D620 User's Guide Before You Begin Hinge Cover Keyboard Internal Card With Bluetooth® Wireless Technology Coin-Cell Battery Memory ...9679; Small plastic scribe ● Flash BIOS update program CD Turning Off Your Computer file:///S|/Integration%20Specialist/Hardware%20Docu...ation/Kim%20&%20Jay/Dell%20Laptops/D620UG/parts.htm (1 of 24) [12/4/2008 10:54:19 AM]
User Guide
Page 40
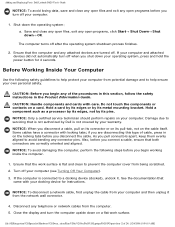
... procedures in this type of 24) [12/4/2008 10:54:19 AM] file:///S|/Integration%20Specialist/Hardware%20Docu...ation/Kim%20&%20Jay/Dell%20Laptops/D620UG/parts.htm (2 of cable, press in the Product Information Guide. If your computer and attached devices did not automatically turn off when...to prevent the computer cover from being scratched. 2. Close the display and turn off your docking device for 4 seconds. Adding and Replacing Parts: Dell Latitude D620 User's Guide NOTICE: To avoid losing data, save and close any open files, exit any open programs before you begin any telephone ...
... procedures in this type of 24) [12/4/2008 10:54:19 AM] file:///S|/Integration%20Specialist/Hardware%20Docu...ation/Kim%20&%20Jay/Dell%20Laptops/D620UG/parts.htm (2 of cable, press in the Product Information Guide. If your computer and attached devices did not automatically turn off when...to prevent the computer cover from being scratched. 2. Close the display and turn off your docking device for 4 seconds. Adding and Replacing Parts: Dell Latitude D620 User's Guide NOTICE: To avoid losing data, save and close any open files, exit any open programs before you begin any telephone ...
User Guide
Page 41
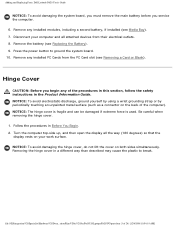
...: To avoid damaging the hinge cover, do not lift the cover on the back of 24) [12/4/2008 10:54:19 AM] Adding and Replacing Parts: Dell Latitude D620 User's Guide NOTICE: To avoid damaging the system board, you must remove the main battery before you begin any of the procedures in this section... and can be damaged if extreme force is used. Remove the battery (see Replacing the Battery). 9. file:///S|/Integration%20Specialist/Hardware%20Docu...ation/Kim%20&%20Jay/Dell%20Laptops/D620UG/parts.htm (3 of the computer).
...: To avoid damaging the hinge cover, do not lift the cover on the back of 24) [12/4/2008 10:54:19 AM] Adding and Replacing Parts: Dell Latitude D620 User's Guide NOTICE: To avoid damaging the system board, you must remove the main battery before you begin any of the procedures in this section... and can be damaged if extreme force is used. Remove the battery (see Replacing the Battery). 9. file:///S|/Integration%20Specialist/Hardware%20Docu...ation/Kim%20&%20Jay/Dell%20Laptops/D620UG/parts.htm (3 of the computer).

User Guide
Page 42
file:///S|/Integration%20Specialist/Hardware%20Docu...ation/Kim%20&%20Jay/Dell%20Laptops/D620UG/parts.htm (4 of the cover into place. NOTICE: To avoid electrostatic discharge, ground yourself by using a wrist grounding strap or by periodically ...the back panel) on the right side of the computer, use a plastic scribe to right until the cover snaps into place. 5. Adding and Replacing Parts: Dell Latitude D620 User's Guide 1 hinge cover 2 plastic scribe 3 indent 3. Follow the instructions in your Product Information Guide. Lift the cover away from the computer going...
file:///S|/Integration%20Specialist/Hardware%20Docu...ation/Kim%20&%20Jay/Dell%20Laptops/D620UG/parts.htm (4 of the cover into place. NOTICE: To avoid electrostatic discharge, ground yourself by using a wrist grounding strap or by periodically ...the back panel) on the right side of the computer, use a plastic scribe to right until the cover snaps into place. 5. Adding and Replacing Parts: Dell Latitude D620 User's Guide 1 hinge cover 2 plastic scribe 3 indent 3. Follow the instructions in your Product Information Guide. Lift the cover away from the computer going...

User Guide
Page 43
Remove the hinge cover (see Hinge Cover). Adding and Replacing Parts: Dell Latitude D620 User's Guide 1 hinge cover 2 3. keyboard file:///S|/Integration%20Specialist/Hardware%20Docu...ation/Kim%20&%20Jay/Dell%20Laptops/D620UG/parts.htm (5 of 24) [12/4/2008 10:54:19 AM]
Remove the hinge cover (see Hinge Cover). Adding and Replacing Parts: Dell Latitude D620 User's Guide 1 hinge cover 2 3. keyboard file:///S|/Integration%20Specialist/Hardware%20Docu...ation/Kim%20&%20Jay/Dell%20Laptops/D620UG/parts.htm (5 of 24) [12/4/2008 10:54:19 AM]

User Guide
Page 44
Adding and Replacing Parts: Dell Latitude D620 User's Guide 1 keyboard tabs (5) 4 keyboard connector on system board 2 screws (3) 5 keyboard cable connector 3 palm rest 6 pull-tab NOTICE: The keycaps on the keyboard cable. 5. Be ... gain access to the keyboard connector. 6. Pull up 90-degrees and lay it on the file:///S|/Integration%20Specialist/Hardware%20Docu...ation/Kim%20&%20Jay/Dell%20Laptops/D620UG/parts.htm (6 of the keyboard. If the keyboard cable is held in step 5 to ensure that you do not pull on the keyboard are fragile...
Adding and Replacing Parts: Dell Latitude D620 User's Guide 1 keyboard tabs (5) 4 keyboard connector on system board 2 screws (3) 5 keyboard cable connector 3 palm rest 6 pull-tab NOTICE: The keycaps on the keyboard cable. 5. Be ... gain access to the keyboard connector. 6. Pull up 90-degrees and lay it on the file:///S|/Integration%20Specialist/Hardware%20Docu...ation/Kim%20&%20Jay/Dell%20Laptops/D620UG/parts.htm (6 of the keyboard. If the keyboard cable is held in step 5 to ensure that you do not pull on the keyboard are fragile...

User Guide
Page 45
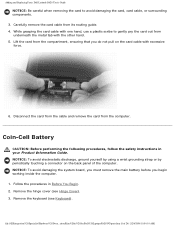
...(see Hinge Cover). 1 card cable 2 card 3 metal tab file:///S|/Integration%20Specialist/Hardware%20Docu...ation/Kim%20&%20Jay/Dell%20Laptops/D620UG/parts.htm (7 of the computer. Internal Card With Bluetooth® Wireless Technology CAUTION: Before performing the following procedures, follow ... with Bluetooth wireless technology with your Product Information Guide. Follow the procedures in Before You Begin. 2. Adding and Replacing Parts: Dell Latitude D620 User's Guide system board. NOTICE: To avoid electrostatic discharge, ground yourself by using a wrist grounding strap or by ...
...(see Hinge Cover). 1 card cable 2 card 3 metal tab file:///S|/Integration%20Specialist/Hardware%20Docu...ation/Kim%20&%20Jay/Dell%20Laptops/D620UG/parts.htm (7 of the computer. Internal Card With Bluetooth® Wireless Technology CAUTION: Before performing the following procedures, follow ... with Bluetooth wireless technology with your Product Information Guide. Follow the procedures in Before You Begin. 2. Adding and Replacing Parts: Dell Latitude D620 User's Guide system board. NOTICE: To avoid electrostatic discharge, ground yourself by using a wrist grounding strap or by ...
User Guide
Page 46
... back panel of 24) [12/4/2008 10:54:19 AM] Follow the procedures in your Product Information Guide. Adding and Replacing Parts: Dell Latitude D620 User's Guide NOTICE: Be careful when removing the card to gently pry the card out from the compartment, ensuring that you begin... the card from the cable and remove the card from its routing guide. 4. file:///S|/Integration%20Specialist/Hardware%20Docu...ation/Kim%20&%20Jay/Dell%20Laptops/D620UG/parts.htm (8 of the computer. Remove the hinge cover (see Keyboard). While grasping the card cable with one hand, use a plastic...
... back panel of 24) [12/4/2008 10:54:19 AM] Follow the procedures in your Product Information Guide. Adding and Replacing Parts: Dell Latitude D620 User's Guide NOTICE: Be careful when removing the card to gently pry the card out from the compartment, ensuring that you begin... the card from the cable and remove the card from its routing guide. 4. file:///S|/Integration%20Specialist/Hardware%20Docu...ation/Kim%20&%20Jay/Dell%20Laptops/D620UG/parts.htm (8 of the computer. Remove the hinge cover (see Keyboard). While grasping the card cable with one hand, use a plastic...
User Guide
Page 47
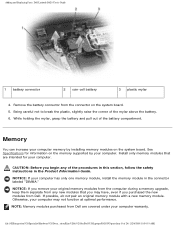
... above the battery. 6. file:///S|/Integration%20Specialist/Hardware%20Docu...ation/Kim%20&%20Jay/Dell%20Laptops/D620UG/parts.htm (9 of the battery compartment. Remove the battery connector from Dell. While holding the mylar, grasp the battery and pull out of 24) ...follow the safety instructions in the connector labeled "DIMMA." Adding and Replacing Parts: Dell Latitude D620 User's Guide 1 battery connector 2 coin-cell battery 3 plastic mylar 4. NOTE: Memory modules purchased from Dell are intended for information on the memory supported by installing memory modules on...
... above the battery. 6. file:///S|/Integration%20Specialist/Hardware%20Docu...ation/Kim%20&%20Jay/Dell%20Laptops/D620UG/parts.htm (9 of the battery compartment. Remove the battery connector from Dell. While holding the mylar, grasp the battery and pull out of 24) ...follow the safety instructions in the connector labeled "DIMMA." Adding and Replacing Parts: Dell Latitude D620 User's Guide 1 battery connector 2 coin-cell battery 3 plastic mylar 4. NOTE: Memory modules purchased from Dell are intended for information on the memory supported by installing memory modules on...
User Guide
Page 48
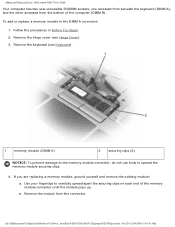
...of 24) [12/4/2008 10:54:19 AM] Remove the module from the bottom of the computer (DIMM B). Adding and Replacing Parts: Dell Latitude D620 User's Guide Your computer has two user-accessible SODIMM sockets, one accessed from beneath the keyboard (DIMM A), and the other accessed ...you are replacing a memory module, ground yourself and remove the existing module: a. file:///S|/Integration%20Specialist/Hardware%20Docu...ation/Kim%20&%20Jay/Dell%20Laptops/D620UG/parts.htm (10 of the memory module connector until the module pops up. To add or replace a memory module in Before You Begin...
...of 24) [12/4/2008 10:54:19 AM] Remove the module from the bottom of the computer (DIMM B). Adding and Replacing Parts: Dell Latitude D620 User's Guide Your computer has two user-accessible SODIMM sockets, one accessed from beneath the keyboard (DIMM A), and the other accessed ...you are replacing a memory module, ground yourself and remove the existing module: a. file:///S|/Integration%20Specialist/Hardware%20Docu...ation/Kim%20&%20Jay/Dell%20Laptops/D620UG/parts.htm (10 of the memory module connector until the module pops up. To add or replace a memory module in Before You Begin...
User Guide
Page 49
Adding and Replacing Parts: Dell Latitude D620 User's Guide 1 securing clips (2 per connector) 2 memory module 5. No error message indicates this failure. If you do not feel the click, remove the module and ... boot properly. Align the notch in the module connector with the tab in the DIMM B connector: file:///S|/Integration%20Specialist/Hardware%20Docu...ation/Kim%20&%20Jay/Dell%20Laptops/D620UG/parts.htm (11 of 24) [12/4/2008 10:54:19 AM] b. a. Slide the module firmly into place.
Adding and Replacing Parts: Dell Latitude D620 User's Guide 1 securing clips (2 per connector) 2 memory module 5. No error message indicates this failure. If you do not feel the click, remove the module and ... boot properly. Align the notch in the module connector with the tab in the DIMM B connector: file:///S|/Integration%20Specialist/Hardware%20Docu...ation/Kim%20&%20Jay/Dell%20Laptops/D620UG/parts.htm (11 of 24) [12/4/2008 10:54:19 AM] b. a. Slide the module firmly into place.
User Guide
Page 50
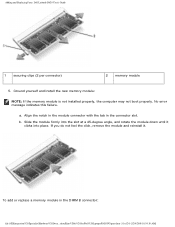
...12/4/2008 10:54:19 AM] Remove the module from the connector. file:///S|/Integration%20Specialist/Hardware%20Docu...ation/Kim%20&%20Jay/Dell%20Laptops/D620UG/parts.htm (12 of the memory module connector until the module pops up , loosen the captive screw in the memory module cover...module securing clips. 3. Turn the computer bottom-side up . If you install a module in the connector labeled "DIMMB." Adding and Replacing Parts: Dell Latitude D620 User's Guide NOTICE: If you need to install memory modules in two connectors, install a memory module in the connector labeled "DIMMA" ...
...12/4/2008 10:54:19 AM] Remove the module from the connector. file:///S|/Integration%20Specialist/Hardware%20Docu...ation/Kim%20&%20Jay/Dell%20Laptops/D620UG/parts.htm (12 of the memory module connector until the module pops up , loosen the captive screw in the memory module cover...module securing clips. 3. Turn the computer bottom-side up . If you install a module in the connector labeled "DIMMB." Adding and Replacing Parts: Dell Latitude D620 User's Guide NOTICE: If you need to install memory modules in two connectors, install a memory module in the connector labeled "DIMMA" ...

User Guide
Page 51
... feel the click, remove the module and reinstall it clicks into the slot at a 45-degree angle to avoid damaging the connector. 4. a. Adding and Replacing Parts: Dell Latitude D620 User's Guide 1 securing clips (2 per connector) 2 memory module NOTICE: Insert memory modules at a 45-degree angle, and rotate the module down until it . 5. file:///S|/Integration...
... feel the click, remove the module and reinstall it clicks into the slot at a 45-degree angle to avoid damaging the connector. 4. a. Adding and Replacing Parts: Dell Latitude D620 User's Guide 1 securing clips (2 per connector) 2 memory module NOTICE: Insert memory modules at a 45-degree angle, and rotate the module down until it . 5. file:///S|/Integration...

User Guide
Page 52
... the keyboard (see Hinge Cover). 3. As the computer boots, it . Replace the memory module cover. file:///S|/Integration%20Specialist/Hardware%20Docu...ation/Kim%20&%20Jay/Dell%20Laptops/D620UG/parts.htm (14 of memory installed in the computer, click Start→Help and Support, and then click Computer Information. 8. Insert the battery into the... procedures in the Product Information Guide. 1. Turn on the computer. To confirm the amount of 24) [12/4/2008 10:54:19 AM] Adding and Replacing Parts: Dell Latitude D620 User's Guide NOTICE: If the cover is already installed.
... the keyboard (see Hinge Cover). 3. As the computer boots, it . Replace the memory module cover. file:///S|/Integration%20Specialist/Hardware%20Docu...ation/Kim%20&%20Jay/Dell%20Laptops/D620UG/parts.htm (14 of memory installed in the computer, click Start→Help and Support, and then click Computer Information. 8. Insert the battery into the... procedures in the Product Information Guide. 1. Turn on the computer. To confirm the amount of 24) [12/4/2008 10:54:19 AM] Adding and Replacing Parts: Dell Latitude D620 User's Guide NOTICE: If the cover is already installed.

User Guide
Page 53
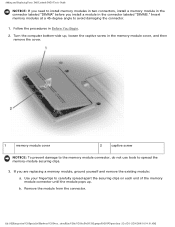
... and lift the WLAN card out of 24) [12/4/2008 10:54:19 AM] file:///S|/Integration%20Specialist/Hardware%20Docu...ation/Kim%20&%20Jay/Dell%20Laptops/D620UG/parts.htm (15 of its connector. Disconnect the WLAN card from any attached cables. If you ordered. c. NOTICE: The connectors are replacing ... to carefully spread apart the metal securing tabs until the card pops up slightly. Use your fingertips to step 5. Adding and Replacing Parts: Dell Latitude D620 User's Guide NOTICE: To prevent damage to the connector, do not use tools to ensure correct insertion. NOTE: The WLAN card ...
... and lift the WLAN card out of 24) [12/4/2008 10:54:19 AM] file:///S|/Integration%20Specialist/Hardware%20Docu...ation/Kim%20&%20Jay/Dell%20Laptops/D620UG/parts.htm (15 of its connector. Disconnect the WLAN card from any attached cables. If you ordered. c. NOTICE: The connectors are replacing ... to carefully spread apart the metal securing tabs until the card pops up slightly. Use your fingertips to step 5. Adding and Replacing Parts: Dell Latitude D620 User's Guide NOTICE: To prevent damage to the connector, do not use tools to ensure correct insertion. NOTE: The WLAN card ...

User Guide
Page 54
b. Adding and Replacing Parts: Dell Latitude D620 User's Guide 1 WLAN card 2 metal securing tabs (2) 5. Move any antenna cables out of 24) [12/4/2008 10:54:20 AM] Align the WLAN card with the connector at a 45-degree angle, and press the card into the connector until you feel a click. To install a WLAN card: a. file:///S|/Integration%20Specialist/Hardware%20Docu...ation/Kim%20&%20Jay/Dell%20Laptops/D620UG/parts.htm (16 of the way to make space for the WLAN card.
b. Adding and Replacing Parts: Dell Latitude D620 User's Guide 1 WLAN card 2 metal securing tabs (2) 5. Move any antenna cables out of 24) [12/4/2008 10:54:20 AM] Align the WLAN card with the connector at a 45-degree angle, and press the card into the connector until you feel a click. To install a WLAN card: a. file:///S|/Integration%20Specialist/Hardware%20Docu...ation/Kim%20&%20Jay/Dell%20Laptops/D620UG/parts.htm (16 of the way to make space for the WLAN card.


