System Information Guide
Page 11
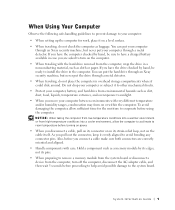
...Hold a component such as a memory module by hand, be sure to have the drive checked by its edges, not its strain-relief loop, not on the computer. • When traveling with the hard drive removed from the computer, turn on the cable itself. Do not drop your computer or... subject it to other mechanical shocks. • Protect your computer, battery, and hard drive from environmental hazards such as dirt, dust, food, liquids, temperature extremes, and overexposure to sunlight. • When you connect a cable make sure...
...Hold a component such as a memory module by hand, be sure to have the drive checked by its edges, not its strain-relief loop, not on the computer. • When traveling with the hard drive removed from the computer, turn on the cable itself. Do not drop your computer or... subject it to other mechanical shocks. • Protect your computer, battery, and hard drive from environmental hazards such as dirt, dust, food, liquids, temperature extremes, and overexposure to sunlight. • When you connect a cable make sure...

System Information Guide
Page 14
...Contact information, order status, warranty, and repair information • Downloads - www.dell.com | support.dell.com Finding Information for Your Computer What are you looking for components, such as memory, the hard drive, and the operating system • Customer Care - Drivers, patches, and software... updates • Reference - You can use the CD to reinstall drivers, run the Dell Diagnostics, or access your computer. • ...
...Contact information, order status, warranty, and repair information • Downloads - www.dell.com | support.dell.com Finding Information for Your Computer What are you looking for components, such as memory, the hard drive, and the operating system • Customer Care - Drivers, patches, and software... updates • Reference - You can use the CD to reinstall drivers, run the Dell Diagnostics, or access your computer. • ...

System Information Guide
Page 19
Left View PC Card slot smart card slot air vents (2) infrared sensor audio connectors (2) security cable slot hard drive System Infor mation Guide 17
Left View PC Card slot smart card slot air vents (2) infrared sensor audio connectors (2) security cable slot hard drive System Infor mation Guide 17
System Information Guide
Page 22
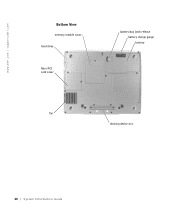
www.dell.com | support.dell.com Bottom View memory module cover hard drive Mini PCI card cover battery-bay latch release battery charge gauge battery fan docking device slot 20 System Infor mation Guide
www.dell.com | support.dell.com Bottom View memory module cover hard drive Mini PCI card cover battery-bay latch release battery charge gauge battery fan docking device slot 20 System Infor mation Guide
System Information Guide
Page 27
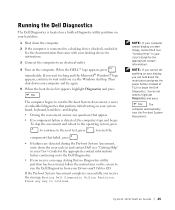
...press . To stop the assessment and reboot to the next test, press ; Running the Dell Diagnostics The Dell Diagnostics is located on a hidden Diagnostic utility partition on your system board, keyboard, hard drive, and display. • During the assessment, answer any key to highlight Diagnostics and press...docking device (docked), undock it. System Infor mation Guide 25 See the documentation that perform initial testing on your hard drive. 1 Shut down the mute button and press the power button (instead of embedded diagnostics that came with your Drivers and Utilities CD....
...press . To stop the assessment and reboot to the next test, press ; Running the Dell Diagnostics The Dell Diagnostics is located on a hidden Diagnostic utility partition on your system board, keyboard, hard drive, and display. • During the assessment, answer any key to highlight Diagnostics and press...docking device (docked), undock it. System Infor mation Guide 25 See the documentation that perform initial testing on your hard drive. 1 Shut down the mute button and press the power button (instead of embedded diagnostics that came with your Drivers and Utilities CD....
System Information Guide
Page 28
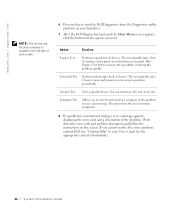
...The test typically takes 10 to be run. Write down the error code and problem description and follow the instructions on your hard drive. 7 After the Dell Diagnostics loads and the Main Menu screen appears, click the button for the appropriate contact information). 26 System Infor mation Guide... utility partition on the screen. If you cannot resolve the error condition, contact Dell (see "Getting Help" in the title bar of each screen. 6 Press any key to answer questions periodically. www.dell.com | support.dell.com NOTE: The service tag for your computer is encountered during a test, ...
...The test typically takes 10 to be run. Write down the error code and problem description and follow the instructions on your hard drive. 7 After the Dell Diagnostics loads and the Main Menu screen appears, click the button for the appropriate contact information). 26 System Infor mation Guide... utility partition on the screen. If you cannot resolve the error condition, contact Dell (see "Getting Help" in the title bar of each screen. 6 Press any key to answer questions periodically. www.dell.com | support.dell.com NOTE: The service tag for your computer is encountered during a test, ...
System Information Guide
Page 33
...make sure to be replaced. We will return the repaired or replacement products to you . If we determine that the product is with Dell, on-site service will be provided to be defective in the product(s). During the remaining years: For the remaining period of service alternatives... responsible for lost or corrupted data. Remove any of our third-party service providers, please refer to that contract for details on the hard drive(s) and any other storage device(s) in returning the replaced part to obtain service. possessions and territories). We will also include a prepaid ...
...make sure to be replaced. We will return the repaired or replacement products to you . If we determine that the product is with Dell, on-site service will be provided to be defective in the product(s). During the remaining years: For the remaining period of service alternatives... responsible for lost or corrupted data. Remove any of our third-party service providers, please refer to that contract for details on the hard drive(s) and any other storage device(s) in returning the replaced part to obtain service. possessions and territories). We will also include a prepaid ...
System Information Guide
Page 37
...that part. We use in shipment. Dell owns all limited warranties, we will pay to ship the repaired or replaced products to you if you . When you contact us a service contract with one of service alternatives that are not responsible for details on the hard drive(s) and any of your return. ...year of all limited warranties: During the first year of the limited warranty for details on how to back up the data on the hard drive(s) and any Dell-branded hardware products returned to us , make sure to obtain service. Please refer to that contract for the product you use an ...
...that part. We use in shipment. Dell owns all limited warranties, we will pay to ship the repaired or replaced products to you if you . When you contact us a service contract with one of service alternatives that are not responsible for details on the hard drive(s) and any of your return. ...year of all limited warranties: During the first year of the limited warranty for details on how to back up the data on the hard drive(s) and any Dell-branded hardware products returned to us , make sure to obtain service. Please refer to that contract for the product you use an ...
Service Manual
Page 1
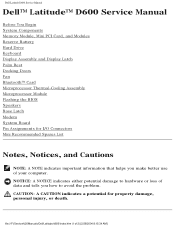
... or loss of your computer. NOTICE: A NOTICE indicates either potential damage to avoid the problem. Dell Latitude D600 Service Manual Dell™ Latitude™ D600 Service Manual Before You Begin System Components Memory Module, Mini PCI Card, and Modules Reserve Battery Hard Drive Keyboard Display Assembly and Display Latch Palm Rest Docking Doors Fan Bluetooth™ Card Microprocessor...
... or loss of your computer. NOTICE: A NOTICE indicates either potential damage to avoid the problem. Dell Latitude D600 Service Manual Dell™ Latitude™ D600 Service Manual Before You Begin System Components Memory Module, Mini PCI Card, and Modules Reserve Battery Hard Drive Keyboard Display Assembly and Display Latch Palm Rest Docking Doors Fan Bluetooth™ Card Microprocessor...
Service Manual
Page 4
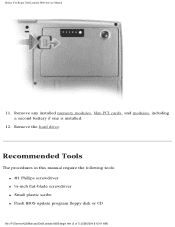
Remove the hard drive. Before You Begin: Dell Latitude D600 Service Manual 11. Recommended Tools The procedures in this manual require the following tools: q #1 Phillips screwdriver q ¼-inch flat-blade screwdriver q Small plastic scribe q Flash BIOS update program floppy disk or CD file:///F|/Service%20Manuals/Dell/Latitude/d600/begin.htm (3 of 7) [2/28/2004 8:15:41 AM] Remove any installed memory modules, Mini PCI cards, and modules, including a second battery if one is installed. 12.
Remove the hard drive. Before You Begin: Dell Latitude D600 Service Manual 11. Recommended Tools The procedures in this manual require the following tools: q #1 Phillips screwdriver q ¼-inch flat-blade screwdriver q Small plastic scribe q Flash BIOS update program floppy disk or CD file:///F|/Service%20Manuals/Dell/Latitude/d600/begin.htm (3 of 7) [2/28/2004 8:15:41 AM] Remove any installed memory modules, Mini PCI cards, and modules, including a second battery if one is installed. 12.
Service Manual
Page 6
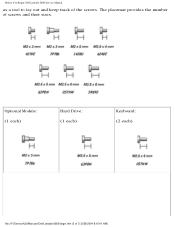
Optional Module: (1 each) Hard Drive: (1 each) Keyboard: (2 each) file:///F|/Service%20Manuals/Dell/Latitude/d600/begin.htm (5 of screws and their sizes. The placemat provides the number of 7) [2/28/2004 8:15:41 AM] Before You Begin: Dell Latitude D600 Service Manual as a tool to lay out and keep track of the screws.
Optional Module: (1 each) Hard Drive: (1 each) Keyboard: (2 each) file:///F|/Service%20Manuals/Dell/Latitude/d600/begin.htm (5 of screws and their sizes. The placemat provides the number of 7) [2/28/2004 8:15:41 AM] Before You Begin: Dell Latitude D600 Service Manual as a tool to lay out and keep track of the screws.

Service Manual
Page 23
... not guarantee compatibility or provide support for hard drives from the computer when the drive is on, in standby mode, or in hibernate mode. Turn the computer over. NOTICE: Hard drives are extremely fragile; even a slight bump can damage the drive. Hard Drive: Dell Latitude D600 Service Manual Back to Contents Page Hard Drive Dell™ Latitude™ D600 Service Manual CAUTION: If you remove the...
... not guarantee compatibility or provide support for hard drives from the computer when the drive is on, in standby mode, or in hibernate mode. Turn the computer over. NOTICE: Hard drives are extremely fragile; even a slight bump can damage the drive. Hard Drive: Dell Latitude D600 Service Manual Back to Contents Page Hard Drive Dell™ Latitude™ D600 Service Manual CAUTION: If you remove the...
Service Manual
Page 24
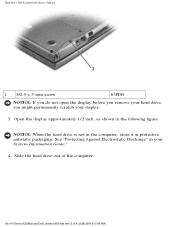
... the display approximately 1/2 inch, as shown in your display. 3. See "Protecting Against Electrostatic Discharge" in the following figure. NOTICE: When the hard drive is not in the computer, store it in protective antistatic packaging. Hard Drive: Dell Latitude D600 Service Manual 1 M2.5 x 5-mm screw 63PDH NOTICE: If you do not open the display before you remove your...
... the display approximately 1/2 inch, as shown in your display. 3. See "Protecting Against Electrostatic Discharge" in the following figure. NOTICE: When the hard drive is not in the computer, store it in protective antistatic packaging. Hard Drive: Dell Latitude D600 Service Manual 1 M2.5 x 5-mm screw 63PDH NOTICE: If you do not open the display before you remove your...
Service Manual
Page 25
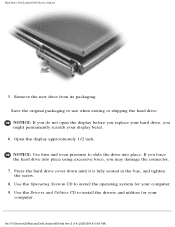
... the bay, and tighten the screw. 8. Use the Operating System CD to install the drivers and utilities for your computer. 9. file:///F|/Service%20Manuals/Dell/Latitude/d600/hdd.htm (3 of 4) [2/28/2004 8:15:45 AM] NOTICE: If you do not open the display before you replace your hard drive, you may damage the connector. 7. Hard Drive: Dell Latitude D600 Service Manual 5.
... the bay, and tighten the screw. 8. Use the Operating System CD to install the drivers and utilities for your computer. 9. file:///F|/Service%20Manuals/Dell/Latitude/d600/hdd.htm (3 of 4) [2/28/2004 8:15:45 AM] NOTICE: If you do not open the display before you replace your hard drive, you may damage the connector. 7. Hard Drive: Dell Latitude D600 Service Manual 5.
Service Manual
Page 26
Hard Drive: Dell Latitude D600 Service Manual Back to Contents Page file:///F|/Service%20Manuals/Dell/Latitude/d600/hdd.htm (4 of 4) [2/28/2004 8:15:45 AM]
Hard Drive: Dell Latitude D600 Service Manual Back to Contents Page file:///F|/Service%20Manuals/Dell/Latitude/d600/hdd.htm (4 of 4) [2/28/2004 8:15:45 AM]
Service Manual
Page 61
... the following procedures, read the safety instructions in your System Information Guide. Remove the hard drive. 3. Remove the speakers. 7. Remove the palm rest. 6. Remove the keyboard. 4. file:///F|/Service%20Manuals/Dell/Latitude/d600/latch.htm (1 of 2) [2/28/2004 8:15:53 AM] Base Latch: Dell Latitude D600 Service Manual Back to Work Inside the Computer." 2. NOTICE: To avoid electrostatic discharge...
... the following procedures, read the safety instructions in your System Information Guide. Remove the hard drive. 3. Remove the speakers. 7. Remove the palm rest. 6. Remove the keyboard. 4. file:///F|/Service%20Manuals/Dell/Latitude/d600/latch.htm (1 of 2) [2/28/2004 8:15:53 AM] Base Latch: Dell Latitude D600 Service Manual Back to Work Inside the Computer." 2. NOTICE: To avoid electrostatic discharge...
Service Manual
Page 74
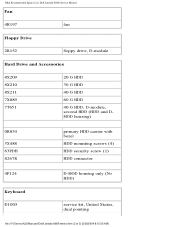
Mini Recommended Spares List: Dell Latitude D600 Service Manual Fan 4R197 fan Floppy Drive 2R152 floppy drive, D-module Hard Drive and Accessories 8X209 8X210 8X211 7X889 7T651 20 G HDD 30 G HDD 40 G HDD 60 G HDD 40 G HDD, D-module, second HDD (HDD and DMOD housing) 0R854 5X488 63PDH 8267R primary HDD carrier with bezel HDD mounting screws (4) HDD security screw (1) HDD connector 4P124 Keyboard D1005 D-MOD housing only (No HDD) service kit, United States, dual pointing file:///F|/Service%20Manuals/Dell/Latitude/d600/minirsl.htm (2 of 5) [2/28/2004 8:15:55 AM]
Mini Recommended Spares List: Dell Latitude D600 Service Manual Fan 4R197 fan Floppy Drive 2R152 floppy drive, D-module Hard Drive and Accessories 8X209 8X210 8X211 7X889 7T651 20 G HDD 30 G HDD 40 G HDD 60 G HDD 40 G HDD, D-module, second HDD (HDD and DMOD housing) 0R854 5X488 63PDH 8267R primary HDD carrier with bezel HDD mounting screws (4) HDD security screw (1) HDD connector 4P124 Keyboard D1005 D-MOD housing only (No HDD) service kit, United States, dual pointing file:///F|/Service%20Manuals/Dell/Latitude/d600/minirsl.htm (2 of 5) [2/28/2004 8:15:55 AM]


