System Information Guide
Page 4
...avoid the problem. Trademarks used in any proprietary interest in this text: Dell, the DELL logo, Inspiron, Dell Precision, Dimension, OptiPlex, and Latitude are not applicable Information in trademarks and trade names other than its own.... NOTICE: A NOTICE indicates either potential damage to hardware or loss of your desktop, or click the Start button, click Help and Support Center, and then click User and system guides). Dell...
...avoid the problem. Trademarks used in any proprietary interest in this text: Dell, the DELL logo, Inspiron, Dell Precision, Dimension, OptiPlex, and Latitude are not applicable Information in trademarks and trade names other than its own.... NOTICE: A NOTICE indicates either potential damage to hardware or loss of your desktop, or click the Start button, click Help and Support Center, and then click User and system guides). Dell...

System Information Guide
Page 15
... box. 2 Set aside the contents of your computer. If this message appears, see your User's Guide on the Dell Support website (support.dell.com) for the devices that you have ordered. 3 Connect the AC adapter to the AC adapter connector and to ...reinstall drivers for instructions about upgrading your computer. The accessories box also contains user documentation and any software or additional hardware (such as a modem) Windows Help and Support Center 1 Click the Start...
... box. 2 Set aside the contents of your computer. If this message appears, see your User's Guide on the Dell Support website (support.dell.com) for the devices that you have ordered. 3 Connect the AC adapter to the AC adapter connector and to ...reinstall drivers for instructions about upgrading your computer. The accessories box also contains user documentation and any software or additional hardware (such as a modem) Windows Help and Support Center 1 Click the Start...
System Information Guide
Page 17
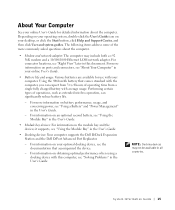
...For connector locations, see "Using the Module Bay" in the User's Guide. • Docking devices: Your computer supports the Dell D/Dock Expansion Station and the Dell D/Port Advanced Port Replicator. - For information on obtaining optimal performance when using a docking device with your computer. System Infor... supports, see "Right View" later in this computer, see "Using a Battery" and "Power Management" in your desktop, or click the Start button, click Help and Support Center, and then click User and system guides. Using the 4460-mAh battery that accompanied the device. - For...
...For connector locations, see "Using the Module Bay" in the User's Guide. • Docking devices: Your computer supports the Dell D/Dock Expansion Station and the Dell D/Port Advanced Port Replicator. - For information on obtaining optimal performance when using a docking device with your computer. System Infor... supports, see "Right View" later in this computer, see "Using a Battery" and "Power Management" in your desktop, or click the Start button, click Help and Support Center, and then click User and system guides. Using the 4460-mAh battery that accompanied the device. - For...
System Information Guide
Page 28
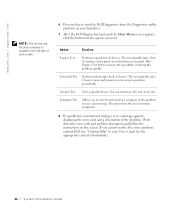
...code and problem description and follow the instructions on a symptom of the problem you want. The test typically takes 10 to start the Dell Diagnostics from the Diagnostics utility partition on your User's Guide for the appropriate contact information). 26 System Infor mation Guide If ... select tests based on the screen. Custom Test Tests a specific device. You can customize the tests to answer questions periodically. www.dell.com | support.dell.com NOTE: The service tag for your computer is encountered during a test, a message appears, displaying the error code and a ...
...code and problem description and follow the instructions on a symptom of the problem you want. The test typically takes 10 to start the Dell Diagnostics from the Diagnostics utility partition on your User's Guide for the appropriate contact information). 26 System Infor mation Guide If ... select tests based on the screen. Custom Test Tests a specific device. You can customize the tests to answer questions periodically. www.dell.com | support.dell.com NOTE: The service tag for your computer is encountered during a test, a message appears, displaying the error code and a ...
Service Manual
Page 36
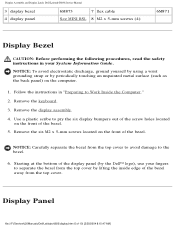
...: Before performing the following procedures, read the safety instructions in "Preparing to Work Inside the Computer." 2. Display Panel file:///F|/Service%20Manuals/Dell/Latitude/d600/display.htm (6 of the bezel. Remove the display assembly. 4. Follow the instructions in your fingers to separate the bezel from the ...such as the back panel) on the front of 10) [2/28/2004 8:15:47 AM] Use a plastic scribe to the bezel. 6. Starting at the bottom of the bezel. 5. Remove the keyboard. 3. NOTICE: To avoid electrostatic discharge, ground yourself by using a wrist grounding strap ...
...: Before performing the following procedures, read the safety instructions in "Preparing to Work Inside the Computer." 2. Display Panel file:///F|/Service%20Manuals/Dell/Latitude/d600/display.htm (6 of the bezel. Remove the display assembly. 4. Follow the instructions in your fingers to separate the bezel from the ...such as the back panel) on the front of 10) [2/28/2004 8:15:47 AM] Use a plastic scribe to the bezel. 6. Starting at the bottom of the bezel. 5. Remove the keyboard. 3. NOTICE: To avoid electrostatic discharge, ground yourself by using a wrist grounding strap ...
Service Manual
Page 44
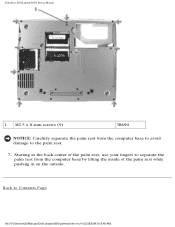
Palm Rest: Dell Latitude D600 Service Manual 1 M2.5 x 8-mm screws (9) 3R690 NOTICE: Carefully separate the palm rest from the computer base by lifting the inside of 4) [2/28/2004 8:15:48 AM] Back to the palm rest. 7. Starting at the back center of the palm rest, use your fingers to separate the palm rest from the computer base to avoid damage to Contents Page file:///F|/Service%20Manuals/Dell/Latitude/d600/palmrest.htm (4 of the palm rest while pushing in on the outside.
Palm Rest: Dell Latitude D600 Service Manual 1 M2.5 x 8-mm screws (9) 3R690 NOTICE: Carefully separate the palm rest from the computer base by lifting the inside of 4) [2/28/2004 8:15:48 AM] Back to the palm rest. 7. Starting at the back center of the palm rest, use your fingers to separate the palm rest from the computer base to avoid damage to Contents Page file:///F|/Service%20Manuals/Dell/Latitude/d600/palmrest.htm (4 of the palm rest while pushing in on the outside.

Service Manual
Page 68
... the computer, replace all of the steps in "Removing the System Board" in damage to the computer base. 10. file:///F|/Service%20Manuals/Dell/Latitude/d600/sysboard.htm (3 of the palm rest. System Board: Dell Latitude D600 Service Manual 1 M2 x 3-mm screws (4) 4270E 9. Pull out the system board starting from the front of 4) [2/28/2004 8:15:54 AM]
... the computer, replace all of the steps in "Removing the System Board" in damage to the computer base. 10. file:///F|/Service%20Manuals/Dell/Latitude/d600/sysboard.htm (3 of the palm rest. System Board: Dell Latitude D600 Service Manual 1 M2 x 3-mm screws (4) 4270E 9. Pull out the system board starting from the front of 4) [2/28/2004 8:15:54 AM]


