
Quick Reference Guide
Page 3
... Side View 18 Back View 19 Bottom View 20 Using a Battery 21 Battery Performance 21 Checking the Battery Charge 22 Power Management Modes 24 Configuring Power Management Settings . . . . . 26 Accessing Power Options Properties 26 Charging the Battery 26 Replacing the Battery 27 Storing a Battery 28 Troubleshooting 28 Lockups and Software Problems 29 Dell Diagnostics 30 Index 35 Contents 3
... Side View 18 Back View 19 Bottom View 20 Using a Battery 21 Battery Performance 21 Checking the Battery Charge 22 Power Management Modes 24 Configuring Power Management Settings . . . . . 26 Accessing Power Options Properties 26 Charging the Battery 26 Replacing the Battery 27 Storing a Battery 28 Troubleshooting 28 Lockups and Software Problems 29 Dell Diagnostics 30 Index 35 Contents 3
Quick Reference Guide
Page 22
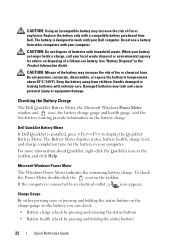
... icon in your Dell computer. Do not use a battery from other computers with a compatible battery purchased from children. Checking the Battery Charge The Dell QuickSet Battery Meter, the Microsoft Windows Power Meter window and icon, the battery charge gauge and health gauge, and the low-battery warning provide information on disposing of batteries with extreme care. Replace the battery only with...
... icon in your Dell computer. Do not use a battery from other computers with a compatible battery purchased from children. Checking the Battery Charge The Dell QuickSet Battery Meter, the Microsoft Windows Power Meter window and icon, the battery charge gauge and health gauge, and the low-battery warning provide information on disposing of batteries with extreme care. Replace the battery only with...

Quick Reference Guide
Page 23
... bay. A pop-up window warns you should consider replacing the battery. If no charge. Low-Battery Warning NOTICE: To avoid losing or corrupting data, save your work immediately after a low-battery warning. For example, if the battery has 80 percent of its charge remaining, four of ...its original charge capacity remains. For information about the battery operating time. That is in Dell QuickSet. Check the Battery Charge To check the battery charge, press and release the status button on . Each light represents incremental degradation. If ...
... bay. A pop-up window warns you should consider replacing the battery. If no charge. Low-Battery Warning NOTICE: To avoid losing or corrupting data, save your work immediately after a low-battery warning. For example, if the battery has 80 percent of its charge remaining, four of ...its original charge capacity remains. For information about the battery operating time. That is in Dell QuickSet. Check the Battery Charge To check the battery charge, press and release the status button on . Each light represents incremental degradation. If ...
Quick Reference Guide
Page 27
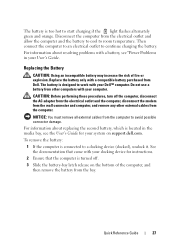
... possible connector damage. Do not use a battery from the computer to work with your Dell™ computer. Disconnect the computer from the computer. CAUTION: Before performing these procedures, turn off . 3 Slide the battery-bay latch release on support.dell.com. Replace the battery only with your computer. To remove the battery: 1 If the computer is too hot...
... possible connector damage. Do not use a battery from the computer to work with your Dell™ computer. Disconnect the computer from the computer. CAUTION: Before performing these procedures, turn off . 3 Slide the battery-bay latch release on support.dell.com. Replace the battery only with your computer. To remove the battery: 1 If the computer is too hot...
Quick Reference Guide
Page 28
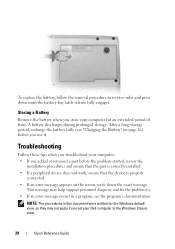
Storing a Battery Remove the battery when you set your Dell computer to the Windows Classic view. 28 Quick Reference Guide Troubleshooting Follow these tips when you troubleshoot your computer for an extended period of time. A battery discharges during prolonged storage. This message may help support personnel ... device is properly connected. • If an error message appears on the screen, write down until the battery-bay latch release fully engages. To replace the battery, follow the removal procedure in reverse order and press down the exact message. After a long storage period,...
Storing a Battery Remove the battery when you set your Dell computer to the Windows Classic view. 28 Quick Reference Guide Troubleshooting Follow these tips when you troubleshoot your computer for an extended period of time. A battery discharges during prolonged storage. This message may help support personnel ... device is properly connected. • If an error message appears on the screen, write down until the battery-bay latch release fully engages. To replace the battery, follow the removal procedure in reverse order and press down the exact message. After a long storage period,...
User's Guide
Page 4
... 43 Hibernate Mode 43 Configuring Power Management Settings 44 Accessing Power Options Properties 44 Charging the Battery 45 Replacing the Battery 45 Storing a Battery 46 5 Using the Keyboard 47 Numeric Keypad 47 Key Combinations 48 System Functions 48 Battery 48 CD or DVD Tray 48 Display Functions 48 Wireless Networking and Bluetooth® Wireless Technology...
... 43 Hibernate Mode 43 Configuring Power Management Settings 44 Accessing Power Options Properties 44 Charging the Battery 45 Replacing the Battery 45 Storing a Battery 46 5 Using the Keyboard 47 Numeric Keypad 47 Key Combinations 48 System Functions 48 Battery 48 CD or DVD Tray 48 Display Functions 48 Wireless Networking and Bluetooth® Wireless Technology...

User's Guide
Page 40
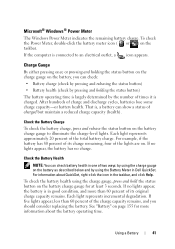
... fire or explosion. • Running the computer in the Product Information Guide. Replace the battery only with extreme care. Dell™ QuickSet Battery Meter If Dell QuickSet is low. When your battery no longer holds a charge, call your Dell computer. CAUTION: Using an incompatible battery may increase the risk of fire or chemical burn. For more information about...
... fire or explosion. • Running the computer in the Product Information Guide. Replace the battery only with extreme care. Dell™ QuickSet Battery Meter If Dell QuickSet is low. When your battery no longer holds a charge, call your Dell computer. CAUTION: Using an incompatible battery may increase the risk of fire or chemical burn. For more information about...
User's Guide
Page 41
... the battery operating time. If no charge. Using a Battery 41 If the computer is , a battery can check battery health in Dell QuickSet. Each light represents approximately 20 percent of charge and discharge cycles, batteries lose some charge capacity-or battery health. Check the Battery Health ...NOTE: You can show a status of the lights are on the taskbar. Check the Battery Charge To check the battery charge, press and release the status button on the battery, you should consider replacing the battery...
... the battery operating time. If no charge. Using a Battery 41 If the computer is , a battery can check battery health in Dell QuickSet. Each light represents approximately 20 percent of charge and discharge cycles, batteries lose some charge capacity-or battery health. Check the Battery Health ...NOTE: You can show a status of the lights are on the taskbar. Check the Battery Charge To check the battery charge, press and release the status button on the battery, you should consider replacing the battery...

User's Guide
Page 45
You can leave the battery in the computer for your computer. Replace the battery only with your system on support.dell.com. If necessary, the AC adapter then charges the battery and maintains the battery charge. The battery's internal circuitry prevents the battery from Dell. To remove the battery: Using a Battery 45 Replacing the Battery CAUTION: Using an incompatible battery may not charge when you...
You can leave the battery in the computer for your computer. Replace the battery only with your system on support.dell.com. If necessary, the AC adapter then charges the battery and maintains the battery charge. The battery's internal circuitry prevents the battery from Dell. To remove the battery: Using a Battery 45 Replacing the Battery CAUTION: Using an incompatible battery may not charge when you...
User's Guide
Page 46
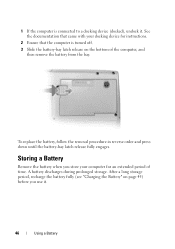
... computer is connected to a docking device (docked), undock it . 46 Using a Battery To replace the battery, follow the removal procedure in reverse order and press down until the battery-bay latch release fully engages. 1 If the computer is turned off. 3 Slide the battery-bay latch release on page 45) before you store your docking device...
... computer is connected to a docking device (docked), undock it . 46 Using a Battery To replace the battery, follow the removal procedure in reverse order and press down until the battery-bay latch release fully engages. 1 If the computer is turned off. 3 Slide the battery-bay latch release on page 45) before you store your docking device...
User's Guide
Page 141
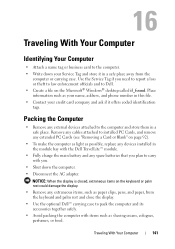
... you plan to carry with items such as your name, address, and phone number in the module bay with the Dell TravelLite™ module. • Fully charge the main battery and any extraneous items, such as paper clips, pens, and paper, from the computer or carrying case. Place information... such as shaving cream, colognes, perfumes, or food. NOTICE: When the display is closed, extraneous items on page 92). • To make the computer as light as possible, replace...
... you plan to carry with items such as your name, address, and phone number in the module bay with the Dell TravelLite™ module. • Fully charge the main battery and any extraneous items, such as paper clips, pens, and paper, from the computer or carrying case. Place information... such as shaving cream, colognes, perfumes, or food. NOTICE: When the display is closed, extraneous items on page 92). • To make the computer as light as possible, replace...
Service Manual
Page 7
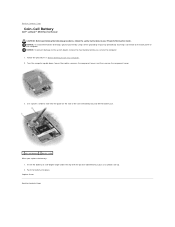
... on the back panel of the coin-cell battery bay and lift the battery out. 1 coin-cell battery 2 plastic scribe When you service the computer. 1. Captive Screw Back to the system board, remove the main battery before you replace the battery: 1. Back to Contents Page Coin-Cell Battery Dell™ Latitude™ D530 Service Manual CAUTION: Before performing the following...
... on the back panel of the coin-cell battery bay and lift the battery out. 1 coin-cell battery 2 plastic scribe When you service the computer. 1. Captive Screw Back to the system board, remove the main battery before you replace the battery: 1. Back to Contents Page Coin-Cell Battery Dell™ Latitude™ D530 Service Manual CAUTION: Before performing the following...
Service Manual
Page 8
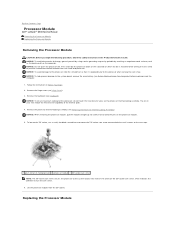
... the cam screw to the processor when turning the cam screw. NOTICE: To help prevent damage to Contents Page Processor Module Dell™ Latitude™ D530 Service Manual Removing the Processor Module Replacing the Processor Module Removing the Processor Module CAUTION: Before you begin the following procedure, follow the safety instructions in the Product... cam screw, which the die is perpendicular to prevent intermittent contact between the cam screw and processor. Back to the system board, remove the main battery (see Removing the Processor Thermal-Cooling Assembly).
... the cam screw to the processor when turning the cam screw. NOTICE: To help prevent damage to Contents Page Processor Module Dell™ Latitude™ D530 Service Manual Removing the Processor Module Replacing the Processor Module Removing the Processor Module CAUTION: Before you begin the following procedure, follow the safety instructions in the Product... cam screw, which the die is perpendicular to prevent intermittent contact between the cam screw and processor. Back to the system board, remove the main battery (see Removing the Processor Thermal-Cooling Assembly).
Service Manual
Page 10
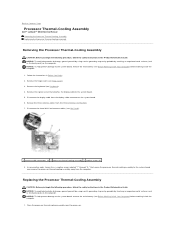
...Dell™ Latitude™ D530 Service Manual Removing the Processor Thermal-Cooling Assembly Replacing the Processor Thermal-Cooling Assembly Removing the Processor Thermal-Cooling Assembly CAUTION: Before you begin the following procedure, follow the safety instructions in Before You Begin. 2. NOTICE: To help prevent damage to the system board, remove the main battery...the system board. 6. Disconnect the three Mini-Card antenna cables (see Hinge Cover). 3. Replacing the Processor Thermal-Cooling Assembly CAUTION: Before you begin the following procedure, follow the safety ...
...Dell™ Latitude™ D530 Service Manual Removing the Processor Thermal-Cooling Assembly Replacing the Processor Thermal-Cooling Assembly Removing the Processor Thermal-Cooling Assembly CAUTION: Before you begin the following procedure, follow the safety instructions in Before You Begin. 2. NOTICE: To help prevent damage to the system board, remove the main battery...the system board. 6. Disconnect the three Mini-Card antenna cables (see Hinge Cover). 3. Replacing the Processor Thermal-Cooling Assembly CAUTION: Before you begin the following procedure, follow the safety ...
Service Manual
Page 12
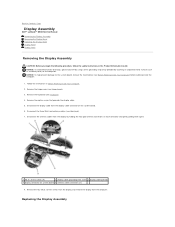
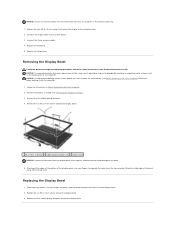
... connectors (3) 8. Disconnect the three Mini-Card antenna cables (see Hinge Cover). 3. Back to the system board, remove the main battery (see Before Working Inside Your Computer) before working inside the computer. 1. Disconnect the antenna cables from the computer. NOTICE: To ... the display cable. 5. NOTICE: To help prevent damage to Contents Page Display Assembly Dell™ Latitude™ D530 Service Manual Removing the Display Assembly Removing the Display Bezel Replacing the Display Bezel Display Panel Display Latch Removing the Display Assembly CAUTION: Before you begin...
... connectors (3) 8. Disconnect the three Mini-Card antenna cables (see Hinge Cover). 3. Back to the system board, remove the main battery (see Before Working Inside Your Computer) before working inside the computer. 1. Disconnect the antenna cables from the computer. NOTICE: To ... the display cable. 5. NOTICE: To help prevent damage to Contents Page Display Assembly Dell™ Latitude™ D530 Service Manual Removing the Display Assembly Removing the Display Bezel Replacing the Display Bezel Display Panel Display Latch Removing the Display Assembly CAUTION: Before you begin...
Service Manual
Page 13
... electrostatic discharge, ground yourself by using a wrist grounding strap or by lifting the inside the computer. 1. Replace the six M2 x 5-mm screws around the display bezel. Replace the keyboard. 5. Follow the instructions in the Product Information Guide. Connect the three antenna cables. 4. Starting...display panel, use your fingers to the system board, you must remove the main battery (see Removing the Display Assembly). 3. Replace the hinge cover. Remove the five rubber display bumpers. 4. Replace the four M2.5 x 5-mm screws that they are lying flat in the antenna ...
... electrostatic discharge, ground yourself by using a wrist grounding strap or by lifting the inside the computer. 1. Replace the six M2 x 5-mm screws around the display bezel. Replace the keyboard. 5. Follow the instructions in the Product Information Guide. Connect the three antenna cables. 4. Starting...display panel, use your fingers to the system board, you must remove the main battery (see Removing the Display Assembly). 3. Replace the hinge cover. Remove the five rubber display bumpers. 4. Replace the four M2.5 x 5-mm screws that they are lying flat in the antenna ...

Service Manual
Page 15
... inverter connector. 3. Replace the eight M2 ...4-mm screw 2 display latch 3 display support bracket Replacing the Display Latch 1. Lift the display support bracket out of copper ...beneath the support bracket on the computer. Replace the display panel inside the computer. 1. Replace the screws in sequential order around the... latch with the posts on each side) in sequential order. 4. Replace the display bezel. NOTICE: To help prevent damage to the top ... not tear this foil while removing the bracket. 5. Replacing the Display Panel 1. Remove the display panel (see Removing the ...
... inverter connector. 3. Replace the eight M2 ...4-mm screw 2 display latch 3 display support bracket Replacing the Display Latch 1. Lift the display support bracket out of copper ...beneath the support bracket on the computer. Replace the display panel inside the computer. 1. Replace the screws in sequential order around the... latch with the posts on each side) in sequential order. 4. Replace the display bezel. NOTICE: To help prevent damage to the top ... not tear this foil while removing the bracket. 5. Replacing the Display Panel 1. Remove the display panel (see Removing the ...
Service Manual
Page 33
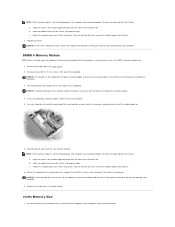
... A Memory Module DIMM A bay is located under the keyboard. b. Replace the two M2.5 x 5-mm screws located at a 45-degree angle. Forcing the keyboard to close may damage your computer. Insert the battery into place. e. Detaching the keyboard from the computer is not required ...to remove or replace the memory module. 4. Be careful when removing and handling the keyboard. 3. If you are ...
... A Memory Module DIMM A bay is located under the keyboard. b. Replace the two M2.5 x 5-mm screws located at a 45-degree angle. Forcing the keyboard to close may damage your computer. Insert the battery into place. e. Detaching the keyboard from the computer is not required ...to remove or replace the memory module. 4. Be careful when removing and handling the keyboard. 3. If you are ...
Service Manual
Page 35
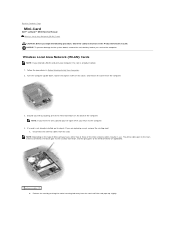
... the card. Back to the system board, remove the main battery before you service the computer. Wireless Local Area Network (WLAN) Cards NOTE: If you are replacing a card, remove the existing card: a. NOTICE: To prevent damage to Contents Page Mini-Card Dell™ Latitude™ D530 Service Manual Wireless Local Area Network (WLAN) Cards CAUTION...
... the card. Back to the system board, remove the main battery before you service the computer. Wireless Local Area Network (WLAN) Cards NOTE: If you are replacing a card, remove the existing card: a. NOTICE: To prevent damage to Contents Page Mini-Card Dell™ Latitude™ D530 Service Manual Wireless Local Area Network (WLAN) Cards CAUTION...
Service Manual
Page 37
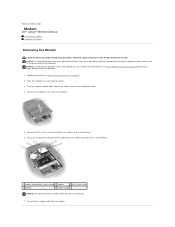
... Page Modem Dell™ Latitude™ D530 Service Manual Removing the Modem Replacing the Modem Removing the Modem CAUTION: Before you begin the following procedure, follow the safety instructions in Before Working Inside Your Computer. 2. Remove the M2 x 3-mm screw that attaches the modem to the system board, you must remove the main battery (see...
... Page Modem Dell™ Latitude™ D530 Service Manual Removing the Modem Replacing the Modem Removing the Modem CAUTION: Before you begin the following procedure, follow the safety instructions in Before Working Inside Your Computer. 2. Remove the M2 x 3-mm screw that attaches the modem to the system board, you must remove the main battery (see...


