Quick Reference Guide
Page 10
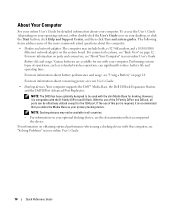
... your User's Guide. • Docking devices: Your computer supports the Dell™ Media Base, the Dell D/Dock Expansion Station, and the Dell D/Port Advanced Port Replicator. Battery life and usage: Various batteries are ... button, click Help and Support Center, and then click User and system guides. NOTE: The D420 has been optimally designed to be used with the D-Family D/Port and D/Dock. NOTE: Docking...is required, it is recommended that accompanied the device. For information on page 12. About Your Computer See your online User's Guide for the 1394 port. Performing certain...
... your User's Guide. • Docking devices: Your computer supports the Dell™ Media Base, the Dell D/Dock Expansion Station, and the Dell D/Port Advanced Port Replicator. Battery life and usage: Various batteries are ... button, click Help and Support Center, and then click User and system guides. NOTE: The D420 has been optimally designed to be used with the D-Family D/Port and D/Dock. NOTE: Docking...is required, it is recommended that accompanied the device. For information on page 12. About Your Computer See your online User's Guide for the 1394 port. Performing certain...
Quick Reference Guide
Page 13
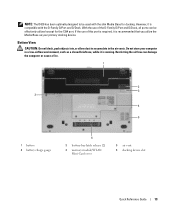
...vent 6 docking device slot Quick Reference Guide 13 However, it is compatible with the slim Media Base for the 1394 port. If the use of this port is required, it is recommended that you utilize the Media Base as a closed briefcase, while it is running. Bottom View CAUTION: Do not block,... push objects into, or allow dust to be effectively utilized except for docking. Restricting the airflow can be used with the D-Family D/Port and D/Dock. NOTE: The D420 has been optimally...
...vent 6 docking device slot Quick Reference Guide 13 However, it is compatible with the slim Media Base for the 1394 port. If the use of this port is required, it is recommended that you utilize the Media Base as a closed briefcase, while it is running. Bottom View CAUTION: Do not block,... push objects into, or allow dust to be effectively utilized except for docking. Restricting the airflow can be used with the D-Family D/Port and D/Dock. NOTE: The D420 has been optimally...
Media Base Setup Guide
Page 5
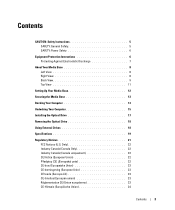
Contents CAUTION: Safety Instructions 5 SAFETY: General Safety 5 SAFETY: Power Safety 6 Equipment Protection Instructions 6 Protecting Against Electrostatic Discharge 7 About Your Media Base 8 Left View 8 Right View 8 Back View 9 Top View 11 Setting Up Your Media Base 12 Securing the Media Base 13 Docking Your Computer 14 Undocking Your Computer 15 Installing the Optical Drive 17 Removing the Optical Drive...
Contents CAUTION: Safety Instructions 5 SAFETY: General Safety 5 SAFETY: Power Safety 6 Equipment Protection Instructions 6 Protecting Against Electrostatic Discharge 7 About Your Media Base 8 Left View 8 Right View 8 Back View 9 Top View 11 Setting Up Your Media Base 12 Securing the Media Base 13 Docking Your Computer 14 Undocking Your Computer 15 Installing the Optical Drive 17 Removing the Optical Drive...
Media Base Setup Guide
Page 7
... or, eventually, a burn. • PC Cards may contain flammable substances. • Ensure that nothing rests on your media base during normal operation. These ODDs contain no user adjustments or serviceable or replaceable parts. Use care when removing PC Cards after handling... not store your computer in a low-airflow environment, such as explained in your Dell™ documentation or in instructions otherwise provided to you clean your device (computer, port replicator, media base, docking station, and similar devices) and working environment from radiators and heat sources...
... or, eventually, a burn. • PC Cards may contain flammable substances. • Ensure that nothing rests on your media base during normal operation. These ODDs contain no user adjustments or serviceable or replaceable parts. Use care when removing PC Cards after handling... not store your computer in a low-airflow environment, such as explained in your Dell™ documentation or in instructions otherwise provided to you clean your device (computer, port replicator, media base, docking station, and similar devices) and working environment from radiators and heat sources...
Media Base Setup Guide
Page 8
...grounding prong from high-temperature conditions into the power strip. Incorrect insertion of electric shock and/or fire. Use of damage or excessive wear. 6 Media Base Setup Guide If you use a power extension cable, use the appropriate type to mate with the adapter power cable plug. • If you... during normal operation of the power strip. • Before you to a grounded electrical outlet only. • Japan Only: Use only the Dell-provided AC power cable with your AC adapter, ensure that the total ampere rating of the products plugged in to the extension power cable does...
...grounding prong from high-temperature conditions into the power strip. Incorrect insertion of electric shock and/or fire. Use of damage or excessive wear. 6 Media Base Setup Guide If you use a power extension cable, use the appropriate type to mate with the adapter power cable plug. • If you... during normal operation of the power strip. • Before you to a grounded electrical outlet only. • Japan Only: Use only the Dell-provided AC power cable with your AC adapter, ensure that the total ampere rating of the products plugged in to the extension power cable does...
Media Base Setup Guide
Page 9
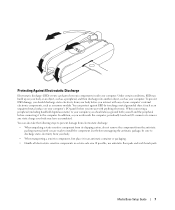
... are ready to install the component. You can protect against ESD by touching a metal grounded object (such as an unpainted metal surface on your computer. Media Base Setup Guide 7 If possible, use antistatic floor pads and work inside your computer.
... are ready to install the component. You can protect against ESD by touching a metal grounded object (such as an unpainted metal surface on your computer. Media Base Setup Guide 7 If possible, use antistatic floor pads and work inside your computer.
Media Base Setup Guide
Page 10
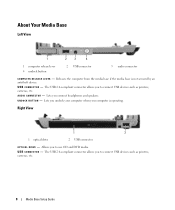
... you to connect USB devices such as printers, cameras, etc. 8 Media Base Setup Guide The USB 2.0-compliant connector allows you connect headphones and speakers. U S B C O N N E C T O R - About Your Media Base Left View 1 2 3 4 1 computer release lever 4 undock button 2 USB connector 3 audio connector C O M P U T E R R E L E A S E L E V E R - Releases the computer from the media base if the media base is operating. Right View 1 2 1 optical drive 2 USB connector...
... you to connect USB devices such as printers, cameras, etc. 8 Media Base Setup Guide The USB 2.0-compliant connector allows you connect headphones and speakers. U S B C O N N E C T O R - About Your Media Base Left View 1 2 3 4 1 computer release lever 4 undock button 2 USB connector 3 audio connector C O M P U T E R R E L E A S E L E V E R - Releases the computer from the media base if the media base is operating. Right View 1 2 1 optical drive 2 USB connector...
Media Base Setup Guide
Page 11
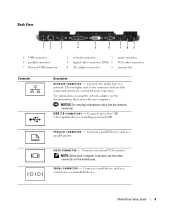
... handheld device. NOTICE: Do not plug a telephone cable into the network connector. Connects the media base to the connector indicate link status and activity for a wired network connection. The two lights ...P A R A L L E L C O N N E C T O R - Connects an external VGA monitor. V I A L C O N N E C T O R - Media Base Setup Guide 9 S E R I D E O C O N N E C T O R - Back View 12 3 4 5 6 7 89 1 USB connector 4 parallel connector 7 Powered USB connector 2 network connector 3 serial connector 5 digital video connector (DVI) 6 VGA video connector 8 AC adapter connector 9 ...
... handheld device. NOTICE: Do not plug a telephone cable into the network connector. Connects the media base to the connector indicate link status and activity for a wired network connection. The two lights ...P A R A L L E L C O N N E C T O R - Connects an external VGA monitor. V I A L C O N N E C T O R - Media Base Setup Guide 9 S E R I D E O C O N N E C T O R - Back View 12 3 4 5 6 7 89 1 USB connector 4 parallel connector 7 Powered USB connector 2 network connector 3 serial connector 5 digital video connector (DVI) 6 VGA video connector 8 AC adapter connector 9 ...

Media Base Setup Guide
Page 12
... power cable into the mating ground contact of the power connector could result in permanent damage to your media base either turned on page 13. 10 Media Base Setup Guide For more information, see "Securing the Media Base" on or off. A C A D A P T E R C O N N E C T O R - Incorrect insertion of the power strip... or speakers. The connector is a stereo output connector. For more information, see "Setting Up Your Media Base" on page 12. Connects an AC adapter to the media base and to AC power to convert AC power to the media base. Lets you to avoid damaging the cable.
... power cable into the mating ground contact of the power connector could result in permanent damage to your media base either turned on page 13. 10 Media Base Setup Guide For more information, see "Securing the Media Base" on or off. A C A D A P T E R C O N N E C T O R - Incorrect insertion of the power strip... or speakers. The connector is a stereo output connector. For more information, see "Setting Up Your Media Base" on page 12. Connects an AC adapter to the media base and to AC power to convert AC power to the media base. Lets you to avoid damaging the cable.
Media Base Setup Guide
Page 14
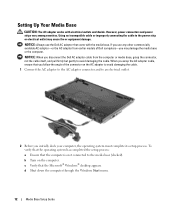
... the AC adapter to the AC adapter connector and to the media base (docked). Setting Up Your Media Base CAUTION: The AC adapter works with the media base. d Shut down the computer through the Windows Start menu. 12 Media Base Setup Guide NOTICE: When you disconnect the Dell AC adapter cable from earlier models of the connector on the computer...
... the AC adapter to the AC adapter connector and to the media base (docked). Setting Up Your Media Base CAUTION: The AC adapter works with the media base. d Shut down the computer through the Windows Start menu. 12 Media Base Setup Guide NOTICE: When you disconnect the Dell AC adapter cable from earlier models of the connector on the computer...
Media Base Setup Guide
Page 15
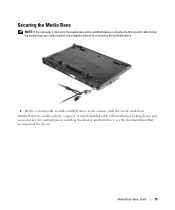
For instructions on the media base. Media Base Setup Guide 13 Securing the Media Base NOTE: If the computer is docked to the media base and an antitheft device is attached to the security cable slot on the media base, you cannot undock the computer without first removing the antitheft device. 1 Attach a commercially available antitheft device to the security cable slot...
For instructions on the media base. Media Base Setup Guide 13 Securing the Media Base NOTE: If the computer is docked to the media base and an antitheft device is attached to the security cable slot on the media base, you cannot undock the computer without first removing the antitheft device. 1 Attach a commercially available antitheft device to the security cable slot...
Media Base Setup Guide
Page 16
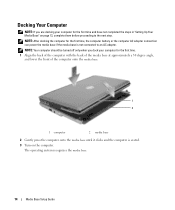
... If you dock your computer for the first time, the computer battery or the computer AC adapter connection can power the media base if the media base is seated. 3 Turn on page 12, complete them before proceeding to an AC adapter. NOTE: After docking the computer for the first time and have not ...completed the steps in "Setting Up Your Media Base" on the computer. NOTE: Your computer should be turned off only when you are ...
... If you dock your computer for the first time, the computer battery or the computer AC adapter connection can power the media base if the media base is seated. 3 Turn on page 12, complete them before proceeding to an AC adapter. NOTE: After docking the computer for the first time and have not ...completed the steps in "Setting Up Your Media Base" on the computer. NOTE: Your computer should be turned off only when you are ...
Media Base Setup Guide
Page 17
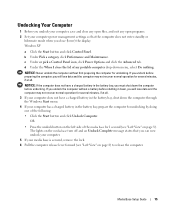
... b Under Pick a category, click Performance and Maintenance. OR • Press the undock button on the left side of the media base for several minutes, if at all. Media Base Setup Guide 15 If you undock the computer without first preparing the computer for undocking by doing one of my portable computer...the Windows Start menu. 4 If your computer has a charged battery in the battery bay, you can now undock your computer. 5 If your media base is secured, remove the lock. 6 Pull the computer release lever forward (see "Left View" on page 8) to release the computer. The lights ...
... b Under Pick a category, click Performance and Maintenance. OR • Press the undock button on the left side of the media base for several minutes, if at all. Media Base Setup Guide 15 If you undock the computer without first preparing the computer for undocking by doing one of my portable computer...the Windows Start menu. 4 If your computer has a charged battery in the battery bay, you can now undock your computer. 5 If your media base is secured, remove the lock. 6 Pull the computer release lever forward (see "Left View" on page 8) to release the computer. The lights ...

Media Base Setup Guide
Page 18
7 Lift the back of the computer up and slide the computer out towards the back of the media base. 16 Media Base Setup Guide
7 Lift the back of the computer up and slide the computer out towards the back of the media base. 16 Media Base Setup Guide

Media Base Setup Guide
Page 19
Media Base Setup Guide 17 Installing the Optical Drive 1 Save and close any open files or programs, and turn off the computer. 2 Insert the optical drive into the bay on the media base. (See "Right View" on page 8.) 3 Insert the securing screw that holds the optical drive in place. 4 Turn on the computer. The operating system recognizes the new drive.
Media Base Setup Guide 17 Installing the Optical Drive 1 Save and close any open files or programs, and turn off the computer. 2 Insert the optical drive into the bay on the media base. (See "Right View" on page 8.) 3 Insert the securing screw that holds the optical drive in place. 4 Turn on the computer. The operating system recognizes the new drive.
Media Base Setup Guide
Page 20
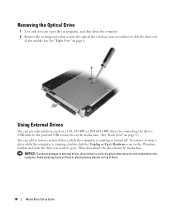
... , double-click the Unplug or Eject Hardware icon on the Windows taskbar and click the drive you want to the powered USB connector on the media base. (See "Back View" on page 9.) You can use your screwdriver to the computer. NOTICE: To prevent damage to external drives, place them in a safe... bay. Using External Drives You can add or remove external drives while the computer is running or turned off. Then disconnect the drive from the media base. Avoid pressing down the computer. 2 Remove the securing screw that secures the optical drive and use external drives such as a CD, CD-RW, or...
... , double-click the Unplug or Eject Hardware icon on the Windows taskbar and click the drive you want to the powered USB connector on the media base. (See "Back View" on page 9.) You can use your screwdriver to the computer. NOTICE: To prevent damage to external drives, place them in a safe... bay. Using External Drives You can add or remove external drives while the computer is running or turned off. Then disconnect the drive from the media base. Avoid pressing down the computer. 2 Remove the securing screw that secures the optical drive and use external drives such as a CD, CD-RW, or...
Media Base Setup Guide
Page 21
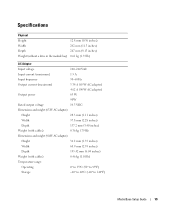
Specifications Physical Height 12.8 mm (0.50 inches) Width 292 mm (11.5 inches) Depth 207 mm (8.15 inches) Weight (without a drive in the module bay) 0.61 kg (1.35 lb) AC ... (1.01 lb) Temperature range: Operating 0° to 35°C (32° to 95°F) Storage -40° to 60°C (-40° to 140°F) Media Base Setup Guide 19
Specifications Physical Height 12.8 mm (0.50 inches) Width 292 mm (11.5 inches) Depth 207 mm (8.15 inches) Weight (without a drive in the module bay) 0.61 kg (1.35 lb) AC ... (1.01 lb) Temperature range: Operating 0° to 35°C (32° to 95°F) Storage -40° to 60°C (-40° to 140°F) Media Base Setup Guide 19

Media Base Setup Guide
Page 22
Ports and Connectors Network connector USB Powered USB Parallel Video DVI connector Serial Audio Docking RJ-45 port for 10/100/1000 Mbits/second BaseTX Bus Master Ethernet three 4-pin USB-2.0 compliant connectors one 9-pin USB-2.0 compliant connector 25-hole connector; unidirectional, bidirectional, or ECP 15-hole connector 24-hole connector 9-pin connector; 16550C-compatible UART with 16-byte buffer headphone/speaker (line-out) mini connector 280-pin connector 20 Media Base Setup Guide
Ports and Connectors Network connector USB Powered USB Parallel Video DVI connector Serial Audio Docking RJ-45 port for 10/100/1000 Mbits/second BaseTX Bus Master Ethernet three 4-pin USB-2.0 compliant connectors one 9-pin USB-2.0 compliant connector 25-hole connector; unidirectional, bidirectional, or ECP 15-hole connector 24-hole connector 9-pin connector; 16550C-compatible UART with 16-byte buffer headphone/speaker (line-out) mini connector 280-pin connector 20 Media Base Setup Guide
Media Base Setup Guide
Page 23
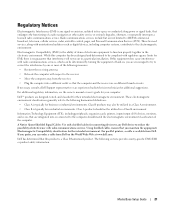
... the receiving antenna. • Relocate the computer with respect to the following sections provide country-specific EMC/EMI or product safety information. Media Base Setup Guide 21 If necessary, consult a Dell Support representative or an experienced radio/television technician for connecting devices to any signal or emission, radiated in free space or conducted...
... the receiving antenna. • Relocate the computer with respect to the following sections provide country-specific EMC/EMI or product safety information. Media Base Setup Guide 21 If necessary, consult a Dell Support representative or an experienced radio/television technician for connecting devices to any signal or emission, radiated in free space or conducted...

Media Base Setup Guide
Page 24
... environment. CE Notice (European Union) This product has been determined to operate this equipment. European Union, Class B This Dell device is on file at Dell Inc. Předpisy CE (Evropská unie) 22 Media Base Setup Guide FCC Notices (U.S. Only) For FCC information, see the appropriate documentation for use in accordance with Canadian ICES...
... environment. CE Notice (European Union) This product has been determined to operate this equipment. European Union, Class B This Dell device is on file at Dell Inc. Předpisy CE (Evropská unie) 22 Media Base Setup Guide FCC Notices (U.S. Only) For FCC information, see the appropriate documentation for use in accordance with Canadian ICES...


