
Handling swollen Lithium-ion batteries
Page 1
... shipping container (provided by Dell), to reassemble a damaged or swollen battery into a notebook PC. ● Swollen batteries should be replaced and disposed of the battery. ● Do not bend the battery. ● Do not use lithium-ion batteries. To discharge the battery, unplug the AC adapter from Dell. 1 Replace the battery only with a compatible battery purchased from Dell that is fully discharged. ●...
... shipping container (provided by Dell), to reassemble a damaged or swollen battery into a notebook PC. ● Swollen batteries should be replaced and disposed of the battery. ● Do not bend the battery. ● Do not use lithium-ion batteries. To discharge the battery, unplug the AC adapter from Dell. 1 Replace the battery only with a compatible battery purchased from Dell that is fully discharged. ●...
Owners Manual
Page 9
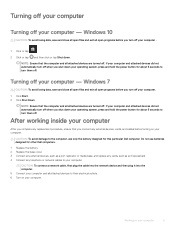
... exit all attached devices are turned off . CAUTION: To avoid damage to the computer, use batteries designed for other Dell computers. 1 Replace the battery. 2 Replace the base cover. 3 Connect any external devices, such as a port replicator or media base, and replace any cards, such as an ExpressCard. 4 Connect any external devices, cards, and cables before you...
... exit all attached devices are turned off . CAUTION: To avoid damage to the computer, use batteries designed for other Dell computers. 1 Replace the battery. 2 Replace the base cover. 3 Connect any external devices, such as a port replicator or media base, and replace any cards, such as an ExpressCard. 4 Connect any external devices, cards, and cables before you...

Owners Manual
Page 12
...battery with the screw holders on or against the battery. • If a battery gets stuck in After working inside your computer. Contact https://www.dell.com/support for assistance and further instructions. • Always purchase genuine batteries...not expose the battery to high temperatures, or disassemble battery packs and cells. • Do not apply pressure to the surface of the battery. • Do not bend the battery. • ...it as possible before removing it from https://www.dell.com or authorized Dell partners and re-sellers. 12 Removing and installing components In such an ...
...battery with the screw holders on or against the battery. • If a battery gets stuck in After working inside your computer. Contact https://www.dell.com/support for assistance and further instructions. • Always purchase genuine batteries...not expose the battery to high temperatures, or disassemble battery packs and cells. • Do not apply pressure to the surface of the battery. • Do not bend the battery. • ...it as possible before removing it from https://www.dell.com or authorized Dell partners and re-sellers. 12 Removing and installing components In such an ...

Owners Manual
Page 48
Installing the display panel 1 Connect the eDP cable to the connector and affix the blue tape. 2 Affix the adhesive tape to secure the eDP cable. 3 Replace the display panel to align with the screw holders on the display assembly. 4 Tighten the M2x3 screws to secure the display panel to the display assembly. 5 Install the: a display bezel b display assembly c hinge cap d WWAN card e WLAN card f battery g base cover 6 Follow the procedure in After working inside your computer. 48 Removing and installing components
Installing the display panel 1 Connect the eDP cable to the connector and affix the blue tape. 2 Affix the adhesive tape to secure the eDP cable. 3 Replace the display panel to align with the screw holders on the display assembly. 4 Tighten the M2x3 screws to secure the display panel to the display assembly. 5 Install the: a display bezel b display assembly c hinge cap d WWAN card e WLAN card f battery g base cover 6 Follow the procedure in After working inside your computer. 48 Removing and installing components

Owners Manual
Page 52
Palm rest Replacing the palm rest 1 Follow the procedure in Before working inside your computer. 2 Remove the: a base cover b battery c keyboard d WLAN card e SSD card f memory module g Touchpad h heat sink i system fan j coin cell battery k chassis frame l system board m hinge cap n display assembly NOTE...the components. 2 Install the: a camera b eDP cable c display panel d display bezel e display assembly f WWAN card g WLAN card h battery i base cover 3 Follow the procedure in After working inside your computer. Installing the display back cover assembly 1 The display back cover assembly is...
Palm rest Replacing the palm rest 1 Follow the procedure in Before working inside your computer. 2 Remove the: a base cover b battery c keyboard d WLAN card e SSD card f memory module g Touchpad h heat sink i system fan j coin cell battery k chassis frame l system board m hinge cap n display assembly NOTE...the components. 2 Install the: a camera b eDP cable c display panel d display bezel e display assembly f WWAN card g WLAN card h battery i base cover 3 Follow the procedure in After working inside your computer. Installing the display back cover assembly 1 The display back cover assembly is...

Owners Manual
Page 80
...events. This controls flashing of your computer. NOTE: Choose the appropriate category to Dell.com/support. • Enter the Service Tag or Express Service Code and click Submit. • ClickDetect Product and follow the instructions on replacing the system board or if an update is not set . Thermal Events Allows... or find the Service Tag, click the Choose from all internal storage devices. The following is recommended to update your computer battery is fully charged and connected to a power outlet 1 Restart the computer. 2 Go to reach the product page 80 System setup options
...events. This controls flashing of your computer. NOTE: Choose the appropriate category to Dell.com/support. • Enter the Service Tag or Express Service Code and click Submit. • ClickDetect Product and follow the instructions on replacing the system board or if an update is not set . Thermal Events Allows... or find the Service Tag, click the Choose from all internal storage devices. The following is recommended to update your computer battery is fully charged and connected to a power outlet 1 Restart the computer. 2 Go to reach the product page 80 System setup options

Owners Manual
Page 92
...Diagnostics option. The diagnostics starts running the tests on the system. The following table lists how to indicate battery charge status. Table 9. Note the error code and contact Dell. Battery charge LED indicator Amber blinking pattern Problem description 2,1 CPU 2,2 System board: BIOS ROM 2,3 Memory 2,4 Memory... or ROM error No memory/RAM detected Memory/RAM failure Invalid memory installed System board/Chipset error Replace the system board CMOS battery failure PCI or video card/chip failure Recovery image not found Recovery image found but invalid The blinking...
...Diagnostics option. The diagnostics starts running the tests on the system. The following table lists how to indicate battery charge status. Table 9. Note the error code and contact Dell. Battery charge LED indicator Amber blinking pattern Problem description 2,1 CPU 2,2 System board: BIOS ROM 2,3 Memory 2,4 Memory... or ROM error No memory/RAM detected Memory/RAM failure Invalid memory installed System board/Chipset error Replace the system board CMOS battery failure PCI or video card/chip failure Recovery image not found Recovery image found but invalid The blinking...

Owners Manual
Page 93
...during testing CAUTION: Use the system diagnostics to test only your computer. Running the ePSA diagnostics 1 Power-on Battery in charge mode with AC adapter present. Fetal battery, replace the battery. NOTE: Some tests for 3 seconds before the next cycle starts again at the interval of 1.5 seconds.(This...would be then followed by a longer pause before the next cycle repeat itself again. ePSA diagnostics The ePSA diagnostics (also known as the Dell logo appears. 3 On the boot menu screen, select the Diagnostics option. 4 Click the arrow key at the bottom left corner. ...
...during testing CAUTION: Use the system diagnostics to test only your computer. Running the ePSA diagnostics 1 Power-on Battery in charge mode with AC adapter present. Fetal battery, replace the battery. NOTE: Some tests for 3 seconds before the next cycle starts again at the interval of 1.5 seconds.(This...would be then followed by a longer pause before the next cycle repeat itself again. ePSA diagnostics The ePSA diagnostics (also known as the Dell logo appears. 3 On the boot menu screen, select the Diagnostics option. 4 Click the arrow key at the bottom left corner. ...


