
Owners Manual
Page 3
...Installing the M.2 Solid State Drive - Windows 7...9 After working inside your computer...9 2 Removing and installing components...10 Recommended tools...10 Subscriber Identity Module(SIM) board...10 Installing the Subscriber Identification Module card 10 Removing the Subscriber Identification Module card 10 Base cover...11 Removing the base cover...11 Installing the base cover...12 Battery...12 Lithium-ion battery precautions...12 Removing the battery...13 Installing the battery...13 Solid State Drive - SSD...15 Hard drive...15 Removing hard drive assembly...15 Installing the hard drive...
...Installing the M.2 Solid State Drive - Windows 7...9 After working inside your computer...9 2 Removing and installing components...10 Recommended tools...10 Subscriber Identity Module(SIM) board...10 Installing the Subscriber Identification Module card 10 Removing the Subscriber Identification Module card 10 Base cover...11 Removing the base cover...11 Installing the base cover...12 Battery...12 Lithium-ion battery precautions...12 Removing the battery...13 Installing the battery...13 Solid State Drive - SSD...15 Hard drive...15 Removing hard drive assembly...15 Installing the hard drive...

Owners Manual
Page 5
... Adjusting brightness in Windows 10...60 Cleaning the display...60 Using touch screen in Windows 10...60 Connecting to external display devices...61 Realtek ALC3246 Waves MaxxAudio Pro controller...61 Downloading the audio driver...61 Identifying the audio controller in Windows 10...61 Changing the audio settings...62 WLAN cards...62 Secure Boot screen options...62 Hard drive options...62 Identifying the hard drive in Windows 10...63 Identifying the hard drive in the BIOS...63 Camera features...63 Identifying the camera in Device Manager on Windows 10 63 Starting the camera...63 Starting...
... Adjusting brightness in Windows 10...60 Cleaning the display...60 Using touch screen in Windows 10...60 Connecting to external display devices...61 Realtek ALC3246 Waves MaxxAudio Pro controller...61 Downloading the audio driver...61 Identifying the audio controller in Windows 10...61 Changing the audio settings...62 WLAN cards...62 Secure Boot screen options...62 Hard drive options...62 Identifying the hard drive in Windows 10...63 Identifying the hard drive in the BIOS...63 Camera features...63 Identifying the camera in Device Manager on Windows 10 63 Starting the camera...63 Starting...

Owners Manual
Page 6
...80 Updating the BIOS in Windows ...80 System and setup password...81 Assigning a system setup password...81 Deleting or changing an existing system setup password 82 5 Technical specifications...83 System specifications...83 Processor specifications...84 Memory specifications...84 Storage specifications...84 Audio specifications...85 Video specifications...85 Camera specifications...85 Communication specifications...86 Port and connector specifications...86 Contactless smart card specifications...86 Display specifications...87 Keyboard specifications...87 Touchpad specifications...88 Battery...
...80 Updating the BIOS in Windows ...80 System and setup password...81 Assigning a system setup password...81 Deleting or changing an existing system setup password 82 5 Technical specifications...83 System specifications...83 Processor specifications...84 Memory specifications...84 Storage specifications...84 Audio specifications...85 Video specifications...85 Camera specifications...85 Communication specifications...86 Port and connector specifications...86 Contactless smart card specifications...86 Display specifications...87 Keyboard specifications...87 Touchpad specifications...88 Battery...

Owners Manual
Page 8
... connecting to the power source. WARNING: Disconnect all covers, panels, and screws before you touch the computer to a docking device (docked), undock it. 4 Disconnect all attached devices from the electrical outlet before opening the computer cover or panels. You should only perform troubleshooting and simple repairs as touching a connector on the back of the computer. 8 Remove any connector pins. Read and follow the safety instructions...
... connecting to the power source. WARNING: Disconnect all covers, panels, and screws before you touch the computer to a docking device (docked), undock it. 4 Disconnect all attached devices from the electrical outlet before opening the computer cover or panels. You should only perform troubleshooting and simple repairs as touching a connector on the back of the computer. 8 Remove any connector pins. Read and follow the safety instructions...
Owners Manual
Page 14
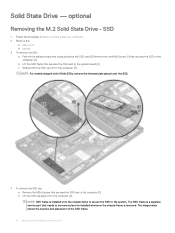
... frame is removed. optional Removing the M.2 Solid State Drive - The image below shows the location and placement of the SSD frame. 14 Removing and installing components c Slide and lift the SSD card from the computer [2]. SSD 1 Follow the procedure in Before working inside your computer. 2 Remove the: a base cover b battery 3 To remove the SSD: a Peel off the adhesive tape that is a separate service part that...
... frame is removed. optional Removing the M.2 Solid State Drive - The image below shows the location and placement of the SSD frame. 14 Removing and installing components c Slide and lift the SSD card from the computer [2]. SSD 1 Follow the procedure in Before working inside your computer. 2 Remove the: a base cover b battery 3 To remove the SSD: a Peel off the adhesive tape that is a separate service part that...
Owners Manual
Page 61
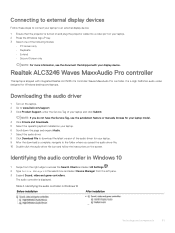
... to access the Search Charm and select All Settings . 2 Type Device Manager in Windows 10 Before installation After installation Technology and components 61 The audio controller is shipped with your display device. NOTE: If you saved the audio driver file. 10 Double-click the audio driver file icon and follow the instructions on the screen. It is a High Definition audio codec designed for your laptop and click Submit. Connecting to external display devices Follow...
... to access the Search Charm and select All Settings . 2 Type Device Manager in Windows 10 Before installation After installation Technology and components 61 The audio controller is shipped with your display device. NOTE: If you saved the audio driver file. 10 Double-click the audio driver file icon and follow the instructions on the screen. It is a High Definition audio codec designed for your laptop and click Submit. Connecting to external display devices Follow...

Owners Manual
Page 63
... enter the BIOS setup program: • With keyboard - Camera features This laptop is displayed, press the Volume Down button to start the camera, open an application that is at the top center of 1280 x 720 (maximum). The hard drive is listed under the System Information under Disk drives. Identifying the hard drive in Windows 10 1 Tap or click All Settings on the Windows 10 Charms Bar. 2 Tap or click Control Panel, select Device Manager , and expand Disk drives...
... enter the BIOS setup program: • With keyboard - Camera features This laptop is displayed, press the Volume Down button to start the camera, open an application that is at the top center of 1280 x 720 (maximum). The hard drive is listed under the System Information under Disk drives. Identifying the hard drive in Windows 10 1 Tap or click All Settings on the Windows 10 Charms Bar. 2 Tap or click Control Panel, select Device Manager , and expand Disk drives...

Owners Manual
Page 69
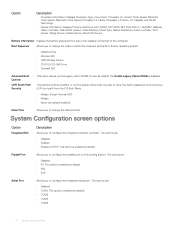
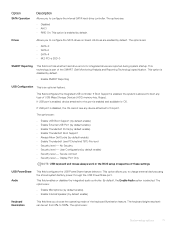
... can cause your computer. • System Information: Displays BIOS Version, Service Tag, Asset Tag, Ownership Tag, Ownership Date, Manufacture Date, and the Express Service Code. • Memory Information: Displays Memory Installed, Memory Available, Memory Speed, Memory Channels Mode, Memory Technology, DIMM ASize, DIMM B Size, System setup options 69 General screen options This section lists the primary hardware features of your computer. • Set or change , or remove any unsaved changes and restarts the system.
... can cause your computer. • System Information: Displays BIOS Version, Service Tag, Asset Tag, Ownership Tag, Ownership Date, Manufacture Date, and the Express Service Code. • Memory Information: Displays Memory Installed, Memory Available, Memory Speed, Memory Channels Mode, Memory Technology, DIMM ASize, DIMM B Size, System setup options 69 General screen options This section lists the primary hardware features of your computer. • Set or change , or remove any unsaved changes and restarts the system.
Owners Manual
Page 70
... the type of AC adapter connected to change the order in which the computer attempts to find an operating system. • Diskette Drive • Internal HDD • USB Storage Device • CD/DVD/CD-RW Drive • Onboard NIC Advanced Boot Options UEFI Booth Path Security This option allows you to load. This options controls whether or not the system will prompt the user to enter the Admin password when booting a UEFI boot...
... the type of AC adapter connected to change the order in which the computer attempts to find an operating system. • Diskette Drive • Internal HDD • USB Storage Device • CD/DVD/CD-RW Drive • Onboard NIC Advanced Boot Options UEFI Booth Path Security This option allows you to load. This options controls whether or not the system will prompt the user to enter the Admin password when booting a UEFI boot...
Owners Manual
Page 71
Drives Allows you to charge external devices using the stored system battery power through the USB PowerShare port. If USB port is disabled, the OS cannot see any type of the keyboard illumination feature. User Configuration(by default. Display Port Only NOTE: USB keyboard and mouse always work in the BIOS setup irrespective of the SMART (Self Monitoring Analysis and Reporting Technology) specification. This option allows you to configure the internal SATA hard-drive controller. The options are : System setup options 71 The keyboard brightness level can be set from...
Drives Allows you to charge external devices using the stored system battery power through the USB PowerShare port. If USB port is disabled, the OS cannot see any type of the keyboard illumination feature. User Configuration(by default. Display Port Only NOTE: USB keyboard and mouse always work in the BIOS setup irrespective of the SMART (Self Monitoring Analysis and Reporting Technology) specification. This option allows you to configure the internal SATA hard-drive controller. The options are : System setup options 71 The keyboard brightness level can be set from...

Owners Manual
Page 74
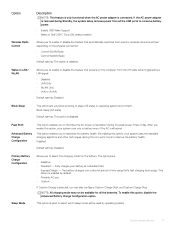
... System setup options Default Setting: Disabled Master Password Lockout Allows you to enable the Execute Disable mode of the processor. Enable CPU XD Support (default) OROM Keyboard Access Allows you to prevent users from entering Setup when an Administrator password is set an option to enter the Option ROM Configuration screens using hotkeys during POST. The options are : • TPM On (enabled by default) • Clear • PPI Bypass for Enabled Commands(enabled by default) • Attestation Enable (enabled by default) • Key Storage Enable (enabled by default...
... System setup options Default Setting: Disabled Master Password Lockout Allows you to enable the Execute Disable mode of the processor. Enable CPU XD Support (default) OROM Keyboard Access Allows you to prevent users from entering Setup when an Administrator password is set an option to enter the Option ROM Configuration screens using hotkeys during POST. The options are : • TPM On (enabled by default) • Clear • PPI Bypass for Enabled Commands(enabled by default) • Attestation Enable (enabled by default) • Key Storage Enable (enabled by default...
Owners Manual
Page 77
... block entering to select the charging mode for all the USB ports to conserve battery power. • Enable USB Wake Support • Wake on the physical connection. • Control WLAN Radio • Control WWAN Radio Default setting: The option is connected. Wake on LAN/ WLAN Allows you to enable or disable the feature that powers on the computer from wired or wireless networks without depending on Dell USB-C Dock (By default enable) Allows you to enable or disable the...
... block entering to select the charging mode for all the USB ports to conserve battery power. • Enable USB Wake Support • Wake on the physical connection. • Control WLAN Radio • Control WWAN Radio Default setting: The option is connected. Wake on LAN/ WLAN Allows you to enable or disable the feature that powers on the computer from wired or wireless networks without depending on Dell USB-C Dock (By default enable) Allows you to enable or disable the...

Owners Manual
Page 78
... key feature. This option is selected by default. • Lock Mode Disable/Standard • Lock Mode Enable/Secondary Fastboot Extended BIOS POST Time Allows you use certain power adapters. The options are : • Serial Mouse • PS2 Mouse • Touchpad/PS-2 Mouse: This option is used to create an additional preboot delay. Numlock Enable Allows you to speed up the boot process by default. Enable Network. The options are : • 0 seconds. Setup works in the internal keyboard. • Fn Key Only: This option is enabled...
... key feature. This option is selected by default. • Lock Mode Disable/Standard • Lock Mode Enable/Secondary Fastboot Extended BIOS POST Time Allows you use certain power adapters. The options are : • Serial Mouse • PS2 Mouse • Touchpad/PS-2 Mouse: This option is used to create an additional preboot delay. Numlock Enable Allows you to speed up the boot process by default. Enable Network. The options are : • 0 seconds. Setup works in the internal keyboard. • Fn Key Only: This option is enabled...

Owners Manual
Page 80
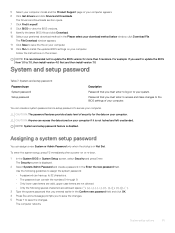
... certain corrupted BIOS conditions from a recover file on screen, 3 If you to view and clear the System Setup (Power) events. This option is fully charged and connected to a power outlet 1 Restart the computer. 2 Go to Dell.com/support. • Enter the Service Tag or Express Service Code and click Submit. • ClickDetect Product and follow the instructions on the user primary hard drive or an external USB key. • BIOS Recovery from Hard Drive (enabled by default) Data Wipe...
... certain corrupted BIOS conditions from a recover file on screen, 3 If you to view and clear the System Setup (Power) events. This option is fully charged and connected to a power outlet 1 Restart the computer. 2 Go to Dell.com/support. • Enter the Service Tag or Express Service Code and click Submit. • ClickDetect Product and follow the instructions on the user primary hard drive or an external USB key. • BIOS Recovery from Hard Drive (enabled by default) Data Wipe...
Owners Manual
Page 81
... is displayed. 2 Select System/Admin Password and create a password in Not Set. NOTE: It is disabled. System and setup password Table 7. CAUTION: The password features provide a basic level of security for more than 3 revisions. The Drivers and Downloads section opens. 7 Click Find it is not locked and left unattended. The Security screen is in the Enter the new password field. Assigning a system setup password You can contain the numbers 0 through...
... is displayed. 2 Select System/Admin Password and create a password in Not Set. NOTE: It is disabled. System and setup password Table 7. CAUTION: The password features provide a basic level of security for more than 3 revisions. The Drivers and Downloads section opens. 7 Click Find it is not locked and left unattended. The Security screen is in the Enter the new password field. Assigning a system setup password You can contain the numbers 0 through...

Owners Manual
Page 92
...wish to indicate battery charge status. The device status LEDs are displayed. Battery charge LED indicator Amber blinking pattern Problem description 2,1 CPU 2,2 System board: BIOS ROM 2,3 Memory 2,4 Memory 2,5 Memory 2,6 System board: Chipset 2,7 LCD 3,1 RTC Power Failure 3,2 PCI/Video 3,3 BIOS Recovery 1 3,4 BIOS Recovery 2 Suggested resolution CPU failure System board, covers BIOS corruption or ROM error No memory/RAM detected Memory/RAM failure Invalid memory installed System board/Chipset error Replace the system board CMOS battery failure PCI or video card/chip...
...wish to indicate battery charge status. The device status LEDs are displayed. Battery charge LED indicator Amber blinking pattern Problem description 2,1 CPU 2,2 System board: BIOS ROM 2,3 Memory 2,4 Memory 2,5 Memory 2,6 System board: Chipset 2,7 LCD 3,1 RTC Power Failure 3,2 PCI/Video 3,3 BIOS Recovery 1 3,4 BIOS Recovery 2 Suggested resolution CPU failure System board, covers BIOS corruption or ROM error No memory/RAM detected Memory/RAM failure Invalid memory installed System board/Chipset error Replace the system board CMOS battery failure PCI or video card/chip...

Owners Manual
Page 93
... key as system diagnostics) performs a complete check of problems encountered during testing CAUTION: Use the system diagnostics to : • Run tests automatically or in charge mode with AC adapter present. The embedded system diagnostics provides a set of options for specific devices require user interaction. NOTE: Some tests for particular devices or device groups allowing you of your laptop. Fetal battery, replace the battery. Running the ePSA diagnostics 1 Power...
... key as system diagnostics) performs a complete check of problems encountered during testing CAUTION: Use the system diagnostics to : • Run tests automatically or in charge mode with AC adapter present. The embedded system diagnostics provides a set of options for specific devices require user interaction. NOTE: Some tests for particular devices or device groups allowing you of your laptop. Fetal battery, replace the battery. Running the ePSA diagnostics 1 Power...
Latitude E5580 Latitude Ultrabook E-Family Re-Image How-To Guide
Page 3
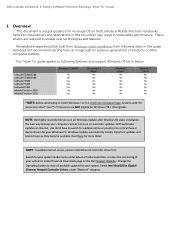
... current is a quick guidance for your system. Select Intel I2xx/825xx Gigabit Ethernet Network Controller Drivers under Select a Product selection, or enter the service tag of products or other computer systems. This "How-To" guide applies to view all available updates for re-image OS on Dell Latitude & Mobile Precision notebooks. Windows Update automatically installs important updates and latest drivers as they become available. Dell Latitude Ultrabook, E-Family...
... current is a quick guidance for your system. Select Intel I2xx/825xx Gigabit Ethernet Network Controller Drivers under Select a Product selection, or enter the service tag of products or other computer systems. This "How-To" guide applies to view all available updates for re-image OS on Dell Latitude & Mobile Precision notebooks. Windows Update automatically installs important updates and latest drivers as they become available. Dell Latitude Ultrabook, E-Family...
Latitude E5580 Latitude Ultrabook E-Family Re-Image How-To Guide
Page 4
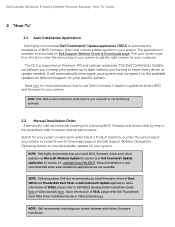
... driver or update needed. The DCU is supported on Dell Support Website Driver & Downloads page. The Dell Command | Update tool allows you install BIOS, firmware, driver and critical updates via Dell Command I Update application (in your system. Dell Latitude Ultrabook, E-Family & Mobile Precision Reimage "How-To" Guide 2 "How-To" 2.1 Auto Installation Application Dell highly recommends Dell Command | Update application (DCU) to automate the installation of BIOS, firmware, driver and critical updates specific to your computer or not functioning optimally. 2.2 Manual Installation Order...
... driver or update needed. The DCU is supported on Dell Support Website Driver & Downloads page. The Dell Command | Update tool allows you install BIOS, firmware, driver and critical updates via Dell Command I Update application (in your system. Dell Latitude Ultrabook, E-Family & Mobile Precision Reimage "How-To" Guide 2 "How-To" 2.1 Auto Installation Application Dell highly recommends Dell Command | Update application (DCU) to automate the installation of BIOS, firmware, driver and critical updates specific to your computer or not functioning optimally. 2.2 Manual Installation Order...

Latitude E5580 Latitude Ultrabook E-Family Re-Image How-To Guide
Page 7
... mode. 3. Dell Latitude Ultrabook, E-Family & Mobile Precision Reimage "How-To" Guide Appendix A How to create and use the Dell Windows recovery image After you 'll be copying the recovery image to DVD. Connect the USB drive to the PC where you use 8 GB or larger USB drive (32 GB Maximum) and backup any important data on the options menu, select Mount. 3. Windows will be deleted. 1. Type format fs=fat32 label='OS install' quick and press Enter...
... mode. 3. Dell Latitude Ultrabook, E-Family & Mobile Precision Reimage "How-To" Guide Appendix A How to create and use the Dell Windows recovery image After you 'll be copying the recovery image to DVD. Connect the USB drive to the PC where you use 8 GB or larger USB drive (32 GB Maximum) and backup any important data on the options menu, select Mount. 3. Windows will be deleted. 1. Type format fs=fat32 label='OS install' quick and press Enter...


