
Dell Owners Manual
Page 3
...Computer 7 2 Removing and Installing Components 8 Recommended Tools...8 Removing the Base Cover...8 Installing the Base Cover...9 Removing the Battery...10 Installing the Battery...11 Removing the Hard Drive...12 Installing the Hard Drive...14 Removing the WLAN Card...14 Installing the WLAN Card...15 ...26 Installing the Heatsink...26 Removing the I/O Board...27 Installing the I/O Board...27 Removing the Coin-Cell Battery...28 Installing the Coin-Cell Battery...28 Removing the Display Assembly...29 Installing the Display Assembly...30 Removing the Display Bezel...30 Installing the Display...
...Computer 7 2 Removing and Installing Components 8 Recommended Tools...8 Removing the Base Cover...8 Installing the Base Cover...9 Removing the Battery...10 Installing the Battery...11 Removing the Hard Drive...12 Installing the Hard Drive...14 Removing the WLAN Card...14 Installing the WLAN Card...15 ...26 Installing the Heatsink...26 Removing the I/O Board...27 Installing the I/O Board...27 Removing the Coin-Cell Battery...28 Installing the Coin-Cell Battery...28 Removing the Display Assembly...29 Installing the Display Assembly...30 Removing the Display Bezel...30 Installing the Display...

Dell Owners Manual
Page 4
Installing the System Board...38 Removing the Speakers...38 Installing the Speaker...39 Removing the Power Connector...40 Installing the Power Connector...41 3 System Setup...42 Boot Sequence...42 Navigation Keys...42 System Setup Options...43 Updating the BIOS ...51 System and Setup Password...52 Assigning a System Password and Setup Password 52 Deleting or Changing an Existing System and/or Setup Password 53 4 Diagnostics...54 Enhanced Pre-Boot System Assessment (ePSA) Diagnostics 54 Device Status Lights...55 Battery Status Lights...55 5 Specifications...56 6 Contacting Dell 61
Installing the System Board...38 Removing the Speakers...38 Installing the Speaker...39 Removing the Power Connector...40 Installing the Power Connector...41 3 System Setup...42 Boot Sequence...42 Navigation Keys...42 System Setup Options...43 Updating the BIOS ...51 System and Setup Password...52 Assigning a System Password and Setup Password 52 Deleting or Changing an Existing System and/or Setup Password 53 4 Diagnostics...54 Enhanced Pre-Boot System Assessment (ePSA) Diagnostics 54 Device Status Lights...55 Battery Status Lights...55 5 Specifications...56 6 Contacting Dell 61
Dell Owners Manual
Page 6
.... Using a mouse: and then select Shut down the operating system: • In Windows 8.1: - b. NOTE: To avoid damaging the system board, you must remove the main battery before opening the Charms menu and select Settings. Shut down . Select the Or and then select Shut down. * On the Home screen, touch the - Point... your computer and all open files and exit all attached devices from the computer. 5. Disconnect all network cables from their electrical outlets. 6. Remove the main battery. 8.
.... Using a mouse: and then select Shut down the operating system: • In Windows 8.1: - b. NOTE: To avoid damaging the system board, you must remove the main battery before opening the Charms menu and select Settings. Shut down . Select the Or and then select Shut down. * On the Home screen, touch the - Point... your computer and all open files and exit all attached devices from the computer. 5. Disconnect all network cables from their electrical outlets. 6. Remove the main battery. 8.

Dell Owners Manual
Page 7
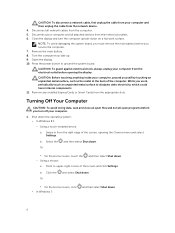
... system, press and hold the power button for about 6 seconds to your computer. Click Start . 2. Do not use only the battery designed for other Dell computers. 1. CAUTION: To connect a network cable, first plug the cable into the network device and then plug it into the computer... 2. Turn on your computer. Connect any replacement procedure, ensure you shut down your computer and all attached devices are turned off . Replace the battery. 4. 1. Click Start . 2. CAUTION: To avoid damage to their electrical outlets. 5. Click Shut Down. or 1. Ensure that the computer and...
... system, press and hold the power button for about 6 seconds to your computer. Click Start . 2. Do not use only the battery designed for other Dell computers. 1. CAUTION: To connect a network cable, first plug the cable into the network device and then plug it into the computer... 2. Turn on your computer. Connect any replacement procedure, ensure you shut down your computer and all attached devices are turned off . Replace the battery. 4. 1. Click Start . 2. CAUTION: To avoid damage to their electrical outlets. 5. Click Shut Down. or 1. Ensure that the computer and...

Dell Owners Manual
Page 10
Removing the Battery 1. b. Lift the battery partially at a 45-degree angle. 10 Tighten the screws that secures battery to the computer. 4. Remove base cover 3. Follow the procedures in the illustration: a. Perform the following steps as shown in Before Working Inside Your Computer.. 2. Lift the battery [2]. 4. Loosen the screw that securethe base cover to the computer [1]. 3. Follow the procedures in After Working Inside Your computer.
Removing the Battery 1. b. Lift the battery partially at a 45-degree angle. 10 Tighten the screws that secures battery to the computer. 4. Remove base cover 3. Follow the procedures in the illustration: a. Perform the following steps as shown in Before Working Inside Your Computer.. 2. Lift the battery [2]. 4. Loosen the screw that securethe base cover to the computer [1]. 3. Follow the procedures in After Working Inside Your computer.

Dell Owners Manual
Page 11
Place the battery in the picture to ensure proper connection after installation. 11 Remove the battery from the computer. Installing the Battery 1. 5. Press the location indicated in itsslots. 2.
Place the battery in the picture to ensure proper connection after installation. 11 Remove the battery from the computer. Installing the Battery 1. 5. Press the location indicated in itsslots. 2.

Dell Owners Manual
Page 12
Follow the procedures in the illustration: a. base cover b. Slide the hard drive from the computer [3]. 12 Removing the Hard Drive 1. battery c. Perform the following steps as shown in After Working Inside Your computer. battery 3. b. Follow the procedures in Before Working Inside Your Computer.. 2. Remove: a. Lift the hard drive partially at a 45-degree angle [2].. Install the base cover. 5. c. Tighten the screw to secure the battery to the computer [1]. Loosen the screw that secures the hard drive to the computer. 4. 3.
Follow the procedures in the illustration: a. base cover b. Slide the hard drive from the computer [3]. 12 Removing the Hard Drive 1. battery c. Perform the following steps as shown in After Working Inside Your computer. battery 3. b. Follow the procedures in Before Working Inside Your Computer.. 2. Remove: a. Lift the hard drive partially at a 45-degree angle [2].. Install the base cover. 5. c. Tighten the screw to secure the battery to the computer [1]. Loosen the screw that secures the hard drive to the computer. 4. 3.

Dell Owners Manual
Page 14
Place the hard drive on the computer. 3. base cover 6. Follow the procedures in the direction indicated [2]. battery 3. Install: a. battery b. c. base cover b. Lift the tab in Before Working Inside Your Computer. 2. Remove the WLAN card from the computer. 14 Follow the procedures in the illustration: a. ...
Place the hard drive on the computer. 3. base cover 6. Follow the procedures in the direction indicated [2]. battery 3. Install: a. battery b. c. base cover b. Lift the tab in Before Working Inside Your Computer. 2. Remove the WLAN card from the computer. 14 Follow the procedures in the illustration: a. ...

Dell Owners Manual
Page 15
... WLAN card to its slot on the WLAN Card. 3. Connect the WLAN antenna cables to the computer. 5. c. base cover b. battery 3. b. Removing the System Fan 1. Place the WLAN card in the illustration: a. battery b. Perform the following steps as shown in its connectors on the computer. 2. Tighten the screw that secures system fan [2]. base...
... WLAN card to its slot on the WLAN Card. 3. Connect the WLAN antenna cables to the computer. 5. c. base cover b. battery 3. b. Removing the System Fan 1. Place the WLAN card in the illustration: a. battery b. Perform the following steps as shown in its connectors on the computer. 2. Tighten the screw that secures system fan [2]. base...

Dell Owners Manual
Page 17
... cover b. Tighten the screw to secure the system fan to the computer. 5. Release the keyboard by prying the tabs on the computer. 2. Removing the Keyboard 1. battery 3. Route the cable to the slot. 4. Follow the procedures in After Working Inside Your computer. Install a. Place the system fan on its slots on the...
... cover b. Tighten the screw to secure the system fan to the computer. 5. Release the keyboard by prying the tabs on the computer. 2. Removing the Keyboard 1. battery 3. Route the cable to the slot. 4. Follow the procedures in After Working Inside Your computer. Install a. Place the system fan on its slots on the...

Dell Owners Manual
Page 23
Remove: a. keyboard 3. Base Cover Removing the Back Cover 1. battery c. Battery b. Flip the computer and remove the screw that secures palmrest assembly to complete the keyboard installation. 10. hard drive d. Press the locations indicated in Before Working Inside Your Computer. 2. system fan e. Follow the procedures in the picture to the system board. 23 9. Install: a. base cover b.
Remove: a. keyboard 3. Base Cover Removing the Back Cover 1. battery c. Battery b. Flip the computer and remove the screw that secures palmrest assembly to complete the keyboard installation. 10. hard drive d. Press the locations indicated in Before Working Inside Your Computer. 2. system fan e. Follow the procedures in the picture to the system board. 23 9. Install: a. base cover b.

Dell Owners Manual
Page 26
...in After Working Inside Your computer. hard drive d. back cover 3. Lift the heatsink from the computer [2]. back cover b. hard drive d. battery e. Remove: a. WLAN card e. system fan f. Loosen the screws that secure theheat sink to the computer. 3. Installing the Heatsink 1. .... 2. Removing the Heatsink 1. system fan c. keyboard c. Install: a. keyboard b. 9. Install: a. base cover 10. base cover b. battery c. keyboard g. Perform the following steps as shown in its slot on computer. 2. b. Place the heatsink in the illustration: a. system fan d.
...in After Working Inside Your computer. hard drive d. back cover 3. Lift the heatsink from the computer [2]. back cover b. hard drive d. battery e. Remove: a. WLAN card e. system fan f. Loosen the screws that secure theheat sink to the computer. 3. Installing the Heatsink 1. .... 2. Removing the Heatsink 1. system fan c. keyboard c. Install: a. keyboard b. 9. Install: a. base cover 10. base cover b. battery c. keyboard g. Perform the following steps as shown in its slot on computer. 2. b. Place the heatsink in the illustration: a. system fan d.

Dell Owners Manual
Page 27
e. Follow the procedures in the illustration: a. hard drive d. keyboard c. battery g. base cover 27 base cover 4. battery c. back cover b. system fan d. hard drive f. Perform the following steps as shown in After Working Inside Your computer. WLAN card e. hard drive f. Follow the procedures ... the computer. 3. base cover b. system fan f. keyboard g. Remove the screw that secures the I /O board to the system board [1]. Place the I /O board from the system board [2]. battery g.
e. Follow the procedures in the illustration: a. hard drive d. keyboard c. battery g. base cover 27 base cover 4. battery c. back cover b. system fan d. hard drive f. Perform the following steps as shown in After Working Inside Your computer. WLAN card e. hard drive f. Follow the procedures ... the computer. 3. base cover b. system fan f. keyboard g. Remove the screw that secures the I /O board to the system board [1]. Place the I /O board from the system board [2]. battery g.

Dell Owners Manual
Page 28
... the coin-cell cable from the computer [2]. Connect the coin-cell battery cable to the computer.. 3. back cover b. 4. battery c. Installing the Coin-Cell Battery 1. Place the Coin-cell battery on the computer. 2. battery g. Remove: a. hard drive d. Install: a. Follow the procedures ...the procedures in the illustration: a. keyboard c. WLAN card e. hard drive f. Removing the Coin-Cell Battery 1. back cover 3. WLAN card e. Lift the coin-cell battery from the computer [1] b. Perform the following steps as shown in After Working Inside Your computer. ...
... the coin-cell cable from the computer [2]. Connect the coin-cell battery cable to the computer.. 3. back cover b. 4. battery c. Installing the Coin-Cell Battery 1. Place the Coin-cell battery on the computer. 2. battery g. Remove: a. hard drive d. Install: a. Follow the procedures ...the procedures in the illustration: a. keyboard c. WLAN card e. hard drive f. Removing the Coin-Cell Battery 1. back cover 3. WLAN card e. Lift the coin-cell battery from the computer [1] b. Perform the following steps as shown in After Working Inside Your computer. ...

Dell Owners Manual
Page 29
battery c. hard drive d. Loosen the screw that secures the display assembly [2]. 4. system fan f. Disconnect the display assembly cable from the computer. 29 Removing the Display Assembly 1. WLAN card e. base cover b. keyboard g. Lift the display assembly from the computer [1] b. Follow the procedures in the illustration: a. Remove: a. back cover 3. Perform the following steps as shown in Before Working Inside Your Computer. 2.
battery c. hard drive d. Loosen the screw that secures the display assembly [2]. 4. system fan f. Disconnect the display assembly cable from the computer. 29 Removing the Display Assembly 1. WLAN card e. base cover b. keyboard g. Lift the display assembly from the computer [1] b. Follow the procedures in the illustration: a. Remove: a. back cover 3. Perform the following steps as shown in Before Working Inside Your Computer. 2.

Dell Owners Manual
Page 30
... Inside Your Computer. 2. Remove: a. display assembly 3. Installing the Display Assembly 1. Install: a. base cover 6. base cover b. Pry right side of the hinge cover. 30 system fan d. battery c. WLAN card e. system fan f. keyboard g. Connect the display assembly cable to the computer. 3. keyboard c. hard drive d. WLAN card e. Removing the Display Bezel 1. Follow the procedures...
... Inside Your Computer. 2. Remove: a. display assembly 3. Installing the Display Assembly 1. Install: a. base cover 6. base cover b. Pry right side of the hinge cover. 30 system fan d. battery c. WLAN card e. system fan f. keyboard g. Connect the display assembly cable to the computer. 3. keyboard c. hard drive d. WLAN card e. Removing the Display Bezel 1. Follow the procedures...

Dell Owners Manual
Page 32
... in the illustration: a. base cover b. display assembly b. Remove: a. hard drive d. Installing the Display Bezel 1. Connect the display assembly cable. 3. system fan e. battery h. Removing the Display Panel 1. system fan f. display assembly h. battery c. hard drive g. display bezel 3. Loosen the screws that secure the display panel [1] 32 Align the display bezel in place and snap...
... in the illustration: a. base cover b. display assembly b. Remove: a. hard drive d. Installing the Display Bezel 1. Connect the display assembly cable. 3. system fan e. battery h. Removing the Display Panel 1. system fan f. display assembly h. battery c. hard drive g. display bezel 3. Loosen the screws that secure the display panel [1] 32 Align the display bezel in place and snap...

Dell Owners Manual
Page 34
back cover d. keyboard e. battery i. base cover 6. hard drive d. Connect the display cable to the display assembly. 5. system fan f. Remove: a. Install: a. hard drive h. display assembly 34 display bezel b. WLAN card e. ... b. WLAN card g. Installing the Display panel 1. Follow the procedures in After Working Inside Your computer. system fan f. Affix the tape to secure the display cable. 3. battery c.
back cover d. keyboard e. battery i. base cover 6. hard drive d. Connect the display cable to the display assembly. 5. system fan f. Remove: a. Install: a. hard drive h. display assembly 34 display bezel b. WLAN card e. ... b. WLAN card g. Installing the Display panel 1. Follow the procedures in After Working Inside Your computer. system fan f. Affix the tape to secure the display cable. 3. battery c.

Dell Owners Manual
Page 35
... 1. Remove: a. Loosen the screws that secure the display hinge [1]. Installing the Display Hinge 1. WLAN card h. Follow the procedures in the illustration: a. Lift the display hinge [2]. battery 35 b. system fan g. Tighten the screws to secure the display hinges to the display assembly. 3. base cover 4. base cover b. h. hard drive i. back cover e. Place the...
... 1. Remove: a. Loosen the screws that secure the display hinge [1]. Installing the Display Hinge 1. WLAN card h. Follow the procedures in the illustration: a. Lift the display hinge [2]. battery 35 b. system fan g. Tighten the screws to secure the display hinges to the display assembly. 3. base cover 4. base cover b. h. hard drive i. back cover e. Place the...

Dell Owners Manual
Page 36
Lift and remove the camera from the connector on the camera module [1] b. Connect the camera cable to the connector on the computer. 3. battery c. Removing the System Board 1. hard drive d. back cover h. heatsink 3. Perform the following steps as shown in its position on the camera module. 2. Lift the locking ... the display assembly [2]. c. display bezel 3. Perform the following steps as shown in the illustration: a. Follow the procedures in Before Working Inside Your Computer. 2. base cover b. battery c. WLAN card e. system fan f.
Lift and remove the camera from the connector on the camera module [1] b. Connect the camera cable to the connector on the computer. 3. battery c. Removing the System Board 1. hard drive d. back cover h. heatsink 3. Perform the following steps as shown in its position on the camera module. 2. Lift the locking ... the display assembly [2]. c. display bezel 3. Perform the following steps as shown in the illustration: a. Follow the procedures in Before Working Inside Your Computer. 2. base cover b. battery c. WLAN card e. system fan f.


