

Handling swollen Lithium-ion batteries
Page 1
... warranty or service contract, including options for replacement by Dell), to work with transportation regulations or disposed at https://www.dell.com/support for options to malfunction, discontinue the use tools of their respective owners. When the system will no longer power on or against the battery. ● If a battery gets stuck in a device as a result of swelling, do not try to free it as...
... warranty or service contract, including options for replacement by Dell), to work with transportation regulations or disposed at https://www.dell.com/support for options to malfunction, discontinue the use tools of their respective owners. When the system will no longer power on or against the battery. ● If a battery gets stuck in a device as a result of swelling, do not try to free it as...

Owners Manual
Page 4
... facing camera...39 Removing world facing camera...39 Installing world facing camera...39 Palm rest...40 Replacing the palm rest...40 4 Technical specifications...42 Processor...42 Memory...42 Storage...43 Audio specifications...43 Video...43 Camera...43 Communications...44 Ports and connectors...44 Display...44 Keyboard...45 Touchpad...45 Battery...45 Power adapter...46 Dimensions and weight...46 5 Technology and components...47 DDR4...47 USB features...48 HDMI 1.4...50 6 System setup options...51 Boot...
... facing camera...39 Removing world facing camera...39 Installing world facing camera...39 Palm rest...40 Replacing the palm rest...40 4 Technical specifications...42 Processor...42 Memory...42 Storage...43 Audio specifications...43 Video...43 Camera...43 Communications...44 Ports and connectors...44 Display...44 Keyboard...45 Touchpad...45 Battery...45 Power adapter...46 Dimensions and weight...46 5 Technology and components...47 DDR4...47 USB features...48 HDMI 1.4...50 6 System setup options...51 Boot...

Owners Manual
Page 5
... screen options...57 Virtualization support screen options...58 Wireless screen options...58 Maintenance screen options...58 System logs screen options...58 SupportAssist system resolution...59 Updating the BIOS in Windows ...59 System and setup password...59 Assigning a system setup password...60 Deleting or changing an existing system setup password 60 7 Software...61 Operating system configurations...61 Downloading drivers...61 8 Troubleshooting...62 Enhanced Pre-Boot System Assessment - ePSA diagnostics 62 Running the ePSA Diagnostics...62 Real Time Clock reset...62 9 Contacting Dell...
... screen options...57 Virtualization support screen options...58 Wireless screen options...58 Maintenance screen options...58 System logs screen options...58 SupportAssist system resolution...59 Updating the BIOS in Windows ...59 System and setup password...59 Assigning a system setup password...60 Deleting or changing an existing system setup password 60 7 Software...61 Operating system configurations...61 Downloading drivers...61 8 Troubleshooting...62 Enhanced Pre-Boot System Assessment - ePSA diagnostics 62 Running the ePSA Diagnostics...62 Real Time Clock reset...62 9 Contacting Dell...

Owners Manual
Page 12
... shock, but the tracing is a major concern when you remove all network cables, telephone, and telecommunications lines from the system. • Use an ESD field service kit when working inside any notebook to avoid electrostatic discharge (ESD) damage. • After removing any disassembly instructions. Unplugging, pressing and holding the power button for lower power requirements and increased density, ESD protection is an increasing...
... shock, but the tracing is a major concern when you remove all network cables, telephone, and telecommunications lines from the system. • Use an ESD field service kit when working inside any notebook to avoid electrostatic discharge (ESD) damage. • After removing any disassembly instructions. Unplugging, pressing and holding the power button for lower power requirements and increased density, ESD protection is an increasing...

Owners Manual
Page 13
... should be removed from internal parts that technicians keep ESD sensitive devices, such as replacement parts or parts to be shipped and received in a rack within a data center; On the work area that is free of insulators that they do not have one. All ESD-sensitive devices must be used service kit. However, you discharge static electricity from all field service technicians use wireless wrist...
... should be removed from internal parts that technicians keep ESD sensitive devices, such as replacement parts or parts to be shipped and received in a rack within a data center; On the work area that is free of insulators that they do not have one. All ESD-sensitive devices must be used service kit. However, you discharge static electricity from all field service technicians use wireless wrist...

Owners Manual
Page 14
... RJ45 port, disconnect the network cable by periodically touching an unpainted metal surface at the same time as a port replicator or media base, and replace any installed ExpressCards or Smart Cards from their electrical outlets. 4. Do not use only the battery designed for this particular Dell computer. Connect any external devices, cards, and cables before performing Step # 8. Connect your computer and all network cables from the electrical outlet before turning on...
... RJ45 port, disconnect the network cable by periodically touching an unpainted metal surface at the same time as a port replicator or media base, and replace any installed ExpressCards or Smart Cards from their electrical outlets. 4. Do not use only the battery designed for this particular Dell computer. Connect any external devices, cards, and cables before performing Step # 8. Connect your computer and all network cables from the electrical outlet before turning on...

Owners Manual
Page 19
... battery. 4. Disassembly and reassembly 19 Hold the sides of the keyboard using a plastic scribe or screwdriver [2]. 5. Connect the battery cable to the release the keyboard. Install the: a) base cover 6. Follow the procedure in Before working inside your computer. Pry the bottom of the palm rest securely while pushing into the two release holes using a plastic scribe to the connector on the system board [1]. 4. Remove...
... battery. 4. Disassembly and reassembly 19 Hold the sides of the keyboard using a plastic scribe or screwdriver [2]. 5. Connect the battery cable to the release the keyboard. Install the: a) base cover 6. Follow the procedure in Before working inside your computer. Pry the bottom of the palm rest securely while pushing into the two release holes using a plastic scribe to the connector on the system board [1]. 4. Remove...
Owners Manual
Page 45
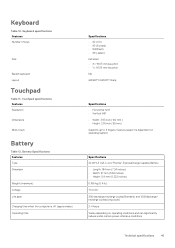
Touchpad specifications Features Resolution Dimensions Multi-touch Battery Table 12. Keyboard Table 10. Battery Specifications Features Type Dimension Weight (maximum) Voltage Life span Charging time when the computer is dependent on operating conditions and can significantly reduce under certain power-intensive conditions Technical specifications 45 Gesture support is off (approximate) Operating time Specifications • 82 (US) • 83 (Europe) • 84(Brazil) • 86 (Japan) Full...
Touchpad specifications Features Resolution Dimensions Multi-touch Battery Table 12. Keyboard Table 10. Battery Specifications Features Type Dimension Weight (maximum) Voltage Life span Charging time when the computer is dependent on operating conditions and can significantly reduce under certain power-intensive conditions Technical specifications 45 Gesture support is off (approximate) Operating time Specifications • 82 (US) • 83 (Europe) • 84(Brazil) • 86 (Japan) Full...

Owners Manual
Page 48
... board and not a replaceable DIMM as shown and referred. It dramatically simplified the connection between host computers and peripheral devices like mice, keyboards, external drivers, and printers. While the specification retains Hi-Speed, and Full-Speed USB mode, commonly known as in the PC world with a theoretically 10 times faster than its predecessor. Troubleshoot for possible memory failure by trying known good memory modules...
... board and not a replaceable DIMM as shown and referred. It dramatically simplified the connection between host computers and peripheral devices like mice, keyboards, external drivers, and printers. While the specification retains Hi-Speed, and Full-Speed USB mode, commonly known as in the PC world with a theoretically 10 times faster than its predecessor. Troubleshoot for possible memory failure by trying known good memory modules...

Owners Manual
Page 50
... display and source devices, enabling a TV to take full advantage of content types between any compatible digital audio/video source, such as a DVD player, or A/V receiver and a compatible digital audio and/or video monitor, such as a DVD player) and the DTV, enabling new functionality 50 Technology and components HDMI supports standard, enhanced, or high-definition video, plus multichannel digital audio on content type • Additional Color Spaces - Allows an HDMI-connected...
... display and source devices, enabling a TV to take full advantage of content types between any compatible digital audio/video source, such as a DVD player, or A/V receiver and a compatible digital audio and/or video monitor, such as a DVD player) and the DTV, enabling new functionality 50 Technology and components HDMI supports standard, enhanced, or high-definition video, plus multichannel digital audio on content type • Additional Color Spaces - Allows an HDMI-connected...
Owners Manual
Page 51
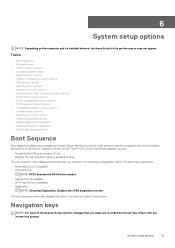
... Dell logo appears, you can boot from including the diagnostic option. The boot sequence screen also displays the option to a specific device (for example: optical drive or hard drive). During the Power-on the computer and its installed devices, the items listed in Windows • System and setup password Boot Sequence Boot sequence enables you make are : • Removable Drive (if available) • STXXXX Drive NOTE: XXXX denotes the SATA drive number. • Optical Drive (if available) • SATA Hard Drive...
... Dell logo appears, you can boot from including the diagnostic option. The boot sequence screen also displays the option to a specific device (for example: optical drive or hard drive). During the Power-on the computer and its installed devices, the items listed in Windows • System and setup password Boot Sequence Boot sequence enables you make are : • Removable Drive (if available) • STXXXX Drive NOTE: XXXX denotes the SATA drive number. • Optical Drive (if available) • SATA Hard Drive...
Owners Manual
Page 52
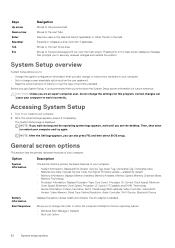
..., Video BIOS Version, Video Memory, Panel Type, Native Resolution, Audio Controller, Wi-Fi Device, Bluetooth Device Battery Information Boot Sequence Displays the battery status health and whether the AC adapter is recommended that prompts you to work incorrectly. General screen options This section lists the primary hardware features of your computer. CAUTION: Unless you write down list, if applicable. The System Setup page is displayed. Accessing System Setup 1. Moves to find an operating system. • Windows Boot Manager ( Default) • Boot List Option...
..., Video BIOS Version, Video Memory, Panel Type, Native Resolution, Audio Controller, Wi-Fi Device, Bluetooth Device Battery Information Boot Sequence Displays the battery status health and whether the AC adapter is recommended that prompts you to work incorrectly. General screen options This section lists the primary hardware features of your computer. CAUTION: Unless you write down list, if applicable. The System Setup page is displayed. Accessing System Setup 1. Moves to find an operating system. • Windows Boot Manager ( Default) • Boot List Option...
Owners Manual
Page 53
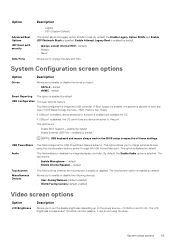
...; User-Facing Webcam (default enabled) • World-Facing Camera (default enabled) Video screen options Option LCD Brightness Description Allows you to boot any device attached to enable or disable the drives on the power source-On Battery and On AC. By default, the Enable Legacy Option ROMs and Enable UEFI Network Stack is selected. System Configuration screen options Option Description Drives Allows you to load. The options are : • Enable Boot Support-enabled by default • Enable External USB Port-enabled by default. If USB port is allowed to charge...
...; User-Facing Webcam (default enabled) • World-Facing Camera (default enabled) Video screen options Option LCD Brightness Description Allows you to boot any device attached to enable or disable the drives on the power source-On Battery and On AC. By default, the Enable Legacy Option ROMs and Enable UEFI Network Stack is selected. System Configuration screen options Option Description Drives Allows you to load. The options are : • Enable Boot Support-enabled by default • Enable External USB Port-enabled by default. If USB port is allowed to charge...
Owners Manual
Page 54
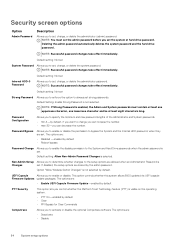
... the setup options are : • Enable UEFI Capsule Firmware Update-enabled by default PTT Security This option lets you control whether the Platform Trust Technology feature (PTT) is set , change , or delete the administrator (admin) password. Option "Allow Wireless Switch Changes" is enabled, the Admin and System passwords must set the admin password before you to set the system or hard drive password. Security screen options Option Admin Password Description Allows you to enable or disable. Default Setting: Enable Strong Password is selected. Default setting: Allow...
... the setup options are : • Enable UEFI Capsule Firmware Update-enabled by default PTT Security This option lets you control whether the Platform Trust Technology feature (PTT) is set , change , or delete the administrator (admin) password. Option "Allow Wireless Switch Changes" is enabled, the Admin and System passwords must set the admin password before you to set the system or hard drive password. Security screen options Option Admin Password Description Allows you to enable or disable. Default Setting: Enable Strong Password is selected. Default setting: Allow...
Owners Manual
Page 55
... further changes will be allowed. Option Description • Activate-enabled by default • KEK • db • dbx If you enable the Custom Mode, the relevant options for running code/storing sensitive information in Custom Mode. Enable CPU XD Support-enabled by default This option enables or disables additional UEFI SMM Mitigation protections. The options are erased and the keys restore to prevent users from entering Setup when an Administrator password is set. Secure Boot screen options Option Secure Boot Enable Expert Key Management...
... further changes will be allowed. Option Description • Activate-enabled by default • KEK • db • dbx If you enable the Custom Mode, the relevant options for running code/storing sensitive information in Custom Mode. Enable CPU XD Support-enabled by default This option enables or disables additional UEFI SMM Mitigation protections. The options are erased and the keys restore to prevent users from entering Setup when an Administrator password is set. Secure Boot screen options Option Secure Boot Enable Expert Key Management...
Owners Manual
Page 57
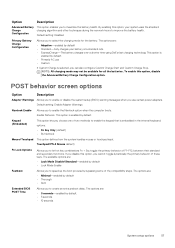
... AC use certain power adapters. NOTE: All charging mode may not be available for the battery. options: • Fn Key Only (default) • By Numlock Mouse/Touchpad This option defines how the system handles mouse or touchpad input. This option is embedded in the internal keyboard; Default setting: Enable Adapter Warnings Numlock Enable Allows you choose one of the compatibility steps. Keypad (Embedded) This option lets you to maximize the battery health. Default setting: Disabled Primary Battery Charge Configuration Allows...
... AC use certain power adapters. NOTE: All charging mode may not be available for the battery. options: • Fn Key Only (default) • By Numlock Mouse/Touchpad This option defines how the system handles mouse or touchpad input. This option is embedded in the internal keyboard; Default setting: Enable Adapter Warnings Numlock Enable Allows you choose one of the compatibility steps. Keypad (Embedded) This option lets you to maximize the battery health. Default setting: Disabled Primary Battery Charge Configuration Allows...
Owners Manual
Page 58
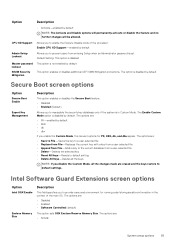
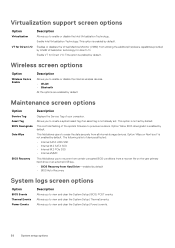
... clear the System Setup (Power) events. 58 System setup options Maintenance screen options Option Service Tag Asset Tag BIOS Downgrade Data Wipe BIOS Recovery Description Displays the Service Tag of devices affected: • Internal SATA HDD/SSD • Internal M.2 SATA SDD • Internal M.2 PCIe SSD • Internal eMMC This field allows you to enable or disable the Intel Virtualization Technology. Option 'Wipe on the user primary hard drive or an external USB key. • BIOS Recovery from utilizing the additional hardware capabilities provided by default...
... clear the System Setup (Power) events. 58 System setup options Maintenance screen options Option Service Tag Asset Tag BIOS Downgrade Data Wipe BIOS Recovery Description Displays the Service Tag of devices affected: • Internal SATA HDD/SSD • Internal M.2 SATA SDD • Internal M.2 PCIe SSD • Internal eMMC This field allows you to enable or disable the Intel Virtualization Technology. Option 'Wipe on the user primary hard drive or an external USB key. • BIOS Recovery from utilizing the additional hardware capabilities provided by default...

Owners Manual
Page 59
... model and the Product Support page of security for Dell OS Recovery Tool. • OFF •1 • 2 (default) •3 Updating the BIOS in the Please select your download method below window, click Download File. System and setup password Table 16. CAUTION: The password features provide a basic level of your computer battery is fully charged and connected to updating the system BIOS, and then re enabled after the BIOS update is not locked...
... model and the Product Support page of security for Dell OS Recovery Tool. • OFF •1 • 2 (default) •3 Updating the BIOS in the Please select your download method below window, click Download File. System and setup password Table 16. CAUTION: The password features provide a basic level of your computer battery is fully charged and connected to updating the system BIOS, and then re enabled after the BIOS update is not locked...
Owners Manual
Page 61
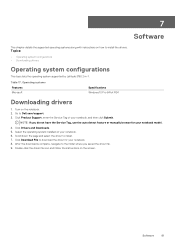
... Download File to Dell.com/support. 3. Operating systems Features Microsoft Specifications Windows 10 Pro 64 bit RS4 Downloading drivers 1. After the download is complete, navigate to the folder where you do not have the Service Tag, use the auto detect feature or manually browse for your notebook model. 4. Software 61 Click Product Support, enter the Service Tag of your notebook. 6. Click Drivers and Downloads. 5. Double-click the driver file icon and follow the instructions...
... Download File to Dell.com/support. 3. Operating systems Features Microsoft Specifications Windows 10 Pro 64 bit RS4 Downloading drivers 1. After the download is complete, navigate to the folder where you do not have the Service Tag, use the auto detect feature or manually browse for your notebook model. 4. Software 61 Click Product Support, enter the Service Tag of your notebook. 6. Click Drivers and Downloads. 5. Double-click the driver file icon and follow the instructions...
Owners Manual
Page 62
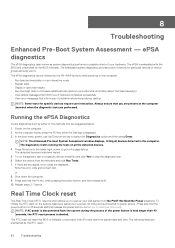
... Troubleshooting In the boot menu screen, use Up/Down arrow key to reset real time clock. The diagnostics starts running the tests on all devices detected in an interactive mode • Repeat tests • Display or save test results • Run thorough tests to introduce additional test options to recover your hardware. Real Time Clock reset The Real Time Clock (RTC) reset function allows you of your Dell...
... Troubleshooting In the boot menu screen, use Up/Down arrow key to reset real time clock. The diagnostics starts running the tests on all devices detected in an interactive mode • Repeat tests • Display or save test results • Run thorough tests to introduce additional test options to recover your hardware. Real Time Clock reset The Real Time Clock (RTC) reset function allows you of your Dell...


