Setup and Features Information Tech Sheet
Page 1
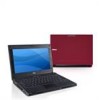
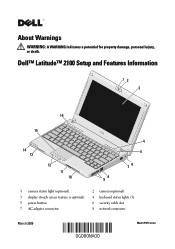
Dell™ Latitude™ 2100 Setup and Features Information 12 3 16 15 14 13 12 11 10 4 5 76 98 1 camera status light (optional) 3 display (touch screen feature is optional) 5 power button 7 AC adapter connector 2 camera (optional) 4 keyboard status lights (3) 6 security cable slot 8 network connector March 2009 Model P02T series About Warnings WARNING: A WARNING indicates a potential for property damage, personal injury, or death.
Dell™ Latitude™ 2100 Setup and Features Information 12 3 16 15 14 13 12 11 10 4 5 76 98 1 camera status light (optional) 3 display (touch screen feature is optional) 5 power button 7 AC adapter connector 2 camera (optional) 4 keyboard status lights (3) 6 security cable slot 8 network connector March 2009 Model P02T series About Warnings WARNING: A WARNING indicates a potential for property damage, personal injury, or death.

Setup and Features Information Tech Sheet
Page 3
...not order them. 1 Connect the AC adapter to the AC adapter connector on the computer. For additional best practices information, see www.dell.com/regulatory_compliance. NOTE: It is recommended that you install any of the connector on and shut down your computer. CAUTION: When you...connect the computer to a docking device or other external device, such as a mouse or keyboard (optional). 4 Open the computer display and press the power button to turn on the portable computer and to the electrical outlet. 2 Connect the network cable (optional). 3 Connect USB devices, such as a...
...not order them. 1 Connect the AC adapter to the AC adapter connector on the computer. For additional best practices information, see www.dell.com/regulatory_compliance. NOTE: It is recommended that you install any of the connector on and shut down your computer. CAUTION: When you...connect the computer to a docking device or other external device, such as a mouse or keyboard (optional). 4 Open the computer display and press the power button to turn on the portable computer and to the electrical outlet. 2 Connect the network cable (optional). 3 Connect USB devices, such as a...
Setup and Features Information Tech Sheet
Page 5
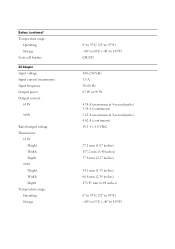
Battery (continued) Temperature range: Operating Storage Coin-cell battery AC Adapter Input voltage Input current (maximum) Input frequency Output power Output current : 65 W 90 W Rated output voltage Dimensions: 65 W Height Width Depth 90 W Height Width Depth Temperature range: Operating Storage 0° to 35°C (32&#...
Battery (continued) Temperature range: Operating Storage Coin-cell battery AC Adapter Input voltage Input current (maximum) Input frequency Output power Output current : 65 W 90 W Rated output voltage Dimensions: 65 W Height Width Depth 90 W Height Width Depth Temperature range: Operating Storage 0° to 35°C (32&#...
Dell™ Mobile Computing Station
Page 2
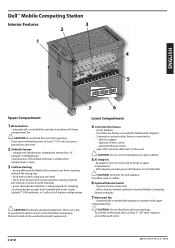
...without adult supervision. Dell™ Mobile Computing Station Interior Features 3 2 1 4 5 ENGLISH 7 6 Upper Compartment 1 Motorized Fan • automatically-controlled fan operates in tandem with netbooks • green tab indicates netbook is seated properly for twenty-four 10" Latitude™ 2100 Netbooks • ...; dock profile matches Netbook to Controller Box. To prevent overheating, leave at front of each dock ensures positive seating of power and network connectors with lower compartment fan CAUTION: Do not block fans and vent openings. This is open outlet(s). 5 AC...
...without adult supervision. Dell™ Mobile Computing Station Interior Features 3 2 1 4 5 ENGLISH 7 6 Upper Compartment 1 Motorized Fan • automatically-controlled fan operates in tandem with netbooks • green tab indicates netbook is seated properly for twenty-four 10" Latitude™ 2100 Netbooks • ...; dock profile matches Netbook to Controller Box. To prevent overheating, leave at front of each dock ensures positive seating of power and network connectors with lower compartment fan CAUTION: Do not block fans and vent openings. This is open outlet(s). 5 AC...
Dell™ Mobile Computing Station
Page 3
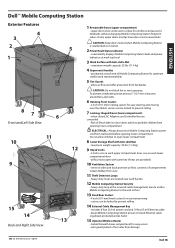
... Computing Station for easy access • wire guard protects the router from fan blades CAUTION: Do not block fan or vent openings. ENGLISH Dell™ Mobile Computing Station Exterior Features 4 3 2 5 1 87 6 Front and Left Side View 11 10 12 9 15 14 13...; 4 inch (101 mm) rotating casters for unobstructed access to prohibit children from opening lower compartment ELECTRICAL: Always disconnect Mobile Computing Station power cord from wall outlet before opening lower compartment. casters can be locked to prevent rolling 7 Locking, Hinged Doors (lower compartment) •...
... Computing Station for easy access • wire guard protects the router from fan blades CAUTION: Do not block fan or vent openings. ENGLISH Dell™ Mobile Computing Station Exterior Features 4 3 2 5 1 87 6 Front and Left Side View 11 10 12 9 15 14 13...; 4 inch (101 mm) rotating casters for unobstructed access to prohibit children from opening lower compartment ELECTRICAL: Always disconnect Mobile Computing Station power cord from wall outlet before opening lower compartment. casters can be locked to prevent rolling 7 Locking, Hinged Doors (lower compartment) •...
Dell™ Mobile Computing Station
Page 4
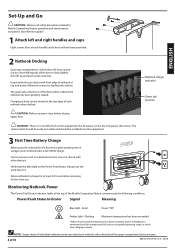
... the Mobile Computing Station communicate the following conditions. The socket outlet should be easily accessible and should be viewed at the work top. Power/Fault Status Indicator Signal Meaning Blue light - Verify that the blue light on netbooks when docked and the upper compartment doors are open....be installed near the equipment. 3 First Time Battery Charge Before using the netbooks for at which time charging resumes. Solid Power "ON" Amber light - the AC power cord is no on/off switch on this reference guide! 1 Attach left and right handles and caps Eight screws (four...
... the Mobile Computing Station communicate the following conditions. The socket outlet should be easily accessible and should be viewed at the work top. Power/Fault Status Indicator Signal Meaning Blue light - Verify that the blue light on netbooks when docked and the upper compartment doors are open....be installed near the equipment. 3 First Time Battery Charge Before using the netbooks for at which time charging resumes. Solid Power "ON" Amber light - the AC power cord is no on/off switch on this reference guide! 1 Attach left and right handles and caps Eight screws (four...
Dell™ Mobile Computing Station
Page 5
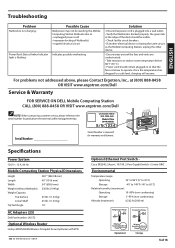
...40° to 149°F (-40° to operate. For problems not addressed above, please Contact Ergotron, Inc., at the edge of 16 Specifications Power System 120 V~, 12 A, 60 Hz Mobile Computing Station Physical Dimensions Height Length Width Weight (without Netbooks) Weight Capacity Top Surface Lower Shelf Tip Test/... mm) 24" (609.6 mm) 230 lbs (104 kg) 25 lbs (11.34 kg) 25 lbs (11.34 kg) 10° AC Adapters (25) Dell Part Number: UU572 Optional Wireless Router Linksys WRVS4400N Wireless-N Gigabit Security Router with VPN 888-24-078-W-06 rev.G • 08/09 Optionsl Ethernet Port...
...40° to 149°F (-40° to operate. For problems not addressed above, please Contact Ergotron, Inc., at the edge of 16 Specifications Power System 120 V~, 12 A, 60 Hz Mobile Computing Station Physical Dimensions Height Length Width Weight (without Netbooks) Weight Capacity Top Surface Lower Shelf Tip Test/... mm) 24" (609.6 mm) 230 lbs (104 kg) 25 lbs (11.34 kg) 25 lbs (11.34 kg) 10° AC Adapters (25) Dell Part Number: UU572 Optional Wireless Router Linksys WRVS4400N Wireless-N Gigabit Security Router with VPN 888-24-078-W-06 rev.G • 08/09 Optionsl Ethernet Port...

Dell™ Mobile Computing Station
Page 6
Disconnect power and Ethernet cords from the top surface and lower shelf 5. Unlock casters 6. CAUTION: Do Not block fans and vent openings. To prevent overheating, leave at ...
Disconnect power and Ethernet cords from the top surface and lower shelf 5. Unlock casters 6. CAUTION: Do Not block fans and vent openings. To prevent overheating, leave at ...
Dell™ Mobile Computing Station
Page 7
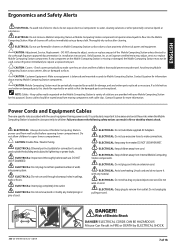
... Do not drive, drag or place objects over cord. CAUTION: Adjustment, Service, Replacement - Check casters periodically to lightening or power faults. CAUTION: Customer Equipment- Do not allow liquids to remove from moving components with the use excessive force to observe the ... Keep cables neatly organized on Mobile Computing Station surfaces due to Mobile Computing Station. ELECTRICAL: Always disconnect Mobile Computing Station power cord from cord. Risk of solutions are specific risks associated with cable clips. Make sure equipment is located in...
... Do not drive, drag or place objects over cord. CAUTION: Adjustment, Service, Replacement - Check casters periodically to lightening or power faults. CAUTION: Customer Equipment- Do not allow liquids to remove from moving components with the use excessive force to observe the ... Keep cables neatly organized on Mobile Computing Station surfaces due to Mobile Computing Station. ELECTRICAL: Always disconnect Mobile Computing Station power cord from cord. Risk of solutions are specific risks associated with cable clips. Make sure equipment is located in...

Dell™ Mobile Computing Station
Page 8
Warranty 3 years for mechanical components and functions / 1 year for electrical components and functions. All 3rd party components (Optional Ethernet Switch, Optional Wireless Router, Dell Power Cables, and AC Adapters) will follow the warranty as defined by the manufacturer. CUSTOM SOLUTION FOR DELL BY ERGOTRON FOR SERVICE CALL (800) 888-8458 OR VISIT www.ergotron.com/Dell 8 of 16 888-24-078-W-06 rev.G • 08/09 ENGLISH
Warranty 3 years for mechanical components and functions / 1 year for electrical components and functions. All 3rd party components (Optional Ethernet Switch, Optional Wireless Router, Dell Power Cables, and AC Adapters) will follow the warranty as defined by the manufacturer. CUSTOM SOLUTION FOR DELL BY ERGOTRON FOR SERVICE CALL (800) 888-8458 OR VISIT www.ergotron.com/Dell 8 of 16 888-24-078-W-06 rev.G • 08/09 ENGLISH
Service Manual
Page 3
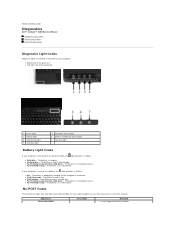
... lock light are located in two areas of your computer: l Bottom left of the palm rest l Top right side of the keyboard 1 power light 3 battery light 5 numeric key light 7 scroll lock light 2 hard drive activity light 4 wireless networking activity light 6 caps lock light... fully charged. The battery is in a fatal failure. l Fast flashing orange - l Flashing blue - Back to Contents Page Diagnostics Dell™ Latitude™ 2100 Service Manual Diagnostic Light Codes Battery Light Codes No-POST Light Codes Diagnostic Light Codes Diagnostic lights are also used to an electrical outlet...
... lock light are located in two areas of your computer: l Bottom left of the palm rest l Top right side of the keyboard 1 power light 3 battery light 5 numeric key light 7 scroll lock light 2 hard drive activity light 4 wireless networking activity light 6 caps lock light... fully charged. The battery is in a fatal failure. l Fast flashing orange - l Flashing blue - Back to Contents Page Diagnostics Dell™ Latitude™ 2100 Service Manual Diagnostic Light Codes Battery Light Codes No-POST Light Codes Diagnostic Light Codes Diagnostic lights are also used to an electrical outlet...
Service Manual
Page 5
Back to Contents Page Adding and Replacing Parts Dell™ Latitude™ 2100 Service Manual Battery Access Panel Coin-Cell Battery Heat Sink Hard Drive Bracket Display Bezel Display Panel Display Brackets DC Power Cable Hinge Cover Keyboard Memory WLAN Card Hard Drive Display Assembly Display LED Board Display Cable Display Hinges System Board Internal Card With Bluetooth® Wireless Technology Back to Contents Page
Back to Contents Page Adding and Replacing Parts Dell™ Latitude™ 2100 Service Manual Battery Access Panel Coin-Cell Battery Heat Sink Hard Drive Bracket Display Bezel Display Panel Display Brackets DC Power Cable Hinge Cover Keyboard Memory WLAN Card Hard Drive Display Assembly Display LED Board Display Cable Display Hinges System Board Internal Card With Bluetooth® Wireless Technology Back to Contents Page
Service Manual
Page 10
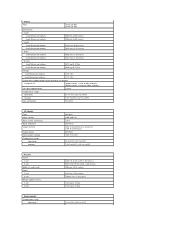
... 65°C (14° to 149°F) Coin-cell battery CR-2032 AC Adapter Type Input voltage Input current (maximum) Input frequency Output current Output power Rated output voltage Temperature range: Operating Storage 65 Watt 100-240 VAC 1.5 A 50-60 Hz 4.34 A (maximum at 4-sec pulse) 3.34 A (continuous) 65 Watts 19...
... 65°C (14° to 149°F) Coin-cell battery CR-2032 AC Adapter Type Input voltage Input current (maximum) Input frequency Output current Output power Rated output voltage Temperature range: Operating Storage 65 Watt 100-240 VAC 1.5 A 50-60 Hz 4.34 A (maximum at 4-sec pulse) 3.34 A (continuous) 65 Watts 19...
Service Manual
Page 19
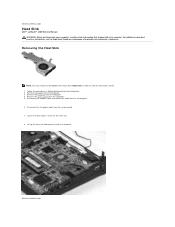
For additional safety best practices information, see the Regulatory Compliance Homepage at www.dell.com/regulatory_compliance. Removing the Heat Sink NOTE: You may need to view the illustrations below. 1. Disconnect the speaker cable and remove ... four captive screws on the heat sink. 8. Remove the keyboard from its routing path. 6. Disconnect the fan power cable from the computer. 3. Back to Contents Page Heat Sink Dell™ Latitude™ 2100 Service Manual WARNING: Before working inside your computer, read the safety information that shipped with your computer. Follow the...
For additional safety best practices information, see the Regulatory Compliance Homepage at www.dell.com/regulatory_compliance. Removing the Heat Sink NOTE: You may need to view the illustrations below. 1. Disconnect the speaker cable and remove ... four captive screws on the heat sink. 8. Remove the keyboard from its routing path. 6. Disconnect the fan power cable from the computer. 3. Back to Contents Page Heat Sink Dell™ Latitude™ 2100 Service Manual WARNING: Before working inside your computer, read the safety information that shipped with your computer. Follow the...
Service Manual
Page 22
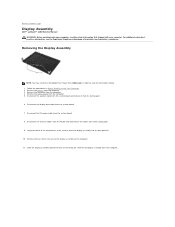
Disconnect the DC power cable from the system board. 7. Laying the base of the computer, then lift the display assembly from their routing path. 9. For additional safety best practices information, see the Regulatory Compliance Homepage at www.dell.com/regulatory_compliance. Disconnect the display... the cables from the computer. Remove the two screws the secure the display assembly to Contents Page Display Assembly Dell™ Latitude™ 2100 Service Manual WARNING: Before working inside your computer, read the safety information that shipped with your computer. Slide...
Disconnect the DC power cable from the system board. 7. Laying the base of the computer, then lift the display assembly from their routing path. 9. For additional safety best practices information, see the Regulatory Compliance Homepage at www.dell.com/regulatory_compliance. Disconnect the display... the cables from the computer. Remove the two screws the secure the display assembly to Contents Page Display Assembly Dell™ Latitude™ 2100 Service Manual WARNING: Before working inside your computer, read the safety information that shipped with your computer. Slide...
Service Manual
Page 32
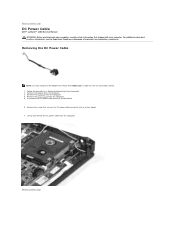
... from Adobe.com in Before Working Inside Your Computer. 2. Follow the procedures in order to Contents Page DC Power Cable Dell™ Latitude™ 2100 Service Manual WARNING: Before working inside your computer, read the safety information that secures the DC... power cable connector to Contents Page Disconnect the DC power cable from the computer. 5. Remove the access panel from the system board. 6. Back to the system board....
... from Adobe.com in Before Working Inside Your Computer. 2. Follow the procedures in order to Contents Page DC Power Cable Dell™ Latitude™ 2100 Service Manual WARNING: Before working inside your computer, read the safety information that secures the DC... power cable connector to Contents Page Disconnect the DC power cable from the computer. 5. Remove the access panel from the system board. 6. Back to the system board....

Service Manual
Page 36
... power button to servicing that shipped with locking tabs; While you connect a cable, ensure that shipped with care. Remove any connector pins. CAUTION: When you disconnect a cable, pull on its connector or on its pull-tab, not on Your Computer Dell™ Latitude™ 2100 ...order. Some cables have read the safety information that is not authorized by Dell is not covered by periodically touching an unpainted metal surface, such as the metal at www.dell.com/regulatory_compliance. Turn off your personal safety. For additional safety best practices information...
... power button to servicing that shipped with locking tabs; While you connect a cable, ensure that shipped with care. Remove any connector pins. CAUTION: When you disconnect a cable, pull on its connector or on its pull-tab, not on Your Computer Dell™ Latitude™ 2100 ...order. Some cables have read the safety information that is not authorized by Dell is not covered by periodically touching an unpainted metal surface, such as the metal at www.dell.com/regulatory_compliance. Turn off your personal safety. For additional safety best practices information...

Service Manual
Page 37
...and all attached devices to their electrical outlets. 5. CAUTION: To avoid damage to turn off . Do not use only the battery designed for other Dell computers. 1. Replace the battery. 4. Connect your computer. l In Windows Vista®: Click Start , then click the arrow in the lower-... After you complete any replacement procedure, ensure you shut down your operating system, press and hold the power button for about 4 seconds to the computer, use batteries designed for this particular Dell computer. Turn on your computer. l In Windows® XP: Click Start® Turn Off Computer...
...and all attached devices to their electrical outlets. 5. CAUTION: To avoid damage to turn off . Do not use only the battery designed for other Dell computers. 1. Replace the battery. 4. Connect your computer. l In Windows Vista®: Click Start , then click the arrow in the lower-... After you complete any replacement procedure, ensure you shut down your operating system, press and hold the power button for about 4 seconds to the computer, use batteries designed for this particular Dell computer. Turn on your computer. l In Windows® XP: Click Start® Turn Off Computer...


