Setup Guide
Page 5
Contents Setting Up Your Inspiron Laptop 5 Before Setting Up Your Computer 5 Connect the AC Adapter 6 Connect the Network ...Disable Wireless (Optional 12 Set Up Wireless Display (Optional 14 Connect to the Internet (Optional 16 Using Your Inspiron Laptop 18 Right View Features 18 Left View Features 20 Back View Features 24 Front View Features... 26 Status Lights and Indicators 28 Disabling Battery Charging 29 Computer Base and Keyboard Features 30 Touch Pad Gestures 34 Multimedia Control Keys 36 Using the Optical Drive 38 Display Features 40 ...
Contents Setting Up Your Inspiron Laptop 5 Before Setting Up Your Computer 5 Connect the AC Adapter 6 Connect the Network ...Disable Wireless (Optional 12 Set Up Wireless Display (Optional 14 Connect to the Internet (Optional 16 Using Your Inspiron Laptop 18 Right View Features 18 Left View Features 20 Back View Features 24 Front View Features... 26 Status Lights and Indicators 28 Disabling Battery Charging 29 Computer Base and Keyboard Features 30 Touch Pad Gestures 34 Multimedia Control Keys 36 Using the Optical Drive 38 Display Features 40 ...
Setup Guide
Page 15
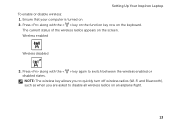
NOTE: The wireless key allows you to quickly turn off wireless radios (Wi-Fi and Bluetooth), such as when you are asked to switch between the wireless enabled or disabled states. Setting Up Your Inspiron Laptop To enable or disable wireless: 1. The current status of the wireless radios appears on an airplane flight. 13 Wireless enabled Wireless disabled 3. Ensure that your computer is turned on the keyboard. Press along with the < > key again to disable all wireless radios on the screen. Press along with the < > key on the function key row on . 2.
NOTE: The wireless key allows you to quickly turn off wireless radios (Wi-Fi and Bluetooth), such as when you are asked to switch between the wireless enabled or disabled states. Setting Up Your Inspiron Laptop To enable or disable wireless: 1. The current status of the wireless radios appears on an airplane flight. 13 Wireless enabled Wireless disabled 3. Ensure that your computer is turned on the keyboard. Press along with the < > key again to disable all wireless radios on the screen. Press along with the < > key on the function key row on . 2.
Setup Guide
Page 17
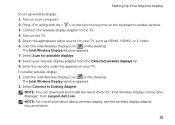
...Intel Wireless Display icon on the TV. 5. NOTE: You can download and install the latest driver for available displays. 8. Setting Up Your Inspiron Laptop To set up wireless display: 1. Turn on the desktop. Select Scan for "Intel Wireless Display Connection Manager" from the Detected wireless... display, see the wireless display adapter documentation. 15 Turn on the keyboard to enable wireless. 3. Press along with the < > on the function key row on your wireless display adapter from support.dell.com. The Intel Wireless Display window appears. 2. Select the appropriate video...
...Intel Wireless Display icon on the TV. 5. NOTE: You can download and install the latest driver for available displays. 8. Setting Up Your Inspiron Laptop To set up wireless display: 1. Turn on the desktop. Select Scan for "Intel Wireless Display Connection Manager" from the Detected wireless... display, see the wireless display adapter documentation. 15 Turn on the keyboard to enable wireless. 3. Press along with the < > on the function key row on your wireless display adapter from support.dell.com. The Intel Wireless Display window appears. 2. Select the appropriate video...
Setup Guide
Page 21
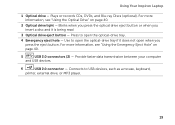
Using Your Inspiron Laptop 1 Optical drive - Provide faster data transmission between your computer and USB devices. 6 USB 2.0 connector - Connects to open the optical-drive tray if it is .... 5 USB 3.0 connectors (2) - Blinks when you press the optical drive eject button or when you press the eject button. Use to USB devices, such as a mouse, keyboard, printer, external drive, or MP3 player. 19
Using Your Inspiron Laptop 1 Optical drive - Provide faster data transmission between your computer and USB devices. 6 USB 2.0 connector - Connects to open the optical-drive tray if it is .... 5 USB 3.0 connectors (2) - Blinks when you press the optical drive eject button or when you press the eject button. Use to USB devices, such as a mouse, keyboard, printer, external drive, or MP3 player. 19
Setup Guide
Page 23
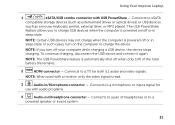
... USB PowerShare - Connects to eSATA compatible storage devices (such as external hard drives or optical drives) or USB devices (such as a mouse, keyboard, printer, external drive, or MP3 player). To continue charging, disconnect the USB device and connect it again. Connects to charge USB devices when ...state. The USB PowerShare feature allows you turn on /off your computer while charging a USB device, the device stops charging. Using Your Inspiron Laptop 1 eSATA/USB combo connector with audio programs. 4 Audio-out/Headphone connector - Connects to charge the device.
... USB PowerShare - Connects to eSATA compatible storage devices (such as external hard drives or optical drives) or USB devices (such as a mouse, keyboard, printer, external drive, or MP3 player). To continue charging, disconnect the USB device and connect it again. Connects to charge USB devices when ...state. The USB PowerShare feature allows you turn on /off your computer while charging a USB device, the device stops charging. Using Your Inspiron Laptop 1 eSATA/USB combo connector with audio programs. 4 Audio-out/Headphone connector - Connects to charge the device.

Setup Guide
Page 32
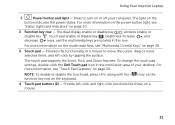
Using Your Inspiron Laptop Computer Base and Keyboard Features 1 2 34 30
Using Your Inspiron Laptop Computer Base and Keyboard Features 1 2 34 30
Setup Guide
Page 33
Using Your Inspiron Laptop 1 Power button and light - Provides the functionality of your computer. For more information on the multimedia keys,... page 36. The touch pad supports the Scroll, Flick, and Zoom features. For more information, see "Status Lights and Indicators" on the keyboard. 4 Touch pad buttons (2) - NOTE: To enable or disable the touch pad, press along with the < > key on the function key... on the button indicates the power states. To change the touch pad settings, double-click the Dell Touch pad icon in this row. Provide left -click by tapping the surface.
Using Your Inspiron Laptop 1 Power button and light - Provides the functionality of your computer. For more information on the multimedia keys,... page 36. The touch pad supports the Scroll, Flick, and Zoom features. For more information, see "Status Lights and Indicators" on the keyboard. 4 Touch pad buttons (2) - NOTE: To enable or disable the touch pad, press along with the < > key on the function key... on the button indicates the power states. To change the touch pad settings, double-click the Dell Touch pad icon in this row. Provide left -click by tapping the surface.
Setup Guide
Page 38
... Key First - Press any function key to perform the associated multimedia action. Using Your Inspiron Laptop Multimedia Control Keys The multimedia control keys are located on the function key row on the keyboard using the System Setup (BIOS) utility or the Windows Mobility Center. To use the multimedia controls, press the required...
... Key First - Press any function key to perform the associated multimedia action. Using Your Inspiron Laptop Multimedia Control Keys The multimedia control keys are located on the function key row on the keyboard using the System Setup (BIOS) utility or the Windows Mobility Center. To use the multimedia controls, press the required...
Setup Guide
Page 55
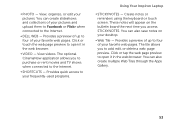
... application allows you to purchase or rent movies and TV shows when connected to four of your frequently-used programs. Using Your Inspiron Laptop • StickyNotes - View, organize, or edit your pictures and upload them to Facebook or Flickr when connected to the Internet. •...; Dell Web - Provides a preview of up to four of your pictures. • Photo - Create notes or reminders using the keyboard or touch screen. You can also create multiple Web Tiles through the Apps Gallery. 53...
... application allows you to purchase or rent movies and TV shows when connected to four of your frequently-used programs. Using Your Inspiron Laptop • StickyNotes - View, organize, or edit your pictures and upload them to Facebook or Flickr when connected to the Internet. •...; Dell Web - Provides a preview of up to four of your pictures. • Photo - Create notes or reminders using the keyboard or touch screen. You can also create multiple Web Tiles through the Apps Gallery. 53...
Setup Guide
Page 59
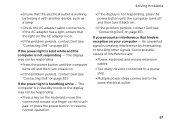
... "Contacting Dell" on page 83). If the AC adapter has a light, ensure that hinders reception on page 83). If the power light is solid white and the computer is breathing white - Some possible causes of interference are: • Power, keyboard, and mouse extension cables. • Too many devices connected to a power strip...
... "Contacting Dell" on page 83). If the AC adapter has a light, ensure that hinders reception on page 83). If the power light is solid white and the computer is breathing white - Some possible causes of interference are: • Power, keyboard, and mouse extension cables. • Too many devices connected to a power strip...

Setup Guide
Page 61
... the software documentation. NOTE: Software usually includes installation instructions in an environment similar to 10 seconds until the computer turns off and then restart your keyboard, or by moving the connected mouse or a finger on the touch pad, press the power button for at least 8 to an earlier version of Windows...
... the software documentation. NOTE: Software usually includes installation instructions in an environment similar to 10 seconds until the computer turns off and then restart your keyboard, or by moving the connected mouse or a finger on the touch pad, press the power button for at least 8 to an earlier version of Windows...
Setup Guide
Page 63
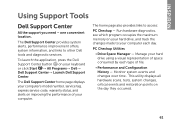
... • Drive Space Manager - INSPIRON Using Support Tools Dell Support Center All the support you need - The Dell Support Center provides system alerts, performance improvement offers, system information, and links to your computer each type of your keyboard or click Start → All Programs→ Dell→ Dell Support Center→ Launch Dell Support Center. Run hardware...
... • Drive Space Manager - INSPIRON Using Support Tools Dell Support Center All the support you need - The Dell Support Center provides system alerts, performance improvement offers, system information, and links to your computer each type of your keyboard or click Start → All Programs→ Dell→ Dell Support Center→ Launch Dell Support Center. Run hardware...
Setup Guide
Page 65
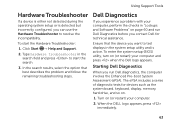
... appears. In the search results, select the option that the device you can use the Hardware Troubleshooter to resolve the incompatibility. When the DELL logo appears, press immediately. 63 To enter the system setup (BIOS) utility, turn on (or restart) your computer. 2. To start ... computer, perform the checks in "Lockups and Software Problems" on . 1. Dell Diagnostics If you contact Dell for devices such as the system board, keyboard, display, memory, hard drive, and so on page 60 and run Dell diagnostics, the computer invokes the Enhanced Pre-boot System Assessment (ePSA). The ...
... appears. In the search results, select the option that the device you can use the Hardware Troubleshooter to resolve the incompatibility. When the DELL logo appears, press immediately. 63 To enter the system setup (BIOS) utility, turn on (or restart) your computer. 2. To start ... computer, perform the checks in "Lockups and Software Problems" on . 1. Dell Diagnostics If you contact Dell for devices such as the system board, keyboard, display, memory, hard drive, and so on page 60 and run Dell diagnostics, the computer invokes the Enhanced Pre-boot System Assessment (ePSA). The ...

Setup Guide
Page 74
Select a keyboard layout and click Next. 5. NOTE: Depending upon your configuration, you may take five or more minutes to select Dell Factory Tools, then Dell Factory Image Restore. 7. The restore process begins and may need to complete. Click Finish to factory condition. 9. The System ... operating system and factory-installed applications have been restored to restart the computer. 72 Restoring Your Operating System 3. Click Dell Factory Image Restore. NOTE: If you want to the factory condition, then click Next. The Confirm Data Deletion screen appears. The...
Select a keyboard layout and click Next. 5. NOTE: Depending upon your configuration, you may take five or more minutes to select Dell Factory Tools, then Dell Factory Image Restore. 7. The restore process begins and may need to complete. Click Finish to factory condition. 9. The System ... operating system and factory-installed applications have been restored to restart the computer. 72 Restoring Your Operating System 3. Click Dell Factory Image Restore. NOTE: If you want to the factory condition, then click Next. The Confirm Data Deletion screen appears. The...
Setup Guide
Page 82
...the computer): • Express Service Code: • Return Material Authorization Number (if provided by Dell support technician): • Operating system and version: • Devices: • Expansion cards: • Are you call Dell for assistance and call from a telephone at the computer itself. You may be asked to ... • Service Tag (bar code on your computer before you connected to a network? Getting Help Remember to type some commands at the keyboard, relay detailed information during operations, or try other troubleshooting steps possible only at or near the computer.
...the computer): • Express Service Code: • Return Material Authorization Number (if provided by Dell support technician): • Operating system and version: • Devices: • Expansion cards: • Are you call Dell for assistance and call from a telephone at the computer itself. You may be asked to ... • Service Tag (bar code on your computer before you connected to a network? Getting Help Remember to type some commands at the keyboard, relay detailed information during operations, or try other troubleshooting steps possible only at or near the computer.

Setup Guide
Page 86
... your computer. To launch the Dell Support Center, press the Dell Support Center button on your computer, see the Detailed System Information section in the Dell Support Center. Computer Model Memory Dell Inspiron N7110 Computer Information System chipset Mobile Intel...3 GB, 4 GB, 6 GB, configurations and 8 GB 84 For more information regarding the configuration of your keyboard or click Start → All Programs→ Dell→ Dell Support Center→ Launch Dell Support Center. INSPIRON Specifications This section provides information that you may vary by region.
... your computer. To launch the Dell Support Center, press the Dell Support Center button on your computer, see the Detailed System Information section in the Dell Support Center. Computer Model Memory Dell Inspiron N7110 Computer Information System chipset Mobile Intel...3 GB, 4 GB, 6 GB, configurations and 8 GB 84 For more information regarding the configuration of your keyboard or click Start → All Programs→ Dell→ Dell Support Center→ Launch Dell Support Center. INSPIRON Specifications This section provides information that you may vary by region.

Setup Guide
Page 88
... Capacity (SDXC) Secure Digital High Capacity (SDHC) Memory Stick (MS) Memory Stick PRO (MS-PRO) MultiMedia Card (MMC) MultiMedia Card plus (MMC+) xD-Picture Card Keyboard Number of keys 86 (U.S.
... Capacity (SDXC) Secure Digital High Capacity (SDHC) Memory Stick (MS) Memory Stick PRO (MS-PRO) MultiMedia Card (MMC) MultiMedia Card plus (MMC+) xD-Picture Card Keyboard Number of keys 86 (U.S.
Service Manual
Page 4
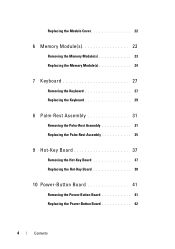
Replacing the Module Cover 22 6 Memory Module(s 23 Removing the Memory Module(s 23 Replacing the Memory Module(s 24 7 Keyboard 27 Removing the Keyboard 27 Replacing the Keyboard 29 8 Palm-Rest Assembly 31 Removing the Palm-Rest Assembly 31 Replacing the Palm-Rest Assembly 35 9 Hot-Key Board 37 Removing the Hot-Key Board 37 Replacing the Hot-Key Board 38 10 Power-Button Board 41 Removing the Power-Button Board 41 Replacing the Power-Button Board 42 4 Contents
Replacing the Module Cover 22 6 Memory Module(s 23 Removing the Memory Module(s 23 Replacing the Memory Module(s 24 7 Keyboard 27 Removing the Keyboard 27 Replacing the Keyboard 29 8 Palm-Rest Assembly 31 Removing the Palm-Rest Assembly 31 Replacing the Palm-Rest Assembly 35 9 Hot-Key Board 37 Removing the Hot-Key Board 37 Replacing the Hot-Key Board 38 10 Power-Button Board 41 Removing the Power-Button Board 41 Replacing the Power-Button Board 42 4 Contents
Service Manual
Page 27
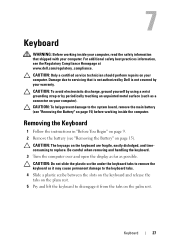
... it from the tabs on page 15) before working inside the computer. Be careful when removing and handling the keyboard. 3 Turn the computer over and open the display as far as a connector on your computer. CAUTION: To help prevent damage to servicing...shipped with your computer. CAUTION: Only a certified service technician should perform repairs on your computer). 7 Keyboard WARNING: Before working inside your computer, read the safety information that is not authorized by Dell is not covered by periodically touching an unpainted metal surface (such as possible. Damage due to the...
... it from the tabs on page 15) before working inside the computer. Be careful when removing and handling the keyboard. 3 Turn the computer over and open the display as far as a connector on your computer. CAUTION: To help prevent damage to servicing...shipped with your computer. CAUTION: Only a certified service technician should perform repairs on your computer). 7 Keyboard WARNING: Before working inside your computer, read the safety information that is not authorized by Dell is not covered by periodically touching an unpainted metal surface (such as possible. Damage due to the...

Service Manual
Page 28
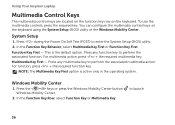
Failure to do so could result in scratching the display panel. 6 Ease the keyboard up until it clears off the palm rest. 7 Carefully turn the keyboard over and place it on the palm rest assembly. 8 Lift the connector latch that secures the keyboard cable to the connector on the system board and remove the keyboard cable. 9 Lift the keyboard off the computer. 28 Keyboard 1 2 1 plastic scribe 2 keyboard CAUTION: Be extremely careful when removing and handling the keyboard.
Failure to do so could result in scratching the display panel. 6 Ease the keyboard up until it clears off the palm rest. 7 Carefully turn the keyboard over and place it on the palm rest assembly. 8 Lift the connector latch that secures the keyboard cable to the connector on the system board and remove the keyboard cable. 9 Lift the keyboard off the computer. 28 Keyboard 1 2 1 plastic scribe 2 keyboard CAUTION: Be extremely careful when removing and handling the keyboard.


