Setup Guide
Page 68
... computer. 2. To enter the system setup (BIOS) utility, turn on page 61 and run Dell diagnostics, the computer invokes the Enhanced Pre-boot System Assessment (ePSA). The ePSA includes a series of diagnostic tests for technical assistance. When the DELL logo appears, press immediately. 66 Ensure that best describes the problem and follow the...
... computer. 2. To enter the system setup (BIOS) utility, turn on page 61 and run Dell diagnostics, the computer invokes the Enhanced Pre-boot System Assessment (ePSA). The ePSA includes a series of diagnostic tests for technical assistance. When the DELL logo appears, press immediately. 66 Ensure that best describes the problem and follow the...
Setup Guide
Page 69
then, shut down the error code(s) and contact Dell (for more . This will take about 30 minutes or more information, see the Microsoft Windows desktop; To stop the assessment and restart the computer, press ; If the Enhanced Pre-boot System Assessment completes successfully, the following message is ..., otherwise press . to continue to the next test, press ; Click to reboot your computer and try again. 3. Select Diagnostics from the boot menu and press . Using Support Tools NOTE: If you wait too long and the operating system logo appears, continue to wait until you want...
then, shut down the error code(s) and contact Dell (for more . This will take about 30 minutes or more information, see the Microsoft Windows desktop; To stop the assessment and restart the computer, press ; If the Enhanced Pre-boot System Assessment completes successfully, the following message is ..., otherwise press . to continue to the next test, press ; Click to reboot your computer and try again. 3. Select Diagnostics from the boot menu and press . Using Support Tools NOTE: If you wait too long and the operating system logo appears, continue to wait until you want...

Setup Guide
Page 73
... the Advanced Boot Options window. Dell DataSafe Local Backup allows you to an earlier operating state • Create system recovery media Dell DataSafe Local Backup Basic To restore the Dell factory-installed software while preserving the data files: 1. Disconnect all regions. When the DELL logo appears,...computer. 4. Turn on page 74) to restore your computer to : • Backup and restore your operating system. You can use Dell Factory Image Restore (see the Microsoft Windows desktop; then, shut down your computer and try again. 5. Select Repair Your Computer. 71...
... the Advanced Boot Options window. Dell DataSafe Local Backup allows you to an earlier operating state • Create system recovery media Dell DataSafe Local Backup Basic To restore the Dell factory-installed software while preserving the data files: 1. Disconnect all regions. When the DELL logo appears,...computer. 4. Turn on page 74) to restore your computer to : • Backup and restore your operating system. You can use Dell Factory Image Restore (see the Microsoft Windows desktop; then, shut down your computer and try again. 5. Select Repair Your Computer. 71...
Setup Guide
Page 75
Select the appropriate boot device from being recovered. System Recovery Media CAUTION: Although the system... prevents data from the list and press . 4. Restoring Your Operating System To restore the Dell factory-installed software of your computer using Dell DataSafe Local Backup, to return your hard drive to wait until you backup your computer. ...Insert the system recovery disc or USB key and restart the computer. 2. When the DELL logo appears, press immediately. Use the system recovery media in when you purchased the computer while preserving the ...
Select the appropriate boot device from being recovered. System Recovery Media CAUTION: Although the system... prevents data from the list and press . 4. Restoring Your Operating System To restore the Dell factory-installed software of your computer using Dell DataSafe Local Backup, to return your hard drive to wait until you backup your computer. ...Insert the system recovery disc or USB key and restart the computer. 2. When the DELL logo appears, press immediately. Use the system recovery media in when you purchased the computer while preserving the ...
Setup Guide
Page 76
... Restore only as the last method to restore your computer and try again. 74 When the DELL logo appears, press several times to access the Advanced Boot Options window. NOTE: If Dell Factory Image Restore is not available on certain computers. This option restores your hard drive to... the operating state it was in certain countries or on your computer, use Dell DataSafe Local Backup (see the Microsoft...
... Restore only as the last method to restore your computer and try again. 74 When the DELL logo appears, press several times to access the Advanced Boot Options window. NOTE: If Dell Factory Image Restore is not available on certain computers. This option restores your hard drive to... the operating state it was in certain countries or on your computer, use Dell DataSafe Local Backup (see the Microsoft...
Service Manual
Page 20
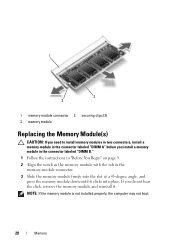
NOTE: If the memory module is not installed properly, the computer may not boot. 20 Memory 1 3 2 1 memory-module connector 2 securing clips (2) 3 memory module Replacing the Memory Module(s) CAUTION: If you need to install memory modules in two connectors, install a ...
NOTE: If the memory module is not installed properly, the computer may not boot. 20 Memory 1 3 2 1 memory-module connector 2 securing clips (2) 3 memory module Replacing the Memory Module(s) CAUTION: If you need to install memory modules in two connectors, install a ...

Service Manual
Page 21
... to do so may result in the computer: Click Start Control PanelSystem and SecuritySystem. As the computer boots, it detects the memory module(s) and automatically updates the system configuration information. CAUTION: Before turning on the computer, replace all screws and ensure that no...
... to do so may result in the computer: Click Start Control PanelSystem and SecuritySystem. As the computer boots, it detects the memory module(s) and automatically updates the system configuration information. CAUTION: Before turning on the computer, replace all screws and ensure that no...


