Setup Guide
Page 11
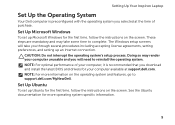
... system. NOTE: For optimal performance of your computer, it is preconfigured with the operating system you download and install the latest BIOS and drivers for your computer available at the time of purchase. These steps are mandatory and may render your computer unusable and ... preferences, and setting up Microsoft Windows for more information on the screen. Setting Up Your Inspiron Laptop Set Up the Operating System Your Dell computer is recommended that you selected at support.dell.com. NOTE: For more operating system specific information. 9 Set Up Microsoft Windows To set...
... system. NOTE: For optimal performance of your computer, it is preconfigured with the operating system you download and install the latest BIOS and drivers for your computer available at the time of purchase. These steps are mandatory and may render your computer unusable and ... preferences, and setting up Microsoft Windows for more information on the screen. Setting Up Your Inspiron Laptop Set Up the Operating System Your Dell computer is recommended that you selected at support.dell.com. NOTE: For more operating system specific information. 9 Set Up Microsoft Windows To set...
Setup Guide
Page 33
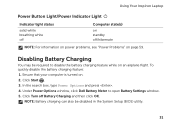
Disabling Battery Charging You may be disabled in the System Setup (BIOS) utility. 31 In the search box, type Power Options and press . 4. To quickly disable the battery charging feature: 1. Click Turn off /hibernate NOTE: For information... window. 5. Ensure that your computer is turned on page 59. Click Start . 3. Under Power Options window, click Dell Battery Meter to disable the battery charging feature while on an airplane flight. Using Your Inspiron Laptop Power Button Light/Power Indicator Light Indicator light status solid white breathing white off Computer state(s) on...
Disabling Battery Charging You may be disabled in the System Setup (BIOS) utility. 31 In the search box, type Power Options and press . 4. To quickly disable the battery charging feature: 1. Click Turn off /hibernate NOTE: For information... window. 5. Ensure that your computer is turned on page 59. Click Start . 3. Under Power Options window, click Dell Battery Meter to disable the battery charging feature while on an airplane flight. Using Your Inspiron Laptop Power Button Light/Power Indicator Light Indicator light status solid white breathing white off Computer state(s) on...
Setup Guide
Page 40
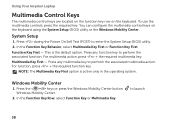
Using Your Inspiron Laptop Multimedia Control Keys The multimedia control keys are located on the function key row on the keyboard using the System Setup (BIOS) utility or the Windows Mobility Center. In the Function Key Behavior, select Multimedia Key First or Function Key First. ...This is active only in the operating system. Windows Mobility Center 1. to enter the System Setup (BIOS) utility. 2. System Setup 1. Press any multimedia key to perform the associated function. Multimedia Key First - Press any function key to perform ...
Using Your Inspiron Laptop Multimedia Control Keys The multimedia control keys are located on the function key row on the keyboard using the System Setup (BIOS) utility or the Windows Mobility Center. In the Function Key Behavior, select Multimedia Key First or Function Key First. ...This is active only in the operating system. Windows Mobility Center 1. to enter the System Setup (BIOS) utility. 2. System Setup 1. Press any multimedia key to perform the associated function. Multimedia Key First - Press any function key to perform ...
Setup Guide
Page 58
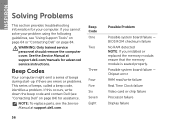
... Possible system board failure - If this occurs, write down the beep code and contact Dell (see the Service Manual at support.dell.com/manuals for advanced service instructions. BIOS ROM checksum failure No RAM detected NOTE: If you cannot solve your computer. Possible system... Video card or chip failure Processor failure Display failure NOTE: To replace parts, see "Contacting Dell" on page 84. See the Service Manual at support.dell.com. INSPIRON Solving Problems This section provides troubleshooting information for your problem using the following guidelines, see "Using...
... Possible system board failure - If this occurs, write down the beep code and contact Dell (see the Service Manual at support.dell.com/manuals for advanced service instructions. BIOS ROM checksum failure No RAM detected NOTE: If you cannot solve your computer. Possible system... Video card or chip failure Processor failure Display failure NOTE: To replace parts, see "Contacting Dell" on page 84. See the Service Manual at support.dell.com. INSPIRON Solving Problems This section provides troubleshooting information for your problem using the following guidelines, see "Using...
Setup Guide
Page 68
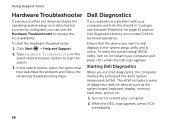
...2. To enter the system setup (BIOS) utility, turn on (or restart) your computer and press when the Dell logo appears. The ePSA includes a series of diagnostic tests for technical assistance. Starting Dell Diagnostics When you run Dell Diagnostics before you contact Dell for devices such as the system ...Hardware Troubleshooter to test displays in the system setup utility and is active. Click Start → Help and Support. 2. When the DELL logo appears, press immediately. 66 Type hardware troubleshooter in "Lockups and Software Problems" on . 1. In the search results, select the...
...2. To enter the system setup (BIOS) utility, turn on (or restart) your computer and press when the Dell logo appears. The ePSA includes a series of diagnostic tests for technical assistance. Starting Dell Diagnostics When you run Dell Diagnostics before you contact Dell for devices such as the system ...Hardware Troubleshooter to test displays in the system setup utility and is active. Click Start → Help and Support. 2. When the DELL logo appears, press immediately. 66 Type hardware troubleshooter in "Lockups and Software Problems" on . 1. In the search results, select the...
Service Manual
Page 6
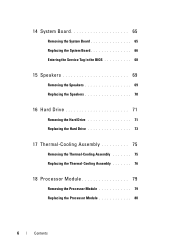
14 System Board 65 Removing the System Board 65 Replacing the System Board 66 Entering the Service Tag in the BIOS 68 15 Speakers 69 Removing the Speakers 69 Replacing the Speakers 70 16 Hard Drive 71 Removing the Hard Drive 71 Replacing the Hard Drive 73 17 Thermal-Cooling Assembly 75 Removing the Thermal-Cooling Assembly 75 Replacing the Thermal-Cooling Assembly 76 18 Processor Module 79 Removing the Processor Module 79 Replacing the Processor Module 80 6 Contents
14 System Board 65 Removing the System Board 65 Replacing the System Board 66 Entering the Service Tag in the BIOS 68 15 Speakers 69 Removing the Speakers 69 Replacing the Speakers 70 16 Hard Drive 71 Removing the Hard Drive 71 Replacing the Hard Drive 73 17 Thermal-Cooling Assembly 75 Removing the Thermal-Cooling Assembly 75 Replacing the Thermal-Cooling Assembly 76 18 Processor Module 79 Removing the Processor Module 79 Replacing the Processor Module 80 6 Contents

Service Manual
Page 7
19 I/O Board 83 Removing the I/O Board 83 Replacing the I/O Board 84 20 VGA/Power Board 85 Removing the VGA/Power Board 85 Replacing the VGA/Power Board 86 21 Flashing the BIOS 89 Contents 7
19 I/O Board 83 Removing the I/O Board 83 Replacing the I/O Board 84 20 VGA/Power Board 85 Removing the VGA/Power Board 85 Replacing the VGA/Power Board 86 21 Flashing the BIOS 89 Contents 7
Service Manual
Page 9
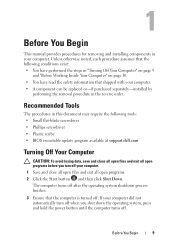
... operating system shutdown process finishes. 3 Ensure that the following tools: • Small flat-blade screwdriver • Phillips screwdriver • Plastic scribe • BIOS executable update program available at support.dell.com Turning Off Your Computer CAUTION: To avoid losing data, save and close all open files and exit all open programs. 2 Click...
... operating system shutdown process finishes. 3 Ensure that the following tools: • Small flat-blade screwdriver • Phillips screwdriver • Plastic scribe • BIOS executable update program available at support.dell.com Turning Off Your Computer CAUTION: To avoid losing data, save and close all open files and exit all open programs. 2 Click...
Service Manual
Page 67
... and ensure that no stray screws remain inside the computer. NOTE: After you have replaced the system board, enter the computer Service Tag in the BIOS of the replacement system board.
... and ensure that no stray screws remain inside the computer. NOTE: After you have replaced the system board, enter the computer Service Tag in the BIOS of the replacement system board.

Service Manual
Page 68
18 Enter the service tag (see "Entering the Service Tag in the Set Service Tag field. 68 System Board Entering the Service Tag in the BIOS 1 Ensure that the AC adapter is plugged in and that the main battery is installed properly. 2 Turn on the computer. 3 Press during POST to enter the system setup program. 4 Navigate to the security tab and enter the service tag in the BIOS" on page 68).
18 Enter the service tag (see "Entering the Service Tag in the Set Service Tag field. 68 System Board Entering the Service Tag in the BIOS 1 Ensure that the AC adapter is plugged in and that the main battery is installed properly. 2 Turn on the computer. 3 Press during POST to enter the system setup program. 4 Navigate to the security tab and enter the service tag in the BIOS" on page 68).

Service Manual
Page 89
...of your computer's Service Tag in the Select Your Product Family list. If you have selected a different model and want to support.dell.com/support/downloads. 3 Locate the BIOS update file for your computer: NOTE: The Service Tag for your desktop. The file downloads to step 4. b Enter your computer... Click Select Model. If you do not have your desktop. 7 Click Close if the Download Complete window appears. 21 Flashing the BIOS The BIOS may require flashing when an update is available or when replacing the system board. c Select the product brand in the Select Your Product...
...of your computer's Service Tag in the Select Your Product Family list. If you have selected a different model and want to support.dell.com/support/downloads. 3 Locate the BIOS update file for your computer: NOTE: The Service Tag for your desktop. The file downloads to step 4. b Enter your computer... Click Select Model. If you do not have your desktop. 7 Click Close if the Download Complete window appears. 21 Flashing the BIOS The BIOS may require flashing when an update is available or when replacing the system board. c Select the product brand in the Select Your Product...

Service Manual
Page 90
8 Double-click the file icon on the desktop and follow the instructions on the screen. 90 Flashing the BIOS
8 Double-click the file icon on the desktop and follow the instructions on the screen. 90 Flashing the BIOS


