Dell™ Technology Guide
Page 54
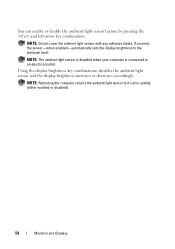
...-automatically sets the display brightness to an electrical outlet. You can enable or disable the ambient light sensor feature by pressing the and left-arrow key combination. NOTE: The ambient light sensor is disabled when your computer is connected to the minimum level. NOTE: Do not cover the ambient light sensor...
...-automatically sets the display brightness to an electrical outlet. You can enable or disable the ambient light sensor feature by pressing the and left-arrow key combination. NOTE: The ambient light sensor is disabled when your computer is connected to the minimum level. NOTE: Do not cover the ambient light sensor...
Dell™ Technology Guide
Page 65
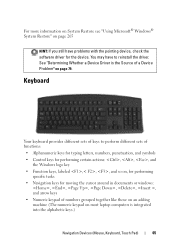
...page 79. Keyboard Your keyboard provides different sets of keys to perform different sets of functions: • Alphanumeric keys for typing letters, numbers, punctuation, and symbols • Control keys for performing certain actions: , , , and the Windows logo key • Function keys, labeled ,< F2>, , and so on, for...the pointing device, check the software driver for moving the cursor around in documents or windows: , , , , , , and arrow keys • Numeric keypad of numbers grouped together like those on an adding machine (The numeric keypad on most laptop computers is the Source ...
...page 79. Keyboard Your keyboard provides different sets of keys to perform different sets of functions: • Alphanumeric keys for typing letters, numbers, punctuation, and symbols • Control keys for performing certain actions: , , , and the Windows logo key • Function keys, labeled ,< F2>, , and so on, for...the pointing device, check the software driver for moving the cursor around in documents or windows: , , , , , , and arrow keys • Numeric keypad of numbers grouped together like those on an adding machine (The numeric keypad on most laptop computers is the Source ...
Dell™ Technology Guide
Page 66
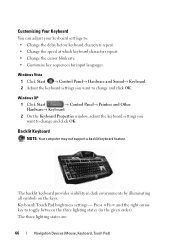
...Keyboard. 2 On the Keyboard Properties window, adjust the keyboard settings you want to change and click OK. Press and the right-arrow key to : • Change the delay before keyboard characters repeat. • Change the speed at which keyboard characters repeat. • Change... the cursor blink rate. • Customize key sequences for input languages. The three lighting states are: 66 Navigation Devices (Mouse, Keyboard, Touch Pad) Customizing Your Keyboard You can adjust...
...Keyboard. 2 On the Keyboard Properties window, adjust the keyboard settings you want to change and click OK. Press and the right-arrow key to : • Change the delay before keyboard characters repeat. • Change the speed at which keyboard characters repeat. • Change... the cursor blink rate. • Customize key sequences for input languages. The three lighting states are: 66 Navigation Devices (Mouse, Keyboard, Touch Pad) Customizing Your Keyboard You can adjust...

Dell™ Technology Guide
Page 68
The keypad corresponds to the keypad of an extended keyboard. • To type a number or symbol, press and hold and press the desired key. • To enable the numeric keypad, press . Using the Numeric Keypad on a Laptop Computer numeric keypad Your laptop computer may have a numeric keypad integrated into the keyboard. The 9 light indicates that the keypad is active. • To disable the numeric keypad, press again. 68 Navigation Devices (Mouse, Keyboard, Touch Pad)
The keypad corresponds to the keypad of an extended keyboard. • To type a number or symbol, press and hold and press the desired key. • To enable the numeric keypad, press . Using the Numeric Keypad on a Laptop Computer numeric keypad Your laptop computer may have a numeric keypad integrated into the keyboard. The 9 light indicates that the keypad is active. • To disable the numeric keypad, press again. 68 Navigation Devices (Mouse, Keyboard, Touch Pad)

Dell™ Technology Guide
Page 69
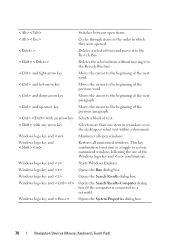
...). Searches for a file or folder. Displays the Address bar list in the active program. General Keyboard Shortcuts and up-arrow key and down-arrow key Opens the Task Manager window. Highlight the desired icon to switch the display to activate a different power management mode using the ...programs that option. Renames the selected item. Pastes a selected item. Activates the menu bar in Windows Explorer. Uses the arrow keys to have multiple documents open items. Navigation Devices (Mouse, Keyboard, Touch Pad) 69 Increases brightness on ).
...). Searches for a file or folder. Displays the Address bar list in the active program. General Keyboard Shortcuts and up-arrow key and down-arrow key Opens the Task Manager window. Highlight the desired icon to switch the display to activate a different power management mode using the ...programs that option. Renames the selected item. Pastes a selected item. Activates the menu bar in Windows Explorer. Uses the arrow keys to have multiple documents open items. Navigation Devices (Mouse, Keyboard, Touch Pad) 69 Increases brightness on ).
Dell™ Technology Guide
Page 70
... the cursor to restore minimized windows following the use of the next paragraph. This key combination functions as a toggle to the beginning of the Windows logo key and combination. Windows logo key and Opens the System Properties dialog box. 70 Navigation Devices (Mouse, Keyboard, Touch Pad) Switches between ... selected item and move it to the Recycle Bin. Deletes the selected item without moving it to the Recycle Bin first. Windows logo key and Restores all open items. Cycles through items in the order in a window or on the desktop, or select text within a document....
... the cursor to restore minimized windows following the use of the next paragraph. This key combination functions as a toggle to the beginning of the Windows logo key and combination. Windows logo key and Opens the System Properties dialog box. 70 Navigation Devices (Mouse, Keyboard, Touch Pad) Switches between ... selected item and move it to the Recycle Bin. Deletes the selected item without moving it to the Recycle Bin first. Windows logo key and Restores all open items. Cycles through items in the order in a window or on the desktop, or select text within a document....
Dell™ Technology Guide
Page 87
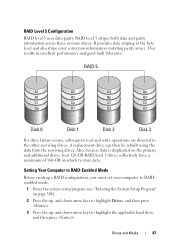
... (see "Entering the System Setup Program" on which to highlight the applicable hard drive, and then press . Drives and Media 87 and down -arrow keys to store data. RAID Level 5 Configuration RAID level 5 uses data parity. RAID level 5 stripes both data and parity information across three or more drives..., four 120-GB RAID level 1 drives collectively have a maximum of 360-GB on page 308). 2 Press the up - and down -arrow keys to the other surviving drives. It provides data striping at the byte level and also stripe error correction information (rotating parity array).
... (see "Entering the System Setup Program" on which to highlight the applicable hard drive, and then press . Drives and Media 87 and down -arrow keys to store data. RAID Level 5 Configuration RAID level 5 uses data parity. RAID level 5 stripes both data and parity information across three or more drives..., four 120-GB RAID level 1 drives collectively have a maximum of 360-GB on page 308). 2 Press the up - and down -arrow keys to the other surviving drives. It provides data striping at the byte level and also stripe error correction information (rotating parity array).
Dell™ Technology Guide
Page 88
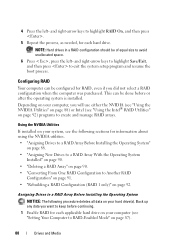
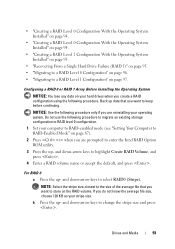
and right-arrow keys to highlight Save/Exit, and then press to create and manage RAID arrays. Assigning Drives to a RAID Array Before Installing the Operating System NOTICE: The ..." on page 92. Configuring RAID Your computer can be of equal size to keep before or after the operating system is installed. and right-arrow keys to highlight RAID On, and then press . 5 Repeat the process, as needed, for RAID, even if you want to avoid unallocated space. 6 Press , press the...
and right-arrow keys to highlight Save/Exit, and then press to create and manage RAID arrays. Assigning Drives to a RAID Array Before Installing the Operating System NOTICE: The ..." on page 92. Configuring RAID Your computer can be of equal size to keep before or after the operating system is installed. and right-arrow keys to highlight RAID On, and then press . 5 Repeat the process, as needed, for RAID, even if you want to avoid unallocated space. 6 Press , press the...
Dell™ Technology Guide
Page 89
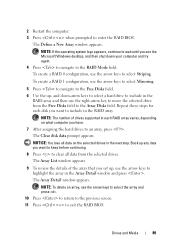
...the previous screen. 11 Press to the Array Disks field. Back up any data you set up - To create a RAID 0 configuration, use the right-arrow key to move the selected drive from the selected drives. NOTE: The number of the array that you want to include in each RAID array varies... array, press . NOTICE: You lose all data from the Free Disks field to exit the RAID BIOS. NOTE: To delete an array, use the arrow keys to enter the RAID BIOS. The Clear disk data prompt appears. and down your computer and try again. 4 Press to navigate to select Striping. 2 Restart...
...the previous screen. 11 Press to the Array Disks field. Back up any data you set up - To create a RAID 0 configuration, use the right-arrow key to move the selected drive from the selected drives. NOTE: The number of the array that you want to include in each RAID array varies... array, press . NOTICE: You lose all data from the Free Disks field to exit the RAID BIOS. NOTE: To delete an array, use the arrow keys to enter the RAID BIOS. The Clear disk data prompt appears. and down your computer and try again. 4 Press to navigate to select Striping. 2 Restart...
Dell™ Technology Guide
Page 93
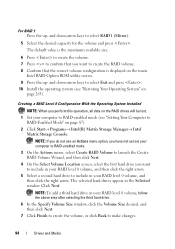
... to RAID-enabled mode (see "Setting Your Computer to store on the RAID volume. and down -arrow keys to change the stripe size and press . Drives and Media 93 and down -arrow keys to keep before continuing. For RAID 0 a Press the up - NOTE: Select the stripe size closest ... file that you want to highlight Create RAID Volume, and press . 4 Enter a RAID volume name or accept the default, and press . and down-arrow keys to a RAID Level 1 Configuration" on page 97. Configuring a RAID 0 or RAID 1 Array Before Installing the Operating System NOTICE: You lose any data on...
... to RAID-enabled mode (see "Setting Your Computer to store on the RAID volume. and down -arrow keys to change the stripe size and press . Drives and Media 93 and down -arrow keys to keep before continuing. For RAID 0 a Press the up - NOTE: Select the stripe size closest ... file that you want to highlight Create RAID Volume, and press . 4 Enter a RAID volume name or accept the default, and press . and down-arrow keys to a RAID Level 1 Configuration" on page 97. Configuring a RAID 0 or RAID 1 Array Before Installing the Operating System NOTICE: You lose any data on...
Dell™ Technology Guide
Page 94
... a third hard drive in your RAID level 0 volume, and then click the right arrow. Click Next. For RAID 1 Press the up - and down -arrow keys to create the RAID volume. 8 Confirm that the correct volume configuration is the maximum available size. 6 Press to create the volume. 7 Press to confirm that... Size desired, and then click Next. 7 Click Finish to create the volume, or click Back to include in the Selected window. and down -arrow keys to RAID-Enabled Mode" on page 265). The default value is displayed on the main Intel RAID Option ROM utility screen. 9 Press the up -
... a third hard drive in your RAID level 0 volume, and then click the right arrow. Click Next. For RAID 1 Press the up - and down -arrow keys to create the RAID volume. 8 Confirm that the correct volume configuration is the maximum available size. 6 Press to create the volume. 7 Press to confirm that... Size desired, and then click Next. 7 Click Finish to create the volume, or click Back to include in the Selected window. and down -arrow keys to RAID-Enabled Mode" on page 265). The default value is displayed on the main Intel RAID Option ROM utility screen. 9 Press the up -

Dell™ Technology Guide
Page 96
...-down box, select RAID 0 as your stripe size. 8 On the Select Source Hard Drive screen, double-click the hard drive from the drop-down -arrow keys to the operating system and begins rebuilding the RAID volume automatically. NOTE: You can use your computer to RAID-enabled mode (see an Actions menu...
...-down box, select RAID 0 as your stripe size. 8 On the Select Source Hard Drive screen, double-click the hard drive from the drop-down -arrow keys to the operating system and begins rebuilding the RAID volume automatically. NOTE: You can use your computer to RAID-enabled mode (see an Actions menu...

Dell™ Technology Guide
Page 108
.... You may tell you that the program did not shut down and restart your computer restarts. Access the Safe Mode by pressing and holding the key while your computer. FOR MORE INFORMATION: To learn more about Safe Mode, see : • Windows Help and Support: click Start or and Support → Help...
.... You may tell you that the program did not shut down and restart your computer restarts. Access the Safe Mode by pressing and holding the key while your computer. FOR MORE INFORMATION: To learn more about Safe Mode, see : • Windows Help and Support: click Start or and Support → Help...

Dell™ Technology Guide
Page 111
... in the group. Files and Folders 111 All the files you click the last file to include in the group. Press and hold down the key as you want included in the group are highlighted. Selecting and Opening Files To open the file, doubleclick the selected filename. To select a file, click.... Selected files appear highlighted. Selecting a Group of Files SHIFT Click the first file you first need to select the file. Press and hold down the key as you selected are highlighted. Selecting Several Random Files CTRL Click a file you click each file.
... in the group. Files and Folders 111 All the files you click the last file to include in the group. Press and hold down the key as you want included in the group are highlighted. Selecting and Opening Files To open the file, doubleclick the selected filename. To select a file, click.... Selected files appear highlighted. Selecting a Group of Files SHIFT Click the first file you first need to select the file. Press and hold down the key as you selected are highlighted. Selecting Several Random Files CTRL Click a file you click each file.

Dell™ Technology Guide
Page 113
...operate. 1 Right-click the file you want to rename. 2 Click Rename from the drop-down menu. 3 Type a new name for the file and press the key. The Confirm File Delete dialog box appears. 3 The selected file is deleted. Files and Folders 113 Windows® XP 1 Click Start → Search. 2 ...part of item you want to search for. 3 Enter a name and click Search. Deleting Files 1 Click the file you want to delete. 2 Press the Delete key. 3 Type the filename or part of the filename in the Search box. 5 Press or click the magnifying glass To search for a picture: 1 Click Start ...
...operate. 1 Right-click the file you want to rename. 2 Click Rename from the drop-down menu. 3 Type a new name for the file and press the key. The Confirm File Delete dialog box appears. 3 The selected file is deleted. Files and Folders 113 Windows® XP 1 Click Start → Search. 2 ...part of item you want to search for. 3 Enter a name and click Search. Deleting Files 1 Click the file you want to delete. 2 Press the Delete key. 3 Type the filename or part of the filename in the Search box. 5 Press or click the magnifying glass To search for a picture: 1 Click Start ...
Dell™ Technology Guide
Page 128
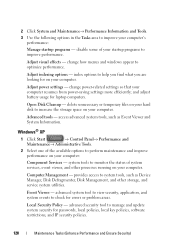
... your computer. Open Disk Cleanup - Event Viewer - Local Security Policy - Adjust indexing options - Adjust power settings - and adjust battery usage for passwords, local policies, local key policies, software restrictions, and IP security policies. 128 Maintenance Tasks (Enhance Performance and Ensure Security) advanced security tool to check for on your hard disk...
... your computer. Open Disk Cleanup - Event Viewer - Local Security Policy - Adjust indexing options - Adjust power settings - and adjust battery usage for passwords, local policies, local key policies, software restrictions, and IP security policies. 128 Maintenance Tasks (Enhance Performance and Ensure Security) advanced security tool to check for on your hard disk...
Dell™ Technology Guide
Page 131
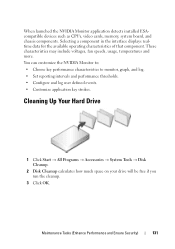
... Performance and Ensure Security) 131 These characteristics may include voltages, fan speeds, usage, temperatures and more. You can customize the NVIDIA Monitor to: • Choose key performance characteristics to monitor, graph, and log. • Set reporting intervals and performance thresholds. • Configure and log user defined events. • Customize application...
... Performance and Ensure Security) 131 These characteristics may include voltages, fan speeds, usage, temperatures and more. You can customize the NVIDIA Monitor to: • Choose key performance characteristics to monitor, graph, and log. • Set reporting intervals and performance thresholds. • Configure and log user defined events. • Customize application...
Dell™ Technology Guide
Page 139
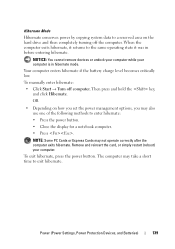
... (Power Settings, Power Protection Devices, and Batteries) 139 To manually enter hibernate: • Click Start → Turn off the computer. Then press and hold the key, and click Hibernate. To exit hibernate, press the power button. Hibernate Mode Hibernate conserves power by copying system data to a reserved area on how you...
... (Power Settings, Power Protection Devices, and Batteries) 139 To manually enter hibernate: • Click Start → Turn off the computer. Then press and hold the key, and click Hibernate. To exit hibernate, press the power button. Hibernate Mode Hibernate conserves power by copying system data to a reserved area on how you...

Dell™ Technology Guide
Page 156
... computers may even display a pop-up indicating that you selected, the same pop-up Connecting to a Secured Wireless Network (Using WEP or WPA Keys) If you select a secure network, you come into range of the wireless network connection. HINT: Follow the instructions for connecting to a public ...wireless network one time, and whenever you must enter the network's WEP or WPA encryption key when prompted. This value is unique to your lists of your computer. wireless network connection pop-up notifies you log on to your ...
... computers may even display a pop-up indicating that you selected, the same pop-up Connecting to a Secured Wireless Network (Using WEP or WPA Keys) If you select a secure network, you come into range of the wireless network connection. HINT: Follow the instructions for connecting to a public ...wireless network one time, and whenever you must enter the network's WEP or WPA encryption key when prompted. This value is unique to your lists of your computer. wireless network connection pop-up notifies you log on to your ...
Dell™ Technology Guide
Page 164
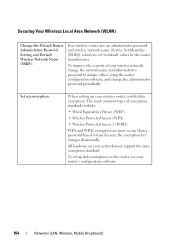
... wireless router uses an administrator password and wireless network name (Service Set Identifier [SSID]), which are more secure than a password-based system because the encryption key changes dynamically. Set up your network must support the same encryption standard. Securing Your Wireless Local Area Network (WLAN) Change the Default Router Administrator Password...
... wireless router uses an administrator password and wireless network name (Service Set Identifier [SSID]), which are more secure than a password-based system because the encryption key changes dynamically. Set up your network must support the same encryption standard. Securing Your Wireless Local Area Network (WLAN) Change the Default Router Administrator Password...


