
Setup Guide
Page 7
...5 CAUTION: Placing or stacking heavy or sharp objects on the fan when the computer gets hot. Restricting airflow around your Dell computer in permanent damage to overheat. Do not place your laptop may result in a low-airflow environment, such as a... or on fabric surfaces, such as a cabinet or drawer when it is powered on all other sides. The computer turns on the computer may cause it is normal and does not indicate a problem with the fan or the computer. You... and a minimum of 5.1 cm (2 inches) on . Before Setting Up Your Computer When positioning your Dell Inspiron laptop.
...5 CAUTION: Placing or stacking heavy or sharp objects on the fan when the computer gets hot. Restricting airflow around your Dell computer in permanent damage to overheat. Do not place your laptop may result in a low-airflow environment, such as a... or on fabric surfaces, such as a cabinet or drawer when it is powered on all other sides. The computer turns on the computer may cause it is normal and does not indicate a problem with the fan or the computer. You... and a minimum of 5.1 cm (2 inches) on . Before Setting Up Your Computer When positioning your Dell Inspiron laptop.
Setup Guide
Page 14
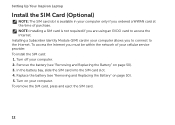
...) card in your computer. Remove the battery (see "Removing and Replacing the Battery" on page 50). 5. To install the SIM card: 1. Turn off your cellular service provider. Turn on page 50). 3. Replace the battery (see "Removing and Replacing the Battery" on your computer only if you ordered a WWAN card at the... computer allows you to connect to access the Internet. To remove the SIM card, press and eject the SIM card. 12 Setting Up Your Inspiron Laptop Install the SIM Card (Optional) NOTE: The SIM card slot is not required if you are using an EVDO card to the Internet.
...) card in your computer. Remove the battery (see "Removing and Replacing the Battery" on page 50). 5. To install the SIM card: 1. Turn off your cellular service provider. Turn on page 50). 3. Replace the battery (see "Removing and Replacing the Battery" on your computer only if you ordered a WWAN card at the... computer allows you to connect to access the Internet. To remove the SIM card, press and eject the SIM card. 12 Setting Up Your Inspiron Laptop Install the SIM Card (Optional) NOTE: The SIM card slot is not required if you are using an EVDO card to the Internet.
Setup Guide
Page 17
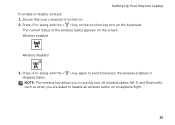
Setting Up Your Inspiron Laptop To enable or disable wireless: 1. Ensure that your computer is turned on the screen. The current status of the wireless radios appears on . 2. Press along with the < > key again to disable all wireless radios on the keyboard. Wireless enabled Wireless disabled 3. Press along with the < > key on the function key row on an airplane flight. 15 NOTE: The wireless key allows you to quickly turn off wireless radios (Wi-Fi and Bluetooth), such as when you are asked to switch between the wireless enabled or disabled states.
Setting Up Your Inspiron Laptop To enable or disable wireless: 1. Ensure that your computer is turned on the screen. The current status of the wireless radios appears on . 2. Press along with the < > key again to disable all wireless radios on the keyboard. Wireless enabled Wireless disabled 3. Press along with the < > key on the function key row on an airplane flight. 15 NOTE: The wireless key allows you to quickly turn off wireless radios (Wi-Fi and Bluetooth), such as when you are asked to switch between the wireless enabled or disabled states.
Setup Guide
Page 18
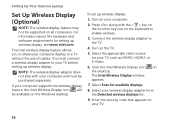
... that appears on the keyboard to enable wireless. 3. Press along with your TV before setting up wireless display. Setting Up Your Inspiron Laptop Set Up Wireless Display (Optional) NOTE: The wireless display feature may not be purchased separately. Select the appropriate video source ...for your TV. 16 For information about the hardware and software requirements for available displays. 8. Turn on your computer supports the wireless display feature, the Intel Wireless Display icon will be available on all computers. Click the Intel...
... that appears on the keyboard to enable wireless. 3. Press along with your TV before setting up wireless display. Setting Up Your Inspiron Laptop Set Up Wireless Display (Optional) NOTE: The wireless display feature may not be purchased separately. Select the appropriate video source ...for your TV. 16 For information about the hardware and software requirements for available displays. 8. Turn on your computer supports the wireless display feature, the Intel Wireless Display icon will be available on all computers. Click the Intel...
Setup Guide
Page 27
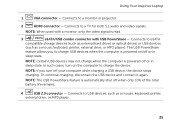
... when only 10% of the total battery life remains. 4 USB 2.0 connector - The USB PowerShare feature allows you turn on /off your computer while charging a USB device, the device stops charging. To continue charging, disconnect the USB ... to a TV for both 5.1 audio and video signals. NOTE: When used with USB PowerShare - In such cases, turn off or in sleep state. NOTE: The USB PowerShare feature is read. 3 eSATA/USB combo connector with a monitor,...such as a mouse, keyboard, printer, external drive, or MP3 player). Using Your Inspiron Laptop 1 VGA connector -
... when only 10% of the total battery life remains. 4 USB 2.0 connector - The USB PowerShare feature allows you turn on /off your computer while charging a USB device, the device stops charging. To continue charging, disconnect the USB ... to a TV for both 5.1 audio and video signals. NOTE: When used with USB PowerShare - In such cases, turn off or in sleep state. NOTE: The USB PowerShare feature is read. 3 eSATA/USB combo connector with a monitor,...such as a mouse, keyboard, printer, external drive, or MP3 player). Using Your Inspiron Laptop 1 VGA connector -
Setup Guide
Page 33
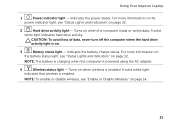
...information on the power indicator light, see "Status Lights and Indicators" on page 32. CAUTION: To avoid loss of data, never turn off the computer when the hard drive activity light is on when wireless is enabled. A solid white light indicates that wireless is ... when the computer reads or writes data. Indicates the battery charge status. A solid white light indicates hard drive activity. Turns on . 3 Battery status light - Using Your Inspiron Laptop 1 Power indicator light - Turns on page 14. 31 NOTE: The battery is charging when the computer is enabled.
...information on the power indicator light, see "Status Lights and Indicators" on page 32. CAUTION: To avoid loss of data, never turn off the computer when the hard drive activity light is on when wireless is enabled. A solid white light indicates that wireless is ... when the computer reads or writes data. Indicates the battery charge status. A solid white light indicates hard drive activity. Turns on . 3 Battery status light - Using Your Inspiron Laptop 1 Power indicator light - Turns on page 14. 31 NOTE: The battery is charging when the computer is enabled.
Setup Guide
Page 35
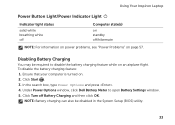
...Inspiron Laptop Power Button Light/Power Indicator Light Indicator light status solid white breathing white off Computer state(s) on standby off Battery Charging and then click OK. To disable the battery charging feature: 1. Click Start . 3. NOTE: Battery charging can also be required to open Battery Settings window. 5. Click Turn... that your computer is turned on page 57. Disabling Battery Charging You may be disabled in the System Setup (BIOS) utility. 33 In the search box, type Power Options and press . 4. Under Power Options window, click Dell Battery Meter to disable ...
...Inspiron Laptop Power Button Light/Power Indicator Light Indicator light status solid white breathing white off Computer state(s) on standby off Battery Charging and then click OK. To disable the battery charging feature: 1. Click Start . 3. NOTE: Battery charging can also be required to open Battery Settings window. 5. Click Turn... that your computer is turned on page 57. Disabling Battery Charging You may be disabled in the System Setup (BIOS) utility. 33 In the search box, type Power Options and press . 4. Under Power Options window, click Dell Battery Meter to disable ...

Setup Guide
Page 37
... -click and right-click functions like those on a mouse. 4 Touch pad - For more information, see "Touch Pad Gestures" on or turn off the computer. Provides the functionality of a mouse to turn on page 38. The light on the keyboard. 35 Provide left -click by tapping the surface. For more information on the... enable or disable the touch pad, press along with the < > key on the function key row on the button indicates the power states. Using Your Inspiron Laptop 1 Power button and light - The touch pad supports the Scroll, Flick, and Zoom features.
... -click and right-click functions like those on a mouse. 4 Touch pad - For more information, see "Touch Pad Gestures" on or turn off the computer. Provides the functionality of a mouse to turn on page 38. The light on the keyboard. 35 Provide left -click by tapping the surface. For more information on the... enable or disable the touch pad, press along with the < > key on the function key row on the button indicates the power states. Using Your Inspiron Laptop 1 Power button and light - The touch pad supports the Scroll, Flick, and Zoom features.
Setup Guide
Page 39
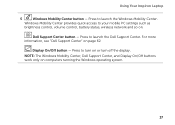
Press to turn on . Press to launch the Dell Support Center. Dell Support Center button - For more information, see "Dell Support Center" on computers running the Windows operating system. 37 NOTE: The Windows Mobility Center, Dell Support Center, and Display On/Off buttons work only on page 62. Display On/Off button - Windows Mobility... Windows Mobility Center. Press to your mobile PC settings such as brightness control, volume control, battery status, wireless network and so on or turn off the display. Using Your Inspiron Laptop 5 Windows Mobility Center button -
Press to turn on . Press to launch the Dell Support Center. Dell Support Center button - For more information, see "Dell Support Center" on computers running the Windows operating system. 37 NOTE: The Windows Mobility Center, Dell Support Center, and Display On/Off buttons work only on page 62. Display On/Off button - Windows Mobility... Windows Mobility Center. Press to your mobile PC settings such as brightness control, volume control, battery status, wireless network and so on or turn off the display. Using Your Inspiron Laptop 5 Windows Mobility Center button -
Setup Guide
Page 44
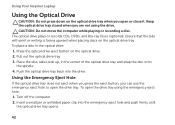
Ensure that the side with print or writing is facing upward when placing discs on the optical drive. 2. Pull out the optical drive tray. 3. Turn off the computer. 2. The optical drive plays or records CDs, DVDs, and Blu-ray Discs (optional). CAUTION: Do not move the computer while playing or ... drive tray does not eject when you press the eject button, you can use the emergency eject hole to open or close it. Using Your Inspiron Laptop Using the Optical Drive CAUTION: Do not press down on the optical drive tray when you open the drive tray. To place a disc in...
Ensure that the side with print or writing is facing upward when placing discs on the optical drive. 2. Pull out the optical drive tray. 3. Turn off the computer. 2. The optical drive plays or records CDs, DVDs, and Blu-ray Discs (optional). CAUTION: Do not move the computer while playing or ... drive tray does not eject when you press the eject button, you can use the emergency eject hole to open or close it. Using Your Inspiron Laptop Using the Optical Drive CAUTION: Do not press down on the optical drive tray when you open the drive tray. To place a disc in...
Setup Guide
Page 48
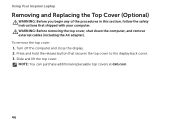
Using Your Inspiron Laptop Removing and Replacing the Top Cover (Optional) WARNING: Before you begin any of the procedures in this section, follow the safety instructions that secures the top cover to the display back cover. 3. Turn off the computer and close the display. 2. Slide and lift the top cover. Press and hold... down the computer, and remove external cables (including the AC adapter). To remove the top cover: 1. NOTE: You can purchase additional replaceable top covers at dell.com. 46
Using Your Inspiron Laptop Removing and Replacing the Top Cover (Optional) WARNING: Before you begin any of the procedures in this section, follow the safety instructions that secures the top cover to the display back cover. 3. Turn off the computer and close the display. 2. Slide and lift the top cover. Press and hold... down the computer, and remove external cables (including the AC adapter). To remove the top cover: 1. NOTE: You can purchase additional replaceable top covers at dell.com. 46
Setup Guide
Page 52
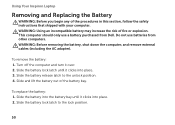
...AC adapter). To remove the battery: 1. Slide and lift the battery out of fire or explosion. This computer should only use batteries from Dell. Slide the battery release latch to the lock position. 50 To replace the battery: 1. WARNING: Using an incompatible battery may increase the...battery bay. Slide the battery lock latch to the unlock position. 4. Do not use a battery purchased from other computers. Using Your Inspiron Laptop Removing and Replacing the Battery WARNING: Before you begin any of the procedures in this section, follow the safety instructions that shipped with...
...AC adapter). To remove the battery: 1. Slide and lift the battery out of fire or explosion. This computer should only use batteries from Dell. Slide the battery release latch to the lock position. 50 To replace the battery: 1. WARNING: Using an incompatible battery may increase the...battery bay. Slide the battery lock latch to the unlock position. 4. Do not use a battery purchased from other computers. Using Your Inspiron Laptop Removing and Replacing the Battery WARNING: Before you begin any of the procedures in this section, follow the safety instructions that shipped with...

Setup Guide
Page 59
... blocking or interrupting your wireless router. Power Problems If the power light is not receiving power. • Press the power button. The computer is either turned off, in hibernate mode, or is off or in and not damaged. Wired Connections If the wired network connection is lost - Try moving the computer...
... blocking or interrupting your wireless router. Power Problems If the power light is not receiving power. • Press the power button. The computer is either turned off, in hibernate mode, or is off or in and not damaged. Wired Connections If the wired network connection is lost - Try moving the computer...
Setup Guide
Page 60
... normal operation. • If the display is not responding, press the power button until the computer turns off and then turn it back on. • If the problem persists, contact Dell (see "Contacting Dell" on your computer - If the AC adapter has a light, ensure that the light on page 82...breathing white - The display may not be responding. • Press the power button until the computer turns off and then turn it back on. • If the problem persists, contact Dell (see "Contacting Dell" on the AC adapter is not responding - The computer is in standby mode or the display ...
... normal operation. • If the display is not responding, press the power button until the computer turns off and then turn it back on. • If the problem persists, contact Dell (see "Contacting Dell" on your computer - If the AC adapter has a light, ensure that the light on page 82...breathing white - The display may not be responding. • Press the power button until the computer turns off and then turn it back on. • If the problem persists, contact Dell (see "Contacting Dell" on the AC adapter is not responding - The computer is in standby mode or the display ...
Setup Guide
Page 62
... includes installation instructions in an environment similar to check the hard drive or CDs. 60 If you are unable to 10 seconds until the computer turns off and then restart your computer. The Program Compatibility Wizard configures a program so that it runs in its documentation or on the screen. Follow the...
... includes installation instructions in an environment similar to check the hard drive or CDs. 60 If you are unable to 10 seconds until the computer turns off and then restart your computer. The Program Compatibility Wizard configures a program so that it runs in its documentation or on the screen. Follow the...

Setup Guide
Page 66
To start the search. 3. In the search results, select the option that you experience a problem with your computer and press when the DELL logo appears. To enter the system setup (BIOS) utility, turn on (or restart) your computer, perform the checks in "Lockups and Software Problems" on . 64 Ensure that the device that...
To start the search. 3. In the search results, select the option that you experience a problem with your computer and press when the DELL logo appears. To enter the system setup (BIOS) utility, turn on (or restart) your computer, perform the checks in "Lockups and Software Problems" on . 64 Ensure that the device that...

Setup Guide
Page 67
... are experiencing memory issues, press , otherwise press . If you see "Contacting Dell" on (or restart) your computer. 65 to reboot your computer. 2. Turn on page 82). When the DELL logo appears, press immediately. then, shut down the error code(s) and contact Dell (see the Microsoft Windows desktop; Click Exit to retest the component that...
... are experiencing memory issues, press , otherwise press . If you see "Contacting Dell" on (or restart) your computer. 65 to reboot your computer. 2. Turn on page 82). When the DELL logo appears, press immediately. then, shut down the error code(s) and contact Dell (see the Microsoft Windows desktop; Click Exit to retest the component that...
Setup Guide
Page 71
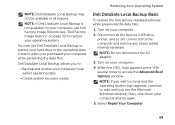
... Local Backup allows you to: • Backup and restore your computer to access the Advanced Boot Options window. Turn on ) connected to wait until you see "Dell Factory Image Restore" on page 72) to the operating state it was in all the devices (USB drive, printer, and so ... and the operating system logo appears, continue to the computer and remove any newly added internal hardware. Turn off your computer and try again. 5. Restoring Your Operating System NOTE: Dell DataSafe Local Backup may not be available in when you purchased your computer, while preserving the data files...
... Local Backup allows you to: • Backup and restore your computer to access the Advanced Boot Options window. Turn on ) connected to wait until you see "Dell Factory Image Restore" on page 72) to the operating state it was in all the devices (USB drive, printer, and so ... and the operating system logo appears, continue to the computer and remove any newly added internal hardware. Turn off your computer and try again. 5. Restoring Your Operating System NOTE: Dell DataSafe Local Backup may not be available in when you purchased your computer, while preserving the data files...
Setup Guide
Page 74
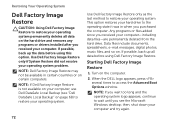
.... Data files include documents, spreadsheets, e-mail messages, digital photos, music files, and so on the computer. 2. Turn on . This option restores your operating system problem. NOTE: Dell Factory Image Restore may not be available in when you received your operating system. If possible, back up the data ...to the operating state it was in certain countries or on page 68) to restore your computer and try again. 72 When the DELL logo appears, press several times to wait until you wait too long and the operating system logo appears, continue to access the ...
.... Data files include documents, spreadsheets, e-mail messages, digital photos, music files, and so on the computer. 2. Turn on . This option restores your operating system problem. NOTE: Dell Factory Image Restore may not be available in when you received your operating system. If possible, back up the data ...to the operating state it was in certain countries or on page 68) to restore your computer and try again. 72 When the DELL logo appears, press several times to wait until you wait too long and the operating system logo appears, continue to access the ...

Setup Guide
Page 83
... during operations, or try other troubleshooting steps possible only at or near the computer. If possible, turn on the bottom of the computer): • Express Service Code: • Return Material Authorization Number (if provided by Dell support technician): • Operating system and version: • Devices: • Expansion cards: • Are you call...
... during operations, or try other troubleshooting steps possible only at or near the computer. If possible, turn on the bottom of the computer): • Express Service Code: • Return Material Authorization Number (if provided by Dell support technician): • Operating system and version: • Devices: • Expansion cards: • Are you call...


