Inspiron Mini 9 Ubuntur Quick Reference Guide
Page 6
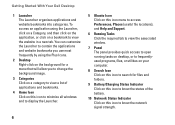
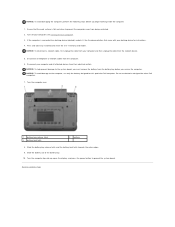
... an application using the Plus Icons. 2 Desktop Right-click on the background for files and folders. 9 Battery/Charging Status Indicator Click on this icon to view the website in a new tab. Getting Started With Your Dell Desktop 1 Launcher The Launcher organizes applications and website bookmarks into categories. You can customize the Launcher... frequently by using the Launcher, click on a Category, and then click on the application, or click on this icon to know the status of the battery. 10 Network Status Indicator Click on a bookmark to know the network signal strength. 6
... an application using the Plus Icons. 2 Desktop Right-click on the background for files and folders. 9 Battery/Charging Status Indicator Click on this icon to view the website in a new tab. Getting Started With Your Dell Desktop 1 Launcher The Launcher organizes applications and website bookmarks into categories. You can customize the Launcher... frequently by using the Launcher, click on a Category, and then click on the application, or click on this icon to know the status of the battery. 10 Network Status Indicator Click on a bookmark to know the network signal strength. 6
Inspiron Mini 9 Service Manual
Page 1
...to change without the written permission of these materials in the United States and/or other than its own. A00 Dell™ Inspiron™ 910 Service Manual Before You Begin Module Cover Memory Module Solid-state Drive Communication Cards Keyboard Palm Rest Internal Card With...® Wireless Technology Power Button Board Display Speaker Camera (Optional) System Board Microphone Coin-Cell Battery Flashing the BIOS Notes, Notices, and Cautions NOTE: A NOTE indicates important information that helps you how to avoid the problem. Reproduction of Dell Inc. Dell Inc.
...to change without the written permission of these materials in the United States and/or other than its own. A00 Dell™ Inspiron™ 910 Service Manual Before You Begin Module Cover Memory Module Solid-state Drive Communication Cards Keyboard Palm Rest Internal Card With...® Wireless Technology Power Button Board Display Speaker Camera (Optional) System Board Microphone Coin-Cell Battery Flashing the BIOS Notes, Notices, and Cautions NOTE: A NOTE indicates important information that helps you how to avoid the problem. Reproduction of Dell Inc. Dell Inc.
Inspiron Mini 9 Service Manual
Page 2
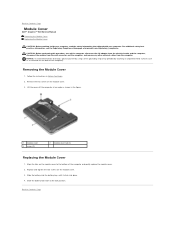
...the computer, and remove any other external cables from the computer. Align the tabs on the module cover. 3. Slide the battery-lock latch to Contents Page For additional safety best practices information, see the Regulatory Compliance Homepage at an angle as a connector... battery into the battery bay, until it clicks into place. 4. Follow the instructions in the figure. 1 module cover 3 screw (2) 2 module cover tab (3) Replacing the Module Cover 1. Replace and tighten the two screws on the module cover to Contents Page Module Cover Dell™ Inspiron™ 910 Service...
...the computer, and remove any other external cables from the computer. Align the tabs on the module cover. 3. Slide the battery-lock latch to Contents Page For additional safety best practices information, see the Regulatory Compliance Homepage at an angle as a connector... battery into the battery bay, until it clicks into place. 4. Follow the instructions in the figure. 1 module cover 3 screw (2) 2 module cover tab (3) Replacing the Module Cover 1. Replace and tighten the two screws on the module cover to Contents Page Module Cover Dell™ Inspiron™ 910 Service...
Inspiron Mini 9 Service Manual
Page 4
... the system board, you must remove the battery from the network device. 5. Slide the battery-bay release latch and the battery-lock latch towards the outer edges. 9. Do not use only the battery designed for this particular Dell computer. Turn the computer over. 1 battery-bay release latch 3 battery-lock latch 2 battery 8. Ensure that came with your computer and...
... the system board, you must remove the battery from the network device. 5. Slide the battery-bay release latch and the battery-lock latch towards the outer edges. 9. Do not use only the battery designed for this particular Dell computer. Turn the computer over. 1 battery-bay release latch 3 battery-lock latch 2 battery 8. Ensure that came with your computer and...
Inspiron Mini 9 Service Manual
Page 5
Flashing the BIOS From a CD 1. Ensure that the AC adapter is plugged in and that the main battery is complete, the computer will automatically reboot. 3. Remove the flash BIOS-update program CD from a CD before inserting the CD. Locate the latest BIOS update .... Double-click the file icon on the desktop and follow the instructions on the computer. 3. Press during POST to Contents Page Flashing the BIOS Dell™ Inspiron™ 910 Service Manual Flashing the BIOS From a CD Flashing the BIOS From the Solid-state Drive in Windows® XP Flashing the BIOS From the...
Flashing the BIOS From a CD 1. Ensure that the AC adapter is plugged in and that the main battery is complete, the computer will automatically reboot. 3. Remove the flash BIOS-update program CD from a CD before inserting the CD. Locate the latest BIOS update .... Double-click the file icon on the desktop and follow the instructions on the computer. 3. Press during POST to Contents Page Flashing the BIOS Dell™ Inspiron™ 910 Service Manual Flashing the BIOS From a CD Flashing the BIOS From the Solid-state Drive in Windows® XP Flashing the BIOS From the...
Inspiron Mini 9 Service Manual
Page 6
... computer may or may not ship with an external optical drive. Click Close if the Download Complete window appears. 11. Type your computer at support.dell.com. 6. Turn on the computer. Click ® Places® Documents. 4. The Save In window appears. 9. string appears. Click Save this... that involve discs. 3. Locate the latest BIOS update file for the procedures that the AC adapter is plugged in and the main battery is complete. Click Download Now to disk and then click OK. The computer will restart automatically once the BIOS flash is properly installed. 2. ...
... computer may or may not ship with an external optical drive. Click Close if the Download Complete window appears. 11. Type your computer at support.dell.com. 6. Turn on the computer. Click ® Places® Documents. 4. The Save In window appears. 9. string appears. Click Save this... that involve discs. 3. Locate the latest BIOS update file for the procedures that the AC adapter is plugged in and the main battery is complete. Click Download Now to disk and then click OK. The computer will restart automatically once the BIOS flash is properly installed. 2. ...

Inspiron Mini 9 Service Manual
Page 8
Replace the module cover (see Replacing the Module Cover). 6. Slide the battery into the battery bay, until it clicks in place and slide the battery-lock latch towards the lock position. Back to Contents Page 5.
Replace the module cover (see Replacing the Module Cover). 6. Slide the battery into the battery bay, until it clicks in place and slide the battery-lock latch towards the lock position. Back to Contents Page 5.
Inspiron Mini 9 Service Manual
Page 9
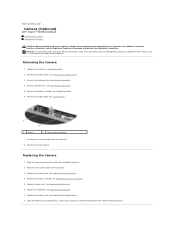
... the Camera 1. Align the camera board over the slot holes and gently replace it clicks in Before You Begin. 2. Slide the battery into the battery bay, until it . 2. Remove the display assembly (see Display Bezel). 1 camera 2 camera cable connector 7. Remove the display bezel...rest (see Replacing the Display Bezel). 4. Replacing the Camera 1. Reconnect the camera cable to Contents Page Camera (Optional) Dell™ Inspiron™ 910 Service Manual Removing the Camera Replacing the Camera CAUTION: Before working inside your computer, read the safety information that shipped ...
... the Camera 1. Align the camera board over the slot holes and gently replace it clicks in Before You Begin. 2. Slide the battery into the battery bay, until it . 2. Remove the display assembly (see Display Bezel). 1 camera 2 camera cable connector 7. Remove the display bezel...rest (see Replacing the Display Bezel). 4. Replacing the Camera 1. Reconnect the camera cable to Contents Page Camera (Optional) Dell™ Inspiron™ 910 Service Manual Removing the Camera Replacing the Camera CAUTION: Before working inside your computer, read the safety information that shipped ...
Inspiron Mini 9 Service Manual
Page 11
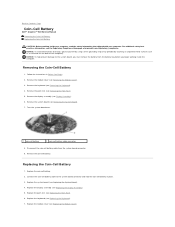
... Replacing the Palm Rest). 6. Connect the coin-cell battery cable to the system board connector and hold the coin-cell battery in Before You Begin. 2. Back to Contents Page Coin-Cell Battery Dell™ Inspiron™ 910 Service Manual Removing the Coin-Cell Battery Replacing the Coin-Cell Battery CAUTION: Before working inside your computer, read the safety...
... Replacing the Palm Rest). 6. Connect the coin-cell battery cable to the system board connector and hold the coin-cell battery in Before You Begin. 2. Back to Contents Page Coin-Cell Battery Dell™ Inspiron™ 910 Service Manual Removing the Coin-Cell Battery Replacing the Coin-Cell Battery CAUTION: Before working inside your computer, read the safety...

Inspiron Mini 9 Service Manual
Page 12
8. Slide the main battery into the battery bay, until it clicks in place and slide the battery-lock latch towards the lock position. Back to Contents Page
8. Slide the main battery into the battery bay, until it clicks in place and slide the battery-lock latch towards the lock position. Back to Contents Page
Inspiron Mini 9 Service Manual
Page 13
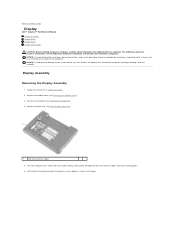
... to the system board, you begin working inside the computer. NOTICE: To help prevent damage to Contents Page Display Dell™ Inspiron™ 910 Service Manual Display Assembly Display Bezel Display Panel Display Panel Cable CAUTION: Before working inside your computer, read the safety... through the system board as a connector on the back of the cable routing, and carefully dislodge the Mini-Card antenna cables from the battery bay before you must remove the battery from their routing guides. 6. Remove the keyboard (see Removing the Module Cover). 3. Turn the computer over...
... to the system board, you begin working inside the computer. NOTICE: To help prevent damage to Contents Page Display Dell™ Inspiron™ 910 Service Manual Display Assembly Display Bezel Display Panel Display Panel Cable CAUTION: Before working inside your computer, read the safety... through the system board as a connector on the back of the cable routing, and carefully dislodge the Mini-Card antenna cables from the battery bay before you must remove the battery from their routing guides. 6. Remove the keyboard (see Removing the Module Cover). 3. Turn the computer over...
Inspiron Mini 9 Service Manual
Page 14
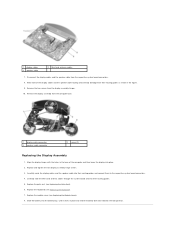
... Palm Rest). 6. Remove the display assembly from the display assembly hinges. 10. Carefully slide the Mini-Card antenna cables through the system board and into their routing guides. 5. Slide the battery into place. 2. Remove the two screws from the computer base. 1 display cable connectors 3 speaker...assembly hinge screws. 3. Disconnect the display cables and the speaker cable from their routing guides as shown in place and slide the battery-lock latch towards the lock position. Replace the palm rest (see Replacing the Keyboard). 7. Replace the module cover (see Replacing ...
... Palm Rest). 6. Remove the display assembly from the display assembly hinges. 10. Carefully slide the Mini-Card antenna cables through the system board and into their routing guides. 5. Slide the battery into place. 2. Remove the two screws from the computer base. 1 display cable connectors 3 speaker...assembly hinge screws. 3. Disconnect the display cables and the speaker cable from their routing guides as shown in place and slide the battery-lock latch towards the lock position. Replace the palm rest (see Replacing the Keyboard). 7. Replace the module cover (see Replacing ...
Inspiron Mini 9 Service Manual
Page 18
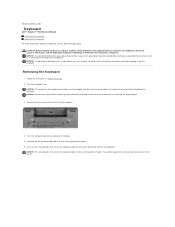
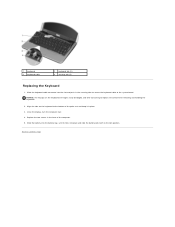
... Guide. Turn the computer over. Remove the two screws from the battery bay before you must remove the battery from the base of the computer). Carefully lift the keyboard and hold it to Contents Page Keyboard Dell™ Inspiron™ 910 Service Manual Removing the Keyboard Replacing the Keyboard For more information about the keyboard...
... Guide. Turn the computer over. Remove the two screws from the battery bay before you must remove the battery from the base of the computer). Carefully lift the keyboard and hold it to Contents Page Keyboard Dell™ Inspiron™ 910 Service Manual Removing the Keyboard Replacing the Keyboard For more information about the keyboard...
Inspiron Mini 9 Service Manual
Page 19
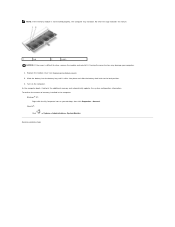
... two screws in the securing tabs to secure the keyboard cable to the system board. Slide the keyboard cable connector into place and slide the battery-lock latch to replace. Align the tabs on the keyboard are fragile, easily dislodged, and time-consuming to the lock position. Back to the bottom... the display, turn the computer over. 4. NOTICE: The keycaps on the keyboard to Contents Page Be careful when removing and handling the keyboard. 2. Slide the battery into the battery bay, until it clicks into the slot and push in the base of the palm rest and keep it in place. 3.
... two screws in the securing tabs to secure the keyboard cable to the system board. Slide the keyboard cable connector into place and slide the battery-lock latch to replace. Align the tabs on the keyboard are fragile, easily dislodged, and time-consuming to the lock position. Back to the bottom... the display, turn the computer over. 4. NOTICE: The keycaps on the keyboard to Contents Page Be careful when removing and handling the keyboard. 2. Slide the battery into the battery bay, until it clicks into the slot and push in the base of the palm rest and keep it in place. 3.
Inspiron Mini 9 Service Manual
Page 21
As the computer boots, it clicks into the battery bay until it detects the additional memory and automatically updates the system configuration information. Turn on your computer. 4. To confirm the amount of memory installed ... 2 notch NOTICE: If the cover is not installed properly, the computer may damage your desktop, then click Properties® General. Slide the battery into place and slide the battery-lock latch to the lock position. 6. Forcing the cover to close , remove the module and reinstall it. Replace the module cover (see Replacing...
As the computer boots, it clicks into the battery bay until it detects the additional memory and automatically updates the system configuration information. Turn on your computer. 4. To confirm the amount of memory installed ... 2 notch NOTICE: If the cover is not installed properly, the computer may damage your desktop, then click Properties® General. Slide the battery into place and slide the battery-lock latch to the lock position. 6. Forcing the cover to close , remove the module and reinstall it. Replace the module cover (see Replacing...
Inspiron Mini 9 Service Manual
Page 22
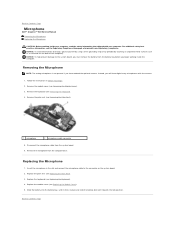
...place and slide the battery-lock latch towards the lock position. Remove the module cover (see Replacing the Palm Rest). 3. Insert the microphone in the slot and connect the microphone cable to Contents Page Microphone Dell™ Inspiron™ 910 Service Manual Removing the... microphone cable connector 5. Remove the palm rest (see the Regulatory Compliance Homepage at www.dell.com/regulatory_compliance. Replace the module cover (see Replacing the Module Cover). 5. Slide the battery into the battery bay, until it clicks in Before You Begin. 2. NOTICE: To avoid electrostatic discharge...
...place and slide the battery-lock latch towards the lock position. Remove the module cover (see Replacing the Palm Rest). 3. Insert the microphone in the slot and connect the microphone cable to Contents Page Microphone Dell™ Inspiron™ 910 Service Manual Removing the... microphone cable connector 5. Remove the palm rest (see the Regulatory Compliance Homepage at www.dell.com/regulatory_compliance. Replace the module cover (see Replacing the Module Cover). 5. Slide the battery into the battery bay, until it clicks in Before You Begin. 2. NOTICE: To avoid electrostatic discharge...
Inspiron Mini 9 Service Manual
Page 24
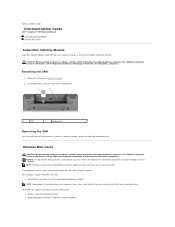
... board, you must remove the battery from the battery bay before you ordered a wireless Mini-Card with your computer, the card is partially ejected, remove the SIM from sources other than Dell. Wireless Mini-Cards CAUTION: Before working inside ...dell.com/regulatory_compliance. Your computer supports two Mini-Card slots: l Two Full Mini-Card slots - CAUTION: Before working inside your computer, read the safety information that shipped with your computer. Back to Contents Page Communication Cards Dell™ Inspiron™ 910 Service Manual Subscriber Identity Module Wireless Mini...
... board, you must remove the battery from the battery bay before you ordered a wireless Mini-Card with your computer, the card is partially ejected, remove the SIM from sources other than Dell. Wireless Mini-Cards CAUTION: Before working inside ...dell.com/regulatory_compliance. Your computer supports two Mini-Card slots: l Two Full Mini-Card slots - CAUTION: Before working inside your computer, read the safety information that shipped with your computer. Back to Contents Page Communication Cards Dell™ Inspiron™ 910 Service Manual Subscriber Identity Module Wireless Mini...
Inspiron Mini 9 Service Manual
Page 26
...unused antenna cables in place and slide the battery-lock latch to the Mini-Card you must install the appropriate drivers and utilities. Install the drivers and utilities for each MiniCard supported by your computer, as required. Press the other than Dell, you are installing a communication card from a...the module cover (see the Dell Technology Guide. For example, the WLAN card connector is labeled WLAN and so on. 4. The following table provides the antenna cable color scheme for your computer. Insert the Mini-Card at a 45-degree angle into the battery bay, until it clicks in...
...unused antenna cables in place and slide the battery-lock latch to the Mini-Card you must install the appropriate drivers and utilities. Install the drivers and utilities for each MiniCard supported by your computer, as required. Press the other than Dell, you are installing a communication card from a...the module cover (see the Dell Technology Guide. For example, the WLAN card connector is labeled WLAN and so on. 4. The following table provides the antenna cable color scheme for your computer. Insert the Mini-Card at a 45-degree angle into the battery bay, until it clicks in...
Inspiron Mini 9 Service Manual
Page 29
6. Replace the module cover (see Replacing the Keyboard). 9. Replace the keyboard (see Replacing the Module Cover). 10. Back to Contents Page Slide the battery into the battery bay, until it clicks in the computer base. 7. Replace the left and right rubber bumpers. 8. Turn the computer over and replace the nine screws in place and slide the battery-lock latch towards the lock position.
6. Replace the module cover (see Replacing the Keyboard). 9. Replace the keyboard (see Replacing the Module Cover). 10. Back to Contents Page Slide the battery into the battery bay, until it clicks in the computer base. 7. Replace the left and right rubber bumpers. 8. Turn the computer over and replace the nine screws in place and slide the battery-lock latch towards the lock position.

Inspiron Mini 9 Service Manual
Page 31
Slide the battery into the battery bay, until it clicks in place and slide the battery-lock latch towards the lock position. 6. Back to Contents Page
Slide the battery into the battery bay, until it clicks in place and slide the battery-lock latch towards the lock position. 6. Back to Contents Page

