Inspiron Mini 12 Service Manual
Page 1
... license; Dell™ Inspiron™ 1210 Service Manual Before You Begin Replacing the Hinge Cover Replacing the Keyboard Replacing the Palm Rest Replacing the Display Replacing the Internal Card With Bluetooth® Wireless Technology Replacing the Hard Drive Replacing the Power Button Board Replacing the Speaker Communication Cards Replacing the Power Cable Replacing the 2-in-1 Processor and Memory Board Replacing the Coin-Cell Battery Replacing the CRT Board Replacing the Camera Replacing the Inverter Board Replacing the USB Board Replacing the System Board Flashing the BIOS Notes...
... license; Dell™ Inspiron™ 1210 Service Manual Before You Begin Replacing the Hinge Cover Replacing the Keyboard Replacing the Palm Rest Replacing the Display Replacing the Internal Card With Bluetooth® Wireless Technology Replacing the Hard Drive Replacing the Power Button Board Replacing the Speaker Communication Cards Replacing the Power Cable Replacing the 2-in-1 Processor and Memory Board Replacing the Coin-Cell Battery Replacing the CRT Board Replacing the Camera Replacing the Inverter Board Replacing the USB Board Replacing the System Board Flashing the BIOS Notes...
Inspiron Mini 12 Service Manual
Page 2
... Begin Dell™ Inspiron™ 1210 Service Manual Recommended Tools Turning Off Your Computer Before Working Inside Your Computer This section provides procedures for removing and installing the components in on the locking tabs before you disconnect a cable, pull on its connector or on your operating system, press and hold the power button until the computer turns off your computer. Before Working Inside Your Computer Use the...
... Begin Dell™ Inspiron™ 1210 Service Manual Recommended Tools Turning Off Your Computer Before Working Inside Your Computer This section provides procedures for removing and installing the components in on the locking tabs before you disconnect a cable, pull on its connector or on your operating system, press and hold the power button until the computer turns off your computer. Before Working Inside Your Computer Use the...
Inspiron Mini 12 Service Manual
Page 3
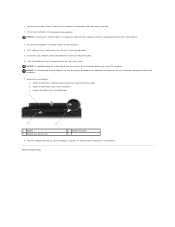
... telephone or network cables from the 3-in-1 memory card reader. 5. See Turning Off Your Computer. NOTICE: To avoid damage to ground the system board. Do not use only the battery designed for other Dell computers. 7. c. Turn the computer top-side up, open the display, and press the power button to the computer, use batteries designed for this particular Dell computer. NOTICE: To disconnect a network cable, first unplug the cable from your...
... telephone or network cables from the 3-in-1 memory card reader. 5. See Turning Off Your Computer. NOTICE: To avoid damage to ground the system board. Do not use only the battery designed for other Dell computers. 7. c. Turn the computer top-side up, open the display, and press the power button to the computer, use batteries designed for this particular Dell computer. NOTICE: To disconnect a network cable, first unplug the cable from your...
Inspiron Mini 12 Service Manual
Page 4
... save configuration changes. 6. Follow the instructions that the AC adapter is plugged in Ubuntu Press , select Save changes and reboot, and press to your computer at support.dell.com. 4. Click Download Now to boot from the CD. The Save In window appears. 7. Use an external optical drive or any external storage device for your desktop. 8. Remove the BIOS-update program CD from the hard drive. If you use a BIOS-update program CD to flash the BIOS, set...
... save configuration changes. 6. Follow the instructions that the AC adapter is plugged in Ubuntu Press , select Save changes and reboot, and press to your computer at support.dell.com. 4. Click Download Now to boot from the CD. The Save In window appears. 7. Use an external optical drive or any external storage device for your desktop. 8. Remove the BIOS-update program CD from the hard drive. If you use a BIOS-update program CD to flash the BIOS, set...
Inspiron Mini 12 Service Manual
Page 6
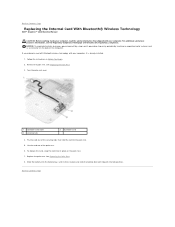
... of the computer). Follow the instructions in place and slide the battery-lock latch towards the lock position. Pry the card out of the palm rest. 6. See Replacing the Palm Rest. 8. Lift the card out of the securing tabs that hold the card to Contents Page Replacing the Internal Card With Bluetooth® Wireless Technology Dell™ Inspiron™ 1210 Service Manual CAUTION: Before working inside your computer, read...
... of the computer). Follow the instructions in place and slide the battery-lock latch towards the lock position. Pry the card out of the palm rest. 6. See Replacing the Palm Rest. 8. Lift the card out of the securing tabs that hold the card to Contents Page Replacing the Internal Card With Bluetooth® Wireless Technology Dell™ Inspiron™ 1210 Service Manual CAUTION: Before working inside your computer, read...
Inspiron Mini 12 Service Manual
Page 7
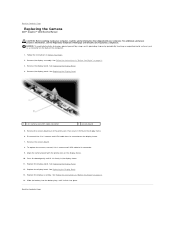
.... Remove the display assembly. Remove the display bezel. See Replacing the Display Panel. 12. Follow the instructions in "Before You Begin" on page 9.. 14. Replace the display panel. See Follow the instructions in -1 camera and LVDS cable from its connector. 9. Press the board gently until it clicks into the battery bay, until it sits firmly in -1 camera and LVDS cable to Contents Page Replacing the Camera Dell™ Inspiron™ 1210 Service Manual CAUTION: Before working inside...
.... Remove the display assembly. Remove the display bezel. See Replacing the Display Panel. 12. Follow the instructions in "Before You Begin" on page 9.. 14. Replace the display panel. See Follow the instructions in -1 camera and LVDS cable from its connector. 9. Press the board gently until it clicks into the battery bay, until it sits firmly in -1 camera and LVDS cable to Contents Page Replacing the Camera Dell™ Inspiron™ 1210 Service Manual CAUTION: Before working inside...
Inspiron Mini 12 Service Manual
Page 10
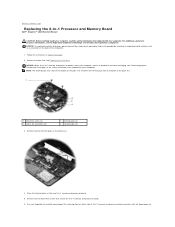
... (2) 3 tab in -1 Processor and Memory Board Dell™ Inspiron™ 1210 Service Manual CAUTION: Before working inside your computer. For additional safety best practices information, see "Protecting Against Electrostatic Discharge" in Before You Begin. 2. Remove the palm rest. NOTE: The thermal pads may stick to the bottom of 2-in -1 memory and processor board. 6. Follow the instructions in the safety instructions that shipped with your...
... (2) 3 tab in -1 Processor and Memory Board Dell™ Inspiron™ 1210 Service Manual CAUTION: Before working inside your computer. For additional safety best practices information, see "Protecting Against Electrostatic Discharge" in Before You Begin. 2. Remove the palm rest. NOTE: The thermal pads may stick to the bottom of 2-in -1 memory and processor board. 6. Follow the instructions in the safety instructions that shipped with your...
Inspiron Mini 12 Service Manual
Page 18
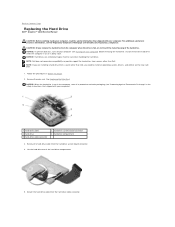
... hard drive out of the hard drive. Do not remove the hard drive while the computer is hot, do not touch the metal housing of the hard drive compartment. 5. NOTE: If you remove the hard drive from a source other than Dell, you need to Contents Page Replacing the Hard Drive Dell™ Inspiron™ 1210 Service Manual CAUTION: Before working inside your computer, read the safety information that shipped with your computer). 1 hard-drive cable 3 hard drive 5 hard-drive cable connector 2 hard-drive system board connector 4 hard-drive...
... hard drive out of the hard drive. Do not remove the hard drive while the computer is hot, do not touch the metal housing of the hard drive compartment. 5. NOTE: If you remove the hard drive from a source other than Dell, you need to Contents Page Replacing the Hard Drive Dell™ Inspiron™ 1210 Service Manual CAUTION: Before working inside your computer, read the safety information that shipped with your computer). 1 hard-drive cable 3 hard drive 5 hard-drive cable connector 2 hard-drive system board connector 4 hard-drive...
Inspiron Mini 12 Service Manual
Page 24
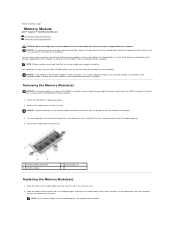
... you need to install memory modules in this section, follow the safety instructions shipped with the tab in the DIMM 2 connector, remove it (DIMM 2). See "Specifications" in Before You Begin. 2. If the module does not click into place. Remove the module cover (see Base Cover). Follow the procedures in your Setup Guide for your computer warranty. Back to Contents Page Memory Module Dell™ Inspiron™ 1210 Service Manual Removing the Memory Module(s) Replacing the Memory Module...
... you need to install memory modules in this section, follow the safety instructions shipped with the tab in the DIMM 2 connector, remove it (DIMM 2). See "Specifications" in Before You Begin. 2. If the module does not click into place. Remove the module cover (see Base Cover). Follow the procedures in your Setup Guide for your computer warranty. Back to Contents Page Memory Module Dell™ Inspiron™ 1210 Service Manual Removing the Memory Module(s) Replacing the Memory Module...
Inspiron Mini 12 Service Manual
Page 33
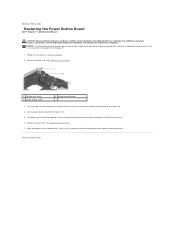
....5x3-mm screw. 6. Back to the palm rest. 4. See Replacing the Palm Rest. 7. Back to Contents Page Replacing the Power Button Board Dell™ Inspiron™ 1210 Service Manual CAUTION: Before working inside your computer. Remove the palm rest. Follow the instructions in place and slide the battery-lock latch towards the lock position. Lift the power button board off the palm rest. 5. For additional safety best practices information...
....5x3-mm screw. 6. Back to the palm rest. 4. See Replacing the Palm Rest. 7. Back to Contents Page Replacing the Power Button Board Dell™ Inspiron™ 1210 Service Manual CAUTION: Before working inside your computer. Remove the palm rest. Follow the instructions in place and slide the battery-lock latch towards the lock position. Lift the power button board off the palm rest. 5. For additional safety best practices information...
Inspiron Mini 12 Service Manual
Page 34
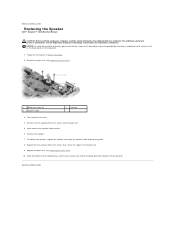
... Contents Page Replacing the Speaker Dell™ Inspiron™ 1210 Service Manual CAUTION: Before working inside your computer. Turn the palm rest over. 4. To replace the speaker, replace the speaker and route the speaker cable through the guide. 8. Replace the palm rest (see the Regulatory Compliance Homepage at www.dell.com/regulatory_compliance. Follow the instructions in place and slide the battery-lock latch towards the lock position. Remove the...
... Contents Page Replacing the Speaker Dell™ Inspiron™ 1210 Service Manual CAUTION: Before working inside your computer. Turn the palm rest over. 4. To replace the speaker, replace the speaker and route the speaker cable through the guide. 8. Replace the palm rest (see the Regulatory Compliance Homepage at www.dell.com/regulatory_compliance. Follow the instructions in place and slide the battery-lock latch towards the lock position. Remove the...
Inspiron Mini 12 Service Manual
Page 35
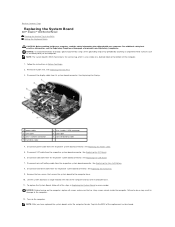
.... See Replacing the USB Board. 7. NOTICE: Before turning on the computer. See Replacing the Power Cable. 5. NOTE: After you have replaced the system board, enter the computer Service Tag into the BIOS of the computer base. 11. Failure to do so may result in the BIOS Setting the Keyboard Matrix CAUTION: Before working inside the computer. See Replacing the Display. 1 power cable 3 CRT cable 5 2-in-1 camera connector 7 hard disk cable 2 2-in-1 cable: LVDS connector 4 USB cable 6 coin-cell battery cable...
.... See Replacing the USB Board. 7. NOTICE: Before turning on the computer. See Replacing the Power Cable. 5. NOTE: After you have replaced the system board, enter the computer Service Tag into the BIOS of the computer base. 11. Failure to do so may result in the BIOS Setting the Keyboard Matrix CAUTION: Before working inside the computer. See Replacing the Display. 1 power cable 3 CRT cable 5 2-in-1 camera connector 7 hard disk cable 2 2-in-1 cable: LVDS connector 4 USB cable 6 coin-cell battery cable...
Inspiron Mini 12 Service Manual
Page 37
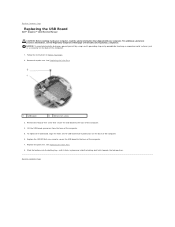
... the base of the computer. 7. Slide the battery into the battery bay, until it clicks in Before You Begin. 2. Back to Contents Page Replacing the USB Board Dell™ Inspiron™ 1210 Service Manual CAUTION: Before working inside your computer. NOTICE: To avoid electrostatic discharge, ground yourself by using a wrist grounding strap or by periodically touching an unpainted metal surface (such as a connector...
... the base of the computer. 7. Slide the battery into the battery bay, until it clicks in Before You Begin. 2. Back to Contents Page Replacing the USB Board Dell™ Inspiron™ 1210 Service Manual CAUTION: Before working inside your computer. NOTICE: To avoid electrostatic discharge, ground yourself by using a wrist grounding strap or by periodically touching an unpainted metal surface (such as a connector...
Inspiron Mini 12 Setup Guide
Page 5
... Setting Up Your Computer 5 Connect the AC Adapter 6 Connect the Network Cable (optional 7 Press the Power Button 8 Ubuntu® Information 9 Windows Vista® Setup 9 Connect to the Internet (Optional 10 Using Your Inspiron Laptop 14 Left Side Features 16 Computer Base and Keyboard Features 18 Display Features 20 Removing and Replacing the Battery 21 Software Features 22 Solving Problems 24 Network Problems 24 Power Problems 25 Memory Problems 26 Lockups and Software Problems 27 Dell Support Center 29 Using Support Tools 29 System Messages 30 Hardware Troubleshooter...
... Setting Up Your Computer 5 Connect the AC Adapter 6 Connect the Network Cable (optional 7 Press the Power Button 8 Ubuntu® Information 9 Windows Vista® Setup 9 Connect to the Internet (Optional 10 Using Your Inspiron Laptop 14 Left Side Features 16 Computer Base and Keyboard Features 18 Display Features 20 Removing and Replacing the Battery 21 Software Features 22 Solving Problems 24 Network Problems 24 Power Problems 25 Memory Problems 26 Lockups and Software Problems 27 Dell Support Center 29 Using Support Tools 29 System Messages 30 Hardware Troubleshooter...
Inspiron Mini 12 Setup Guide
Page 21
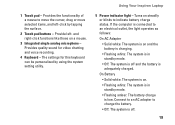
... surface. 2 Touch pad buttons - Using Your Inspiron Laptop 5 Power indicator light - If the computer is connected to indicate battery charge status. Turns on steadily or blinks to an electrical outlet, the light operates as follows: On AC Adapter • Solid white: The system is on and the battery is charging. • Flashing white: The system is in standby mode. • Flashing amber: The battery charge is low. The settings for video chatting and voice recording. 4 Keyboard - On Battery •...
... surface. 2 Touch pad buttons - Using Your Inspiron Laptop 5 Power indicator light - If the computer is connected to indicate battery charge status. Turns on steadily or blinks to an electrical outlet, the light operates as follows: On AC Adapter • Solid white: The system is on and the battery is charging. • Flashing white: The system is in standby mode. • Flashing amber: The battery charge is low. The settings for video chatting and voice recording. 4 Keyboard - On Battery •...
Inspiron Mini 12 Setup Guide
Page 28
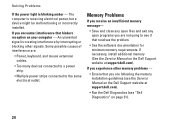
... software documentation for minimum memory requirements. Some possible causes of interference are following the memory installation guidelines (see if that hinders reception on the Dell Support website at support.dell.com). If you experience other signals. Solving Problems If the power light is blinking amber - If you are : • Power, keyboard, and mouse extension cables. • Too many devices connected to a power strip. • Multiple power strips connected to see the Service Manual...
... software documentation for minimum memory requirements. Some possible causes of interference are following the memory installation guidelines (see if that hinders reception on the Dell Support website at support.dell.com). If you experience other signals. Solving Problems If the power light is blinking amber - If you are : • Power, keyboard, and mouse extension cables. • Too many devices connected to a power strip. • Multiple power strips connected to see the Service Manual...
Inspiron Mini 12 Setup Guide
Page 40
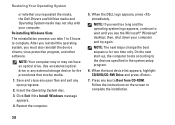
... your computer. NOTE: The next steps change the boot sequence for the procedures that involve media. 1. When the boot device list appears, highlight CD/DVD/CD-RW Drive and press . 7. Restoring Your Operating System or whether you requested the media, the Dell Drivers and Utilities media and Operating System media may not have an optical drive. Click Exit if the Install Windows message appears. 4. When the DELL logo appears, press immediately.
... your computer. NOTE: The next steps change the boot sequence for the procedures that involve media. 1. When the boot device list appears, highlight CD/DVD/CD-RW Drive and press . 7. Restoring Your Operating System or whether you requested the media, the Dell Drivers and Utilities media and Operating System media may not have an optical drive. Click Exit if the Install Windows message appears. 4. When the DELL logo appears, press immediately.
Inspiron Mini 12 Setup Guide
Page 46
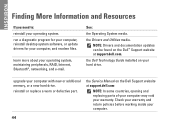
... memory, or a new hard drive. the Dell Technology Guide installed on the Dell Support website at support.dell.com. reinstall or replace a worn or defective part. the Service Manual on your operating system. upgrade your operating system, maintaining peripherals, RAID, Internet, Bluetooth®, networking, and e-mail. the Drivers and Utilities media. Check your warranty and return policies before working inside your computer, and readme files. run a diagnostic program for your computer, reinstall desktop system software, or update drivers...
... memory, or a new hard drive. the Dell Technology Guide installed on the Dell Support website at support.dell.com. reinstall or replace a worn or defective part. the Service Manual on your operating system. upgrade your operating system, maintaining peripherals, RAID, Internet, Bluetooth®, networking, and e-mail. the Drivers and Utilities media. Check your warranty and return policies before working inside your computer, and readme files. run a diagnostic program for your computer, reinstall desktop system software, or update drivers...
Inspiron Mini 12 Setup Guide
Page 48
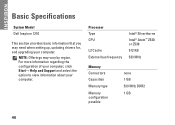
..., click Start→ Help and Support and select the option to view information about your computer. Processor Type CPU L2 Cache External bus frequency Intel® Silverthorne Intel® Atom™ Z520 or Z530 512 KB 533 MHz Memory Connectors Capacities Memory type Memory configuration possible none 1 GB 533 MHz DDR2 1 GB 46 NOTE: Offerings may need when setting up, updating drivers for, and upgrading your...
..., click Start→ Help and Support and select the option to view information about your computer. Processor Type CPU L2 Cache External bus frequency Intel® Silverthorne Intel® Atom™ Z520 or Z530 512 KB 533 MHz Memory Connectors Capacities Memory type Memory configuration possible none 1 GB 533 MHz DDR2 1 GB 46 NOTE: Offerings may need when setting up, updating drivers for, and upgrading your...
Inspiron Mini 12 Quick Reference Guide
Page 18
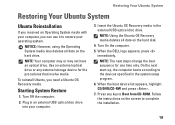
... an Operating System media with your computer, you need a Ubuntu OS Recovery media. Starting System Restore 1. NOTE: Using the Ubuntu OS Recovery media deletes all data on the hard disk. 4. Follow the instructions on the screen to restore your computer. 3. To reinstall Ubuntu, you can use it to complete the installation. 19 On the next start-up, the computer boots according to Boot from CD-ROM. When the boot device list appears, highlight CD/DVD...
... an Operating System media with your computer, you need a Ubuntu OS Recovery media. Starting System Restore 1. NOTE: Using the Ubuntu OS Recovery media deletes all data on the hard disk. 4. Follow the instructions on the screen to restore your computer. 3. To reinstall Ubuntu, you can use it to complete the installation. 19 On the next start-up, the computer boots according to Boot from CD-ROM. When the boot device list appears, highlight CD/DVD...


