Service Manual
Page 1
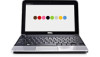
... the problem. is a registered trademark owned by Dell under license; Model PP19S April 2009 Rev. Trademarks used in the United States and/or other than its own. A00 Dell™ Inspiron™ 1011 Service Manual Before You Begin Battery Keyboard Hard Drive Palm Rest Palm Rest Bracket Communication Cards Power/Battery Status Light Board Speakers Internal Card With Bluetooth® Wireless Technology Power Button Board USB and SIM Card Board AC Adapter Connector System Board Memory Coin-Cell Battery Display Camera Flashing the BIOS Notes...
... the problem. is a registered trademark owned by Dell under license; Model PP19S April 2009 Rev. Trademarks used in the United States and/or other than its own. A00 Dell™ Inspiron™ 1011 Service Manual Before You Begin Battery Keyboard Hard Drive Palm Rest Palm Rest Bracket Communication Cards Power/Battery Status Light Board Speakers Internal Card With Bluetooth® Wireless Technology Power Button Board USB and SIM Card Board AC Adapter Connector System Board Memory Coin-Cell Battery Display Camera Flashing the BIOS Notes...
Service Manual
Page 2
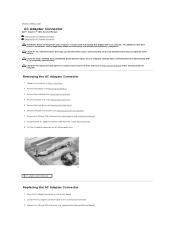
... Removing the Keyboard). 4. Replace the USB and SIM card board (see Removing the Palm Rest). 5. Remove the palm rest (see Replacing the USB and SIM Card Board). Remove the hard drive (see Removing the Palm Rest Bracket). 7. Damage due to servicing that shipped with your computer, read the safety information that is not authorized by Dell™ is not covered by periodically touching an unpainted metal surface. Place the AC adapter...
... Removing the Keyboard). 4. Replace the USB and SIM card board (see Removing the Palm Rest). 5. Remove the palm rest (see Replacing the USB and SIM Card Board). Remove the hard drive (see Removing the Palm Rest Bracket). 7. Damage due to servicing that shipped with your computer, read the safety information that is not authorized by Dell™ is not covered by periodically touching an unpainted metal surface. Place the AC adapter...
Service Manual
Page 4
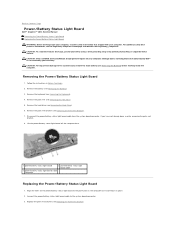
... Page Power/Battery Status Light Board Dell™ Inspiron™ 1011 Service Manual Removing the Power/Battery Status Light Board Replacing the Power/Battery Status Light Board WARNING: Before working inside your computer, read the safety information that is not authorized by Dell™ is not covered by periodically touching an unpainted metal surface. For additional safety best practices information, see Removing the Keyboard). 4. Damage due to servicing that shipped with your computer. Connect the power/battery status light board cable...
... Page Power/Battery Status Light Board Dell™ Inspiron™ 1011 Service Manual Removing the Power/Battery Status Light Board Replacing the Power/Battery Status Light Board WARNING: Before working inside your computer, read the safety information that is not authorized by Dell™ is not covered by periodically touching an unpainted metal surface. For additional safety best practices information, see Removing the Keyboard). 4. Damage due to servicing that shipped with your computer. Connect the power/battery status light board cable...
Service Manual
Page 6
... Contents Page Before You Begin Dell™ Inspiron™ 1011 Service Manual Recommended Tools Turning Off Your Computer Before Working Inside Your Computer This section provides procedures for removing and installing components in your computer. CAUTION: When you disconnect the cable. l You have performed the steps in the reverse order. CAUTION: Handle components and cards with locking tabs; As you shut down...
... Contents Page Before You Begin Dell™ Inspiron™ 1011 Service Manual Recommended Tools Turning Off Your Computer Before Working Inside Your Computer This section provides procedures for removing and installing components in your computer. CAUTION: When you disconnect the cable. l You have performed the steps in the reverse order. CAUTION: Handle components and cards with locking tabs; As you shut down...
Service Manual
Page 8
... main battery is properly installed, and a network cable is attached. 2. The Save In window appears. 7. Click Close if the Download Complete window appears. Back to Contents Page Flashing the BIOS Dell™ Inspiron™ 1011 Service Manual Flashing the BIOS From a CD Flashing the BIOS From the Hard Drive Flashing the BIOS in Ubuntu If a BIOS-update program CD is installed properly. If you use a BIOS-update program CD to flash the BIOS, set up the computer to boot from the drive...
... main battery is properly installed, and a network cable is attached. 2. The Save In window appears. 7. Click Close if the Download Complete window appears. Back to Contents Page Flashing the BIOS Dell™ Inspiron™ 1011 Service Manual Flashing the BIOS From a CD Flashing the BIOS From the Hard Drive Flashing the BIOS in Ubuntu If a BIOS-update program CD is installed properly. If you use a BIOS-update program CD to flash the BIOS, set up the computer to boot from the drive...
Service Manual
Page 10
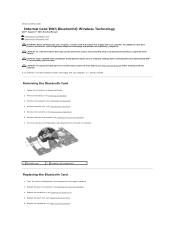
... the Bluetooth card compartment in Before You Begin. 2. Replace the keyboard (see Removing the Battery). 3. Damage due to servicing that shipped with your computer. Remove the hard drive (see Replacing the Hard Drive). 4. Replace the hard drive (see Removing the Hard Drive). 6. Back to Contents Page Internal Card With Bluetooth® Wireless Technology Dell™ Inspiron™ 1011 Service Manual Removing the Bluetooth Card Replacing the Bluetooth Card WARNING: Before working inside your computer. CAUTION: To help prevent damage to the system board, remove the main battery...
... the Bluetooth card compartment in Before You Begin. 2. Replace the keyboard (see Removing the Battery). 3. Damage due to servicing that shipped with your computer. Remove the hard drive (see Replacing the Hard Drive). 4. Replace the hard drive (see Removing the Hard Drive). 6. Back to Contents Page Internal Card With Bluetooth® Wireless Technology Dell™ Inspiron™ 1011 Service Manual Removing the Bluetooth Card Replacing the Bluetooth Card WARNING: Before working inside your computer. CAUTION: To help prevent damage to the system board, remove the main battery...
Service Manual
Page 15
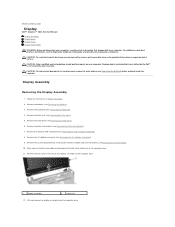
... by using a wrist grounding strap or by your computer. CAUTION: Only a certified service technician should perform repairs on your computer, read the safety information that is not authorized by Dell™ is not covered by periodically touching an unpainted metal surface. Display Assembly Removing the Display Assembly 1. Remove the hard drive (see Removing the USB and SIM Card Board). 8. Remove the AC adapter connector (see Removing the Keyboard). 4. Remove the keyboard (see Removing...
... by using a wrist grounding strap or by your computer. CAUTION: Only a certified service technician should perform repairs on your computer, read the safety information that is not authorized by Dell™ is not covered by periodically touching an unpainted metal surface. Display Assembly Removing the Display Assembly 1. Remove the hard drive (see Removing the USB and SIM Card Board). 8. Remove the AC adapter connector (see Removing the Keyboard). 4. Remove the keyboard (see Removing...

Service Manual
Page 20
...) before working inside the computer. CAUTION: To prevent data loss, turn off the hard drive bracket. CAUTION: Only a certified service technician should perform repairs on the new hard drive (see the Dell Technology Guide). Damage due to servicing that secure the hard drive bracket to the hard drive. 8. NOTE: Dell does not guarantee compatibility or provide support for hard drives from sources other than Dell. Remove the keyboard (see Removing the Battery) before removing the hard drive. CAUTION...
...) before working inside the computer. CAUTION: To prevent data loss, turn off the hard drive bracket. CAUTION: Only a certified service technician should perform repairs on the new hard drive (see the Dell Technology Guide). Damage due to servicing that secure the hard drive bracket to the hard drive. 8. NOTE: Dell does not guarantee compatibility or provide support for hard drives from sources other than Dell. Remove the keyboard (see Removing the Battery) before removing the hard drive. CAUTION...

Service Manual
Page 24
... to Contents Page Memory Dell™ Inspiron™ 1011 Service Manual Removing the Memory Module Replacing the Memory Module WARNING: Before working inside your computer, read the safety information that is not authorized by Dell™ is not installed properly, the computer may not boot. Removing the Memory Module 1. NOTE: If the memory module is not covered by your computer. For additional safety best practices information, see Removing the Battery) before working inside the...
... to Contents Page Memory Dell™ Inspiron™ 1011 Service Manual Removing the Memory Module Replacing the Memory Module WARNING: Before working inside your computer, read the safety information that is not authorized by Dell™ is not installed properly, the computer may not boot. Removing the Memory Module 1. NOTE: If the memory module is not covered by your computer. For additional safety best practices information, see Removing the Battery) before working inside the...
Service Manual
Page 26
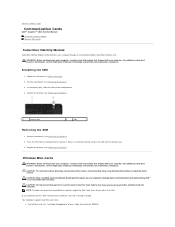
...Communication Cards Dell™ Inspiron™ 1011 Service Manual Subscriber Identity Module Wireless Mini-Cards Subscriber Identity Module Subscriber Identity Module (SIM) identifies users uniquely through an International Mobile Subscriber Identity card. Wireless Mini-Cards WARNING: Before working inside the computer. Your computer supports two Mini-Card slots: l One full Mini-Card slot - For additional safety best practices information, see the Regulatory Compliance Homepage at www.dell.com/regulatory_compliance. Remove the battery (see Removing the Battery). 3. Remove the battery...
...Communication Cards Dell™ Inspiron™ 1011 Service Manual Subscriber Identity Module Wireless Mini-Cards Subscriber Identity Module Subscriber Identity Module (SIM) identifies users uniquely through an International Mobile Subscriber Identity card. Wireless Mini-Cards WARNING: Before working inside the computer. Your computer supports two Mini-Card slots: l One full Mini-Card slot - For additional safety best practices information, see the Regulatory Compliance Homepage at www.dell.com/regulatory_compliance. Remove the battery (see Removing the Battery). 3. Remove the battery...
Service Manual
Page 28
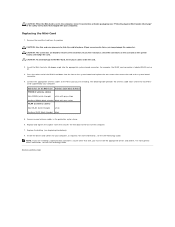
... Guide. Replace the battery (see the Dell Technology Guide. For more information, see "Protecting Against Electrostatic Discharge" in the protective mylar sleeve. 6. Secure unused antenna cables in the safety instructions that shipped with gray stripe WLAN (2 antenna cables) Main WLAN (white triangle) white Auxiliary WLAN (black triangle) black 5. Back to the Mini-Card, never place cables under the card. 2. Install the drivers and utilities for each MiniCard supported...
... Guide. Replace the battery (see the Dell Technology Guide. For more information, see "Protecting Against Electrostatic Discharge" in the protective mylar sleeve. 6. Secure unused antenna cables in the safety instructions that shipped with gray stripe WLAN (2 antenna cables) Main WLAN (white triangle) white Auxiliary WLAN (black triangle) black 5. Back to the Mini-Card, never place cables under the card. 2. Install the drivers and utilities for each MiniCard supported...

Service Manual
Page 40
... enter the system setup program. 4. Replace the memory modules (see Replacing the Mini-Card). 11. Replace the palm rest bracket (see Replacing the Hard Drive). 8. Replace the hard drive (see Replacing the Palm Rest Bracket). 7. Turn on the computer. 3. Press during POST to Contents Page Navigate to the security tab and enter the service tag in and that the AC adapter is installed properly. 2. 11. Connect the USB and SIM card board cable, AC adapter connector cable, and display cable...
... enter the system setup program. 4. Replace the memory modules (see Replacing the Mini-Card). 11. Replace the palm rest bracket (see Replacing the Hard Drive). 8. Replace the hard drive (see Replacing the Palm Rest Bracket). 7. Turn on the computer. 3. Press during POST to Contents Page Navigate to the security tab and enter the service tag in and that the AC adapter is installed properly. 2. 11. Connect the USB and SIM card board cable, AC adapter connector cable, and display cable...
Setup Guide
Page 5
... AC Adapter 6 Connect the Network Cable (Optional 7 Press the Power Button 8 Microsoft® Windows® XP Setup 9 Ubuntu® Setup 9 Enable or Disable Wireless 9 Connect to the Internet (Optional 10 Using Your Inspiron™ Mini 10 14 Right Side Features 14 Left Side Features 16 Computer Base and Keyboard Features 18 Touch Pad Gestures 20 Display Features 22 Removing and Replacing the Battery 24 Software Features 26 Solving Problems 28 Network Problems 28 Power Problems 30 Memory Problems 31 Lockups and Software Problems 32 Using Support Tools 34 Dell Support...
... AC Adapter 6 Connect the Network Cable (Optional 7 Press the Power Button 8 Microsoft® Windows® XP Setup 9 Ubuntu® Setup 9 Enable or Disable Wireless 9 Connect to the Internet (Optional 10 Using Your Inspiron™ Mini 10 14 Right Side Features 14 Left Side Features 16 Computer Base and Keyboard Features 18 Touch Pad Gestures 20 Display Features 22 Removing and Replacing the Battery 24 Software Features 26 Solving Problems 28 Network Problems 28 Power Problems 30 Memory Problems 31 Lockups and Software Problems 32 Using Support Tools 34 Dell Support...
Setup Guide
Page 13
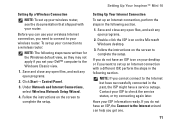
... close any open files, and exit any open programs. 2. NOTE: If you cannot connect to check the service status, or try connecting again later. To set your router. Click Start→ Control Panel. 3. If you set up an Internet connection with your Dell™ computer to a wireless router: NOTE: The following section. 1. Follow the instructions on the screen to complete the setup. Under Network and Internet Connections, select Wireless Network Setup Wizard. 4. Double...
... close any open files, and exit any open programs. 2. NOTE: If you cannot connect to check the service status, or try connecting again later. To set your router. Click Start→ Control Panel. 3. If you set up an Internet connection with your Dell™ computer to a wireless router: NOTE: The following section. 1. Follow the instructions on the screen to complete the setup. Under Network and Internet Connections, select Wireless Network Setup Wizard. 4. Double...
Setup Guide
Page 14
... Connect to complete the setup. Otherwise, follow the instructions on the screen to the Internet. 6. Setting Up Your Inspiron™ Mini 10 NOTE: The following steps were written for the procedures that involve discs. 7. Click Start→ Control Panel. 3. In the next window, click the appropriate option: --If you do not know which type of Internet service providers (ISPs). --If you have an internal optical drive. Click Next. The New Connection...
... Connect to complete the setup. Otherwise, follow the instructions on the screen to the Internet. 6. Setting Up Your Inspiron™ Mini 10 NOTE: The following steps were written for the procedures that involve discs. 7. Click Start→ Control Panel. 3. In the next window, click the appropriate option: --If you do not know which type of Internet service providers (ISPs). --If you have an internal optical drive. Click Next. The New Connection...
Setup Guide
Page 33
... creating interference by interrupting or blocking other memory problems - • Ensure that you are not using to the same electrical outlet. If you experience other signals. Memory Problems If you receive an insufficient memory message - • Save and close any open files and exit any open programs you are : • Power, keyboard, and mouse extension cables. • Too many devices connected to a power strip. • Multiple power...
... creating interference by interrupting or blocking other memory problems - • Ensure that you are not using to the same electrical outlet. If you experience other signals. Memory Problems If you receive an insufficient memory message - • Save and close any open files and exit any open programs you are : • Power, keyboard, and mouse extension cables. • Too many devices connected to a power strip. • Multiple power...
Setup Guide
Page 47
... device drivers, virus protection program, and other software. On the next start-up, the computer boots according to Boot from CD-ROM. Press any key to the devices specified in the system setup program. 6. Use an external optical drive or any open programs. 2. Click Exit if the Install Windows message appears. 4. NOTE: The next steps change the boot sequence for the procedures that involve discs. 1. After you reinstall the operating...
... device drivers, virus protection program, and other software. On the next start-up, the computer boots according to Boot from CD-ROM. Press any key to the devices specified in the system setup program. 6. Use an external optical drive or any open programs. 2. Click Exit if the Install Windows message appears. 4. NOTE: The next steps change the boot sequence for the procedures that involve discs. 1. After you reinstall the operating...
Setup Guide
Page 54
... hard drive. the Dell Technology Guide installed on your computer. 52 See: the Operating System disc. the Drivers and Utilities disc. NOTE: Drivers and documentation updates can be found on the Dell Support website at support.dell.com. upgrade your computer, and readme files. run a diagnostic program for your computer, reinstall desktop system software, or update drivers for your computer with new or additional memory, or a new hard drive. reinstall or replace a worn or defective part. the Service Manual...
... hard drive. the Dell Technology Guide installed on your computer. 52 See: the Operating System disc. the Drivers and Utilities disc. NOTE: Drivers and documentation updates can be found on the Dell Support website at support.dell.com. upgrade your computer, and readme files. run a diagnostic program for your computer, reinstall desktop system software, or update drivers for your computer with new or additional memory, or a new hard drive. reinstall or replace a worn or defective part. the Service Manual...

Setup Guide
Page 56
... your computer. INSPIRON Specifications System model Inspiron 1011 This section provides information that you may vary by region. NOTE: Offerings may need when setting up, updating drivers for, and upgrading your computer. 54 Processor Type Intel® Atom™ N270 Intel Atom N280 L2 cache 512 KB External bus frequency 533 MHz and 667 MHz Memory Connectors Capacities Memory type Memory configurations possible one internally-accessible SO‑...
... your computer. INSPIRON Specifications System model Inspiron 1011 This section provides information that you may vary by region. NOTE: Offerings may need when setting up, updating drivers for, and upgrading your computer. 54 Processor Type Intel® Atom™ N270 Intel Atom N280 L2 cache 512 KB External bus frequency 533 MHz and 667 MHz Memory Connectors Capacities Memory type Memory configurations possible one internally-accessible SO‑...

Ubuntu® Quick Reference Guide
Page 24
... optical drive. Starting System Restore 1. Follow the instructions on the hard drive. 4. Use an external optical drive or any key to the devices specified in the external USB optical disc drive. On the next start-up, the computer boots according to Boot from CD-ROM. Turn off the computer. 2. CAUTION: Using the Ubuntu LTS DVD deletes all data on the screen to restore your computer to complete the installation. 22 Insert the Ubuntu LTS DVD in...
... optical drive. Starting System Restore 1. Follow the instructions on the hard drive. 4. Use an external optical drive or any key to the devices specified in the external USB optical disc drive. On the next start-up, the computer boots according to Boot from CD-ROM. Turn off the computer. 2. CAUTION: Using the Ubuntu LTS DVD deletes all data on the screen to restore your computer to complete the installation. 22 Insert the Ubuntu LTS DVD in...


