Inspiron Mini 1018 Service Manual
Page 1
... Corporation in this document to refer to hardware or loss of your computer. Dell™ Inspiron™ 1018 Service Manual Before You Begin Battery Keyboard Hard Drive Palm Rest Assembly Power Button Board Memory Module Speaker Middle Cover Display Camera Module I/O Board Wireless Mini-Card Status Lights Board Support Brackets AC Adapter Connector System Board Coin-Cell Battery Flashing the BIOS Notes, Cautions, and Warnings NOTE: A NOTE indicates important information that helps you make better use of data if instructions are not followed. WARNING: A WARNING...
... Corporation in this document to refer to hardware or loss of your computer. Dell™ Inspiron™ 1018 Service Manual Before You Begin Battery Keyboard Hard Drive Palm Rest Assembly Power Button Board Memory Module Speaker Middle Cover Display Camera Module I/O Board Wireless Mini-Card Status Lights Board Support Brackets AC Adapter Connector System Board Coin-Cell Battery Flashing the BIOS Notes, Cautions, and Warnings NOTE: A NOTE indicates important information that helps you make better use of data if instructions are not followed. WARNING: A WARNING...
Inspiron Mini 1018 Service Manual
Page 3
... Before You Begin Dell™ Inspiron™ 1018 Service Manual Recommended Tools Turning Off Your Computer Before Working Inside Your Computer This manual provides procedures for removing and installing the components in your computer (see the Regulatory Compliance Homepage at support.dell.com Turning Off Your Computer CAUTION: To avoid losing data, save and close all open files and exit all open programs before you...
... Before You Begin Dell™ Inspiron™ 1018 Service Manual Recommended Tools Turning Off Your Computer Before Working Inside Your Computer This manual provides procedures for removing and installing the components in your computer (see the Regulatory Compliance Homepage at support.dell.com Turning Off Your Computer CAUTION: To avoid losing data, save and close all open files and exit all open programs before you...
Inspiron Mini 1018 Service Manual
Page 6
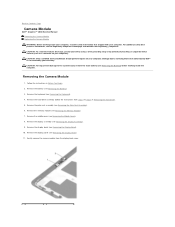
... Removing the Display Bezel). 10. Follow the instructions in Removing the Hard Drive). 5. CAUTION: To avoid electrostatic discharge, ground yourself by using a wrist grounding strap or by your warranty. Remove the display bezel (see the Regulatory Compliance Homepage at www.dell.com/regulatory_compliance. Remove the palm rest assembly (see Removing the Battery). 3. Back to Contents Page Camera Module Dell™ Inspiron™ 1018 Service Manual Removing the Camera Module Replacing the Camera Module WARNING: Before working inside...
... Removing the Display Bezel). 10. Follow the instructions in Removing the Hard Drive). 5. CAUTION: To avoid electrostatic discharge, ground yourself by using a wrist grounding strap or by your warranty. Remove the display bezel (see the Regulatory Compliance Homepage at www.dell.com/regulatory_compliance. Remove the palm rest assembly (see Removing the Battery). 3. Back to Contents Page Camera Module Dell™ Inspiron™ 1018 Service Manual Removing the Camera Module Replacing the Camera Module WARNING: Before working inside...
Inspiron Mini 1018 Service Manual
Page 9
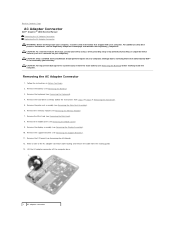
... and remove the cable from step 4 to step 6 in Before You Begin. 2. CAUTION: To help prevent damage to the system board, remove the main battery (see Removing the Battery) before working inside the computer. Remove the support brackets (see Removing the Middle Cover). 9. Remove the hard-drive assembly (follow the instructions from the routing guide. 13. Back to Contents Page AC Adapter Connector Dell™ Inspiron™ 1018 Service Manual Removing the AC Adapter Connector Replacing...
... and remove the cable from step 4 to step 6 in Before You Begin. 2. CAUTION: To help prevent damage to the system board, remove the main battery (see Removing the Battery) before working inside the computer. Remove the support brackets (see Removing the Middle Cover). 9. Remove the hard-drive assembly (follow the instructions from the routing guide. 13. Back to Contents Page AC Adapter Connector Dell™ Inspiron™ 1018 Service Manual Removing the AC Adapter Connector Replacing...
Inspiron Mini 1018 Service Manual
Page 11
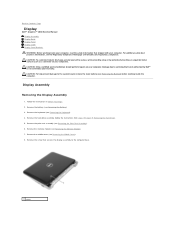
... Removing the Battery). 3. Remove the palm rest assembly (see Removing the Memory Module). 7. CAUTION: Only a certified service technician should perform repairs on your computer. CAUTION: To avoid electrostatic discharge, ground yourself by using a wrist grounding strap or by your computer. Damage due to servicing that shipped with your warranty. Display Assembly Removing the Display Assembly 1. Back to Contents Page Display Dell™ Inspiron™ 1018 Service Manual Display Assembly Display Bezel Display Panel Display Cable Display Panel...
... Removing the Battery). 3. Remove the palm rest assembly (see Removing the Memory Module). 7. CAUTION: Only a certified service technician should perform repairs on your computer. CAUTION: To avoid electrostatic discharge, ground yourself by using a wrist grounding strap or by your computer. Damage due to servicing that shipped with your warranty. Display Assembly Removing the Display Assembly 1. Back to Contents Page Display Dell™ Inspiron™ 1018 Service Manual Display Assembly Display Bezel Display Panel Display Cable Display Panel...
Inspiron Mini 1018 Service Manual
Page 18
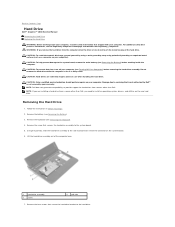
... handling the hard drive. Follow the instructions in Sleep state. For additional safety best practices information, see Removing the Keyboard). 4. Damage due to install an operating system, drivers, and utilities on the system board. 6. NOTE: If you need to servicing that is not authorized by Dell™ is not covered by periodically touching an unpainted metal surface (such as a connector on your computer. Removing the Hard Drive 1. Using the pull...
... handling the hard drive. Follow the instructions in Sleep state. For additional safety best practices information, see Removing the Keyboard). 4. Damage due to install an operating system, drivers, and utilities on the system board. 6. NOTE: If you need to servicing that is not authorized by Dell™ is not covered by periodically touching an unpainted metal surface (such as a connector on your computer. Removing the Hard Drive 1. Using the pull...
Inspiron Mini 1018 Service Manual
Page 19
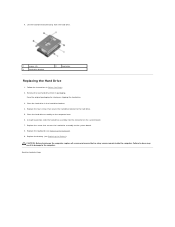
Remove the new hard drive from the hard drive. 1 screws (4) 3 hard-drive bracket 2 hard drive Replacing the Hard Drive 1. Replace the screw that secures the hard-drive assembly to Contents Page Save the original packaging for storing or shipping the hard drive. 3. Replace the battery (see Replacing the Keyboard). 9. Follow the instructions in the hard-drive bracket. 4. Back to the system board. 8. Place the hard drive in Before You Begin. 2. Place the hard-drive assembly on the system board. 7. Failure to do...
Remove the new hard drive from the hard drive. 1 screws (4) 3 hard-drive bracket 2 hard drive Replacing the Hard Drive 1. Replace the screw that secures the hard-drive assembly to Contents Page Save the original packaging for storing or shipping the hard drive. 3. Replace the battery (see Replacing the Keyboard). 9. Follow the instructions in the hard-drive bracket. 4. Back to the system board. 8. Place the hard drive in Before You Begin. 2. Place the hard-drive assembly on the system board. 7. Failure to do...
Inspiron Mini 1018 Service Manual
Page 22
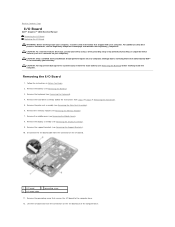
... Contents Page I/O Board Dell™ Inspiron™ 1018 Service Manual Removing the I/O Board Replacing the I/O Board WARNING: Before working inside your computer). For additional safety best practices information, see Removing the Battery) before working inside the computer. CAUTION: To help prevent damage to the system board, remove the main battery (see the Regulatory Compliance Homepage at www.dell.com/regulatory_compliance. Remove the keyboard (see Removing the Memory Module). 7. Lift the I/O board and ease the...
... Contents Page I/O Board Dell™ Inspiron™ 1018 Service Manual Removing the I/O Board Replacing the I/O Board WARNING: Before working inside your computer). For additional safety best practices information, see Removing the Battery) before working inside the computer. CAUTION: To help prevent damage to the system board, remove the main battery (see the Regulatory Compliance Homepage at www.dell.com/regulatory_compliance. Remove the keyboard (see Removing the Memory Module). 7. Lift the I/O board and ease the...
Inspiron Mini 1018 Service Manual
Page 27
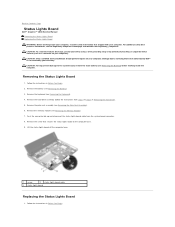
... Status Lights Board Dell™ Inspiron™ 1018 Service Manual Removing the Status Lights Board Replacing the Status Lights Board WARNING: Before working inside your computer, read the safety information that shipped with your warranty. Removing the Status Lights Board 1. Lift the status lights board off the computer base. 1 screw 2 status lights board cable 3 status lights board Replacing the Status Lights Board 1. Follow the instructions in Before You Begin. 2. Push the connector-tab up and disconnect the status lights board cable...
... Status Lights Board Dell™ Inspiron™ 1018 Service Manual Removing the Status Lights Board Replacing the Status Lights Board WARNING: Before working inside your computer, read the safety information that shipped with your warranty. Removing the Status Lights Board 1. Lift the status lights board off the computer base. 1 screw 2 status lights board cable 3 status lights board Replacing the Status Lights Board 1. Follow the instructions in Before You Begin. 2. Push the connector-tab up and disconnect the status lights board cable...
Inspiron Mini 1018 Service Manual
Page 29
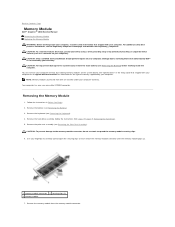
...board. Damage due to servicing that is not authorized by Dell™ is not covered by installing memory modules on the type of the memory-module connector until the memory module pops up. 1 memory-module connector 2 securing clips (2) 3 memory module 7. NOTE: Memory modules purchased from the memory-module connector. Your computer has one user-accessible SODIMM connector. Remove the keyboard (see Removing the Palm Rest Assembly). Removing the Memory Module 1. Back to Contents Page Memory Module Dell™ Inspiron™ 1018 Service Manual Removing the Memory Module Replacing...
...board. Damage due to servicing that is not authorized by Dell™ is not covered by installing memory modules on the type of the memory-module connector until the memory module pops up. 1 memory-module connector 2 securing clips (2) 3 memory module 7. NOTE: Memory modules purchased from the memory-module connector. Your computer has one user-accessible SODIMM connector. Remove the keyboard (see Removing the Palm Rest Assembly). Removing the Memory Module 1. Back to Contents Page Memory Module Dell™ Inspiron™ 1018 Service Manual Removing the Memory Module Replacing...
Inspiron Mini 1018 Service Manual
Page 30
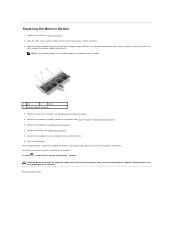
... click, remove the memory module and reinstall it. As the computer boots, it clicks into the slot at a 45-degree angle, and press the memory module down until it detects the additional memory and automatically updates the system configuration information. To confirm the amount of memory installed in the memory- Connect the AC adapter to step 7 in Replacing the Hard Drive). 6. Slide the memory module firmly into place. Replace the hard-drive assembly...
... click, remove the memory module and reinstall it. As the computer boots, it clicks into the slot at a 45-degree angle, and press the memory module down until it detects the additional memory and automatically updates the system configuration information. To confirm the amount of memory installed in the memory- Connect the AC adapter to step 7 in Replacing the Hard Drive). 6. Slide the memory module firmly into place. Replace the hard-drive assembly...
Inspiron Mini 1018 Service Manual
Page 32
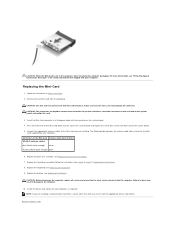
... Replacing the Battery). Remove the new Mini-Card from step 5 to slide the card into the slot on the Mini-Card Antenna Cable Color Scheme WLAN (2 antenna cables) Main WLAN (white triangle) white Auxiliary WLAN (black triangle) black 6. If you are keyed to the system board. 5. Insert the Mini-Card connector at a 45-degree angle into the connector on the system board, and realign the card. 3. Card supported by your computer. Replace the hard-drive...
... Replacing the Battery). Remove the new Mini-Card from step 5 to slide the card into the slot on the Mini-Card Antenna Cable Color Scheme WLAN (2 antenna cables) Main WLAN (white triangle) white Auxiliary WLAN (black triangle) black 6. If you are keyed to the system board. 5. Insert the Mini-Card connector at a 45-degree angle into the connector on the system board, and realign the card. 3. Card supported by your computer. Replace the hard-drive...
Inspiron Mini 1018 Service Manual
Page 39
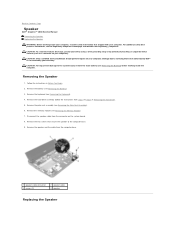
... unpainted metal surface (such as a connector on your computer). Remove the speaker and the cable from the connector on your computer. Remove the memory module (see Removing the Battery) before working inside the computer. Back to Contents Page Speaker Dell™ Inspiron™ 1018 Service Manual Removing the Speaker Replacing the Speaker WARNING: Before working inside your computer, read the safety information that shipped with your...
... unpainted metal surface (such as a connector on your computer). Remove the speaker and the cable from the connector on your computer. Remove the memory module (see Removing the Battery) before working inside the computer. Back to Contents Page Speaker Dell™ Inspiron™ 1018 Service Manual Removing the Speaker Replacing the Speaker WARNING: Before working inside your computer, read the safety information that shipped with your...
Inspiron Mini 1018 Service Manual
Page 41
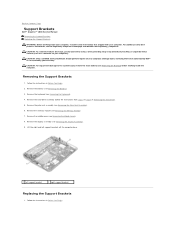
... battery (see Removing the Keyboard). 4. CAUTION: To help prevent damage to Contents Page Support Brackets Dell™ Inspiron™ 1018 Service Manual Removing the Support Brackets Replacing the Support Brackets WARNING: Before working inside your computer, read the safety information that is not authorized by Dell™ is not covered by periodically touching an unpainted metal surface (such as a connector on your computer). Remove the keyboard (see Removing the Battery). 3. Remove the display...
... battery (see Removing the Keyboard). 4. CAUTION: To help prevent damage to Contents Page Support Brackets Dell™ Inspiron™ 1018 Service Manual Removing the Support Brackets Replacing the Support Brackets WARNING: Before working inside your computer, read the safety information that is not authorized by Dell™ is not covered by periodically touching an unpainted metal surface (such as a connector on your computer). Remove the keyboard (see Removing the Battery). 3. Remove the display...
Inspiron Mini 1018 Service Manual
Page 43
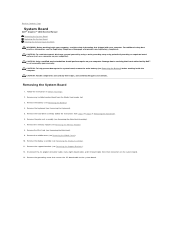
Damage due to servicing that secures the I /O board cable from their edges, and avoid touching pins and contacts. Remove the keyboard (see Removing the Palm Rest Assembly). 7. Remove the hard-drive assembly (follow the instructions from the Media Card reader slot. 3. Back to Contents Page System Board Dell™ Inspiron™ 1018 Service Manual Removing the System Board Replacing the System Board Entering the Service Tag in the BIOS WARNING: Before working inside your computer, read the safety information that...
Damage due to servicing that secures the I /O board cable from their edges, and avoid touching pins and contacts. Remove the keyboard (see Removing the Palm Rest Assembly). 7. Remove the hard-drive assembly (follow the instructions from the Media Card reader slot. 3. Back to Contents Page System Board Dell™ Inspiron™ 1018 Service Manual Removing the System Board Replacing the System Board Entering the Service Tag in the BIOS WARNING: Before working inside your computer, read the safety information that...
Inspiron Mini 1018 Setup Guide
Page 5
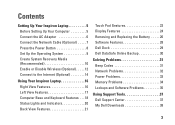
... AC Adapter 6 Connect the Network Cable (Optional 7 Press the Power Button 8 Set Up the Operating System 9 Create System Recovery Media (Recommended 10 Enable or Disable Wireless (Optional 12 Connect to the Internet (Optional 14 Using Your Inspiron Laptop 16 Right View Features 16 Left View Features 17 Computer Base and Keyboard Features 18 Status Lights and Indicators 20 Back View Features 21 Touch Pad Gestures 22 Display Features 24 Removing and Replacing the Battery 26 Software Features 28 Dell Dock 29 Dell DataSafe Online Backup...
... AC Adapter 6 Connect the Network Cable (Optional 7 Press the Power Button 8 Set Up the Operating System 9 Create System Recovery Media (Recommended 10 Enable or Disable Wireless (Optional 12 Connect to the Internet (Optional 14 Using Your Inspiron Laptop 16 Right View Features 16 Left View Features 17 Computer Base and Keyboard Features 18 Status Lights and Indicators 20 Back View Features 21 Touch Pad Gestures 22 Display Features 24 Removing and Replacing the Battery 26 Software Features 28 Dell Dock 29 Dell DataSafe Online Backup...

Inspiron Mini 1018 Setup Guide
Page 33
... Dell" on page 61. Beep Code Possible Problem One Possible system board failure - INSPIRON Solving Problems This section provides troubleshooting information for your problem using the following guidelines, see "Using Support Tools" on page 37 or "Contacting Dell" on page 61). If you installed or replaced the memory module, ensure that the memory module is seated properly. Chipset error Four RAM read/write failure Five Real Time Clock failure Six Video card...
... Dell" on page 61. Beep Code Possible Problem One Possible system board failure - INSPIRON Solving Problems This section provides troubleshooting information for your problem using the following guidelines, see "Using Support Tools" on page 37 or "Contacting Dell" on page 61). If you installed or replaced the memory module, ensure that the memory module is seated properly. Chipset error Four RAM read/write failure Five Real Time Clock failure Six Video card...
Inspiron Mini 1018 Setup Guide
Page 41
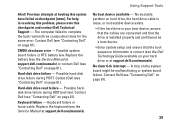
...; Enter system setup and ensure that the boot sequence information is correct (see "Contacting Dell" on your hard drive or at checkpoint [nnnn]. Using Support Tools Alert! Contact Dell (see "Contacting Dell" on page 61). Previous attempts at booting this checkpoint and contact Dell Technical Support - Contact Dell (see "Contacting Dell" on page 61). 39 Possible system board failure or RTC battery low. Keyboard failure or loose cable. CMOS checksum error - Keyboard...
...; Enter system setup and ensure that the boot sequence information is correct (see "Contacting Dell" on your hard drive or at checkpoint [nnnn]. Using Support Tools Alert! Contact Dell (see "Contacting Dell" on page 61). Previous attempts at booting this checkpoint and contact Dell Technical Support - Contact Dell (see "Contacting Dell" on page 61). 39 Possible system board failure or RTC battery low. Keyboard failure or loose cable. CMOS checksum error - Keyboard...
Inspiron Mini 1018 Setup Guide
Page 42
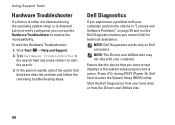
... use the Hardware Troubleshooter to test displays in the search field and press to enter the System Setup (BIOS) utility. Press during the operating system setup or is detected but incorrectly configured, you experience a problem with your computer. Type hardware troubleshooter in the system setup program and is active. Start the Dell Diagnostics from the Drivers and Utilities disc. 40 To start the search. 3. NOTE: Dell Diagnostics works only on page 35 and run the Dell...
... use the Hardware Troubleshooter to test displays in the search field and press to enter the System Setup (BIOS) utility. Press during the operating system setup or is detected but incorrectly configured, you experience a problem with your computer. Type hardware troubleshooter in the system setup program and is active. Start the Dell Diagnostics from the Drivers and Utilities disc. 40 To start the search. 3. NOTE: Dell Diagnostics works only on page 35 and run the Dell...
Inspiron Mini 1018 Setup Guide
Page 66
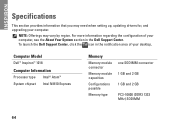
... section in the Dell Support Center. Computer Model Dell™ Inspiron™ 1018 Computer Information Processor type Intel® Atom™ System chipset Intel NM10 Express Memory Memory module connector Memory module capacities Configurations possible Memory type one SODIMM connector 1 GB and 2 GB 1 GB and 2 GB PC3-10600 (DDR3 1333 MHz) SODIMM 64 NOTE: Offerings may need when setting up, updating drivers for, and upgrading your desktop. INSPIRON Specifications This section provides...
... section in the Dell Support Center. Computer Model Dell™ Inspiron™ 1018 Computer Information Processor type Intel® Atom™ System chipset Intel NM10 Express Memory Memory module connector Memory module capacities Configurations possible Memory type one SODIMM connector 1 GB and 2 GB 1 GB and 2 GB PC3-10600 (DDR3 1333 MHz) SODIMM 64 NOTE: Offerings may need when setting up, updating drivers for, and upgrading your desktop. INSPIRON Specifications This section provides...


