Setup Guide
Page 5
... Inspiron Laptop 5 Before Setting Up Your Computer 5 Connect the AC Adapter 6 Connect the Network Cable (Optional 7 Press the Power Button 8 Set Up the Operating System 9 Create System Recovery Media (Recommended 10 Enable or Disable Wireless (Optional 12 Connect to the Internet (Optional 14 Using Your Inspiron Laptop... the Battery 26 Software Features 28 Dell Dock 29 Dell DataSafe Online Backup 30 Solving Problems 31 Beep Codes 31 Network Problems 32 Power Problems 33 Memory Problems 34 Lockups and Software Problems 35 Using Support Tools 37 Dell Support Center 37 My...
... Inspiron Laptop 5 Before Setting Up Your Computer 5 Connect the AC Adapter 6 Connect the Network Cable (Optional 7 Press the Power Button 8 Set Up the Operating System 9 Create System Recovery Media (Recommended 10 Enable or Disable Wireless (Optional 12 Connect to the Internet (Optional 14 Using Your Inspiron Laptop... the Battery 26 Software Features 28 Dell Dock 29 Dell DataSafe Online Backup 30 Solving Problems 31 Beep Codes 31 Network Problems 32 Power Problems 33 Memory Problems 34 Lockups and Software Problems 35 Using Support Tools 37 Dell Support Center 37 My...
Setup Guide
Page 8
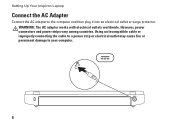
WARNING: The AC adapter works with electrical outlets worldwide. However, power connectors and power strips vary among countries. Using an incompatible cable or improperly connecting the cable to a power strip or electrical outlet may cause fire or permanent damage to the computer and then plug it into an electrical outlet or surge protector. Setting Up Your Inspiron Laptop Connect the AC Adapter Connect the AC adapter to your computer. 6
WARNING: The AC adapter works with electrical outlets worldwide. However, power connectors and power strips vary among countries. Using an incompatible cable or improperly connecting the cable to a power strip or electrical outlet may cause fire or permanent damage to the computer and then plug it into an electrical outlet or surge protector. Setting Up Your Inspiron Laptop Connect the AC Adapter Connect the AC adapter to your computer. 6
Setup Guide
Page 13
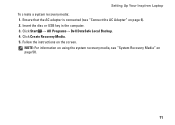
Click Create Recovery Media. 5. Ensure that the AC adapter is connected (see "System Recovery Media" on page 50. 11 Click Start → All Programs→ Dell DataSafe Local Backup. 4. Follow the instructions on page 6). 2. NOTE: For information on using the system recovery media, see "Connect the AC Adapter" on the screen. Setting Up Your Inspiron Laptop To create a system recovery media: 1. Insert the disc or USB key in the computer. 3.
Click Create Recovery Media. 5. Ensure that the AC adapter is connected (see "System Recovery Media" on page 50. 11 Click Start → All Programs→ Dell DataSafe Local Backup. 4. Follow the instructions on page 6). 2. NOTE: For information on using the system recovery media, see "Connect the AC Adapter" on the screen. Setting Up Your Inspiron Laptop To create a system recovery media: 1. Insert the disc or USB key in the computer. 3.
Setup Guide
Page 21
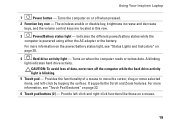
Using Your Inspiron Laptop 1 Power button - CAUTION: To avoid loss of a mouse to move the cursor, drag or move selected items, and left -click and right-click functions like those on or off the computer while the hard drive activity light is powered using either the AC adapter or the battery. Turns the computer...
Using Your Inspiron Laptop 1 Power button - CAUTION: To avoid loss of a mouse to move the cursor, drag or move selected items, and left -click and right-click functions like those on or off the computer while the hard drive activity light is powered using either the AC adapter or the battery. Turns the computer...
Setup Guide
Page 22
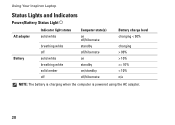
Using Your Inspiron Laptop Status Lights and Indicators Power/Battery Status Light AC adapter Battery Indicator light status solid white breathing white off solid white breathing white solid amber off Computer state(s) on off/hibernate standby off/hibernate on standby on/standby off/hibernate Battery charge level charging < 90% charging > 90% > 10% >= 10% < 10% n/a NOTE: The battery is charging when the computer is powered using the AC adapter. 20
Using Your Inspiron Laptop Status Lights and Indicators Power/Battery Status Light AC adapter Battery Indicator light status solid white breathing white off solid white breathing white solid amber off Computer state(s) on off/hibernate standby off/hibernate on standby on/standby off/hibernate Battery charge level charging < 90% charging > 90% > 10% >= 10% < 10% n/a NOTE: The battery is charging when the computer is powered using the AC adapter. 20
Setup Guide
Page 23
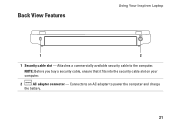
Attaches a commercially available security cable to power the computer and charge the battery. 21 Connects to an AC adapter to the computer. Back View Features Using Your Inspiron Laptop 1 2 1 Security cable slot - NOTE: Before you buy a security cable, ensure that it fits into the security cable slot on your computer. 2 AC adapter connector -
Attaches a commercially available security cable to power the computer and charge the battery. 21 Connects to an AC adapter to the computer. Back View Features Using Your Inspiron Laptop 1 2 1 Security cable slot - NOTE: Before you buy a security cable, ensure that it fits into the security cable slot on your computer. 2 AC adapter connector -

Setup Guide
Page 28
... place. 26 To replace the battery: Align the tabs on the battery with your computer. This computer should only use batteries from Dell. Lift the battery out of fire or explosion. WARNING: Using an incompatible battery may increase the risk of the battery bay. Using Your... Inspiron Laptop Removing and Replacing the Battery WARNING: Before you begin any of the procedures in this section, follow the safety instructions that shipped with the slots in the battery bay and gently press the battery down the computer, and remove external cables (including the AC adapter).
... place. 26 To replace the battery: Align the tabs on the battery with your computer. This computer should only use batteries from Dell. Lift the battery out of fire or explosion. WARNING: Using an incompatible battery may increase the risk of the battery bay. Using Your... Inspiron Laptop Removing and Replacing the Battery WARNING: Before you begin any of the procedures in this section, follow the safety instructions that shipped with the slots in the battery bay and gently press the battery down the computer, and remove external cables (including the AC adapter).
Setup Guide
Page 35
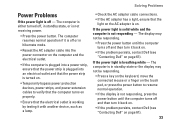
...it back on. • If the problem persists, contact Dell (see "Contacting Dell" on . The display may not be responding. • Press the power button until the computer turns off , in hibernate mode. • Reseat the AC adapter cable into the power connector on the computer and the ...then turn it with another device, such as a lamp. • Check the AC adapter cable connections. • If the AC adapter has a light, ensure that the light on the AC adapter is working by testing it back on. • If the problem persists, contact Dell (see "Contacting Dell" on page 61). 33
...it back on. • If the problem persists, contact Dell (see "Contacting Dell" on . The display may not be responding. • Press the power button until the computer turns off , in hibernate mode. • Reseat the AC adapter cable into the power connector on the computer and the ...then turn it with another device, such as a lamp. • Check the AC adapter cable connections. • If the AC adapter has a light, ensure that the light on the AC adapter is working by testing it back on. • If the problem persists, contact Dell (see "Contacting Dell" on page 61). 33
Setup Guide
Page 37
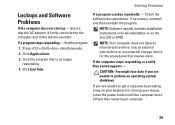
... and then reinstall the program. Click End Task. Click Applications. 3. Use an external optical drive or any external storage device for the procedures that the AC adapter is no longer responding. 4. If a program stops responding - Solving Problems Lockups and Software Problems If the computer does not start up - Click the program that...
... and then reinstall the program. Click End Task. Click Applications. 3. Use an external optical drive or any external storage device for the procedures that the AC adapter is no longer responding. 4. If a program stops responding - Solving Problems Lockups and Software Problems If the computer does not start up - Click the program that...
Setup Guide
Page 50
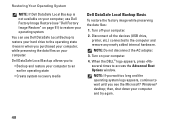
... to: • Backup and restore your computer. 2. NOTE: Do not disconnect the AC adapter. 3. Turn on page 51) to restore your operating system. Turn off your computer to an earlier operating state • Create system recovery media Dell DataSafe Local Backup Basic To restore the factory image while preserving the data files... operating state it was in when you purchased your computer, while preserving the data files on your computer and try again. 48 When the DELL™ logo appears, press several times to the computer and remove any newly added internal hardware. You can use...
... to: • Backup and restore your computer. 2. NOTE: Do not disconnect the AC adapter. 3. Turn on page 51) to restore your operating system. Turn off your computer to an earlier operating state • Create system recovery media Dell DataSafe Local Backup Basic To restore the factory image while preserving the data files... operating state it was in when you purchased your computer, while preserving the data files on your computer and try again. 48 When the DELL™ logo appears, press several times to the computer and remove any newly added internal hardware. You can use...
Setup Guide
Page 70
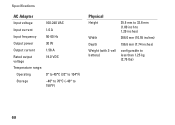
Specifications AC Adapter Input voltage 100-240 VAC Input current 1.0 A Input frequency 50-60 Hz Output power 30 W Output current 1.58 A Rated output voltage 19.0 VDC Temperature range: Operating 0° to 40°C (32° to 104°F) Storage -40° to 70°C (-40° to 158°F) Physical Height Width Depth Weight (with 3-cell battery) 25.5 mm to 32.8 mm (1.00 inch to 1.29 inches) 268.0 mm (10.55 inches) 196.6 mm (7.74 inches) configurable to less than 1.25 kg (2.75 lbs) 68
Specifications AC Adapter Input voltage 100-240 VAC Input current 1.0 A Input frequency 50-60 Hz Output power 30 W Output current 1.58 A Rated output voltage 19.0 VDC Temperature range: Operating 0° to 40°C (32° to 104°F) Storage -40° to 70°C (-40° to 158°F) Physical Height Width Depth Weight (with 3-cell battery) 25.5 mm to 32.8 mm (1.00 inch to 1.29 inches) 268.0 mm (10.55 inches) 196.6 mm (7.74 inches) configurable to less than 1.25 kg (2.75 lbs) 68


