Service Manual
Page 1
... to hardware or loss of data and tells you make better use of Dell Inc. and is subject to avoid the problem. Dell™ Inspiron™ 1010 Service Manual Before You Begin Battery Keyboard Palm Rest Hard Drive Communication Cards Palm Rest Bracket Battery Status Light Board Speakers Internal Card With Bluetooth® Wireless Technology Power...
... to hardware or loss of data and tells you make better use of Dell Inc. and is subject to avoid the problem. Dell™ Inspiron™ 1010 Service Manual Before You Begin Battery Keyboard Palm Rest Hard Drive Communication Cards Palm Rest Bracket Battery Status Light Board Speakers Internal Card With Bluetooth® Wireless Technology Power...
Service Manual
Page 2
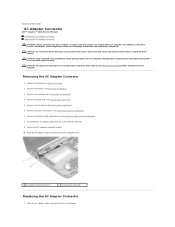
...Inspiron™ 1010 Service Manual Removing the AC Adapter Connector Replacing the AC Adapter Connector WARNING: Before working inside your computer, read the safety information that is not authorized by Dell™ is not covered by periodically touching an unpainted metal surface. Remove the AC adapter connector bracket. 10... the Palm Rest). 5. Place the AC adapter cable connector on your computer. Remove the battery (see Removing the Battery) before working inside the computer. Disconnect the AC adapter cable from the system board connector. 9. Removing the...
...Inspiron™ 1010 Service Manual Removing the AC Adapter Connector Replacing the AC Adapter Connector WARNING: Before working inside your computer, read the safety information that is not authorized by Dell™ is not covered by periodically touching an unpainted metal surface. Remove the AC adapter connector bracket. 10... the Palm Rest). 5. Place the AC adapter cable connector on your computer. Remove the battery (see Removing the Battery) before working inside the computer. Disconnect the AC adapter cable from the system board connector. 9. Removing the...
Service Manual
Page 3
Replace the palm rest bracket (see Replacing the USB and SIM Card Board). 5. Replace the USB and SIM card board (see Replacing the Palm Rest Bracket). 6. Replace the keyboard (see Replacing the Hard Drive). 7. Replace the hard drive (see Replacing the Keyboard). 9. Back to the system board connector. 4. Replace the battery (see Replacing the Palm Rest). 8. Replace the palm rest (see Replacing the Battery). Replace the AC adapter connector bracket. 3. 2. Connect the AC adapter cable to Contents Page
Replace the palm rest bracket (see Replacing the USB and SIM Card Board). 5. Replace the USB and SIM card board (see Replacing the Palm Rest Bracket). 6. Replace the keyboard (see Replacing the Hard Drive). 7. Replace the hard drive (see Replacing the Keyboard). 9. Back to the system board connector. 4. Replace the battery (see Replacing the Palm Rest). 8. Replace the palm rest (see Replacing the Battery). Replace the AC adapter connector bracket. 3. 2. Connect the AC adapter cable to Contents Page

Service Manual
Page 4
... Begin. 2. Remove the palm rest bracket (see Replacing the Palm Rest Bracket). 4. Connect the battery status light board cable to Contents Page Battery Status Light Board Dell™ Inspiron™ 1010 Service Manual Removing the Battery Status Light Board Replacing the Battery Status Light Board WARNING: Before working inside your computer, read the safety information that is...
... Begin. 2. Remove the palm rest bracket (see Replacing the Palm Rest Bracket). 4. Connect the battery status light board cable to Contents Page Battery Status Light Board Dell™ Inspiron™ 1010 Service Manual Removing the Battery Status Light Board Replacing the Battery Status Light Board WARNING: Before working inside your computer, read the safety information that is...

Service Manual
Page 5
Replace the keyboard (see Replacing the Palm Rest). 6. Replace the palm rest (see Replacing the Keyboard). 7. Back to Contents Page Replace the battery (see Replacing the Battery). 5.
Replace the keyboard (see Replacing the Palm Rest). 6. Replace the palm rest (see Replacing the Keyboard). 7. Back to Contents Page Replace the battery (see Replacing the Battery). 5.
Service Manual
Page 7
... being scratched. 2. Back to Contents Page CAUTION: To avoid damaging the computer, perform the following steps before you begin working inside the computer. 1. Remove the battery (see Removing the Battery). 7. Turn off your computer. them evenly aligned to avoid bending any installed cards from the Memory Card Reader. 5.
... being scratched. 2. Back to Contents Page CAUTION: To avoid damaging the computer, perform the following steps before you begin working inside the computer. 1. Remove the battery (see Removing the Battery). 7. Turn off your computer. them evenly aligned to avoid bending any installed cards from the Memory Card Reader. 5.
Service Manual
Page 8
...The computer continues to download the file. 5. Ensure that the AC adapter is plugged in and that the AC adapter is plugged in , the main battery is properly installed, and a network cable is provided with the new system board, flash the BIOS from a CD before inserting the CD. 2. Click ... Hard Drive 1. Locate the latest BIOS update file for the procedures that appear on the screen. Back to Contents Page Flashing the BIOS Dell™ Inspiron™ 1010 Service Manual Flashing the BIOS From a CD Flashing the BIOS From the Hard Drive Flashing the BIOS in Ubuntu If you use a BIOS...
...The computer continues to download the file. 5. Ensure that the AC adapter is plugged in and that the AC adapter is plugged in , the main battery is properly installed, and a network cable is provided with the new system board, flash the BIOS from a CD before inserting the CD. 2. Click ... Hard Drive 1. Locate the latest BIOS update file for the procedures that appear on the screen. Back to Contents Page Flashing the BIOS Dell™ Inspiron™ 1010 Service Manual Flashing the BIOS From a CD Flashing the BIOS From the Hard Drive Flashing the BIOS in Ubuntu If you use a BIOS...
Service Manual
Page 9
...the Save In menu, select Documents® BIOS, and then click Save. 10. Type cd BIOS e. The computer will restart automatically once the BIOS flash ...down arrow to download the file. 7. The file icon appears on the computer. 3. Type your computer at support.dell.com. 6. Locate the latest BIOS update file for your password c. The File Download window appears. 8. The ... Back to disk and then click OK. 1. Ensure that the AC adapter is plugged in, the main battery is properly installed, and a network cable is attached. 2. If the Export Compliance Disclaimer window appears, click...
...the Save In menu, select Documents® BIOS, and then click Save. 10. Type cd BIOS e. The computer will restart automatically once the BIOS flash ...down arrow to download the file. 7. The file icon appears on the computer. 3. Type your computer at support.dell.com. 6. Locate the latest BIOS update file for your password c. The File Download window appears. 8. The ... Back to disk and then click OK. 1. Ensure that the AC adapter is plugged in, the main battery is properly installed, and a network cable is attached. 2. If the Export Compliance Disclaimer window appears, click...
Service Manual
Page 10
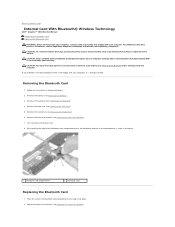
... in the figure. 1 bluetooth card compartment 2 bluetooth card Replacing the Bluetooth Card 1. Remove the hard drive (see Removing the Battery). 3. While pulling the edge of the bluetooth card compartment push the bluetooth card out of the compartment as show in Before You... by periodically touching an unpainted metal surface. Damage due to Contents Page Internal Card With Bluetooth® Wireless Technology Dell™ Inspiron™ 1010 Service Manual Removing the Bluetooth Card Replacing the Bluetooth Card WARNING: Before working inside your computer. Removing the Bluetooth ...
... in the figure. 1 bluetooth card compartment 2 bluetooth card Replacing the Bluetooth Card 1. Remove the hard drive (see Removing the Battery). 3. While pulling the edge of the bluetooth card compartment push the bluetooth card out of the compartment as show in Before You... by periodically touching an unpainted metal surface. Damage due to Contents Page Internal Card With Bluetooth® Wireless Technology Dell™ Inspiron™ 1010 Service Manual Removing the Bluetooth Card Replacing the Bluetooth Card WARNING: Before working inside your computer. Removing the Bluetooth ...

Service Manual
Page 11
Back to Contents Page Replace the hard drive (see Replacing the Battery). Replace the battery (see Replacing the Hard Drive). 4. 3. Replace the palm rest (see Replacing the Keyboard). 6. Replace the keyboard (see Replacing the Palm Rest). 5.
Back to Contents Page Replace the hard drive (see Replacing the Battery). Replace the battery (see Replacing the Hard Drive). 4. 3. Replace the palm rest (see Replacing the Keyboard). 6. Replace the keyboard (see Replacing the Palm Rest). 5.
Service Manual
Page 12
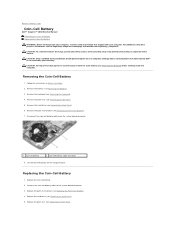
..., see Removing the Palm Rest). 5. Back to Contents Page Coin-Cell Battery Dell™ Inspiron™ 1010 Service Manual Removing the Coin-Cell Battery Replacing the Coin-Cell Battery WARNING: Before working inside your computer, read the safety information that is not authorized by Dell™ is not covered by periodically touching an unpainted metal surface. Lift...
..., see Removing the Palm Rest). 5. Back to Contents Page Coin-Cell Battery Dell™ Inspiron™ 1010 Service Manual Removing the Coin-Cell Battery Replacing the Coin-Cell Battery WARNING: Before working inside your computer, read the safety information that is not authorized by Dell™ is not covered by periodically touching an unpainted metal surface. Lift...

Service Manual
Page 13
Replace the keyboard (see Replacing the Battery). Back to Contents Page 6. Replace the battery (see Replacing the Keyboard). 7.
Replace the keyboard (see Replacing the Battery). Back to Contents Page 6. Replace the battery (see Replacing the Keyboard). 7.
Service Manual
Page 14
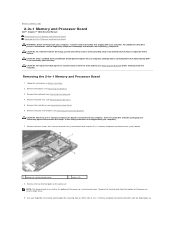
... the palm rest bracket (see Removing the Battery). 3. Remove the two thermal pads on the processor. Remove the thermal pads from the computer, store it in protective antistatic packaging (see Removing the Hard Drive). 6. Back to Contents Page 2-in-1 Memory and Processor Board Dell™ Inspiron™ 1010 Service Manual Removing the 2-in-1 Memory...
... the palm rest bracket (see Removing the Battery). 3. Remove the two thermal pads on the processor. Remove the thermal pads from the computer, store it in protective antistatic packaging (see Removing the Hard Drive). 6. Back to Contents Page 2-in-1 Memory and Processor Board Dell™ Inspiron™ 1010 Service Manual Removing the 2-in-1 Memory...
Service Manual
Page 15
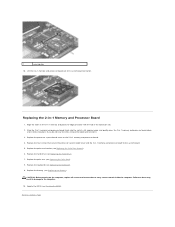
... Drive). 7. Back to the computer. 10. degree angle, and gently press the 2-in -1 memory and processor board firmly into place. Align the notch in the 2-in-1 memory and processor edge connector with the tab in -1 memory and processor board. 4. Replace the hard drive (see Replacing the Battery). Slide the 2-in -1 memory and... 2-in -1 memory and processor board out of its system board connector. Replace the four screws that no stray screws remain inside the computer. 1 securing clips 10.
... Drive). 7. Back to the computer. 10. degree angle, and gently press the 2-in -1 memory and processor board firmly into place. Align the notch in the 2-in-1 memory and processor edge connector with the tab in -1 memory and processor board. 4. Replace the hard drive (see Replacing the Battery). Slide the 2-in -1 memory and... 2-in -1 memory and processor board out of its system board connector. Replace the four screws that no stray screws remain inside the computer. 1 securing clips 10.
Service Manual
Page 16
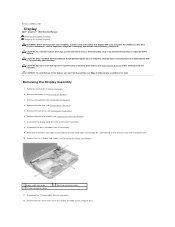
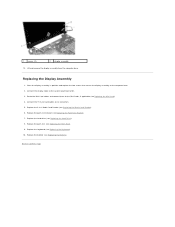
... on your warranty. Follow the instructions in -1 Media Card Reader (see Removing the Battery) before working inside your computer, read the safety information that they are clear of the computer base. 10. Remove the hard drive (see Removing the Palm Rest Bracket). 7. CAUTION: To ... the Regulatory Compliance Homepage at www.dell.com/regulatory_compliance. Make note of the Mini-Card cable routing and pull the Mini-Card cables out through the system board so that shipped with your Edge-to Contents Page Display Dell™ Inspiron™ 1010 Service Manual Removing the Display Assembly ...
... on your warranty. Follow the instructions in -1 Media Card Reader (see Removing the Battery) before working inside your computer, read the safety information that they are clear of the computer base. 10. Remove the hard drive (see Removing the Palm Rest Bracket). 7. CAUTION: To ... the Regulatory Compliance Homepage at www.dell.com/regulatory_compliance. Make note of the Mini-Card cable routing and pull the Mini-Card cables out through the system board so that shipped with your Edge-to Contents Page Display Dell™ Inspiron™ 1010 Service Manual Removing the Display Assembly ...
Service Manual
Page 17
... Card Reader). 6. Lift and remove the display assembly from the computer base. Replace the palm rest bracket (see Replacing the Battery). Replace the battery (see Replacing the Palm Rest Bracket). 7. Place the display assembly in -1 Media Card Reader (see Replacing the Palm Rest)....system board connector. 3. Replace the hard drive (see Replacing the Keyboard). 10. Replacing the Display Assembly 1. Replace the keyboard (see Replacing the Hard Drive). 8. 1 screws (2) 2 display assembly 13. Route the Mini-Card cables and connect them to the Mini-Cards, if applicable (see Replacing the...
... Card Reader). 6. Lift and remove the display assembly from the computer base. Replace the palm rest bracket (see Replacing the Battery). Replace the battery (see Replacing the Palm Rest Bracket). 7. Place the display assembly in -1 Media Card Reader (see Replacing the Palm Rest)....system board connector. 3. Replace the hard drive (see Replacing the Keyboard). 10. Replacing the Display Assembly 1. Replace the keyboard (see Replacing the Hard Drive). 8. 1 screws (2) 2 display assembly 13. Route the Mini-Card cables and connect them to the Mini-Cards, if applicable (see Replacing the...

Service Manual
Page 18
...rest (see Removing the Battery). 3. Fix the mylar tape back on the computer base. 2. Back to Contents Page 3-in Before You Begin. 2. Removing the Media Card Reader 1. Follow the instructions in -1 Media Card Reader (Daughter Board 1) Dell™ Inspiron™ 1010 Service Manual Removing the... Media Card Reader Replacing the Media Card Reader WARNING: Before working inside your computer, read the safety information that is not authorized by Dell™ is not covered by periodically ...
...rest (see Removing the Battery). 3. Fix the mylar tape back on the computer base. 2. Back to Contents Page 3-in Before You Begin. 2. Removing the Media Card Reader 1. Follow the instructions in -1 Media Card Reader (Daughter Board 1) Dell™ Inspiron™ 1010 Service Manual Removing the... Media Card Reader Replacing the Media Card Reader WARNING: Before working inside your computer, read the safety information that is not authorized by Dell™ is not covered by periodically ...

Service Manual
Page 19
Replace the palm rest (see Replacing the Keyboard). 8. Back to Contents Page Replace the keyboard (see Replacing the Palm Rest). 7. Replace the palm rest bracket (see Replacing the Hard Drive). 6. Replace the hard drive (see Replacing the Palm Rest Bracket). 5. Replace the battery (see Replacing the Battery). 4.
Replace the palm rest (see Replacing the Keyboard). 8. Back to Contents Page Replace the keyboard (see Replacing the Palm Rest). 7. Replace the palm rest bracket (see Replacing the Hard Drive). 6. Replace the hard drive (see Replacing the Palm Rest Bracket). 5. Replace the battery (see Replacing the Battery). 4.
Service Manual
Page 20
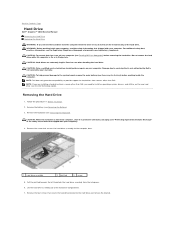
...the main battery (see Removing the Keyboard). Damage due to servicing that secures the hard drive assembly to the computer base. 1 hard drive assembly 2 pull-tab 3 screw 5. Removing the Hard Drive 1. Back to Contents Page Hard Drive Dell™ Inspiron™ 1010 Service Manual... Removing the Hard Drive Replacing the Hard Drive WARNING: If you remove the hard drive from a source other than Dell, you are extremely fragile. WARNING: Before working inside your ...
...the main battery (see Removing the Keyboard). Damage due to servicing that secures the hard drive assembly to the computer base. 1 hard drive assembly 2 pull-tab 3 screw 5. Removing the Hard Drive 1. Back to Contents Page Hard Drive Dell™ Inspiron™ 1010 Service Manual... Removing the Hard Drive Replacing the Hard Drive WARNING: If you remove the hard drive from a source other than Dell, you are extremely fragile. WARNING: Before working inside your ...
Service Manual
Page 21
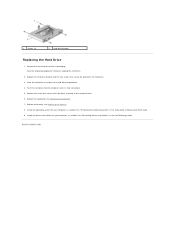
..., as needed . Place the hard drive assembly in the Setup Guide or Ubuntu Quick Start Guide. 9. Replace the keyboard (see Replacing the Battery). 8. See "Restoring Your Operating System" in the hard drive compartment. 4. Back to the hard drive. 3. Replace the hard drive bracket ... computer base. 6. Install the operating system for storing or shipping the hard drive. 2. See "Reinstalling Drivers and Utilities" in the Dell Technology Guide. Install the drivers and utilities for your computer, as needed . Replace the screw that secure the bracket to Contents Page ...
..., as needed . Place the hard drive assembly in the Setup Guide or Ubuntu Quick Start Guide. 9. Replace the keyboard (see Replacing the Battery). 8. See "Restoring Your Operating System" in the hard drive compartment. 4. Back to the hard drive. 3. Replace the hard drive bracket ... computer base. 6. Install the operating system for storing or shipping the hard drive. 2. See "Reinstalling Drivers and Utilities" in the Dell Technology Guide. Install the drivers and utilities for your computer, as needed . Replace the screw that secure the bracket to Contents Page ...

