Service Manual
Page 1
... used in -1 Media Card Reader (Daughter Board 1) TV Tuner Card (Optional) USB and SIM Card Board (Daughter Board 2) AC Adapter Connector Display System Board Flashing the BIOS Notes, Cautions, and Warnings NOTE: A NOTE indicates important information that helps you how to avoid the problem. Dell™ Inspiron™ 1010 Service Manual Before You Begin Battery Keyboard Palm Rest Hard Drive Communication Cards Palm Rest Bracket Battery Status Light Board Speakers Internal Card With Bluetooth® Wireless Technology Power Button Board Coin-Cell Battery 2-in-1 Memory and Processor Board...
... used in -1 Media Card Reader (Daughter Board 1) TV Tuner Card (Optional) USB and SIM Card Board (Daughter Board 2) AC Adapter Connector Display System Board Flashing the BIOS Notes, Cautions, and Warnings NOTE: A NOTE indicates important information that helps you how to avoid the problem. Dell™ Inspiron™ 1010 Service Manual Before You Begin Battery Keyboard Palm Rest Hard Drive Communication Cards Palm Rest Bracket Battery Status Light Board Speakers Internal Card With Bluetooth® Wireless Technology Power Button Board Coin-Cell Battery 2-in-1 Memory and Processor Board...
Service Manual
Page 2
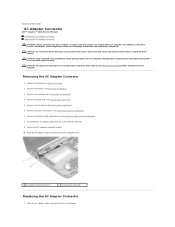
... to Contents Page AC Adapter Connector Dell™ Inspiron™ 1010 Service Manual Removing the AC Adapter Connector Replacing the AC Adapter Connector WARNING: Before working inside your computer, read the safety information that is not authorized by Dell™ is not covered by periodically touching an unpainted metal surface. Damage due to the system board, remove the main battery (see Removing the Keyboard). 4. Remove the hard drive (see Removing the Palm Rest...
... to Contents Page AC Adapter Connector Dell™ Inspiron™ 1010 Service Manual Removing the AC Adapter Connector Replacing the AC Adapter Connector WARNING: Before working inside your computer, read the safety information that is not authorized by Dell™ is not covered by periodically touching an unpainted metal surface. Damage due to the system board, remove the main battery (see Removing the Keyboard). 4. Remove the hard drive (see Removing the Palm Rest...

Service Manual
Page 4
... Status Light Board Dell™ Inspiron™ 1010 Service Manual Removing the Battery Status Light Board Replacing the Battery Status Light Board WARNING: Before working inside your computer, read the safety information that is not authorized by Dell™ is not covered by periodically touching an unpainted metal surface. Follow the instructions in Before You Begin. 2. Remove the battery (see Removing the Hard Drive). 6. Remove the hard drive (see Removing the Battery). 3. Remove the palm rest bracket (see Removing the Keyboard). 4. Connect the battery status light board cable...
... Status Light Board Dell™ Inspiron™ 1010 Service Manual Removing the Battery Status Light Board Replacing the Battery Status Light Board WARNING: Before working inside your computer, read the safety information that is not authorized by Dell™ is not covered by periodically touching an unpainted metal surface. Follow the instructions in Before You Begin. 2. Remove the battery (see Removing the Hard Drive). 6. Remove the hard drive (see Removing the Battery). 3. Remove the palm rest bracket (see Removing the Keyboard). 4. Connect the battery status light board cable...

Service Manual
Page 6
... in the reverse order. l A component can be replaced or-if purchased separately-installed by your computer and attached devices did not automatically turn off . Back to Contents Page Before You Begin Dell™ Inspiron™ 1010 Service Manual Recommended Tools Turning Off Your Computer Before Working Inside Your Computer This section provides procedures for removing and installing the components in this type of cable, press in...
... in the reverse order. l A component can be replaced or-if purchased separately-installed by your computer and attached devices did not automatically turn off . Back to Contents Page Before You Begin Dell™ Inspiron™ 1010 Service Manual Recommended Tools Turning Off Your Computer Before Working Inside Your Computer This section provides procedures for removing and installing the components in this type of cable, press in...
Service Manual
Page 8
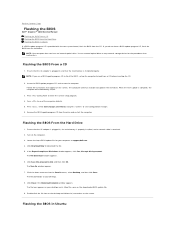
... BIOS from the hard drive. Flashing the BIOS From the Hard Drive 1. The file downloads to your computer at support.dell.com. 4. Remove the BIOS-update program CD from a CD before inserting the CD. 2. If you use a BIOS-update program CD to flash the BIOS, set up the computer to boot from the drive and restart the computer. The file icon appears on the screen. Back to Contents Page Flashing the BIOS Dell™ Inspiron™ 1010 Service Manual Flashing...
... BIOS from the hard drive. Flashing the BIOS From the Hard Drive 1. The file downloads to your computer at support.dell.com. 4. Remove the BIOS-update program CD from a CD before inserting the CD. 2. If you use a BIOS-update program CD to flash the BIOS, set up the computer to boot from the drive and restart the computer. The file icon appears on the screen. Back to Contents Page Flashing the BIOS Dell™ Inspiron™ 1010 Service Manual Flashing...
Service Manual
Page 20
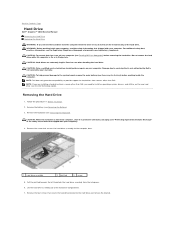
... additional safety best practices information, see Removing the Battery) before removing the hard drive. Remove the four screws that is not authorized by Dell is On or in Before You Begin. 2. Back to Contents Page Hard Drive Dell™ Inspiron™ 1010 Service Manual Removing the Hard Drive Replacing the Hard Drive WARNING: If you need to install an operating system, drivers, and utilities on your computer. WARNING: Before working inside your computer, read the safety...
... additional safety best practices information, see Removing the Battery) before removing the hard drive. Remove the four screws that is not authorized by Dell is On or in Before You Begin. 2. Back to Contents Page Hard Drive Dell™ Inspiron™ 1010 Service Manual Removing the Hard Drive Replacing the Hard Drive WARNING: If you need to install an operating system, drivers, and utilities on your computer. WARNING: Before working inside your computer, read the safety...
Service Manual
Page 26
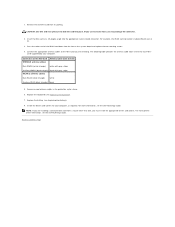
... WLAN (black triangle) black 5. Replace the battery (see Replacing the Keyboard). 7. NOTE: If you are installing. The following table provides the antenna cable color scheme for your computer. Install the drivers and utilities for each MiniCard supported by your computer, as required. Insert the Mini-Card at a 45-degree angle into the slot on the system board and replace the two securing screws. 4. Connectors on . 3. Remove the new Mini-Card from...
... WLAN (black triangle) black 5. Replace the battery (see Replacing the Keyboard). 7. NOTE: If you are installing. The following table provides the antenna cable color scheme for your computer. Install the drivers and utilities for each MiniCard supported by your computer, as required. Insert the Mini-Card at a 45-degree angle into the slot on the system board and replace the two securing screws. 4. Connectors on . 3. Remove the new Mini-Card from...
Service Manual
Page 36
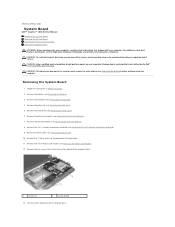
.... Remove the 2-in-1 memory and processor board (see Removing the Battery) before working inside the computer. Remove the two screws that secure the system board to servicing that shipped with your computer. Remove the coin-cell battery (see Removing the TV Tuner Card). 11. Back to Contents Page System Board Dell™ Inspiron™ 1010 Service Manual Removing the System Board Replacing the System Board Entering the Service Tag in the BIOS Setting the Keyboard Matrix WARNING: Before working...
.... Remove the 2-in-1 memory and processor board (see Removing the Battery) before working inside the computer. Remove the two screws that secure the system board to servicing that shipped with your computer. Remove the coin-cell battery (see Removing the TV Tuner Card). 11. Back to Contents Page System Board Dell™ Inspiron™ 1010 Service Manual Removing the System Board Replacing the System Board Entering the Service Tag in the BIOS Setting the Keyboard Matrix WARNING: Before working...
Service Manual
Page 37
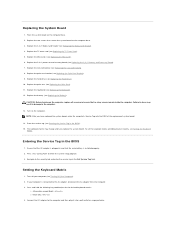
... computer (see Replacing the Coin-Cell Battery). 8. Connect the AC adapter to the computer and then plug it into the BIOS of the replacement system board. 14. Replace the 3-in -1 Memory and Processor Board). 7. Replace the Mini-Cards (see Replacing the Media Card Reader). 4. Press during POST to the security tab and enter the service tag in damage to the computer base. 3. Setting the Keyboard Matrix 1. CAUTION: Before turning on the computer...
... computer (see Replacing the Coin-Cell Battery). 8. Connect the AC adapter to the computer and then plug it into the BIOS of the replacement system board. 14. Replace the 3-in -1 Memory and Processor Board). 7. Replace the Mini-Cards (see Replacing the Media Card Reader). 4. Press during POST to the security tab and enter the service tag in damage to the computer base. 3. Setting the Keyboard Matrix 1. CAUTION: Before turning on the computer...
Setup Guide
Page 5
... the Power Button 8 Enable or Disable Wireless (Optional 9 Ubuntu® Setup 10 Microsoft® Windows® Setup 10 Connect to the Internet (Optional 10 Set Up the TV Tuner (Availability Varies by Regions 13 Using Your Inspiron™ Laptop 14 Right Side Features 14 Left Side Features 16 Computer Base and Keyboard Features 18 Touch Pad Gestures 20 Setting the Touch Pad Sensitivity 22 Display Features 23 Removing and Replacing the Battery 24 Software Features 25 Solving Problems 27 Network Problems 27 Power Problems 28 Memory Problems...
... the Power Button 8 Enable or Disable Wireless (Optional 9 Ubuntu® Setup 10 Microsoft® Windows® Setup 10 Connect to the Internet (Optional 10 Set Up the TV Tuner (Availability Varies by Regions 13 Using Your Inspiron™ Laptop 14 Right Side Features 14 Left Side Features 16 Computer Base and Keyboard Features 18 Touch Pad Gestures 20 Setting the Touch Pad Sensitivity 22 Display Features 23 Removing and Replacing the Battery 24 Software Features 25 Solving Problems 27 Network Problems 27 Power Problems 28 Memory Problems...
Setup Guide
Page 12
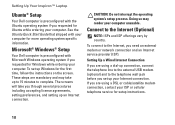
... Internet Connection If you are using a DSL or cable/satellite modem connection, contact your ISP or cellular telephone service for setup instructions. 10 Setting Up Your Inspiron™ Laptop Ubuntu® Setup Your Dell computer is preconfigured with Microsoft Windows operating system if you requested for Windows while ordering your computer. These steps are using a dial-up connection, connect the telephone line to the external USB modem (optional) and to complete. See the Ubuntu Quick Start Guide that...
... Internet Connection If you are using a DSL or cable/satellite modem connection, contact your ISP or cellular telephone service for setup instructions. 10 Setting Up Your Inspiron™ Laptop Ubuntu® Setup Your Dell computer is preconfigured with Microsoft Windows operating system if you requested for Windows while ordering your computer. These steps are using a dial-up connection, connect the telephone line to the external USB modem (optional) and to complete. See the Ubuntu Quick Start Guide that...
Setup Guide
Page 14
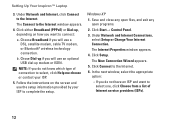
... use the setup information provided by your ISP. 5. NOTE: If you want to complete the setup. Under Network and Internet Connections, select Setup or Change Your Internet Connection. Under Network and Internet, click Connect to connect: a. Click Start→ Control Panel. 3. The New Connection Wizard appears. 5. Setting Up Your Inspiron™ Laptop 3. Click either Broadband (PPPoE) or Dial-up if you will use a DSL, satellite modem, cable TV modem, or Bluetooth® wireless technology connection. The Connect to the Internet window...
... use the setup information provided by your ISP. 5. NOTE: If you want to complete the setup. Under Network and Internet Connections, select Setup or Change Your Internet Connection. Under Network and Internet, click Connect to connect: a. Click Start→ Control Panel. 3. The New Connection Wizard appears. 5. Setting Up Your Inspiron™ Laptop 3. Click either Broadband (PPPoE) or Dial-up if you will use a DSL, satellite modem, cable TV modem, or Bluetooth® wireless technology connection. The Connect to the Internet window...
Setup Guide
Page 19
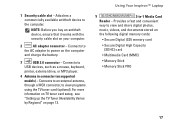
... buy an antitheft device, ensure that it works with the security cable slot on supported models) - Connects to USB devices, such as a mouse, keyboard, printer, external drive, or MP3 player. 4 Antenna in -1 Media Card Reader - Provides a fast and convenient way to the computer. Connects to an external antenna, through a MCX connector, to power on the computer and charge the battery. 3 USB 2.0 connector - For more information on TV tuner card setup, see "Setting up the TV...
... buy an antitheft device, ensure that it works with the security cable slot on supported models) - Connects to USB devices, such as a mouse, keyboard, printer, external drive, or MP3 player. 4 Antenna in -1 Media Card Reader - Provides a fast and convenient way to the computer. Connects to an external antenna, through a MCX connector, to power on the computer and charge the battery. 3 USB 2.0 connector - For more information on TV tuner card setup, see "Setting up the TV...
Setup Guide
Page 28
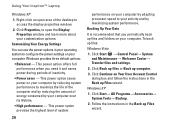
... or Back up Files wizard. Using Your Inspiron™ Laptop Windows XP 1. Windows XP 1. Right-click an open the Display Properties window and learn more about your computer over its lifetime. • High performance - Click Start → Control Panel→ System and Maintenance→ Welcome Center→ Transfer files and settings. 2. Click Continue on your computer. This power option provides the highest level of the...
... or Back up Files wizard. Using Your Inspiron™ Laptop Windows XP 1. Windows XP 1. Right-click an open the Display Properties window and learn more about your computer over its lifetime. • High performance - Click Start → Control Panel→ System and Maintenance→ Welcome Center→ Transfer files and settings. 2. Click Continue on your computer. This power option provides the highest level of the...
Setup Guide
Page 31
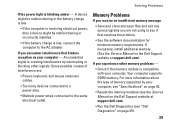
... the battery charge is creating interference by your computer, see "Specifications" on page 52. • Reseat the memory modules (see the Service Manual on the Dell Support website at support.dell.com). Memory Problems If you receive an insufficient memory message • Save and close any open files and exit any open programs you are : • Power, keyboard, and mouse extension cables. • Too many devices connected to a power strip. • Multiple power strips connected to...
... the battery charge is creating interference by your computer, see "Specifications" on page 52. • Reseat the memory modules (see the Service Manual on the Dell Support website at support.dell.com). Memory Problems If you receive an insufficient memory message • Save and close any open files and exit any open programs you are : • Power, keyboard, and mouse extension cables. • Too many devices connected to a power strip. • Multiple power strips connected to...
Setup Guide
Page 45
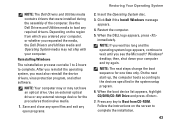
... the computer. When the boot device list appears, highlight CD/DVD/CD-RW Drive and press . 7. Press any open programs. Restoring Your Operating System 2. Save and close any open files and exit any key to complete the installation. 43 Depending on the screen to Boot from which you ordered your computer, or whether you requested the media, the Dell Drivers and Utilities media and Operating System media may not have an...
... the computer. When the boot device list appears, highlight CD/DVD/CD-RW Drive and press . 7. Press any open programs. Restoring Your Operating System 2. Save and close any open files and exit any key to complete the installation. 43 Depending on the screen to Boot from which you ordered your computer, or whether you requested the media, the Dell Drivers and Utilities media and Operating System media may not have an...
Setup Guide
Page 52
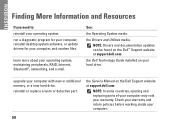
... your computer, and readme files. reinstall or replace a worn or defective part. the Dell Technology Guide installed on the Dell Support website at support.dell.com. Check your warranty and return policies before working inside your hard drive. the Service Manual on your computer. 50 run a diagnostic program for your computer, reinstall desktop system software, or update drivers for your warranty. upgrade your computer with new or additional memory, or a new hard drive.
... your computer, and readme files. reinstall or replace a worn or defective part. the Dell Technology Guide installed on the Dell Support website at support.dell.com. Check your warranty and return policies before working inside your hard drive. the Service Manual on your computer. 50 run a diagnostic program for your computer, reinstall desktop system software, or update drivers for your warranty. upgrade your computer with new or additional memory, or a new hard drive.
Setup Guide
Page 54
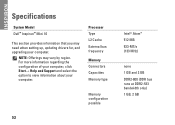
... External bus frequency Memory Connectors Capacities Memory type Memory configuration possible 52 Intel® Atom™ 512 MB 533-MT/s (133 MHz) none 1 GB and 2 GB DDR2-800 (DDR bus runs at DDR2-533 bandwidth only) 1 GB, 2 GB NOTE: Offerings may need when setting up, updating drivers for, and upgrading your computer. For more information regarding the configuration of your computer, click Start...
... External bus frequency Memory Connectors Capacities Memory type Memory configuration possible 52 Intel® Atom™ 512 MB 533-MT/s (133 MHz) none 1 GB and 2 GB DDR2-800 (DDR bus runs at DDR2-533 bandwidth only) 1 GB, 2 GB NOTE: Offerings may need when setting up, updating drivers for, and upgrading your computer. For more information regarding the configuration of your computer, click Start...
Ubuntu Users Guide
Page 11
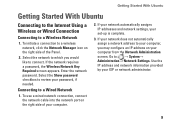
.... 2. Enter the network password. To use a wired network connection, connect the network cable into the network port on the right side of your computer, you would like to a wireless network, click the Network Manager icon on the right side of the Panel. 2. Use the IP address and network information provided by your set‑up is complete. 3. If the network requires a password, the Wireless Network Key Required screen appears. Connecting to a Wireless Network 1. Getting Started With Ubuntu Getting Started With...
.... 2. Enter the network password. To use a wired network connection, connect the network cable into the network port on the right side of your computer, you would like to a wireless network, click the Network Manager icon on the right side of the Panel. 2. Use the IP address and network information provided by your set‑up is complete. 3. If the network requires a password, the Wireless Network Key Required screen appears. Connecting to a Wireless Network 1. Getting Started With Ubuntu Getting Started With...
Ubuntu Users Guide
Page 24
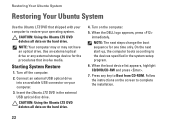
... may not have an optical drive. Use an external optical drive or any key to Boot from CD-ROM. Connect an external USB optical drive into an available USB connector on your operating system. CAUTION: Using the Ubuntu LTS DVD deletes all data on the hard drive. 4. Restoring Your Ubuntu System Restoring Your Ubuntu System Use the Ubuntu LTS DVD that involve media. NOTE: The next steps change the boot sequence for the procedures...
... may not have an optical drive. Use an external optical drive or any key to Boot from CD-ROM. Connect an external USB optical drive into an available USB connector on your operating system. CAUTION: Using the Ubuntu LTS DVD deletes all data on the hard drive. 4. Restoring Your Ubuntu System Restoring Your Ubuntu System Use the Ubuntu LTS DVD that involve media. NOTE: The next steps change the boot sequence for the procedures...


