Setup Guide
Page 61
... the computer and remove any newly added internal hardware. Turn on your operating system. Select Repair Your Computer. 59 NOTE: Do not disconnect the AC adapter. 3. Restoring Your Operating System NOTE: If Dell DataSafe Local Backup is not available on your computer, use Dell DataSafe Local Backup to restore your hard drive to the operating...
... the computer and remove any newly added internal hardware. Turn on your operating system. Select Repair Your Computer. 59 NOTE: Do not disconnect the AC adapter. 3. Restoring Your Operating System NOTE: If Dell DataSafe Local Backup is not available on your computer, use Dell DataSafe Local Backup to restore your hard drive to the operating...

Setup Guide
Page 64
... data files-are permanently deleted from the hard drive. Any programs or files added since you purchased the computer. When the DELL™ logo appears, press several times to the operating state it was in certain countries or on the hard drive and removes any programs or drivers installed after you ...received your operating system Use Dell Factory Image Restore only as the last method to wait until you wait too long and the...
... data files-are permanently deleted from the hard drive. Any programs or files added since you purchased the computer. When the DELL™ logo appears, press several times to the operating state it was in certain countries or on the hard drive and removes any programs or drivers installed after you ...received your operating system Use Dell Factory Image Restore only as the last method to wait until you wait too long and the...
Setup Guide
Page 70
...missing any data on the hard drive(s) and on page 51. 4. Getting Help Returning Items for Repair Under Warranty or for Credit Prepare all confidential, proprietary and personal information, as well as removable media, such as follows: NOTE: Before you return the product to Dell, make sure to obtain... a Return Material Authorization Number, and write it clearly and prominently on the outside of the invoice and a letter describing the reason for the return. 3. Remove any and all items being returned (power cables, ...
...missing any data on the hard drive(s) and on page 51. 4. Getting Help Returning Items for Repair Under Warranty or for Credit Prepare all confidential, proprietary and personal information, as well as removable media, such as follows: NOTE: Before you return the product to Dell, make sure to obtain... a Return Material Authorization Number, and write it clearly and prominently on the outside of the invoice and a letter describing the reason for the return. 3. Remove any and all items being returned (power cables, ...
Service Guide
Page 19
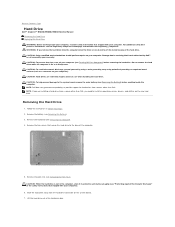
... battery (see Turning Off Your Computer) before working inside the computer. Slide the hard drive away from sources other than Dell. Back to Contents Page Hard Drive Dell™ Inspiron™ N5020/M5030/N5030 Service Manual Removing the Hard Drive Replacing the Hard Drive WARNING: Before working inside your computer, read the safety information that shipped with your computer. CAUTION: Only a certified service...
... battery (see Turning Off Your Computer) before working inside the computer. Slide the hard drive away from sources other than Dell. Back to Contents Page Hard Drive Dell™ Inspiron™ N5020/M5030/N5030 Service Manual Removing the Hard Drive Replacing the Hard Drive WARNING: Before working inside your computer, read the safety information that shipped with your computer. CAUTION: Only a certified service...
Service Guide
Page 20
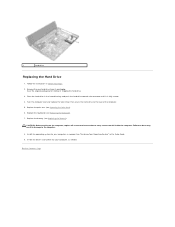
... the Palm Rest). 6. CAUTION: Before turning on the computer, replace all screws and ensure that secure the hard- Replace the palm rest (see Replacing the Keyboard). 7. 1 hard drive Replacing the Hard Drive 1. Remove the new hard drive from its packaging. drive to the computer. 8. Back to Contents Page Turn the computer over and replace the two screws that no...
... the Palm Rest). 6. CAUTION: Before turning on the computer, replace all screws and ensure that secure the hard- Replace the palm rest (see Replacing the Keyboard). 7. 1 hard drive Replacing the Hard Drive 1. Remove the new hard drive from its packaging. drive to the computer. 8. Back to Contents Page Turn the computer over and replace the two screws that no...
Service Guide
Page 39
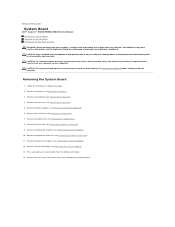
...dell.com/regulatory_compliance. Remove the coin-cell battery (see Removing the Hard Drive). 7. CAUTION: To avoid electrostatic discharge, ground yourself by using a wrist grounding strap or by your computer. Remove the hard drive (see Removing the Coin-Cell Battery). 13. Remove the processor heat sink (see Removing... Removing the System Board 1. Remove memory module(s) (see Removing the Processor Heat Sink). 11. Remove the optical drive (see Removing the Optical Drive). 8. Back to Contents Page System Board Dell™ Inspiron™ N5020/M5030/N5030 Service Manual Removing the...
...dell.com/regulatory_compliance. Remove the coin-cell battery (see Removing the Hard Drive). 7. CAUTION: To avoid electrostatic discharge, ground yourself by using a wrist grounding strap or by your computer. Remove the hard drive (see Removing the Coin-Cell Battery). 13. Remove the processor heat sink (see Removing... Removing the System Board 1. Remove memory module(s) (see Removing the Processor Heat Sink). 11. Remove the optical drive (see Removing the Optical Drive). 8. Back to Contents Page System Board Dell™ Inspiron™ N5020/M5030/N5030 Service Manual Removing the...

Service Guide
Page 40
.... Turn on the computer base. 3. Lift the system board assembly off the computer base. Replace the hard drive (see Replacing the Memory Module(s)). 13. Replace memory module(s) (see Replacing the Hard Drive). 12. Replacing the System Board 1. Align the connectors on the system board with the slots on the... system board. 17. 1 screws (2) 2 system board 15. Replace the keyboard (see Replacing the Wireless Mini-Card). 10. NOTE: After you removed from the Media Card Reader. 5. Replace any card or blank that secure the system board to the computer. 16. Failure to do so may ...
.... Turn on the computer base. 3. Lift the system board assembly off the computer base. Replace the hard drive (see Replacing the Memory Module(s)). 13. Replace memory module(s) (see Replacing the Hard Drive). 12. Replacing the System Board 1. Align the connectors on the system board with the slots on the... system board. 17. 1 screws (2) 2 system board 15. Replace the keyboard (see Replacing the Wireless Mini-Card). 10. NOTE: After you removed from the Media Card Reader. 5. Replace any card or blank that secure the system board to the computer. 16. Failure to do so may ...


