Owner's Manual
Page 4
... 29 Touch Pad 30 Customizing the Touch Pad 30 5 Using a Battery Battery Performance 31 Checking the Battery Charge 32 Dell™ QuickSet Battery Meter 32 Microsoft® Windows® Power Meter 32 Low-Battery Warning 32 Conserving Battery Power 32 Power Management Modes 33 Configuring Power Management Settings 34 Charging the Battery 37 Replacing the Battery 38 Storing a Battery 39 4 Contents
... 29 Touch Pad 30 Customizing the Touch Pad 30 5 Using a Battery Battery Performance 31 Checking the Battery Charge 32 Dell™ QuickSet Battery Meter 32 Microsoft® Windows® Power Meter 32 Low-Battery Warning 32 Conserving Battery Power 32 Power Management Modes 33 Configuring Power Management Settings 34 Charging the Battery 37 Replacing the Battery 38 Storing a Battery 39 4 Contents
Owner's Manual
Page 18
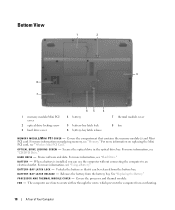
... installed, you can be released from the battery bay. B A T T E R Y - B A Y L A T C H R E L E A S E - Covers the processor and thermal module. Bottom View 1 2 3 8 7 1 memory module/Mini PCI cover 2 optical drive locking screw 3 hard drive cover 65 4 4 battery 5 battery-bay latch lock 6 battery-bay latch release 7 thermal module cover 8 fan M E M O R Y M O D U L E / M I N I P C I N G S C R E W - O P T I C A L D R I V E L O C K I C O V E R - For more information on replacing memory, see "CD/DVD Drive." H A R D D R I V E - Stores software...
... installed, you can be released from the battery bay. B A T T E R Y - B A Y L A T C H R E L E A S E - Covers the processor and thermal module. Bottom View 1 2 3 8 7 1 memory module/Mini PCI cover 2 optical drive locking screw 3 hard drive cover 65 4 4 battery 5 battery-bay latch lock 6 battery-bay latch release 7 thermal module cover 8 fan M E M O R Y M O D U L E / M I N I P C I N G S C R E W - O P T I C A L D R I V E L O C K I C O V E R - For more information on replacing memory, see "CD/DVD Drive." H A R D D R I V E - Stores software...
Owner's Manual
Page 31
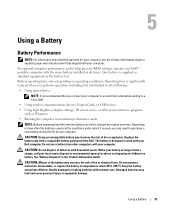
..., operate your computer. See "Battery Disposal" in the battery bay. Replace the battery only with your Dell computer. Do not puncture, incinerate, disassemble, or expose the battery to work with household waste. Using a Battery Battery Performance NOTE: For information about the Dell warranty for advice on operating conditions. One battery is recommended that shipped with a compatible battery purchased from children. Using...
..., operate your computer. See "Battery Disposal" in the battery bay. Replace the battery only with your Dell computer. Do not puncture, incinerate, disassemble, or expose the battery to work with household waste. Using a Battery Battery Performance NOTE: For information about the Dell warranty for advice on operating conditions. One battery is recommended that shipped with a compatible battery purchased from children. Using...
Owner's Manual
Page 38
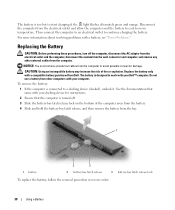
... latch release lock on the bottom of fire or explosion. Replace the battery only with a battery, see "Power Problems." See the documentation that came with your computer. The battery is too hot to work with your Dell™ computer. The battery is designed to start charging if the light flashes alternately green and orange. Disconnect the...
... latch release lock on the bottom of fire or explosion. Replace the battery only with a battery, see "Power Problems." See the documentation that came with your computer. The battery is too hot to work with your Dell™ computer. The battery is designed to start charging if the light flashes alternately green and orange. Disconnect the...
Owner's Manual
Page 63
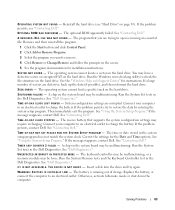
... charge. A chip on the system board may be loose. If the message reappears, contact Dell. If the problem persists, contact Dell. See "Using the System Setup Program." A chip on the system board may be malfunctioning. See "Dell Diagnostics." Replace the battery, or connect the computer to restore the data by entering the system setup program...
... charge. A chip on the system board may be loose. If the message reappears, contact Dell. If the problem persists, contact Dell. See "Using the System Setup Program." A chip on the system board may be malfunctioning. See "Dell Diagnostics." Replace the battery, or connect the computer to restore the data by entering the system setup program...
Owner's Manual
Page 67
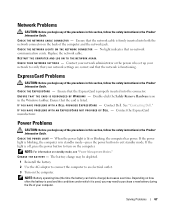
...THE NETWORK AGAIN. See "Contacting Dell." CHECK THE POWER LIGHT - Depending on how often the battery is used and the conditions under which it is used, you may be depleted. 1 Reinstall the battery. 2 Use the AC adapter to...indicates that the card is lit or blinking, the computer has power. E N S U R E T H A T T H E C A R D I S R E C O G N I Z E D B Y W I D E D B Y D E L L - P R O V I G H T S O N T H E N E T W O R K C O N N E C T O R - Replace the network cable. If the light is off, press the power button to verify that your network to turn on the back of the computer...
...THE NETWORK AGAIN. See "Contacting Dell." CHECK THE POWER LIGHT - Depending on how often the battery is used and the conditions under which it is used, you may be depleted. 1 Reinstall the battery. 2 Use the AC adapter to...indicates that the card is lit or blinking, the computer has power. E N S U R E T H A T T H E C A R D I S R E C O G N I Z E D B Y W I D E D B Y D E L L - P R O V I G H T S O N T H E N E T W O R K C O N N E C T O R - Replace the network cable. If the light is off, press the power button to verify that your network to turn on the back of the computer...

Owner's Manual
Page 82
...the components or contacts on the bottom of cable, press in the Product Information Guide. Damage due to servicing that is not authorized by Dell is flat and clean to avoid bending any telephone or network cables from the computer. 4 Disconnect your computer and all attached devices from... it from the network wall jack. 3 Disconnect any connector pins. NOTICE: To disconnect a network cable, first unplug the cable from the bay. 1 1 battery 3 2 2 battery-bay latch release 3 battery-bay latch release lock 82 Adding and Replacing Parts Some cables have a connector with care.
...the components or contacts on the bottom of cable, press in the Product Information Guide. Damage due to servicing that is not authorized by Dell is flat and clean to avoid bending any telephone or network cables from the computer. 4 Disconnect your computer and all attached devices from... it from the network wall jack. 3 Disconnect any connector pins. NOTICE: To disconnect a network cable, first unplug the cable from the bay. 1 1 battery 3 2 2 battery-bay latch release 3 battery-bay latch release lock 82 Adding and Replacing Parts Some cables have a connector with care.

Owner's Manual
Page 86
... Information Guide. NOTE: Memory modules purchased from Dell are intended for information on the memory supported by installing memory modules on the system board. 1 2 3 1 CD/DVD drive 2 drive removal slot 3 securing screw 6 To replace the device, push the new device straight into... memory by your computer. NOTICE: To avoid damaging the system board, you must remove the main battery before you begin working inside the computer. 86 Adding and Replacing Parts If necessary, enter your password to unlock your computer warranty. See "Specifications" for your computer...
... Information Guide. NOTE: Memory modules purchased from Dell are intended for information on the memory supported by installing memory modules on the system board. 1 2 3 1 CD/DVD drive 2 drive removal slot 3 securing screw 6 To replace the device, push the new device straight into... memory by your computer. NOTICE: To avoid damaging the system board, you must remove the main battery before you begin working inside the computer. 86 Adding and Replacing Parts If necessary, enter your password to unlock your computer warranty. See "Specifications" for your computer...
Owner's Manual
Page 89
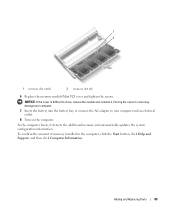
... computer. As the computer boots, it . NOTICE: If the cover is difficult to close may damage your computer. 7 Insert the battery into the battery bay, or connect the AC adapter to close , remove the module and reinstall it detects the additional memory and automatically updates the system... configuration information. Adding and Replacing Parts 89 To confirm the amount of memory installed in the computer, click the Start button, ...
... computer. As the computer boots, it . NOTICE: If the cover is difficult to close may damage your computer. 7 Insert the battery into the battery bay, or connect the AC adapter to close , remove the module and reinstall it detects the additional memory and automatically updates the system... configuration information. Adding and Replacing Parts 89 To confirm the amount of memory installed in the computer, click the Start button, ...

Owner's Manual
Page 90
NOTICE: To avoid damaging the system board, you must remove the main battery before you ordered a Mini PCI card with your computer, the card is not already installed, go to step 4. Wireless Mini PCI Card If you begin ... a Mini PCI card is already installed. If you begin working inside the computer. 1 Follow the procedures in the Product Information Guide. CAUTION: Before you are replacing a Mini PCI card, remove the existing card: a Disconnect the antenna cable from the Mini PCI card. 90 Adding and...
NOTICE: To avoid damaging the system board, you must remove the main battery before you ordered a Mini PCI card with your computer, the card is not already installed, go to step 4. Wireless Mini PCI Card If you begin ... a Mini PCI card is already installed. If you begin working inside the computer. 1 Follow the procedures in the Product Information Guide. CAUTION: Before you are replacing a Mini PCI card, remove the existing card: a Disconnect the antenna cable from the Mini PCI card. 90 Adding and...
Owner's Manual
Page 94
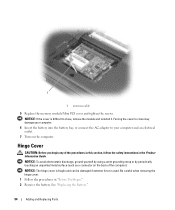
...safety instructions in "Before You Begin." 2 Remove the battery. Be careful when removing the hinge cover. 1 Follow the procedures in the Product Information Guide. NOTICE: If the cover is used. See "Replacing the Battery." 94 Adding and Replacing Parts NOTICE: The hinge cover is fragile and can ...be damaged if extreme force is difficult to your computer. 6 Insert the battery into the battery bay, or connect the AC adapter to close, ...
...safety instructions in "Before You Begin." 2 Remove the battery. Be careful when removing the hinge cover. 1 Follow the procedures in the Product Information Guide. NOTICE: If the cover is used. See "Replacing the Battery." 94 Adding and Replacing Parts NOTICE: The hinge cover is fragile and can ...be damaged if extreme force is difficult to your computer. 6 Insert the battery into the battery bay, or connect the AC adapter to close, ...
Owner's Manual
Page 95
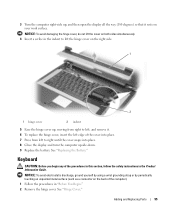
... side. 1 2 1 hinge cover 2 indent 5 Ease the hinge cover up , and then open the display all the way (180 degrees) so that it . 6 To replace the hinge cover, insert the left edge of the procedures in this section, follow the safety instructions in "Before You Begin." 2 Remove the hinge cover...computer right-side up , moving from left to right until the cover snaps into place. 8 Close the display and turn the computer upside-down. 9 Replace the battery. Keyboard CAUTION: Before you begin any of the cover into place. 7 Press from right to left, and remove it rests on your work surface....
... side. 1 2 1 hinge cover 2 indent 5 Ease the hinge cover up , and then open the display all the way (180 degrees) so that it . 6 To replace the hinge cover, insert the left edge of the procedures in this section, follow the safety instructions in "Before You Begin." 2 Remove the hinge cover...computer right-side up , moving from left to right until the cover snaps into place. 8 Close the display and turn the computer upside-down. 9 Replace the battery. Keyboard CAUTION: Before you begin any of the cover into place. 7 Press from right to left, and remove it rests on your work surface....


