Owners Manual
Page 7
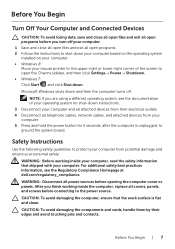
After you finish working inside the computer, replace all covers, panels, and screws before connecting to ground the system board. CAUTION: To avoid damaging the...system installed on your computer. • Windows 8: Move your computer. WARNING: Disconnect all power sources before opening the computer cover or panels. Before You Begin | 7 For additional safety best practices information, see the documentation of the screen to protect ... Shut down. NOTE: If you are using a different operating system, see the Regulatory Compliance Homepage at dell.com/regulatory_compliance.
After you finish working inside the computer, replace all covers, panels, and screws before connecting to ground the system board. CAUTION: To avoid damaging the...system installed on your computer. • Windows 8: Move your computer. WARNING: Disconnect all power sources before opening the computer cover or panels. Before You Begin | 7 For additional safety best practices information, see the documentation of the screen to protect ... Shut down. NOTE: If you are using a different operating system, see the Regulatory Compliance Homepage at dell.com/regulatory_compliance.

Owners Manual
Page 8
... touch an unpainted metal surface to dissipate static electricity, which could harm internal components. CAUTION: Only a certified service technician is authorized to remove the computer cover and access any of the computer. See the safety instructions for complete information about safety precautions, working inside the computer. Recommended Tools The procedures in...
... touch an unpainted metal surface to dissipate static electricity, which could harm internal components. CAUTION: Only a certified service technician is authorized to remove the computer cover and access any of the computer. See the safety instructions for complete information about safety precautions, working inside the computer. Recommended Tools The procedures in...
Owners Manual
Page 15
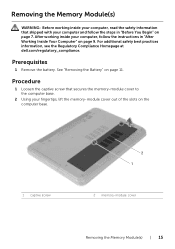
...in "Before You Begin" on page 7. See "Removing the Battery" on the computer base. 1 captive screw 2 1 2 memory-module cover Removing the Memory Module(s) | 15 Removing the Memory Module(s) WARNING: Before working inside your computer, read the safety information that secures the memory-...module cover to the computer base. 2 Using your fingertips, lift the memory-module cover out of the slots on page 11. For additional safety best practices information, see the Regulatory ...
...in "Before You Begin" on page 7. See "Removing the Battery" on the computer base. 1 captive screw 2 1 2 memory-module cover Removing the Memory Module(s) | 15 Removing the Memory Module(s) WARNING: Before working inside your computer, read the safety information that secures the memory-...module cover to the computer base. 2 Using your fingertips, lift the memory-module cover out of the slots on page 11. For additional safety best practices information, see the Regulatory ...
Owners Manual
Page 17
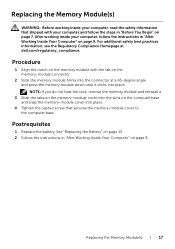
NOTE: If you do not hear the click, remove the memory module and reinstall it clicks into the connector at dell.com/regulatory_compliance. Replacing the Memory Module(s) | 17 For additional safety best practices information, see the Regulatory Compliance Homepage at a 45-...Your Computer" on page 9. Replacing the Memory Module(s) WARNING: Before working inside your computer, read the safety information that secures the memory-module cover to the computer base. After working inside your computer, follow the steps in "Before You Begin" on the memory-module connector. 2 Slide the...
NOTE: If you do not hear the click, remove the memory module and reinstall it clicks into the connector at dell.com/regulatory_compliance. Replacing the Memory Module(s) | 17 For additional safety best practices information, see the Regulatory Compliance Homepage at a 45-...Your Computer" on page 9. Replacing the Memory Module(s) WARNING: Before working inside your computer, read the safety information that secures the memory-module cover to the computer base. After working inside your computer, follow the steps in "Before You Begin" on the memory-module connector. 2 Slide the...

Owners Manual
Page 76
Procedure 1 Press the hinge covers on the sides and lift the hinge covers to remove it from the display assembly. 1 1 hinge covers (2) 2 Using your fingertips, carefully pry up the inside edge of the display bezel. 3 Remove the display bezel off the display back-cover. 1 1 display bezel 76 | Removing the Display Bezel
Procedure 1 Press the hinge covers on the sides and lift the hinge covers to remove it from the display assembly. 1 1 hinge covers (2) 2 Using your fingertips, carefully pry up the inside edge of the display bezel. 3 Remove the display bezel off the display back-cover. 1 1 display bezel 76 | Removing the Display Bezel

Owners Manual
Page 77
... instructions in "Before You Begin" on page 73. 2 Replace the palm-rest. For additional safety best practices information, see the Regulatory Compliance Homepage at dell.com/regulatory_compliance. Procedure 1 Align the display bezel with the display back-cover, and gently snap the display bezel into place. See "Replacing the Display Assembly" on page 7.
... instructions in "Before You Begin" on page 73. 2 Replace the palm-rest. For additional safety best practices information, see the Regulatory Compliance Homepage at dell.com/regulatory_compliance. Procedure 1 Align the display bezel with the display back-cover, and gently snap the display bezel into place. See "Replacing the Display Assembly" on page 7.

Owners Manual
Page 80
Procedure 1 Remove the screws that secure the display hinges to the display panel. 2 Lift the display hinges off the display back-cover. 1 2 1 screws (8) 2 display hinges (2) 80 | Removing the Display Hinges
Procedure 1 Remove the screws that secure the display hinges to the display panel. 2 Lift the display hinges off the display back-cover. 1 2 1 screws (8) 2 display hinges (2) 80 | Removing the Display Hinges

Owners Manual
Page 81
...in "Replacing the Memory Module(s)" on page 17. 8 Replace the battery. For additional safety best practices information, see the Regulatory Compliance Homepage at dell.com/regulatory_compliance. Postrequisites 1 Replace the display bezel. See "Replacing the Hard-Drive Assembly" on page 25. 7 Follow the instructions from step ...WARNING: Before working inside your computer, read the safety information that secure the display hinges to the display back-cover. See "Replacing the Optical-Drive Assembly" on page 29. 5 Replace the optical-drive assembly. See "Replacing the Display Bezel" on ...
...in "Replacing the Memory Module(s)" on page 17. 8 Replace the battery. For additional safety best practices information, see the Regulatory Compliance Homepage at dell.com/regulatory_compliance. Postrequisites 1 Replace the display bezel. See "Replacing the Hard-Drive Assembly" on page 25. 7 Follow the instructions from step ...WARNING: Before working inside your computer, read the safety information that secure the display hinges to the display back-cover. See "Replacing the Optical-Drive Assembly" on page 29. 5 Replace the optical-drive assembly. See "Replacing the Display Bezel" on ...

Owners Manual
Page 84
Procedure 1 Remove the screws that secure the display panel to the display back-cover. 2 Gently lift the display panel and turn it over. 2 1 3 1 display back-cover 3 screws (4) 2 display panel 84 | Removing the Display Panel
Procedure 1 Remove the screws that secure the display panel to the display back-cover. 2 Gently lift the display panel and turn it over. 2 1 3 1 display back-cover 3 screws (4) 2 display panel 84 | Removing the Display Panel

Owners Manual
Page 87
...2 Adhere the tape that secures the display cable. 3 Gently place the display panel on the display back cover. 4 Align the screw holes on the display panel with the screw holes on the display back-cover. 5 Replace the screws that shipped with your computer, follow the steps in "Before You Begin" on page... follow the instructions in "After Working Inside Your Computer" on page 17. 9 Replace the battery. Procedure 1 Connect the display cable to the display back-cover. Replacing the Display Panel | 87 For additional safety best practices information, see the Regulatory Compliance Homepage at...
...2 Adhere the tape that secures the display cable. 3 Gently place the display panel on the display back cover. 4 Align the screw holes on the display panel with the screw holes on the display back-cover. 5 Replace the screws that shipped with your computer, follow the steps in "Before You Begin" on page... follow the instructions in "After Working Inside Your Computer" on page 17. 9 Replace the battery. Procedure 1 Connect the display cable to the display back-cover. Replacing the Display Panel | 87 For additional safety best practices information, see the Regulatory Compliance Homepage at...

Owners Manual
Page 90
Procedure 1 Remove the screw that secures the camera module to the display back-cover. 2 Disconnect the camera cable from the connector on the camera module. 3 Peel the tape that secures the camera module to the display back-cover. 4 Lift the camera module off the display back-cover. 1 1 screw 3 tape 2 3 4 2 camera module 4 camera cable 90 | Removing the Camera Module
Procedure 1 Remove the screw that secures the camera module to the display back-cover. 2 Disconnect the camera cable from the connector on the camera module. 3 Peel the tape that secures the camera module to the display back-cover. 4 Lift the camera module off the display back-cover. 1 1 screw 3 tape 2 3 4 2 camera module 4 camera cable 90 | Removing the Camera Module

Owners Manual
Page 91
...assembly. Replacing the Camera Module WARNING: Before working inside your computer, read the safety information that secures the camera module to the display back-cover. 4 Connect the camera cable to the connector on the camera module. See "Replacing the Keyboard" on page 7. See "Replacing the Battery...Module(s)" on page 17. 8 Replace the battery. Procedure 1 Align the camera module on the display back-cover. 2 Replace the screw that secures the camera module to the display back-cover. 3 Adhere the tape that shipped with your computer, follow the steps in "Before You Begin" on ...
...assembly. Replacing the Camera Module WARNING: Before working inside your computer, read the safety information that secures the camera module to the display back-cover. 4 Connect the camera cable to the connector on the camera module. See "Replacing the Keyboard" on page 7. See "Replacing the Battery...Module(s)" on page 17. 8 Replace the battery. Procedure 1 Align the camera module on the display back-cover. 2 Replace the screw that secures the camera module to the display back-cover. 3 Adhere the tape that shipped with your computer, follow the steps in "Before You Begin" on ...


