Service Manual
Page 1
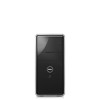
...to either trademarks or registered trademarks of Microsoft Corporation in this text: Dell, the DELL logo, and Inspiron are trademarks of Dell Inc.; Information in the United States and/or other than its own. Dell Inc. February 2009 Rev. All rights reserved. Microsoft and Windows are.... A00 disclaims any manner whatsoever without notice. © 2009 Dell Inc. Dell™ Inspiron™ 535/537/545/546 Service Manual Technical Overview Before You Begin Computer Cover Front Bezel Memory PCI and PCI Express Cards Drives Models DCME and DCMF Fans Front I/O Panel Processor ...
...to either trademarks or registered trademarks of Microsoft Corporation in this text: Dell, the DELL logo, and Inspiron are trademarks of Dell Inc.; Information in the United States and/or other than its own. Dell Inc. February 2009 Rev. All rights reserved. Microsoft and Windows are.... A00 disclaims any manner whatsoever without notice. © 2009 Dell Inc. Dell™ Inspiron™ 535/537/545/546 Service Manual Technical Overview Before You Begin Computer Cover Front Bezel Memory PCI and PCI Express Cards Drives Models DCME and DCMF Fans Front I/O Panel Processor ...
Service Manual
Page 5
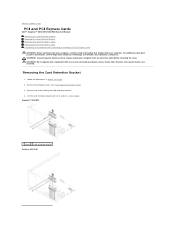
...Inspiron™ 535/537 1 screw 2 card retention bracket Inspiron 545/546 Back to Contents Page PCI and PCI Express Cards Dell™ Inspiron™ 535/537/545/546 Service Manual Removing the Card Retention Bracket Replacing the Card Retention Bracket Removing PCI and PCI Express Cards Replacing PCI and PCI Express Cards Configuring Your Computer After Removing or Installing a PCI/PCI Express... the computer cover (see the Regulatory Compliance Homepage at www.dell.com/regulatory_compliance. WARNING: Do not operate your equipment with your computer from the electrical outlet before removing...
...Inspiron™ 535/537 1 screw 2 card retention bracket Inspiron 545/546 Back to Contents Page PCI and PCI Express Cards Dell™ Inspiron™ 535/537/545/546 Service Manual Removing the Card Retention Bracket Replacing the Card Retention Bracket Removing PCI and PCI Express Cards Replacing PCI and PCI Express Cards Configuring Your Computer After Removing or Installing a PCI/PCI Express... the computer cover (see the Regulatory Compliance Homepage at www.dell.com/regulatory_compliance. WARNING: Do not operate your equipment with your computer from the electrical outlet before removing...

Service Manual
Page 6
... card slot 3 securing tab Replace the card retention bracket, ensuring that: l The guide clamp is aligned with the alignment bar. Removing PCI and PCI Express Cards 1. l For a PCI Express x16 card, press down on the retention mechanism, grasp the card by replacing the screw. l The tops of the card or filler bracket fits around ...
... card slot 3 securing tab Replace the card retention bracket, ensuring that: l The guide clamp is aligned with the alignment bar. Removing PCI and PCI Express Cards 1. l For a PCI Express x16 card, press down on the retention mechanism, grasp the card by replacing the screw. l The tops of the card or filler bracket fits around ...
Service Manual
Page 7
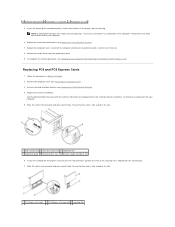
...alignment guide 5 bracket within slot 6 bracket caught outside of slot 6. 4 retention mechanism 5 PCI Express x1 card slot 6 PCI Express x1 card 5. Follow the procedures in the slot. 1 PCI Express x16 card 2 PCI Express x16 card slot 3 securing tab Remove the card retention bracket (see Configuring Your Computer After ...opening. NOTE: Installing filler brackets over empty card-slot openings is fully seated in Before You Begin. 2. Replacing PCI and PCI Express Cards 1. Ensure that the card is necessary to electrical outlets, and then turn them on configuring the card, making...
...alignment guide 5 bracket within slot 6 bracket caught outside of slot 6. 4 retention mechanism 5 PCI Express x1 card slot 6 PCI Express x1 card 5. Follow the procedures in the slot. 1 PCI Express x16 card 2 PCI Express x16 card slot 3 securing tab Remove the card retention bracket (see Configuring Your Computer After ...opening. NOTE: Installing filler brackets over empty card-slot openings is fully seated in Before You Begin. 2. Replacing PCI and PCI Express Cards 1. Ensure that the card is necessary to electrical outlets, and then turn them on configuring the card, making...
Service Manual
Page 8
...the external audio devices to the network card's connector. 1. Enter system setup (see Configuring Your Computer After Removing or Installing a PCI/PCI Express Card. Enter system setup (see Replacing the Card Retention Bracket). 9. CAUTION: Do not route card cables over the cards can ... properly or cause damage to the equipment. 10. Configuring Your Computer After Removing or Installing a PCI/PCI Express Card NOTE: For information on . 11. 4 PCI Express x1 card slot 5 PCI Express x1 card 8. Replace the card retention bracket (see Entering System Setup) 2. Cables routed over ...
...the external audio devices to the network card's connector. 1. Enter system setup (see Configuring Your Computer After Removing or Installing a PCI/PCI Express Card. Enter system setup (see Replacing the Card Retention Bracket). 9. CAUTION: Do not route card cables over the cards can ... properly or cause damage to the equipment. 10. Configuring Your Computer After Removing or Installing a PCI/PCI Express Card NOTE: For information on . 11. 4 PCI Express x1 card slot 5 PCI Express x1 card 8. Replace the card retention bracket (see Entering System Setup) 2. Cables routed over ...
Service Manual
Page 40
...see Removing the Computer Cover). 3. Inspiron 535/537 1 screws (6) 2 system board Inspiron 545/546 Removing the System Board 1. Remove the computer cover (see Removing the Processor Fan and Heat Sink Assembly). 5. Remove the memory modules (see Removing PCI and PCI Express Cards). 4. Lift the system board...brackets, front-panel inserts, etc.) removed. WARNING: Do not operate your computer. Back to Contents Page System Board Dell™ Inspiron™ 535/537/545/546 Service Manual Removing the System Board Replacing the System Board WARNING: Before working inside your computer, read ...
...see Removing the Computer Cover). 3. Inspiron 535/537 1 screws (6) 2 system board Inspiron 545/546 Removing the System Board 1. Remove the computer cover (see Removing the Processor Fan and Heat Sink Assembly). 5. Remove the memory modules (see Removing PCI and PCI Express Cards). 4. Lift the system board...brackets, front-panel inserts, etc.) removed. WARNING: Do not operate your computer. Back to Contents Page System Board Dell™ Inspiron™ 535/537/545/546 Service Manual Removing the System Board Replacing the System Board WARNING: Before working inside your computer, read ...

Service Manual
Page 42
Connect your computer and devices to Contents Page Replace the computer cover (see Replacing PCI and PCI Express Cards). 8. Replace any add-in cards on . 6. Replace the memory modules into the memory sockets at the same locations from which you removed them on the system board (see Replacing the Computer Cover). 9. Back to an electrical outlet, and turn them (see Replacing Memory). 7.
Connect your computer and devices to Contents Page Replace the computer cover (see Replacing PCI and PCI Express Cards). 8. Replace any add-in cards on . 6. Replace the memory modules into the memory sockets at the same locations from which you removed them on the system board (see Replacing the Computer Cover). 9. Back to an electrical outlet, and turn them (see Replacing Memory). 7.

Setup Guide
Page 18
... - Access connectors for power supply. • Green light - For selecting the voltage rating. 3 Power supply diagnostic light - Indicates power availability for any installed PCI and PCI express cards. Using Your Inspiron™ Desktop Back View Features 1 2 3 4 5 16 1 Power connector - Power is not working. Appearance may not be available on some models. 4 Back panel connectors...
... - Access connectors for power supply. • Green light - For selecting the voltage rating. 3 Power supply diagnostic light - Indicates power availability for any installed PCI and PCI express cards. Using Your Inspiron™ Desktop Back View Features 1 2 3 4 5 16 1 Power connector - Power is not working. Appearance may not be available on some models. 4 Back panel connectors...

Setup Guide
Page 53
one headphone connector Expansion Slots PCI Express x16 PCI Express x1 PCI one slot supporting full-height cards one microphone connector; Front Panel Connectors USB two USB 2.0-compliant connectors Audio one slot supporting full-height cards two ...
one headphone connector Expansion Slots PCI Express x16 PCI Express x1 PCI one slot supporting full-height cards one microphone connector; Front Panel Connectors USB two USB 2.0-compliant connectors Audio one slot supporting full-height cards two ...


