Service Manual
Page 1
...its own. Trademarks used in this document is strictly forbidden. disclaims any manner whatsoever without notice. © 2009 Dell Inc. WARNING: A WARNING indicates a potential for property damage, personal injury, or death. A00 CAUTION: A ...these materials in any proprietary interest in trademarks and trade names other countries. Dell™ Inspiron™ 535/537/545/546 Service Manual Technical Overview Before You Begin Computer Cover Front Bezel Memory PCI and PCI ...you make better use of Microsoft Corporation in this text: Dell, the DELL logo, and Inspiron are not followed.
...its own. Trademarks used in this document is strictly forbidden. disclaims any manner whatsoever without notice. © 2009 Dell Inc. WARNING: A WARNING indicates a potential for property damage, personal injury, or death. A00 CAUTION: A ...these materials in any proprietary interest in trademarks and trade names other countries. Dell™ Inspiron™ 535/537/545/546 Service Manual Technical Overview Before You Begin Computer Cover Front Bezel Memory PCI and PCI ...you make better use of Microsoft Corporation in this text: Dell, the DELL logo, and Inspiron are not followed.
Service Manual
Page 2
... cables from potential damage and to help protect your computer or see the Regulatory Compliance Homepage at support.dell.com. Back to Contents Page Before You Begin Dell™ Inspiron™ 535/537/545/546 Service Manual Technical Specifications Recommended Tools Turning Off Your Computer Safety Instructions This chapter provides procedures for about 4 seconds to...
... cables from potential damage and to help protect your computer or see the Regulatory Compliance Homepage at support.dell.com. Back to Contents Page Before You Begin Dell™ Inspiron™ 535/537/545/546 Service Manual Technical Specifications Recommended Tools Turning Off Your Computer Safety Instructions This chapter provides procedures for about 4 seconds to...
Service Manual
Page 4
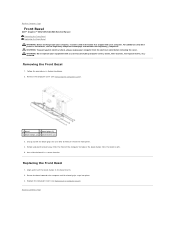
... it from the front panel. 4. Rotate and pull the bezel away from the front of the computer to Contents Page Front Bezel Dell™ Inspiron™ 535/537/545/546 Service Manual Removing the Front Bezel Replacing the Front Bezel WARNING: Before working inside your computer, read the safety information that shipped with any...
... it from the front panel. 4. Rotate and pull the bezel away from the front of the computer to Contents Page Front Bezel Dell™ Inspiron™ 535/537/545/546 Service Manual Removing the Front Bezel Replacing the Front Bezel WARNING: Before working inside your computer, read the safety information that shipped with any...
Service Manual
Page 5
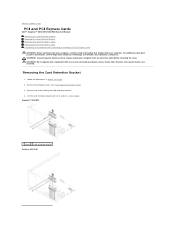
...Begin. 2. WARNING: Do not operate your equipment with your computer. Inspiron™ 535/537 1 screw 2 card retention bracket Inspiron 545/546 Remove the computer cover (see the Regulatory Compliance Homepage at www.dell.com/regulatory_compliance. Remove the screw holding the card retention bracket. 4. ...cover. Follow the procedures in a secure place. Back to Contents Page PCI and PCI Express Cards Dell™ Inspiron™ 535/537/545/546 Service Manual Removing the Card Retention Bracket Replacing the Card Retention Bracket Removing PCI and PCI Express Cards Replacing ...
...Begin. 2. WARNING: Do not operate your equipment with your computer. Inspiron™ 535/537 1 screw 2 card retention bracket Inspiron 545/546 Remove the computer cover (see the Regulatory Compliance Homepage at www.dell.com/regulatory_compliance. Remove the screw holding the card retention bracket. 4. ...cover. Follow the procedures in a secure place. Back to Contents Page PCI and PCI Express Cards Dell™ Inspiron™ 535/537/545/546 Service Manual Removing the Card Retention Bracket Replacing the Card Retention Bracket Removing PCI and PCI Express Cards Replacing ...
Service Manual
Page 9
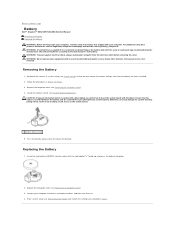
...additional safety best practices information, see Removing the Computer Cover). 4. Remove the computer cover (see the Regulatory Compliance Homepage at www.dell.com/regulatory_compliance. Replace the computer cover (see System Board Components). Locate the battery socket (see Replacing the Computer Cover). 3. Insert... System Setup) so that you attempt to pry out the battery. Back to Contents Page Battery Dell™ Inspiron™ 535/537/545/546 Service Manual Removing the Battery Replacing the Battery WARNING: Before working inside your computer, read the safety information that...
...additional safety best practices information, see Removing the Computer Cover). 4. Remove the computer cover (see the Regulatory Compliance Homepage at www.dell.com/regulatory_compliance. Replace the computer cover (see System Board Components). Locate the battery socket (see Replacing the Computer Cover). 3. Insert... System Setup) so that you attempt to pry out the battery. Back to Contents Page Battery Dell™ Inspiron™ 535/537/545/546 Service Manual Removing the Battery Replacing the Battery WARNING: Before working inside your computer, read the safety information that...
Service Manual
Page 11
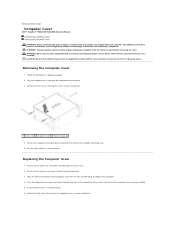
.... Ensure that no tools or extra parts are connected, and fold cables out of desk top space. Align the tabs at www.dell.com/regulatory_compliance. Removing the Computer Cover 1. Set the cover aside in Before You Begin. 2. Ensure that all cables are left inside... to support the system with your computer. Replace the two screws that sufficient space exists to Contents Page Computer Cover Dell™ Inspiron™ 535/537/545/546 Service Manual Removing the Computer Cover Replacing the Computer Cover WARNING: Before working inside the computer. 3. WARNING: Do not operate ...
.... Ensure that no tools or extra parts are connected, and fold cables out of desk top space. Align the tabs at www.dell.com/regulatory_compliance. Removing the Computer Cover 1. Set the cover aside in Before You Begin. 2. Ensure that all cables are left inside... to support the system with your computer. Replace the two screws that sufficient space exists to Contents Page Computer Cover Dell™ Inspiron™ 535/537/545/546 Service Manual Removing the Computer Cover Replacing the Computer Cover WARNING: Before working inside the computer. 3. WARNING: Do not operate ...
Service Manual
Page 13
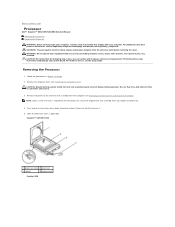
..., reuse the original heat sink assembly when you are familiar with hardware removal and replacement. Inspiron™ 535/537/545 1 processor cover 2 processor 3 socket 4 release lever Inspiron 546 CAUTION: Despite having a plastic shield, the heat sink assembly may be very hot ... you touch it. 3. Performing these steps incorrectly could damage your computer. Back to Contents Page Processor Dell™ Inspiron™ 535/537/545/546 Service Manual Removing the Processor Replacing the Processor WARNING: Before working inside your computer, read the safety information that secures...
..., reuse the original heat sink assembly when you are familiar with hardware removal and replacement. Inspiron™ 535/537/545 1 processor cover 2 processor 3 socket 4 release lever Inspiron 546 CAUTION: Despite having a plastic shield, the heat sink assembly may be very hot ... you touch it. 3. Performing these steps incorrectly could damage your computer. Back to Contents Page Processor Dell™ Inspiron™ 535/537/545/546 Service Manual Removing the Processor Replacing the Processor WARNING: Before working inside your computer, read the safety information that secures...
Service Manual
Page 16
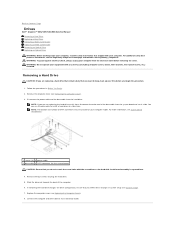
... Compliance Homepage at this procedure. 1. NOTE: If you are replacing a hard drive that contains data that you want to Contents Page Drives Dell™ Inspiron™ 535/537/545/546 Service Manual Removing a Hard Drive Replacing a Hard Drive Removing a Media Card Reader Replacing a Media Card Reader Removing an Optical Drive Replacing an Optical Drive...
... Compliance Homepage at this procedure. 1. NOTE: If you are replacing a hard drive that contains data that you want to Contents Page Drives Dell™ Inspiron™ 535/537/545/546 Service Manual Removing a Hard Drive Replacing a Hard Drive Removing a Media Card Reader Replacing a Media Card Reader Removing an Optical Drive Replacing an Optical Drive...
Service Manual
Page 20
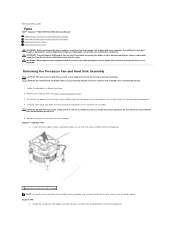
... processor fan and heat sink assembly and lift it . 5. Be sure that it has had sufficient time to cool before removing the cover. Inspiron™ 535/537/545 a. This could damage the fan. 1. Carefully move away any cover(s) (including computer covers, bezels, filler brackets, front-panel inserts,...and heat sink assembly in your computer may be very hot during normal operation. Back to Contents Page Fans Dell™ Inspiron™ 535/537/545/546 Service Manual Removing the Processor Fan and Heat Sink Assembly Replacing the Processor Fan and Heat Sink Assembly Removing the Chassis Fan...
... processor fan and heat sink assembly and lift it . 5. Be sure that it has had sufficient time to cool before removing the cover. Inspiron™ 535/537/545 a. This could damage the fan. 1. Carefully move away any cover(s) (including computer covers, bezels, filler brackets, front-panel inserts,...and heat sink assembly in your computer may be very hot during normal operation. Back to Contents Page Fans Dell™ Inspiron™ 535/537/545/546 Service Manual Removing the Processor Fan and Heat Sink Assembly Replacing the Processor Fan and Heat Sink Assembly Removing the Chassis Fan...
Service Manual
Page 24
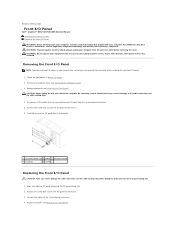
... connectors and the cable routing clips. 4. Back to the chassis. 3. Replace the screw that secures the I/O panel to Contents Page Front I/O Panel Dell™ Inspiron™ 535/537/545/546 Service Manual Removing the Front I/O Panel Replacing the Front I/O Panel WARNING: Before working inside your computer, read the safety information that are connected to... shipped with any cover(s) (including computer covers, bezels, filler brackets, front-panel inserts, etc.) removed. Replace the bezel (see the Regulatory Compliance Homepage at www.dell.com/regulatory_compliance.
... connectors and the cable routing clips. 4. Back to the chassis. 3. Replace the screw that secures the I/O panel to Contents Page Front I/O Panel Dell™ Inspiron™ 535/537/545/546 Service Manual Removing the Front I/O Panel Replacing the Front I/O Panel WARNING: Before working inside your computer, read the safety information that are connected to... shipped with any cover(s) (including computer covers, bezels, filler brackets, front-panel inserts, etc.) removed. Replace the bezel (see the Regulatory Compliance Homepage at www.dell.com/regulatory_compliance.
Service Manual
Page 26
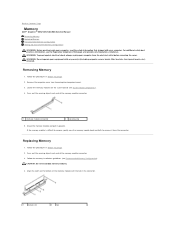
... cover. If the memory module is difficult to remove, gently ease the memory module back and forth to Contents Page Memory Dell™ Inspiron™ 535/537/545/546 Service Manual Removing Memory Replacing Memory Recommended Memory Configuration Setting Up Dual Channel Memory Configuration WARNING: Before working inside your computer, read the... tab in the connector. 1 cutouts (2) 2 tab For additional safety best practices information, see System Board Components). 4. Press out the securing clip at www.dell.com/regulatory_compliance. Follow the procedures in Before You Begin. 2.
... cover. If the memory module is difficult to remove, gently ease the memory module back and forth to Contents Page Memory Dell™ Inspiron™ 535/537/545/546 Service Manual Removing Memory Replacing Memory Recommended Memory Configuration Setting Up Dual Channel Memory Configuration WARNING: Before working inside your computer, read the... tab in the connector. 1 cutouts (2) 2 tab For additional safety best practices information, see System Board Components). 4. Press out the securing clip at www.dell.com/regulatory_compliance. Follow the procedures in Before You Begin. 2.
Service Manual
Page 29
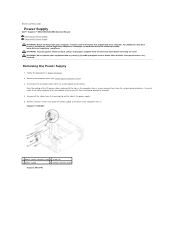
... WARNING: To guard against electrical shock, always unplug your computer from the system board and drives. Back to Contents Page Power Supply Dell™ Inspiron™ 535/537/545/546 Service Manual Removing the Power Supply Replacing the Power Supply WARNING: Before working inside your computer, read the safety information that attach the power...
... WARNING: To guard against electrical shock, always unplug your computer from the system board and drives. Back to Contents Page Power Supply Dell™ Inspiron™ 535/537/545/546 Service Manual Removing the Power Supply Replacing the Power Supply WARNING: Before working inside your computer, read the safety information that attach the power...
Service Manual
Page 31
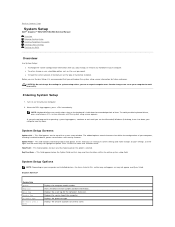
Back to Contents Page System Setup Dell™ Inspiron™ 535/537/545/546 Service Manual Overview Entering System Setup Clearing Forgotten Passwords Clearing CMOS Settings Flashing the BIOS Overview Use System Setup: l To change the system configuration information after...changes to highlight an option. This field appears below the Option Field and lists keys and their functions within the active system setup field. Inspiron 535/537 System Info System BIOS Info Asset Tag Service Tag Processor Type Processor Level 2 Cache Displays the computer model number. Displays the asset tag for...
Back to Contents Page System Setup Dell™ Inspiron™ 535/537/545/546 Service Manual Overview Entering System Setup Clearing Forgotten Passwords Clearing CMOS Settings Flashing the BIOS Overview Use System Setup: l To change the system configuration information after...changes to highlight an option. This field appears below the Option Field and lists keys and their functions within the active system setup field. Inspiron 535/537 System Info System BIOS Info Asset Tag Service Tag Processor Type Processor Level 2 Cache Displays the computer model number. Displays the asset tag for...
Service Manual
Page 40
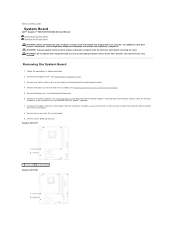
Lift the system board up and out. Back to Contents Page System Board Dell™ Inspiron™ 535/537/545/546 Service Manual Removing the System Board Replacing the System Board WARNING: Before working inside your computer, read the safety ... computer. Remove the computer cover (see the Regulatory Compliance Homepage at www.dell.com/regulatory_compliance. Remove the memory modules (see Removing Memory) and document which memory module is replaced. 7. Inspiron 535/537 1 screws (6) 2 system board Inspiron 545/546 Removing the System Board 1. Follow the procedures in Before You...
Lift the system board up and out. Back to Contents Page System Board Dell™ Inspiron™ 535/537/545/546 Service Manual Removing the System Board Replacing the System Board WARNING: Before working inside your computer, read the safety ... computer. Remove the computer cover (see the Regulatory Compliance Homepage at www.dell.com/regulatory_compliance. Remove the memory modules (see Removing Memory) and document which memory module is replaced. 7. Inspiron 535/537 1 screws (6) 2 system board Inspiron 545/546 Removing the System Board 1. Follow the procedures in Before You...
Service Manual
Page 43
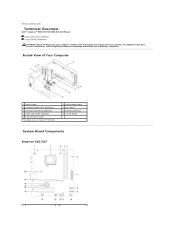
Back to Contents Page Technical Overview Dell™ Inspiron™ 535/537/545/546 Service Manual Inside View of Your Computer 1 power supply 3 secondary optical drive (optional)* 5 secondary hard drive (optional)* 7 media card reader (optional) 9 card retention bracket * available only on Inspiron™ 545/546 2 primary optical drive 4 front bezel 6 primary hard drive 8 system board System...
Back to Contents Page Technical Overview Dell™ Inspiron™ 535/537/545/546 Service Manual Inside View of Your Computer 1 power supply 3 secondary optical drive (optional)* 5 secondary hard drive (optional)* 7 media card reader (optional) 9 card retention bracket * available only on Inspiron™ 545/546 2 primary optical drive 4 front bezel 6 primary hard drive 8 system board System...

Setup Guide
Page 23
See the Service Manual on the Dell Support website at www.dell.com/regulatory_compliance. INSPIRON Solving Problems This section provides troubleshooting information for advanced service and troubleshooting instructions. If you are unable to ensure it is lost - c.... your computer. Follow the instructions on page 46. For additional safety best practice information, see "Using Support Tools" on page 28 or "Contacting Dell" on the screen to the wireless router: a. Click Start → Connect To. Network Problems Wireless Connections If the network connection is powered on...
See the Service Manual on the Dell Support website at www.dell.com/regulatory_compliance. INSPIRON Solving Problems This section provides troubleshooting information for advanced service and troubleshooting instructions. If you are unable to ensure it is lost - c.... your computer. Follow the instructions on page 46. For additional safety best practice information, see "Using Support Tools" on page 28 or "Contacting Dell" on the screen to the wireless router: a. Click Start → Connect To. Network Problems Wireless Connections If the network connection is powered on...
Setup Guide
Page 25
... the power button to remove and then reinstall the memory modules (for information on removing and replacing memory modules, see the Service Manual on the Dell Support website at support.dell.com). 23 You may not be malfunctioning or incorrectly installed. If the power light is solid amber - The computer is receiving electrical...
... the power button to remove and then reinstall the memory modules (for information on removing and replacing memory modules, see the Service Manual on the Dell Support website at support.dell.com). 23 You may not be malfunctioning or incorrectly installed. If the power light is solid amber - The computer is receiving electrical...

Setup Guide
Page 26
...files and exit any open programs you encounter interference that hinders reception on the Dell Support website at support.dell.com). • Reseat the memory modules (see the Service Manual on your computer is creating interference by interrupting or blocking other signals. Some ...possible causes of interference are not using to see the Service Manual on the Dell Support website at support.dell.com) to ensure that resolves the problem. • See the software documentation for minimum memory requirements. Solving...
...files and exit any open programs you encounter interference that hinders reception on the Dell Support website at support.dell.com). • Reseat the memory modules (see the Service Manual on your computer is creating interference by interrupting or blocking other signals. Some ...possible causes of interference are not using to see the Service Manual on the Dell Support website at support.dell.com) to ensure that resolves the problem. • See the software documentation for minimum memory requirements. Solving...

Setup Guide
Page 27
...If necessary, uninstall and then reinstall the program. NOTE: Software usually includes installation instructions in its documentation or on the Dell Support website at support.dell.com) to the electrical outlet. Ensure that you experience other memory problems - • Ensure that the power cable is... Your computer supports DDR2 memory. Solving Problems If you are following the memory installation guidelines (see the Service Manual on the Dell Support website at support.dell.com). • Check if the memory module is compatible with the memory. For more information about the type...
...If necessary, uninstall and then reinstall the program. NOTE: Software usually includes installation instructions in its documentation or on the Dell Support website at support.dell.com) to the electrical outlet. Ensure that you experience other memory problems - • Ensure that the power cable is... Your computer supports DDR2 memory. Solving Problems If you are following the memory installation guidelines (see the Service Manual on the Dell Support website at support.dell.com). • Check if the memory module is compatible with the memory. For more information about the type...
Setup Guide
Page 31
... one module and restart the computer. Video BIOS Test Failure Contact Dell (see the Service Manual on the Dell Support website at support.dell.com. Two beeps - Six beeps - Seven beeps (Inspiron 535 and 545 only) - Three beeps - Possible motherboard failure Contact Dell (see "Contacting Dell" on page 46). Four beeps - Five beeps - BIOS ROM checksum failure...
... one module and restart the computer. Video BIOS Test Failure Contact Dell (see the Service Manual on the Dell Support website at support.dell.com. Two beeps - Six beeps - Seven beeps (Inspiron 535 and 545 only) - Three beeps - Possible motherboard failure Contact Dell (see "Contacting Dell" on page 46). Four beeps - Five beeps - BIOS ROM checksum failure...

