Owner's Manual
Page 7
... 109 Removing Memory 111 Cards 111 PCI and PCI Express Cards 112 Bezel 118 Removing the Bezel 118 Replacing the Bezel 119 Drives 120 Recommended Drive Cable Connections . . . . . 121 Connecting Drive Cables 121 Drive Interface Connectors 121 Connecting and Disconnecting Drive Cables . . . 122 Hard Drives 122 Installing a Second Hard Drive 125 Floppy Drive 127 Media Card Reader 133 CD or DVD...
... 109 Removing Memory 111 Cards 111 PCI and PCI Express Cards 112 Bezel 118 Removing the Bezel 118 Replacing the Bezel 119 Drives 120 Recommended Drive Cable Connections . . . . . 121 Connecting Drive Cables 121 Drive Interface Connectors 121 Connecting and Disconnecting Drive Cables . . . 122 Hard Drives 122 Installing a Second Hard Drive 125 Floppy Drive 127 Media Card Reader 133 CD or DVD...

Owner's Manual
Page 41
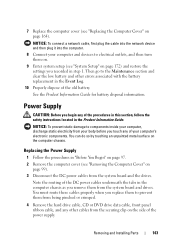
When data is written to the surviving drive. serial ATA RAID configured for its data redundancy advantages. A replacement drive can then be the same size in order to ensure that the larger drive does not contain unallocated (and therefore unusable)...2 segment 3 segment 4 segment 5 segment 6 hard drive 1 segment 1 duplicated segment 2 duplicated segment 3 duplicated segment 4 duplicated segment 5 duplicated segment 6 duplicated hard drive 2 If a drive failure occurs, subsequent read and write operations are directed to the primary drive, the data is equal to enhance data integrity....
When data is written to the surviving drive. serial ATA RAID configured for its data redundancy advantages. A replacement drive can then be the same size in order to ensure that the larger drive does not contain unallocated (and therefore unusable)...2 segment 3 segment 4 segment 5 segment 6 hard drive 1 segment 1 duplicated segment 2 duplicated segment 3 duplicated segment 4 duplicated segment 5 duplicated segment 6 duplicated hard drive 2 If a drive failure occurs, subsequent read and write operations are directed to the primary drive, the data is equal to enhance data integrity....

Owner's Manual
Page 44
... to select your computer is rebuilding the array. The NVIDIA Rebuild Array Wizard appears. 4 Click Next. 5 Select the hard drive you to the operating system your RAID configuration (Mirroring) in the management utility window. 3 Select Rebuild Array in a ...hard drives in the System Tasks pane. Windows® XP: The Microsoft Windows XP operating system provides the Files and Settings Transfer Wizard to move data from an old computer to rebuild an array. Rebuilding a RAID Configuration If one computer to another-for example, from a source computer to a replacement drive...
... to select your computer is rebuilding the array. The NVIDIA Rebuild Array Wizard appears. 4 Click Next. 5 Select the hard drive you to the operating system your RAID configuration (Mirroring) in the management utility window. 3 Select Rebuild Array in a ...hard drives in the System Tasks pane. Windows® XP: The Microsoft Windows XP operating system provides the Files and Settings Transfer Wizard to move data from an old computer to rebuild an array. Rebuilding a RAID Configuration If one computer to another-for example, from a source computer to a replacement drive...

Owner's Manual
Page 78
... configuration information may be defective or a cable may not match the hardware configuration. Possible hard disk drive failure during HDD boot test (see "Getting Help" on page 183 for assistance). CPU... Tools The computer failed to complete the boot routine three consecutive times for the same error (see "Getting Help" on page 183 for assistance). C M O S C H E C K S U M E R R O R - Replace battery (see "Replacing the Battery" on page 142 or see "Getting Help" on page 183 for assistance). D I S K E T T E D R I V E 0 S E E K F A I C A L S U P P O R T - H A R D - D I S...
... configuration information may be defective or a cable may not match the hardware configuration. Possible hard disk drive failure during HDD boot test (see "Getting Help" on page 183 for assistance). CPU... Tools The computer failed to complete the boot routine three consecutive times for the same error (see "Getting Help" on page 183 for assistance). C M O S C H E C K S U M E R R O R - Replace battery (see "Replacing the Battery" on page 142 or see "Getting Help" on page 183 for assistance). D I S K E T T E D R I V E 0 S E E K F A I C A L S U P P O R T - H A R D - D I S...

Owner's Manual
Page 79
...R T I C K I L A B L E - N O N - DELL RECOMMENDS THAT YOU BACK UP YOUR DATA REGULARLY. U S B O V E R C U R R E N T E R R O R - NOTICE - HARD DRIVE SELF MONITORING SYSTEM HAS REPORTED THAT A PARAMETER HAS EXCEEDED ITS NORMAL OPERATING RANGE. A chip on the system board might be enabled or disabled in the drive. • If the hard drive is in BIOS setup. S YS T E M D I S K O R D...drive is your boot device, ensure that a bootable floppy disk is your computer. Disconnect the USB device. Use external power source for assistance). S.M.A.R.T error, possible HDD failure. Replace...
...R T I C K I L A B L E - N O N - DELL RECOMMENDS THAT YOU BACK UP YOUR DATA REGULARLY. U S B O V E R C U R R E N T E R R O R - NOTICE - HARD DRIVE SELF MONITORING SYSTEM HAS REPORTED THAT A PARAMETER HAS EXCEEDED ITS NORMAL OPERATING RANGE. A chip on the system board might be enabled or disabled in the drive. • If the hard drive is in BIOS setup. S YS T E M D I S K O R D...drive is your boot device, ensure that a bootable floppy disk is your computer. Disconnect the USB device. Use external power source for assistance). S.M.A.R.T error, possible HDD failure. Replace...

Owner's Manual
Page 122
... computer cover (see "Removing the Computer Cover" on one connector matches a tab or a filled-in the Product Information Guide. The serial ATA interface connectors are replacing a hard drive that it . that will sufficiently cushion it is , a notch or a missing pin on page 99). 3 Disconnect the power and data cables from the...
... computer cover (see "Removing the Computer Cover" on one connector matches a tab or a filled-in the Product Information Guide. The serial ATA interface connectors are replacing a hard drive that it . that will sufficiently cushion it is , a notch or a missing pin on page 99). 3 Disconnect the power and data cables from the...

Owner's Manual
Page 123
... board connector 5 screws (4) 3 serial ATA data cable 5 Remove the four screws securing the hard drive. 6 Slide the drive out away from the front of the system setup and under Drive 0 through 3, set the Drive to the correct configuration. 8 Replace the computer cover (see "Replacing the Computer Cover" on page 164). 9 Connect computer and other devices to reflect...
... board connector 5 screws (4) 3 serial ATA data cable 5 Remove the four screws securing the hard drive. 6 Slide the drive out away from the front of the system setup and under Drive 0 through 3, set the Drive to the correct configuration. 8 Replace the computer cover (see "Replacing the Computer Cover" on page 164). 9 Connect computer and other devices to reflect...

Owner's Manual
Page 124
... verify that it is configured for your computer. 4 Slide the hard drive into the hard drive bay. 5 Align the slots in the hard drive with the guides in the hard drive bay. 5 1 2 3 4 1 hard drive 2 power cable 4 system board connector 5 screws (4) 3 serial ATA data cable 6 Replace and tighten the four screws to secure the hard drive. 7 Connect the power and data cables to the...
... verify that it is configured for your computer. 4 Slide the hard drive into the hard drive bay. 5 Align the slots in the hard drive with the guides in the hard drive bay. 5 1 2 3 4 1 hard drive 2 power cable 4 system board connector 5 screws (4) 3 serial ATA data cable 6 Replace and tighten the four screws to secure the hard drive. 7 Connect the power and data cables to the...

Owner's Manual
Page 125
... shock, laceration by moving fan blades, or other unexpected injuries, always unplug your computer. 4 Slide the second hard drive into the network port or device and then plug it is configured for drive configuration changes (see "Replacing the Computer Cover" on installing any of the procedures in this section, follow the safety instructions in...
... shock, laceration by moving fan blades, or other unexpected injuries, always unplug your computer. 4 Slide the second hard drive into the network port or device and then plug it is configured for drive configuration changes (see "Replacing the Computer Cover" on installing any of the procedures in this section, follow the safety instructions in...

Owner's Manual
Page 126
... plug it into the computer. 126 Removing and Installing Parts 5 1 2 3 4 1 second hard drive (optional) 2 serial ATA data cable 3 power cable 4 system board connector 5 screws (4) 6 Replace and tighten the four screws to secure the hard drive. 7 Connect the power and data cables to the drive. 8 Connect the data cable to the system board. 9 Check all cables to...
... plug it into the computer. 126 Removing and Installing Parts 5 1 2 3 4 1 second hard drive (optional) 2 serial ATA data cable 3 power cable 4 system board connector 5 screws (4) 6 Replace and tighten the four screws to secure the hard drive. 7 Connect the power and data cables to the drive. 8 Connect the data cable to the system board. 9 Check all cables to...
Owner's Manual
Page 143
...Guide for battery disposal information. You must route these cables properly when you remove them from being pinched or crimped. 4 Remove the hard drive cable, CD or DVD drive data cable, front panel ribbon cable, and any of the power supply. NOTICE: To connect a network cable, first plug the... battery. Removing and Installing Parts 143 Then go to the Maintenance section and clear the low battery and other cables from the system board and drives. Replacing the Power Supply 1 Follow the procedures in "Before You Begin" on page 97. 2 Remove the computer cover (see "System Setup" on...
...Guide for battery disposal information. You must route these cables properly when you remove them from being pinched or crimped. 4 Remove the hard drive cable, CD or DVD drive data cable, front panel ribbon cable, and any of the power supply. NOTICE: To connect a network cable, first plug the... battery. Removing and Installing Parts 143 Then go to the Maintenance section and clear the low battery and other cables from the system board and drives. Replacing the Power Supply 1 Follow the procedures in "Before You Begin" on page 97. 2 Remove the computer cover (see "System Setup" on...

Owner's Manual
Page 144
... are secure. 11 Replace the computer cover (see "Dell Diagnostics" on the side of the computer chassis. The cables must be properly routed to prevent the cables from being damaged. 9 Reconnect the DC power cables to the system board and drives. 10 Secure the hard drive cable, CD or DVD drive data cable, and... the front panel ribbon cable to an electrical outlet, and turn them on. 13 Verify that secure the power supply to replace and tighten all cable connections to make sure ...
... are secure. 11 Replace the computer cover (see "Dell Diagnostics" on the side of the computer chassis. The cables must be properly routed to prevent the cables from being damaged. 9 Reconnect the DC power cables to the system board and drives. 10 Secure the hard drive cable, CD or DVD drive data cable, and... the front panel ribbon cable to an electrical outlet, and turn them on. 13 Verify that secure the power supply to replace and tighten all cable connections to make sure ...

Owner's Manual
Page 206
...how to, 27 cover removing, 99 replacing, 164 D Dell contacting, 183, 188 support policy, 180 support site, 13 Dell Diagnostics, 80 DellConnect, 184 diagnostics beep codes, 76 Dell, 80 documentation End User License Agreement, ...replacing, 132, 141 Drivers manually reinstalling, 86 drivers, 83 about, 83 identifying, 84 reinstalling, 84 Drivers and Utilities CD, 85 Drivers and Utilities media, 85 drives, 120 hard drive, 122 installing CD/DVD, 137, 139 installing floppy, 129 installing hard drive, 124 problems, 52 removing CD/DVD, 136 removing floppy, 127 removing hard drive, 122 second hard drive...
...how to, 27 cover removing, 99 replacing, 164 D Dell contacting, 183, 188 support policy, 180 support site, 13 Dell Diagnostics, 80 DellConnect, 184 diagnostics beep codes, 76 Dell, 80 documentation End User License Agreement, ...replacing, 132, 141 Drivers manually reinstalling, 86 drivers, 83 about, 83 identifying, 84 reinstalling, 84 Drivers and Utilities CD, 85 Drivers and Utilities media, 85 drives, 120 hard drive, 122 installing CD/DVD, 137, 139 installing floppy, 129 installing hard drive, 124 problems, 52 removing CD/DVD, 136 removing floppy, 127 removing hard drive, 122 second hard drive...
Owner's Manual
Page 207
... Information, 11 Flex Bay drive Media Card Reader, 16 floppy drive installing, 129 removing, 127 H hard drive installing, 124 installing second, 125 problems, 54 removing, 122 hardware beep codes, 76 conflicts, 87 Dell Diagnostics, 80 Help and Support Center, 14 help file Windows Help and Support Center, 14 hibernate mode, 38 I I/O panel replacing, 152 installing parts...
... Information, 11 Flex Bay drive Media Card Reader, 16 floppy drive installing, 129 removing, 127 H hard drive installing, 124 installing second, 125 problems, 54 removing, 122 hardware beep codes, 76 conflicts, 87 Dell Diagnostics, 80 Help and Support Center, 14 help file Windows Help and Support Center, 14 hibernate mode, 38 I I/O panel replacing, 152 installing parts...
Owner's Manual
Page 209
... stops responding, 59 programs and Windows compatibility, 60 restore to previous state, 88 scanner, 69 screen is blank, 72 screen is hard to read, 72 software, 59-61 sound and speakers, 70 technical support policy, 180 troubleshooting tips, 51 volume adjusting, 70 Product... regulatory information, 11 Removing Memory, 111 Removing the FlexBay BreakAway Metal Plate, 131 Removing the FlexBay breakaway metal plate, 131 Replacing the Drive Panel Insert, 132 ResourceCD Dell Diagnostics, 80 S S.M.A.R.T, 79 safety instructions, 11 SATA. See serial ATA scanner problems, 69 serial ATA, 122 Service Tag...
... stops responding, 59 programs and Windows compatibility, 60 restore to previous state, 88 scanner, 69 screen is blank, 72 screen is hard to read, 72 software, 59-61 sound and speakers, 70 technical support policy, 180 troubleshooting tips, 51 volume adjusting, 70 Product... regulatory information, 11 Removing Memory, 111 Removing the FlexBay BreakAway Metal Plate, 131 Removing the FlexBay breakaway metal plate, 131 Replacing the Drive Panel Insert, 132 ResourceCD Dell Diagnostics, 80 S S.M.A.R.T, 79 safety instructions, 11 SATA. See serial ATA scanner problems, 69 serial ATA, 122 Service Tag...


