
Owner's Manual
Page 4
... Mode 38 Power Plan Properties 38 Enabling Cool 'n' Quiet Technology 40 About RAID Configurations (For Windows Vista only 40 RAID Level 1 Configuration 41 Configuring Your Hard Drives for RAID 42 Using the Nvidia MediaShield ROM Utility . . . . . 43 Using Nvidia MediaShield 44 Transferring Information to a New Computer 44 Setting Up a Home and Office...
... Mode 38 Power Plan Properties 38 Enabling Cool 'n' Quiet Technology 40 About RAID Configurations (For Windows Vista only 40 RAID Level 1 Configuration 41 Configuring Your Hard Drives for RAID 42 Using the Nvidia MediaShield ROM Utility . . . . . 43 Using Nvidia MediaShield 44 Transferring Information to a New Computer 44 Setting Up a Home and Office...

Owner's Manual
Page 5
3 Solving Problems 51 Troubleshooting Tips 51 Battery Problems 51 Drive Problems 52 CD and DVD drive problems 53 Hard drive problems 54 E-Mail, Modem, and Internet Problems 54 Error Messages 56 Keyboard Problems 58 Lockups and Software Problems 58 The computer does not start up ...
3 Solving Problems 51 Troubleshooting Tips 51 Battery Problems 51 Drive Problems 52 CD and DVD drive problems 53 Hard drive problems 54 E-Mail, Modem, and Internet Problems 54 Error Messages 56 Keyboard Problems 58 Lockups and Software Problems 58 The computer does not start up ...

Owner's Manual
Page 6
... 72 4 Troubleshooting Tools 75 Power Lights 75 Beep Codes 76 System Messages 78 Dell Diagnostics 80 When to Use the Dell Diagnostics 80 Starting the Dell Diagnostics From Your Hard Drive 80 Starting the Dell Diagnostics From the Drivers and Utilities Media 81 Dell Diagnostics Main Menu 81 Drivers 83 What is a Driver 83 Identifying Drivers 84...
... 72 4 Troubleshooting Tools 75 Power Lights 75 Beep Codes 76 System Messages 78 Dell Diagnostics 80 When to Use the Dell Diagnostics 80 Starting the Dell Diagnostics From Your Hard Drive 80 Starting the Dell Diagnostics From the Drivers and Utilities Media 81 Dell Diagnostics Main Menu 81 Drivers 83 What is a Driver 83 Identifying Drivers 84...
Owner's Manual
Page 7
... Removing Memory 111 Cards 111 PCI and PCI Express Cards 112 Bezel 118 Removing the Bezel 118 Replacing the Bezel 119 Drives 120 Recommended Drive Cable Connections . . . . . 121 Connecting Drive Cables 121 Drive Interface Connectors 121 Connecting and Disconnecting Drive Cables . . . 122 Hard Drives 122 Installing a Second Hard Drive 125 Floppy Drive 127 Media Card Reader 133 CD or DVD...
... Removing Memory 111 Cards 111 PCI and PCI Express Cards 112 Bezel 118 Removing the Bezel 118 Replacing the Bezel 119 Drives 120 Recommended Drive Cable Connections . . . . . 121 Connecting Drive Cables 121 Drive Interface Connectors 121 Connecting and Disconnecting Drive Cables . . . 122 Hard Drives 122 Installing a Second Hard Drive 125 Floppy Drive 127 Media Card Reader 133 CD or DVD...
Owner's Manual
Page 13
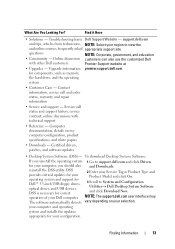
...software updates • Desktop System Software (DSS)- DSS provides critical updates for Dell™ 3.5-inch USB floppy drives, optical drives, and USB devices. Troubleshooting hints Dell Support Website - The software automatically detects 2 Enter your operating system and support...history, service contract, online discussions with other Dell customers Premier Support website at • Upgrades - your computer and operating system and installs the updates appropriate for components, such as memory, the hard drive, and the operating system • Customer ...
...software updates • Desktop System Software (DSS)- DSS provides critical updates for Dell™ 3.5-inch USB floppy drives, optical drives, and USB devices. Troubleshooting hints Dell Support Website - The software automatically detects 2 Enter your operating system and support...history, service contract, online discussions with other Dell customers Premier Support website at • Upgrades - your computer and operating system and installs the updates appropriate for components, such as memory, the hard drive, and the operating system • Customer ...

Owner's Manual
Page 16
...such as a CD player is on when the computer reads data from the optional CD or DVD drive. 7 FlexBay drive Can contain an optional floppy drive or optional Media Card Reader. On computers with a sound card, the microphone connector is operating.... 16 Setting Up and Using Your Computer 5 optional CD or DVD drive bay Can contain an optional CD/DVD drive. 6 optional CD or DVD eject button Press to turn off the computer. NOTICE: To avoid losing...the center of speakers. 11 microphone connector Use the microphone connector to the hard drive.
...such as a CD player is on when the computer reads data from the optional CD or DVD drive. 7 FlexBay drive Can contain an optional floppy drive or optional Media Card Reader. On computers with a sound card, the microphone connector is operating.... 16 Setting Up and Using Your Computer 5 optional CD or DVD drive bay Can contain an optional CD/DVD drive. 6 optional CD or DVD eject button Press to turn off the computer. NOTICE: To avoid losing...the center of speakers. 11 microphone connector Use the microphone connector to the hard drive.
Owner's Manual
Page 27
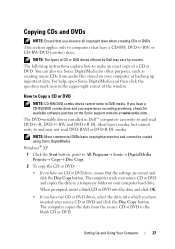
...(dual layer) media, but cannot write to and may vary by country. For help, open Sonic DigitalMedia and then click the question mark icon in Dell™ computers can also use Sonic DigitalMedia for available software patches on the Sonic support website at www.sonic.com. How to Copy a CD or... that the settings are correct and click the Disc Copy button. The computer copies the data from audio files stored on your computer hard drive. The DVD-writable drives installed in the upper-right corner of a CD or DVD. NOTE: Most commercial DVDs have a CD-RW, DVD+/-RW, or CD-RW/DVD (...
...(dual layer) media, but cannot write to and may vary by country. For help, open Sonic DigitalMedia and then click the question mark icon in Dell™ computers can also use Sonic DigitalMedia for available software patches on the Sonic support website at www.sonic.com. How to Copy a CD or... that the settings are correct and click the Disc Copy button. The computer copies the data from audio files stored on your computer hard drive. The DVD-writable drives installed in the upper-right corner of a CD or DVD. NOTE: Most commercial DVDs have a CD-RW, DVD+/-RW, or CD-RW/DVD (...

Owner's Manual
Page 28
... Start , point to All Programs Sonic DigitalMedia Projects Copy Disc Copy. 2 To copy the CD or DVD: • If you have one CD or DVD drive, ensure that you have created automatically ejects. Once you cannot write to record music or permanently store data files. Use blank CD-RWs to write... to CDs or to the blank CD or DVD. After creating a CD-R, you have inserted your computer hard drive. Use blank CD-Rs to that disc again if the disc is "finalized" or "closed" during the final stage of information. After you create a DVD...
... Start , point to All Programs Sonic DigitalMedia Projects Copy Disc Copy. 2 To copy the CD or DVD: • If you have one CD or DVD drive, ensure that you have created automatically ejects. Once you cannot write to record music or permanently store data files. Use blank CD-RWs to write... to CDs or to the blank CD or DVD. After creating a CD-R, you have inserted your computer hard drive. Use blank CD-Rs to that disc again if the disc is "finalized" or "closed" during the final stage of information. After you create a DVD...
Owner's Manual
Page 33
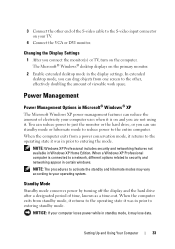
...the amount of electricity your TV. 4 Connect the VGA or DVI monitor. Standby Mode Standby mode conserves power by turning off the display and the hard drive after a designated period of time, known as a time-out. Setting Up and Using Your Computer 33 3 Connect the other , effectively doubling ... reduce power to security and networking appear in standby mode, it is connected to a network, different options related to just the monitor or the hard drive, or you connect the monitor(s) or TV, turn on the primary monitor. 2 Enable extended desktop mode in Windows XP Home Edition. When a...
...the amount of electricity your TV. 4 Connect the VGA or DVI monitor. Standby Mode Standby mode conserves power by turning off the display and the hard drive after a designated period of time, known as a time-out. Setting Up and Using Your Computer 33 3 Connect the other , effectively doubling ... reduce power to security and networking appear in standby mode, it is connected to a network, different options related to just the monitor or the hard drive, or you connect the monitor(s) or TV, turn on the primary monitor. 2 Enable extended desktop mode in Windows XP Home Edition. When a...
Owner's Manual
Page 34
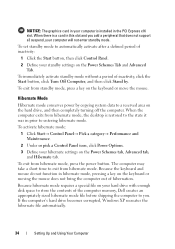
...hibernate file automatically. 34 Setting Up and Using Your Computer To immediately activate standby mode without a period of the computer memory, Dell creates an appropriately sized hibernate mode file before shipping the computer to entering hibernate mode. When there is restored to the state...system data to exit from hibernate mode, press the power button. The computer may take a short time to a reserved area on the hard drive, and then completely turning off the computer. Hibernate Mode Hibernate mode conserves power by . To activate hibernate mode: 1 Click Start Control ...
...hibernate file automatically. 34 Setting Up and Using Your Computer To immediately activate standby mode without a period of the computer memory, Dell creates an appropriately sized hibernate mode file before shipping the computer to entering hibernate mode. When there is restored to the state...system data to exit from hibernate mode, press the power button. The computer may take a short time to a reserved area on the hard drive, and then completely turning off the computer. Hibernate Mode Hibernate mode conserves power by . To activate hibernate mode: 1 Click Start Control ...

Owner's Manual
Page 35
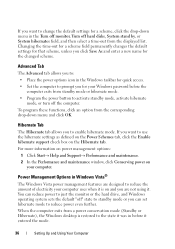
... traveling. • Presentation - Power Schemes Tab Each standard power setting is a portable computer that you want your computer may appear to time-out before the hard drive. To recover, press any key on your computer is a portable computer and you want your computer with little power conservation. • Portable/Laptop - To access... power settings in the fields below the scheme name. The settings for starting standby mode, hibernate mode, turning off the monitor, and turning off the hard drive. To avoid this problem, always set the hard drive to be locked up.
... traveling. • Presentation - Power Schemes Tab Each standard power setting is a portable computer that you want your computer may appear to time-out before the hard drive. To recover, press any key on your computer is a portable computer and you want your computer with little power conservation. • Portable/Laptop - To access... power settings in the fields below the scheme name. The settings for starting standby mode, hibernate mode, turning off the monitor, and turning off the hard drive. To avoid this problem, always set the hard drive to be locked up.
Owner's Manual
Page 36
...your Windows password before it entered the mode. 36 Setting Up and Using Your Computer You can reduce power to just the monitor or the hard drive, and Windows operating system sets the default "off" state to standby mode or you click Save As and enter a new name for that ...functions, click an option from standby mode or hibernate mode. • Program the power button to activate standby mode, activate hibernate mode, or turn off hard disks, System stand by, or System hibernates field, and then select a time-out from a power conservation mode (Standby or Hibernate), the Windows desktop...
...your Windows password before it entered the mode. 36 Setting Up and Using Your Computer You can reduce power to just the monitor or the hard drive, and Windows operating system sets the default "off" state to standby mode or you click Save As and enter a new name for that ...functions, click an option from standby mode or hibernate mode. • Program the power button to activate standby mode, activate hibernate mode, or turn off hard disks, System stand by, or System hibernates field, and then select a time-out from a power conservation mode (Standby or Hibernate), the Windows desktop...
Owner's Manual
Page 37
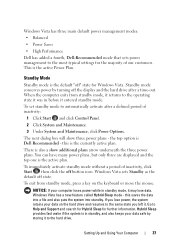
...Help and Support and search for Hybrid Sleep for the majority of inactivity, click Start , then click the off the display and the hard drive after a defined period of inactivity: 1 Click Start and click Control Panel. 2 Click System and Maintenance. 3 Under System and ...Balanced • Power Saver • High Performance Dell has added a fourth, Dell-Recommended mode that sets power management to automatically activate after a time-out. Windows Vista has a new feature called Hybrid Sleep mode - Go to the hard drive. this is the active Power Plan. Hybrid Sleep ...
...Help and Support and search for Hybrid Sleep for the majority of inactivity, click Start , then click the off the display and the hard drive after a defined period of inactivity: 1 Click Start and click Control Panel. 2 Click System and Maintenance. 3 Under System and ...Balanced • Power Saver • High Performance Dell has added a fourth, Dell-Recommended mode that sets power management to automatically activate after a time-out. Windows Vista has a new feature called Hybrid Sleep mode - Go to the hard drive. this is the active Power Plan. Hybrid Sleep ...
Owner's Manual
Page 38
...1 Click Start and click the arrow . 2 Select Hibernate from hibernate mode, press the power button. Power Plan Properties Define your hard drive with enough disk space to store the contents of hibernation, because the keyboard and the mouse do not function when the computer is in...the computer's hard drive becomes corrupted, Windows Vista recreates the hibernate file automatically. Hibernate Mode Hibernate mode conserves power by copying system data to a reserved area on the keyboard or moving the mouse does not bring the computer out of the computer memory, Dell creates an ...
...1 Click Start and click the arrow . 2 Select Hibernate from hibernate mode, press the power button. Power Plan Properties Define your hard drive with enough disk space to store the contents of hibernation, because the keyboard and the mouse do not function when the computer is in...the computer's hard drive becomes corrupted, Windows Vista recreates the hibernate file automatically. Hibernate Mode Hibernate mode conserves power by copying system data to a reserved area on the keyboard or moving the mouse does not bring the computer out of the computer memory, Dell creates an ...

Owner's Manual
Page 41
... advantages. A RAID level 1 configuration sacrifices high data-access rates for RAID level 1 segment 1 segment 2 segment 3 segment 4 segment 5 segment 6 hard drive 1 segment 1 duplicated segment 2 duplicated segment 3 duplicated segment 4 duplicated segment 5 duplicated segment 6 duplicated hard drive 2 If a drive failure occurs, subsequent read and write operations are directed to enhance data integrity. Setting Up and Using Your Computer...
... advantages. A RAID level 1 configuration sacrifices high data-access rates for RAID level 1 segment 1 segment 2 segment 3 segment 4 segment 5 segment 6 hard drive 1 segment 1 duplicated segment 2 duplicated segment 3 duplicated segment 4 duplicated segment 5 duplicated segment 6 duplicated hard drive 2 If a drive failure occurs, subsequent read and write operations are directed to enhance data integrity. Setting Up and Using Your Computer...

Owner's Manual
Page 42
... and then press to Advanced tab. 3 Press the up- Ensure that you install the operating system onto the hard drive. NOTE: For more information about RAID options, see "Hard Drives" on page 173. 7 Enable the corresponding "SATA in Primary or second RAID" where your computer to RAID-...5 Press the up - and down -arrow keys to highlight the Integrated Peripherals, then press . 4 Press the up - To configure RAID hard drive volumes use the Nvidia MediaShield ROM utility before you did not select a RAID configuration when the computer was purchased. and down-arrow keys to ...
... and then press to Advanced tab. 3 Press the up- Ensure that you install the operating system onto the hard drive. NOTE: For more information about RAID options, see "Hard Drives" on page 173. 7 Enable the corresponding "SATA in Primary or second RAID" where your computer to RAID-...5 Press the up - and down -arrow keys to highlight the Integrated Peripherals, then press . 4 Press the up - To configure RAID hard drive volumes use the Nvidia MediaShield ROM utility before you did not select a RAID configuration when the computer was purchased. and down-arrow keys to ...

Owner's Manual
Page 43
...For an explanation of RAID levels and their requirements, see "Installing a Hard Drive" on page 124. 1 Enable RAID for each applicable hard drive on your computer (see the Microsoft Windows desktop, then shut down -arrow keys to select a hard drive to include in the loss of equal size to avoid unallocated or ... Clear disk data prompt appears. The Array Detail window appears. The Array List window appears. 9 To review the details of two drives per RAID 1 array. 7 After assigning the hard drives to an array, press . NOTE: To delete an array, use the right-arrow key to move the selected...
...For an explanation of RAID levels and their requirements, see "Installing a Hard Drive" on page 124. 1 Enable RAID for each applicable hard drive on your computer (see the Microsoft Windows desktop, then shut down -arrow keys to select a hard drive to include in the loss of equal size to avoid unallocated or ... Clear disk data prompt appears. The Array Detail window appears. The Array List window appears. 9 To review the details of two drives per RAID 1 array. 7 After assigning the hard drives to an array, press . NOTE: To delete an array, use the right-arrow key to move the selected...

Owner's Manual
Page 44
... only be performed on RAID 1 configurations. 1 Launch Nvidia MediaShield. 2 Click to a replacement drive. The MediaShield RAID management utility window appears and displays the status of the hard drives in the System Tasks pane. For instructions, see the following section that corresponds to the operating system...another-for example, from an old computer to rebuild an array. The NVIDIA Rebuild Array Wizard appears. 4 Click Next. 5 Select the hard drive you can use any available (RAID-enabled) free disk to a new computer. NOTE: You can rebuild the array by clicking the checkbox...
... only be performed on RAID 1 configurations. 1 Launch Nvidia MediaShield. 2 Click to a replacement drive. The MediaShield RAID management utility window appears and displays the status of the hard drives in the System Tasks pane. For instructions, see the following section that corresponds to the operating system...another-for example, from an old computer to rebuild an array. The NVIDIA Rebuild Array Wizard appears. 4 Click Next. 5 Select the hard drive you can use any available (RAID-enabled) free disk to a new computer. NOTE: You can rebuild the array by clicking the checkbox...

Owner's Manual
Page 52
..." on page 172. ENSURE THAT THE DRIVE IS ENABLED IN THE SYSTEM SETUP PROGRAM - See "Cleaning Your Computer" on page 80. 52 Solving Problems See "Starting the Dell Diagnostics From Your Hard Drive" on page 179. TEST THE DRIVE - • Insert another floppy disk,... CD, or DVD to check for and remove viruses. R U N T H E D E L L D I A G N O S T I S K - Drive Problems CAUTION: Before you begin any of the procedures in...
..." on page 172. ENSURE THAT THE DRIVE IS ENABLED IN THE SYSTEM SETUP PROGRAM - See "Cleaning Your Computer" on page 80. 52 Solving Problems See "Starting the Dell Diagnostics From Your Hard Drive" on page 179. TEST THE DRIVE - • Insert another floppy disk,... CD, or DVD to check for and remove viruses. R U N T H E D E L L D I A G N O S T I S K - Drive Problems CAUTION: Before you begin any of the procedures in...

Owner's Manual
Page 54
... Options, and then click Security. 2 Click Do not allow attachments to be saved or opened that could potentially be logged in the Product Information Guide. Hard drive problems RUN CHECK DISK - NOTE: You must be a virus to perform this section, follow the safety instructions in with Administrator privileges to remove the checkmark...
... Options, and then click Security. 2 Click Do not allow attachments to be saved or opened that could potentially be logged in the Product Information Guide. Hard drive problems RUN CHECK DISK - NOTE: You must be a virus to perform this section, follow the safety instructions in with Administrator privileges to remove the checkmark...


