User Guide
Page 11
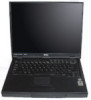
... computer restarts, Windows modifies settings, creates a Dock 1 con- If necessary, consult your network administrator for the location of your CD-ROM or DVD-ROM drive), and then click Next. 11. dialog box, click The updated driver (Recommended) - Click Finish when Windows displays a message that it is installed. 14. Click OK. 17. Insert the Inspiron 5000 Advanced Port Replicator CD into the CD-ROM or DVD-ROM drive. 8. Click Specify a location:. 10...
... computer restarts, Windows modifies settings, creates a Dock 1 con- If necessary, consult your network administrator for the location of your CD-ROM or DVD-ROM drive), and then click Next. 11. dialog box, click The updated driver (Recommended) - Click Finish when Windows displays a message that it is installed. 14. Click OK. 17. Insert the Inspiron 5000 Advanced Port Replicator CD into the CD-ROM or DVD-ROM drive. 8. Click Specify a location:. 10...
User Guide
Page 21
... defects in materials and workmanship. support.dell.com Dell Inspiron 5000 Port Replicator User's Guide 1-17 The limited warranty term is covered under this limited warranty. de C.V. al Cuidado de Kuehne & Nagel de México S. Otherwise, this limited warranty does not cover damage due to external causes, including accident, abuse, misuse, problems with electrical power, servicing not authorized by Dell. Dell Computer de México...
... defects in materials and workmanship. support.dell.com Dell Inspiron 5000 Port Replicator User's Guide 1-17 The limited warranty term is covered under this limited warranty. de C.V. al Cuidado de Kuehne & Nagel de México S. Otherwise, this limited warranty does not cover damage due to external causes, including accident, abuse, misuse, problems with electrical power, servicing not authorized by Dell. Dell Computer de México...

User Guide
Page 22
.... 1-18 Dell Inspiron 5000 Port Replicator User's Guide Dell uses new and reconditioned parts made by various manufacturers in the product(s). During the second and third years of this limited warranty when a part requires replacement. Refer to the chapter titled "Getting Help" in your system's online guide to a Dell system through the DellWare program) are included on the hard-disk drive(s) and any removable media, such as specifically noted...
.... 1-18 Dell Inspiron 5000 Port Replicator User's Guide Dell uses new and reconditioned parts made by various manufacturers in the product(s). During the second and third years of this limited warranty when a part requires replacement. Refer to the chapter titled "Getting Help" in your system's online guide to a Dell system through the DellWare program) are included on the hard-disk drive(s) and any removable media, such as specifically noted...
User Guide
Page 24
... date of 1-20 Dell Inspiron 5000 Port Replicator User's Guide accessories or parts added to other storage device(s) in the Dell factory; or DellWare products. Batteries for the Dell hardware product(s) covered under this limited warranty that are not covered. Shipments to a Dell system after the system is three years beginning on the hard-disk drive(s) and any other locations will issue a Return Material Authorization Number. free from repaired products. Refer to...
... date of 1-20 Dell Inspiron 5000 Port Replicator User's Guide accessories or parts added to other storage device(s) in the Dell factory; or DellWare products. Batteries for the Dell hardware product(s) covered under this limited warranty that are not covered. Shipments to a Dell system after the system is three years beginning on the hard-disk drive(s) and any other locations will issue a Return Material Authorization Number. free from repaired products. Refer to...

User Guide
Page 26
... number provided to and from Dell's repair/replacement center. Dell uses new and reconditioned parts made by various manufacturers in place of all parts removed from defects in Latin America or the Caribbean by contacting the Dell point of sale within the guarantee period. Claims must always supply proof of purchase, indicating name and address of the seller, date of purchase, model and serial number...
... number provided to and from Dell's repair/replacement center. Dell uses new and reconditioned parts made by various manufacturers in place of all parts removed from defects in Latin America or the Caribbean by contacting the Dell point of sale within the guarantee period. Claims must always supply proof of purchase, indicating name and address of the seller, date of purchase, model and serial number...

Reference Guide
Page 5
... display. • When using your computer: • Position your computer directly in front of you as you work. • Adjust the tilt of the computer's display, its contrast and/or brightness settings, and the lighting around you (such as a memory module by its edges, not its pins. • When removing a memory module from the system board or disconnecting a peripheral device from its power source, and remove the battery...
... display. • When using your computer: • Position your computer directly in front of you as you work. • Adjust the tilt of the computer's display, its contrast and/or brightness settings, and the lighting around you (such as a memory module by its edges, not its pins. • When removing a memory module from the system board or disconnecting a peripheral device from its power source, and remove the battery...

Reference Guide
Page 13
...2 Options and Upgrades 1-1 Available Options and Upgrades 1-1 Using Drives in the Media Bay 1-2 Swapping Media Bay Devices 1-2 Swapping Devices While the Computer Is Turned Off 1-2 Swapping Devices Using Softex BayManager 1-3 Installing an Internal Hard-Disk Drive 1-4 Returning a Hard-Disk Drive to Dell 1-5 Installing Memory Modules 1-6 Connecting Other External Devices 1-9 Using a Port Replicator 1-9 Troubleshooting 2-1 Checking the Basics 2-1 Check Connections 2-2 Evaluate Environmental Factors 2-2 Check the Electrical Power Source 2-3 Running the Dell Diagnostics 2-3 Start...
...2 Options and Upgrades 1-1 Available Options and Upgrades 1-1 Using Drives in the Media Bay 1-2 Swapping Media Bay Devices 1-2 Swapping Devices While the Computer Is Turned Off 1-2 Swapping Devices Using Softex BayManager 1-3 Installing an Internal Hard-Disk Drive 1-4 Returning a Hard-Disk Drive to Dell 1-5 Installing Memory Modules 1-6 Connecting Other External Devices 1-9 Using a Port Replicator 1-9 Troubleshooting 2-1 Checking the Basics 2-1 Check Connections 2-2 Evaluate Environmental Factors 2-2 Check the Electrical Power Source 2-3 Running the Dell Diagnostics 2-3 Start...

Reference Guide
Page 14
... Monitor Problems 2-14 Resolve External Keyboard Problems 2-15 Resolve Hard-Disk Drive Problems 2-15 Resolve Hardware Conflicts 2-15 Resolve Infrared Port Problems 2-16 Resolve Memory Problems 2-17 Resolve Modem, Fax, and Internet Connection Problems 2-18 Resolve PC Card Problems 2-18 Resolve Software Problems 2-19 Install and Configure Software 2-19 Resolve Touch Pad and Mouse Problems 2-19 Resolve Television Problems 2-20 Check the Television Type Setting 2-20 Check the System Setup Program Settings 2-20 Installing System Software 3-1 Installing the Windows 98 Operating...
... Monitor Problems 2-14 Resolve External Keyboard Problems 2-15 Resolve Hard-Disk Drive Problems 2-15 Resolve Hardware Conflicts 2-15 Resolve Infrared Port Problems 2-16 Resolve Memory Problems 2-17 Resolve Modem, Fax, and Internet Connection Problems 2-18 Resolve PC Card Problems 2-18 Resolve Software Problems 2-19 Install and Configure Software 2-19 Resolve Touch Pad and Mouse Problems 2-19 Resolve Television Problems 2-20 Check the Television Type Setting 2-20 Check the System Setup Program Settings 2-20 Installing System Software 3-1 Installing the Windows 98 Operating...
Reference Guide
Page 15
... Install the Touch Pad Driver (Windows 2000 3-13 Install the Software DVD Decoder (Windows 2000) (Optional 3-14 Setting and Changing the DVD-ROM Drive Region Code 3-15 Install the Intel SpeedStep Utility (Windows 2000) (Optional 3-15 Install the System Help From the System Software CD 3-16 Download the System Help From the Dell Support Web Site 3-17 Updating Drivers and Utilities 3-17 Getting Help 4-1 Technical Assistance Help Tools 4-1 World Wide Web 4-2 AutoTech Service 4-2 TechFax Service 4-3 Automated Order-Status System 4-3 Technical Support Service 4-3 Problems With...
... Install the Touch Pad Driver (Windows 2000 3-13 Install the Software DVD Decoder (Windows 2000) (Optional 3-14 Setting and Changing the DVD-ROM Drive Region Code 3-15 Install the Intel SpeedStep Utility (Windows 2000) (Optional 3-15 Install the System Help From the System Software CD 3-16 Download the System Help From the Dell Support Web Site 3-17 Updating Drivers and Utilities 3-17 Getting Help 4-1 Technical Assistance Help Tools 4-1 World Wide Web 4-2 AutoTech Service 4-2 TechFax Service 4-3 Automated Order-Status System 4-3 Technical Support Service 4-3 Problems With...

Reference Guide
Page 17
Figure 1-4. Figure 3-1. Figure B-6. Table B-1. Figure 4-1. Figure B-4. Figure B-5. Removing a Device From the Media Bay 1-3 Removing the Internal Hard-Disk Drive 1-5 Repackaging the Hard-Disk Drive 1-6 Removing the Memory Module Cover 1-7 Removing a Memory Module 1-8 Installing a Memory Module 1-8 Diagnostics Menu 2-5 Dell Diagnostics Main Screen 2-7 Diagnostics Menu 3-3 Diagnostics Checklist 4-6 Main Menu B-3 System Devices Menu B-4 Security Menu B-5 Power Menu B-6 Boot Menu B-7 Exit Menu B-8 VCCI Class A ITE Regulatory Mark D-9 VCCI Class B ITE Regulatory Mark ...
Figure 1-4. Figure 3-1. Figure B-6. Table B-1. Figure 4-1. Figure B-4. Figure B-5. Removing a Device From the Media Bay 1-3 Removing the Internal Hard-Disk Drive 1-5 Repackaging the Hard-Disk Drive 1-6 Removing the Memory Module Cover 1-7 Removing a Memory Module 1-8 Installing a Memory Module 1-8 Diagnostics Menu 2-5 Dell Diagnostics Main Screen 2-7 Diagnostics Menu 3-3 Diagnostics Checklist 4-6 Main Menu B-3 System Devices Menu B-4 Security Menu B-5 Power Menu B-6 Boot Menu B-7 Exit Menu B-8 VCCI Class A ITE Regulatory Mark D-9 VCCI Class B ITE Regulatory Mark ...

Reference Guide
Page 25
... are replacing a memory module, remove the installed memory module. Then lift the memory module away from the socket (the module should pop up slightly). support.dell.com Options and Upgrades 1-7 NOTES: The 192-MB memory modules are adding an additional memory module, put the additional module in the available socket. You must remove a memory module only to disengage from the socket. bottom of the memory module socket just far enough for the memory module to replace a module. 6. Removing the Memory Module Cover...
... are replacing a memory module, remove the installed memory module. Then lift the memory module away from the socket (the module should pop up slightly). support.dell.com Options and Upgrades 1-7 NOTES: The 192-MB memory modules are adding an additional memory module, put the additional module in the available socket. You must remove a memory module only to disengage from the socket. bottom of the memory module socket just far enough for the memory module to replace a module. 6. Removing the Memory Module Cover...

Reference Guide
Page 27
.... support.dell.com Options and Upgrades 1-9 NOTES: The memory total shown in the system Help. Repeat steps 1 through 12 until the memory total is booting. To enter the system setup program, press while the computer is correct. No error message indicates this failure. 13. 12. Confirm that the installed memory modules operate correctly. The Main menu appears. Connecting Other External Devices For instructions, see "Recreating the Hibernate (Save-to your hard-disk drive...
.... support.dell.com Options and Upgrades 1-9 NOTES: The memory total shown in the system Help. Repeat steps 1 through 12 until the memory total is booting. To enter the system setup program, press while the computer is correct. No error message indicates this failure. 13. 12. Confirm that the installed memory modules operate correctly. The Main menu appears. Connecting Other External Devices For instructions, see "Recreating the Hibernate (Save-to your hard-disk drive...

Reference Guide
Page 30
... easily solve these factors, try removing the potential problem source or move the computer to another location. 2-2 Dell Inspiron 5000 Reference and Troubleshooting Guide NOTE: See "System Features" in the media bay • Cables that the screws are likely sources of these problems. If the connector has two small thumbscrews, ensure that connect external devices through the input/output (I/O) connectors and ports on connectors.
... easily solve these factors, try removing the potential problem source or move the computer to another location. 2-2 Dell Inspiron 5000 Reference and Troubleshooting Guide NOTE: See "System Features" in the media bay • Cables that the screws are likely sources of these problems. If the connector has two small thumbscrews, ensure that connect external devices through the input/output (I/O) connectors and ports on connectors.

Reference Guide
Page 31
... tests. Check the Electrical Power Source If you are experiencing problems with important information. Using this information on the power strip to terminate testing if an adjustable error limit is reached • A menu category called Devices that briefly describes each test and its parameters • A menu category called Options that lets you call Dell for your computer's operation. Record this diagnostic program...
... tests. Check the Electrical Power Source If you are experiencing problems with important information. Using this information on the power strip to terminate testing if an adjustable error limit is reached • A menu category called Devices that briefly describes each test and its parameters • A menu category called Options that lets you call Dell for your computer's operation. Record this diagnostic program...

Reference Guide
Page 51
... device drivers and utilities for both Windows 98 Second Edition and Microsoft Windows 2000. You may need to refer to this chapter under the following steps to exit ScanDisk. 6. CHAPTER 3 Installing System Software This chapter explains how to create a start-up diskette, remove the Microsoft Boot Disk Windows 98 Series diskette, and click Next>. Select Start Windows 98 Setup from CD-ROM and press . When the hard-disk drive check is complete, type...
... device drivers and utilities for both Windows 98 Second Edition and Microsoft Windows 2000. You may need to refer to this chapter under the following steps to exit ScanDisk. 6. CHAPTER 3 Installing System Software This chapter explains how to create a start-up diskette, remove the Microsoft Boot Disk Windows 98 Series diskette, and click Next>. Select Start Windows 98 Setup from CD-ROM and press . When the hard-disk drive check is complete, type...

Reference Guide
Page 55
Installing Drivers and Utilities for Windows 98 To install the system software, you need the following items: • CD-ROM or DVD-ROM drive installed in this chapter. To download the latest versions of the computer • System Software CD • Dell Inspiron 5000 Software DVD Decoder CD • Microsoft Windows 98 Second Edition CD • Microsoft Boot Disk Windows 98 Series diskette NOTES: Verify that Dell installed on your hard-disk drive before shipping the computer to boot from...
Installing Drivers and Utilities for Windows 98 To install the system software, you need the following items: • CD-ROM or DVD-ROM drive installed in this chapter. To download the latest versions of the computer • System Software CD • Dell Inspiron 5000 Software DVD Decoder CD • Microsoft Windows 98 Second Edition CD • Microsoft Boot Disk Windows 98 Series diskette NOTES: Verify that Dell installed on your hard-disk drive before shipping the computer to boot from...

Reference Guide
Page 56
... if the driver is the CD-ROM or DVD-ROM drive letter. 3-6 Dell Inspiron 5000 Reference and Troubleshooting Guide is the CD-ROM or DVD-ROM drive letter. After the computer restarts, you need to use extended video modes, check the documentation that Yes, I want to select a directory, Dell recommends using a Japanese-language version of Windows, type x:\touchpad\japanese\setup.exe, where x is provided. If you are using the default directory settings. 1. Install the Video Driver (Windows 98) The video driver controls video resolution...
... if the driver is the CD-ROM or DVD-ROM drive letter. 3-6 Dell Inspiron 5000 Reference and Troubleshooting Guide is the CD-ROM or DVD-ROM drive letter. After the computer restarts, you need to use extended video modes, check the documentation that Yes, I want to select a directory, Dell recommends using a Japanese-language version of Windows, type x:\touchpad\japanese\setup.exe, where x is provided. If you are using the default directory settings. 1. Install the Video Driver (Windows 98) The video driver controls video resolution...
Reference Guide
Page 57
... Windows starts. Click the Start button, point to your Touch Pad window appears. Double-click Add/Remove Programs. 4. Follow the instructions on changing the boot sequence, refer to restart my computer now button is usually D. For information on the screen to swap media bay devices without turning off the computer. To uninstall Softex BayManager, perform the following steps: 1. Insert the System Software CD into the CD-ROM or DVD-ROM drive...
... Windows starts. Click the Start button, point to your Touch Pad window appears. Double-click Add/Remove Programs. 4. Follow the instructions on changing the boot sequence, refer to restart my computer now button is usually D. For information on the screen to swap media bay devices without turning off the computer. To uninstall Softex BayManager, perform the following steps: 1. Insert the System Software CD into the CD-ROM or DVD-ROM drive...

Reference Guide
Page 62
... now is provided. After the computer restarts, you need to use extended video modes, check the documentation that the computer does not boot from the CD-ROM or DVD-ROM drive before the hard-disk drive, remove the System Software CD before the computer restarts so that the audio driver is installed on changing the boot sequence, refer to determine if the driver is selected, and then click Finish. An...
... now is provided. After the computer restarts, you need to use extended video modes, check the documentation that the computer does not boot from the CD-ROM or DVD-ROM drive before the hard-disk drive, remove the System Software CD before the computer restarts so that the audio driver is installed on changing the boot sequence, refer to determine if the driver is selected, and then click Finish. An...
Reference Guide
Page 119
... warranty period in order for repair prior to your invoice. or DellWare products. NOTE: If you is covered under this limited warranty does not cover damage due to external causes, including accident, abuse, misuse, problems with electrical power, servicing not authorized by Dell, usage not in accordance with product instructions, failure to perform required preventive maintenance, and problems caused by use of the...
... warranty period in order for repair prior to your invoice. or DellWare products. NOTE: If you is covered under this limited warranty does not cover damage due to external causes, including accident, abuse, misuse, problems with electrical power, servicing not authorized by Dell, usage not in accordance with product instructions, failure to perform required preventive maintenance, and problems caused by use of the...


