
Inspiron 27 7000 Service Manual
Page 36
...-AF0C-4FA0-8736-EAD91D8969A8 Status Released Removing the camera WARNING: Before working inside your computer, read the safety information that secure the camera assembly to the front bezel. 2 Lift the camera assembly and turn it over. 36 Identifier GUID...working inside your computer. Identifier Status Procedure GUID-28502559-4C4B-4FB6-B622-343D211BD240 Released 1 Remove the two screws (M3x5) that shipped with your computer and follow the instructions in Before working inside your computer. For more safety best practices, see the Regulatory Compliance home page at www.dell...
...-AF0C-4FA0-8736-EAD91D8969A8 Status Released Removing the camera WARNING: Before working inside your computer, read the safety information that secure the camera assembly to the front bezel. 2 Lift the camera assembly and turn it over. 36 Identifier GUID...working inside your computer. Identifier Status Procedure GUID-28502559-4C4B-4FB6-B622-343D211BD240 Released 1 Remove the two screws (M3x5) that shipped with your computer and follow the instructions in Before working inside your computer. For more safety best practices, see the Regulatory Compliance home page at www.dell...

Inspiron 27 7000 Service Manual
Page 38
...3 Replace the back cover. 38 Identifier GUID-690FF12D-2581-4326-8270-C4B813388FD3 Status Released Replacing the camera WARNING: Before working inside your computer, read the safety information that shipped with the screw holes on the front bezel...camera assembly. 2 Align the screw holes on the camera assembly with your computer and follow the instructions in Before working inside your computer. For more safety best practices, see the Regulatory Compliance home page at www.dell.com/ regulatory_compliance. After working inside your computer, follow the steps in After working...
...3 Replace the back cover. 38 Identifier GUID-690FF12D-2581-4326-8270-C4B813388FD3 Status Released Replacing the camera WARNING: Before working inside your computer, read the safety information that shipped with the screw holes on the front bezel...camera assembly. 2 Align the screw holes on the camera assembly with your computer and follow the instructions in Before working inside your computer. For more safety best practices, see the Regulatory Compliance home page at www.dell.com/ regulatory_compliance. After working inside your computer, follow the steps in After working...
Inspiron 27 7000 Service Manual
Page 109
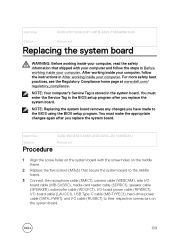
...best practices, see the Regulatory Compliance home page at www.dell.com/ regulatory_compliance. You must enter the Service Tag in Before working inside your computer. NOTE: Your computer's Service Tag is stored in After working inside your computer. NOTE: Replacing the system board removes ...the middle frame. 2 Replace the five screws (M3x5) that secure the system board to the middle frame. 3 Connect the microphone cable (DMIC1), camera cable (WEBCAM), side I/Oboard cable (MB-SUSBC), media-card reader cable (SDRDC1), speaker cable (SPEAKER), subwoofer cable (WOOFC1), I/O-board power ...
...best practices, see the Regulatory Compliance home page at www.dell.com/ regulatory_compliance. You must enter the Service Tag in Before working inside your computer. NOTE: Your computer's Service Tag is stored in After working inside your computer. NOTE: Replacing the system board removes ...the middle frame. 2 Replace the five screws (M3x5) that secure the system board to the middle frame. 3 Connect the microphone cable (DMIC1), camera cable (WEBCAM), side I/Oboard cable (MB-SUSBC), media-card reader cable (SDRDC1), speaker cable (SPEAKER), subwoofer cable (WOOFC1), I/O-board power ...

Inspiron 27 7000 Service Manual
Page 111
...44FA-9A0D-1DC9BEF34BCA Status Released Prerequisites 1 Remove the back cover. 2 Remove the stand. 3 Remove the hard drive. 4 Remove the inner frame. 5 Remove the camera. 6 Remove the microphones. 7 Remove the power-button board. 8 Remove the front bezel. 9 Remove the media-card reader. 10 Remove the side I/O-board. ...16 Remove the heat sink. 111 Identifier GUID-665E66D0-54D4-403E-91DA-E6669EC906EC Status Released Removing the middle frame WARNING: Before working inside your computer, read the safety information that shipped with your computer and follow the instructions in Before...
...44FA-9A0D-1DC9BEF34BCA Status Released Prerequisites 1 Remove the back cover. 2 Remove the stand. 3 Remove the hard drive. 4 Remove the inner frame. 5 Remove the camera. 6 Remove the microphones. 7 Remove the power-button board. 8 Remove the front bezel. 9 Remove the media-card reader. 10 Remove the side I/O-board. ...16 Remove the heat sink. 111 Identifier GUID-665E66D0-54D4-403E-91DA-E6669EC906EC Status Released Removing the middle frame WARNING: Before working inside your computer, read the safety information that shipped with your computer and follow the instructions in Before...


