Solutions Guide
Page 6
... System Restore 73 Reinstalling Microsoft® Windows® XP 74 Before You Reinstall 74 Reinstalling Windows XP 74 Reinstalling Drivers and Software 76 3 Adding and Replacing Parts Removing a Battery 78 Installing a Battery 78 Adding Memory 79 Adding a Modem Card 82 Replacing the Hard Drive 85 Returning a Hard Drive to...
... System Restore 73 Reinstalling Microsoft® Windows® XP 74 Before You Reinstall 74 Reinstalling Windows XP 74 Reinstalling Drivers and Software 76 3 Adding and Replacing Parts Removing a Battery 78 Installing a Battery 78 Adding Memory 79 Adding a Modem Card 82 Replacing the Hard Drive 85 Returning a Hard Drive to...

Solutions Guide
Page 15
... packaging, be performed by an authorized service technician. Contact your Dell computer documentation. Battery Disposal Your computer uses an lithium-ion battery and a coin cell battery. While you are ready to replace it. However, should you will never need to prevent damage... be sure to discharge static electricity from the antistatic packing material until you work, periodically touch the I/O panel to the section about replacing the battery in your local waste disposal agency for the address of your body may have accumulated. W h e n U s i n g Yo u r...
... packaging, be performed by an authorized service technician. Contact your Dell computer documentation. Battery Disposal Your computer uses an lithium-ion battery and a coin cell battery. While you are ready to replace it. However, should you will never need to prevent damage... be sure to discharge static electricity from the antistatic packing material until you work, periodically touch the I/O panel to the section about replacing the battery in your local waste disposal agency for the address of your body may have accumulated. W h e n U s i n g Yo u r...

Solutions Guide
Page 66
... page 37). 2 Disconnect the AC adapter from the computer and from the electrical outlet. 3 Turn off any PC Cards you removed. 14 Replace the battery. 15 Turn on the computer and verify that the computer is thoroughly dry before continuing with the rest of this procedure. 10 Ground yourself by... computer. 4 Remove and reinstall the battery. 5 Turn on your warranty coverage. NOTICE: Do not use artificial means, such as a hair dryer or a fan, to speed the drying process. If the computer does not start , or if you cannot identify the damaged components, contact Dell (see page 100). 66 So l...
... page 37). 2 Disconnect the AC adapter from the computer and from the electrical outlet. 3 Turn off any PC Cards you removed. 14 Replace the battery. 15 Turn on the computer and verify that the computer is thoroughly dry before continuing with the rest of this procedure. 10 Ground yourself by... computer. 4 Remove and reinstall the battery. 5 Turn on your warranty coverage. NOTICE: Do not use artificial means, such as a hair dryer or a fan, to speed the drying process. If the computer does not start , or if you cannot identify the damaged components, contact Dell (see page 100). 66 So l...

Solutions Guide
Page 77
SECTION 3 Adding and Replacing Parts Removing a Battery Installing a Battery Adding Memory Adding a Modem Card Replacing the Hard Drive 3
SECTION 3 Adding and Replacing Parts Removing a Battery Installing a Battery Adding Memory Adding a Modem Card Replacing the Hard Drive 3

Solutions Guide
Page 78
... until the left edge of the computer. 1 Unlock the battery. 2 Slide and hold the battery latch all the way up until the latch clicks. 3 Lock the battery. 78 Adding and Replacing Pa rts www.dell.com | support.dell.com Removing a Battery Before removing the battery, ensure that the battery lock is turned off or disconnected from an electrical outlet.
... until the left edge of the computer. 1 Unlock the battery. 2 Slide and hold the battery latch all the way up until the latch clicks. 3 Lock the battery. 78 Adding and Replacing Pa rts www.dell.com | support.dell.com Removing a Battery Before removing the battery, ensure that the battery lock is turned off or disconnected from an electrical outlet.

Solutions Guide
Page 82
www.dell.com | support.dell.com 9 Replace and tighten the screw you removed in step 5. 10 Insert the battery into the battery bay, or connect the AC adapter to 20 seconds and then disconnect any attached devices. 5 Remove any open programs, and shut down the computer (... while you work surface is flat and clean to prevent scratching the computer cover. 2 Save and close any open files, exit any installed PC Cards, battery, and devices. 6 To ground yourself, periodically touch an unpainted metal surface on the computer. Adding a Modem Card 1 Make sure that the work . 7 Handle components...
www.dell.com | support.dell.com 9 Replace and tighten the screw you removed in step 5. 10 Insert the battery into the battery bay, or connect the AC adapter to 20 seconds and then disconnect any attached devices. 5 Remove any open programs, and shut down the computer (... while you work surface is flat and clean to prevent scratching the computer cover. 2 Save and close any open files, exit any installed PC Cards, battery, and devices. 6 To ground yourself, periodically touch an unpainted metal surface on the computer. Adding a Modem Card 1 Make sure that the work . 7 Handle components...

Solutions Guide
Page 85
...even a slight bump can damage the drive. Handle components and cards by their edges, and avoid touching pins and contacts. HINT: Dell does not guarantee compatibility or provide support for hard drives from the electrical outlet. 4 Wait 10 to 20 seconds and then disconnect... any attached devices. 5 Remove any installed PC Cards, battery, and devices. CAUTION: Before working inside your computer (see page 37). 3 Disconnect the computer from sources other than Dell. Replacing the Hard Drive NOTICE: To prevent data loss, turn off your computer, read ...
...even a slight bump can damage the drive. Handle components and cards by their edges, and avoid touching pins and contacts. HINT: Dell does not guarantee compatibility or provide support for hard drives from the electrical outlet. 4 Wait 10 to 20 seconds and then disconnect... any attached devices. 5 Remove any installed PC Cards, battery, and devices. CAUTION: Before working inside your computer (see page 37). 3 Disconnect the computer from sources other than Dell. Replacing the Hard Drive NOTICE: To prevent data loss, turn off your computer, read ...

Solutions Guide
Page 120
...damaged in materials or workmanship. Please also have your invoice, except that the limited warranty on Dellbranded batteries lasts only one year and the limited warranty on the lamps for Dell-branded projectors lasts only ninety days. We will issue a Return Material Authorization Number for the time ...we will not be defective in shipment. Otherwise, we will pay to ship the repaired or replaced products to be retroactive. We will repair any parts. The limited warranty begins on your Dell service tag number or order number available. During the first 90 days of the 90-day...
...damaged in materials or workmanship. Please also have your invoice, except that the limited warranty on Dellbranded batteries lasts only one year and the limited warranty on the lamps for Dell-branded projectors lasts only ninety days. We will issue a Return Material Authorization Number for the time ...we will not be defective in shipment. Otherwise, we will pay to ship the repaired or replaced products to be retroactive. We will repair any parts. The limited warranty begins on your Dell service tag number or order number available. During the first 90 days of the 90-day...

Solutions Guide
Page 124
... table. Please also have your invoice, except that is not extended if we repair or replace a warranted product or any changes will not be retroactive (that the limited warranty on Dellbranded batteries lasts only one year and the limited warranty on the lamps for the time period indicated ...expires, please call us at the relevant number listed in place at its discretion, but any parts. DELL'S RESPONSIBILITY FOR MALFUNCTIONS AND DEFECTS IN PRODUCT IS LIMITED TO REPAIR AND REPLACEMENT AS SET FORTH IN THIS WARRANTY STATEMENT, FOR THE TERM OF THE WARRANTY PERIOD REFLECTED ON YOUR INVOICE....
... table. Please also have your invoice, except that is not extended if we repair or replace a warranted product or any changes will not be retroactive (that the limited warranty on Dellbranded batteries lasts only one year and the limited warranty on the lamps for the time period indicated ...expires, please call us at the relevant number listed in place at its discretion, but any parts. DELL'S RESPONSIBILITY FOR MALFUNCTIONS AND DEFECTS IN PRODUCT IS LIMITED TO REPAIR AND REPLACEMENT AS SET FORTH IN THIS WARRANTY STATEMENT, FOR THE TERM OF THE WARRANTY PERIOD REFLECTED ON YOUR INVOICE....

Solutions Guide
Page 127
... product must be returned with it . you are covered by the warranties provided by Dell, the whole system must be returned with it . 127 To qualify for refund or replacement, returned products must be in as-new condition, software products must be in as...a Dell company, you to return the products to Dell in preceding sections. Dell-Branded Peripheral Products Dell does provide a limited warranty for new Dell-branded peripheral products (products for specific warranty information. You must ship the Dell Software and Peripherals products back to Dell in as monitors, batteries, memory...
... product must be returned with it . you are covered by the warranties provided by Dell, the whole system must be returned with it . 127 To qualify for refund or replacement, returned products must be in as-new condition, software products must be in as...a Dell company, you to return the products to Dell in preceding sections. Dell-Branded Peripheral Products Dell does provide a limited warranty for new Dell-branded peripheral products (products for specific warranty information. You must ship the Dell Software and Peripherals products back to Dell in as monitors, batteries, memory...

Solutions Guide
Page 131
Index A air vents description, 27 system view, 27 audio connectors description, 22 system view, 22 B battery description, 28 installing, 78 removing, 78 system view, 28 battery lock description, 28 system view, 28 battery release latch description, 28 system view, 28 C CD-RW drive fixing problems, 62 characters unexpected, 60 computer crashes, 64 specifications, ...fixed optical drive description, 24 system view, 24 floppy drive description, 23 fixing problems, 60 system view, 23 H hard drive description, 21 preventing damage, 86 replacing, 85 system view, 21 help file accessing, 50 Index 131
Index A air vents description, 27 system view, 27 audio connectors description, 22 system view, 22 B battery description, 28 installing, 78 removing, 78 system view, 28 battery lock description, 28 system view, 28 battery release latch description, 28 system view, 28 C CD-RW drive fixing problems, 62 characters unexpected, 60 computer crashes, 64 specifications, ...fixed optical drive description, 24 system view, 24 floppy drive description, 23 fixing problems, 60 system view, 23 H hard drive description, 21 preventing damage, 86 replacing, 85 system view, 21 help file accessing, 50 Index 131

System Information Guide
Page 20
www.dell.com | support.dell.com USB connectors video connector parallel connector air vent modem connector PS/2 connector AC adapter connector Removing a Battery NOTICE: If you choose to replace the battery with the computer in standby mode, you have up to 4 minutes to complete the battery replacement before the computer shuts down and loses any unsaved data. Before...
www.dell.com | support.dell.com USB connectors video connector parallel connector air vent modem connector PS/2 connector AC adapter connector Removing a Battery NOTICE: If you choose to replace the battery with the computer in standby mode, you have up to 4 minutes to complete the battery replacement before the computer shuts down and loses any unsaved data. Before...

System Information Guide
Page 25
... agency for the address of the battery along with household waste. Dell™ Inspiron™ 2600 and 2650 System Infor mation Guide 23 Do not dispose of the nearest battery deposit site. Battery Disposal Your computer uses a lithium-ion battery and a nickel-cadmium battery. For instructions about replacing the lithium-ion battery in your Dell computer documentation. However, should you will...
... agency for the address of the battery along with household waste. Dell™ Inspiron™ 2600 and 2650 System Infor mation Guide 23 Do not dispose of the nearest battery deposit site. Battery Disposal Your computer uses a lithium-ion battery and a nickel-cadmium battery. For instructions about replacing the lithium-ion battery in your Dell computer documentation. However, should you will...
User Guide
Page 14
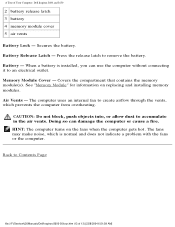
A Tour of 13) [2/28/2004 6:51:59 AM] Battery - HINT: The computer turns on replacing and installing memory modules. The computer uses an internal fan to remove the battery. See "Memory Module" for information on the fans when the computer gets hot. Press ... computer from overheating. Back to Contents Page file:///F|/Service%20Manuals/Dell/Inspiron/2600-50/tour.htm (13 of Your Computer: Dell Inspiron 2600 and 2650 2 battery release latch 3 battery 4 memory module cover 5 air vents Battery Lock - Secures the battery. Air Vents - Doing so can use the computer without ...
A Tour of 13) [2/28/2004 6:51:59 AM] Battery - HINT: The computer turns on replacing and installing memory modules. The computer uses an internal fan to remove the battery. See "Memory Module" for information on the fans when the computer gets hot. Press ... computer from overheating. Back to Contents Page file:///F|/Service%20Manuals/Dell/Inspiron/2600-50/tour.htm (13 of Your Computer: Dell Inspiron 2600 and 2650 2 battery release latch 3 battery 4 memory module cover 5 air vents Battery Lock - Secures the battery. Air Vents - Doing so can use the computer without ...

User Guide
Page 35
...reinstall the battery. 5. file:///F|/Service%20Manuals/Dell/Inspiron/2600-50/solving.htm (21 of the computer. 11. Ground yourself by touching one of this procedure. 10. Replace any PC Cards you cannot identify the damaged components, contact Dell for technical assistance (see "Contacting Dell" in the Dell Owner's ... AC adapter from the computer and from the computer. 4. Solving Problems: Dell Inspiron 2600 and 2650 NOTICE: Do not use artificial means, such as a hair dryer or a fan, to speed the drying process. Replace the memory module, the memory module cover, and the screw. 12. CAUTION...
...reinstall the battery. 5. file:///F|/Service%20Manuals/Dell/Inspiron/2600-50/solving.htm (21 of the computer. 11. Ground yourself by touching one of this procedure. 10. Replace any PC Cards you cannot identify the damaged components, contact Dell for technical assistance (see "Contacting Dell" in the Dell Owner's ... AC adapter from the computer and from the computer. 4. Solving Problems: Dell Inspiron 2600 and 2650 NOTICE: Do not use artificial means, such as a hair dryer or a fan, to speed the drying process. Replace the memory module, the memory module cover, and the screw. 12. CAUTION...
User Guide
Page 84
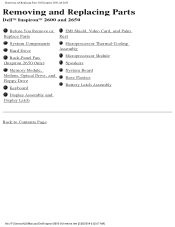
... Replacing Parts: Dell Inspiron 2600 and 2650 Removing and Replacing Parts Dell™ Inspiron™ 2600 and 2650 Before You Remove or EMI Shield, Video Card, and Palm Replace Parts Rest System Components Hard Drive Back-Panel Fan (Inspiron 2650 Only) Microprocessor Thermal-Cooling Assembly Microprocessor Module Speakers Memory Module, Modem, Optical Drive, and Floppy Drive Keyboard System Board Base Plastics Battery...
... Replacing Parts: Dell Inspiron 2600 and 2650 Removing and Replacing Parts Dell™ Inspiron™ 2600 and 2650 Before You Remove or EMI Shield, Video Card, and Palm Replace Parts Rest System Components Hard Drive Back-Panel Fan (Inspiron 2650 Only) Microprocessor Thermal-Cooling Assembly Microprocessor Module Speakers Memory Module, Modem, Optical Drive, and Floppy Drive Keyboard System Board Base Plastics Battery...

User Guide
Page 85
...to Contents Page Battery Latch Assembly Dell™ Inspiron™ 2600 and 2650 Removing the Battery Latch Assembly Replacing the Battery Latch Assembly Removing the Battery Latch Assembly ...NOTICE: Disconnect the computer and any attached devices from electrical outlets, and remove any installed battery. NOTICE: To avoid ESD, ground yourself by using a wrist grounding strap or by touching an unpainted metal surface on the computer. file:///F|/Service%20Manuals/Dell/Inspiron...
...to Contents Page Battery Latch Assembly Dell™ Inspiron™ 2600 and 2650 Removing the Battery Latch Assembly Replacing the Battery Latch Assembly Removing the Battery Latch Assembly ...NOTICE: Disconnect the computer and any attached devices from electrical outlets, and remove any installed battery. NOTICE: To avoid ESD, ground yourself by using a wrist grounding strap or by touching an unpainted metal surface on the computer. file:///F|/Service%20Manuals/Dell/Inspiron...

User Guide
Page 86
Remove the latch spring and plate from the battery latch assembly. 13. Remove the M2 x 4-mm screw from the bottom case. 1 M2 x 4-mm screw (1) 2 latch plate 3 latch button 4 bottom case 5 latch spring 6 latch spring connector Replacing the Battery Latch Assembly file:///F|/Service%20Manuals/Dell/Inspiron/2600-50/batlatch.htm (2 of 3) [2/28/2004 6:52:22 AM] Battery Latch Assembly: Dell Inspiron 2600 and 2650 11. Remove the system board. 12.
Remove the latch spring and plate from the battery latch assembly. 13. Remove the M2 x 4-mm screw from the bottom case. 1 M2 x 4-mm screw (1) 2 latch plate 3 latch button 4 bottom case 5 latch spring 6 latch spring connector Replacing the Battery Latch Assembly file:///F|/Service%20Manuals/Dell/Inspiron/2600-50/batlatch.htm (2 of 3) [2/28/2004 6:52:22 AM] Battery Latch Assembly: Dell Inspiron 2600 and 2650 11. Remove the system board. 12.

User Guide
Page 87
... and spring while replacing the latch button. 4. Install the new latch button from coming loose, apply pressure to the bottom case. To prevent the latch assembly from behind the bottom case, ensuring that the newly installed latch moves smoothly and freely when pushed and released. Battery Latch Assembly: Dell Inspiron 2600 and 2650 1. Insert the...
... and spring while replacing the latch button. 4. Install the new latch button from coming loose, apply pressure to the bottom case. To prevent the latch assembly from behind the bottom case, ensuring that the newly installed latch moves smoothly and freely when pushed and released. Battery Latch Assembly: Dell Inspiron 2600 and 2650 1. Insert the...

User Guide
Page 89
.... Before You Remove or Replace Parts: Dell Inspiron 2600 and 2650 6. b. NOTICE: To avoid damaging the system board, you must remove the battery before you service the computer. 9. Remove the battery: a. Remove the battery. 1 battery lock 2 battery latch release 3 battery file:///F|/Service%20Manuals/Dell/Inspiron/2600-50/begin.htm (2 of the battery pops up. Slide and hold the battery latch release all other external...
.... Before You Remove or Replace Parts: Dell Inspiron 2600 and 2650 6. b. NOTICE: To avoid damaging the system board, you must remove the battery before you service the computer. 9. Remove the battery: a. Remove the battery. 1 battery lock 2 battery latch release 3 battery file:///F|/Service%20Manuals/Dell/Inspiron/2600-50/begin.htm (2 of the battery pops up. Slide and hold the battery latch release all other external...


