
View
Page 10
... and Replacing Parts 137 Before You Begin 137 Recommended Tools 137 Turning Off Your Computer 137 Before Working Inside Your Computer 138 Hard Drive 139 Removing the Hard Drive 140 Replacing the Hard Drive 141 Returning a Hard Drive to Dell 142 Optical Drive 142 Removing the Optical Drive 142 Replacing the Optical...
... and Replacing Parts 137 Before You Begin 137 Recommended Tools 137 Turning Off Your Computer 137 Before Working Inside Your Computer 138 Hard Drive 139 Removing the Hard Drive 140 Replacing the Hard Drive 141 Returning a Hard Drive to Dell 142 Optical Drive 142 Removing the Optical Drive 142 Replacing the Optical...

View
Page 23
...optional) 4 display 6 keyboard 8 touch pad 10 media control buttons 12 Dell™ MediaDirect™ button 14 digital array microphones C A M E R A I N D I S P L A Y - Keeps the display closed. C A M E R A - Press the power button to turn off completely (may not include a camera. Based on page 45. ... when ordering your computer, your computer may take several seconds). Indicates that the camera is turned on page 41. D I S P L A Y L A T C H - NOTICE: To avoid losing data, turn on the computer or exit a power management mode (see "Using the Keyboard and Touch...
...optional) 4 display 6 keyboard 8 touch pad 10 media control buttons 12 Dell™ MediaDirect™ button 14 digital array microphones C A M E R A I N D I S P L A Y - Keeps the display closed. C A M E R A - Press the power button to turn off completely (may not include a camera. Based on page 45. ... when ordering your computer, your computer may take several seconds). Indicates that the camera is turned on page 41. D I S P L A Y L A T C H - NOTICE: To avoid losing data, turn on the computer or exit a power management mode (see "Using the Keyboard and Touch...

View
Page 24
...light - Hard drive activity light - NOTICE: To avoid loss of the keyboard indicate the following: Power light - Turns on steadily or blinks to the right of data, never turn on the computer, and blinks when the computer is in a power management mode. DEVICE STATUS LIGHTS The blue lights... located to indicate battery charge status. Turns on when you turn off the computer while the light is enabled. Turns on when wireless networking is...
...light - Hard drive activity light - NOTICE: To avoid loss of the keyboard indicate the following: Power light - Turns on steadily or blinks to the right of data, never turn on the computer, and blinks when the computer is in a power management mode. DEVICE STATUS LIGHTS The blue lights... located to indicate battery charge status. Turns on when you turn off the computer while the light is enabled. Turns on when wireless networking is...

View
Page 25
..." on page 27). T O U C H P A D - Use these buttons much like the buttons on page 43). Mute Turn the volume down Turn the volume up Play or pause Play the previous track Play the next track Stop About Your Computer 25 If the computer is critically... C H P A D B U T T O N S - Provides the functionality of a mouse (see "Touch Pad" on a mouse when you ordered the card with Bluetooth wireless technology is turned off only the Bluetooth wireless technology functionality, right-click the icon in the notification area, and then click Disable Bluetooth Radio. Bluetooth® status light...
..." on page 27). T O U C H P A D - Use these buttons much like the buttons on page 43). Mute Turn the volume down Turn the volume up Play or pause Play the previous track Play the next track Stop About Your Computer 25 If the computer is critically... C H P A D B U T T O N S - Provides the functionality of a mouse (see "Touch Pad" on a mouse when you ordered the card with Bluetooth wireless technology is turned off only the Bluetooth wireless technology functionality, right-click the icon in the notification area, and then click Disable Bluetooth Radio. Bluetooth® status light...

View
Page 26
D E L L ™ M E D I A D I C R O P H O N E S - A Turns on page 62). D I G I T A L A R R A Y M I R E C T ™ B U T T O N - Press the Dell MediaDirect button to launch Dell MediaDirect (see "Using Dell MediaDirect™" on when the uppercase letter (Caps Lock) function is enabled. Turns on when the numeric keypad (Num Lock) is enabled. Built-in microphone for conferencing and chat. 26 About Your Computer KEYBOARD STATUS LIGHTS The blue lights located above the keyboard indicate the following: 9 Turns on when the scroll lock function is enabled.
D E L L ™ M E D I A D I C R O P H O N E S - A Turns on page 62). D I G I T A L A R R A Y M I R E C T ™ B U T T O N - Press the Dell MediaDirect button to launch Dell MediaDirect (see "Using Dell MediaDirect™" on when the uppercase letter (Caps Lock) function is enabled. Turns on when the numeric keypad (Num Lock) is enabled. Built-in microphone for conferencing and chat. 26 About Your Computer KEYBOARD STATUS LIGHTS The blue lights located above the keyboard indicate the following: 9 Turns on when the scroll lock function is enabled.
View
Page 27
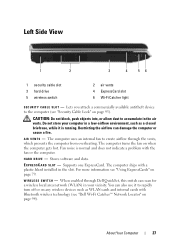
...) in your computer in a low-airflow environment, such as WLAN cards and internal cards with Bluetooth wireless technology (see "Dell Wi-Fi Catcher™ Network Locator" on any wireless devices such as a closed briefcase, while it to accumulate in the slot. ... or the computer. CAUTION: Do not block, push objects into, or allow dust to rapidly turn off or on page 94). About Your Computer 27 Lets you attach a commercially available antitheft device to create airflow through Dell QuickSet, this switch can damage the computer or cause a fire. W I R E L E S S S W I T Y C...
...) in your computer in a low-airflow environment, such as WLAN cards and internal cards with Bluetooth wireless technology (see "Dell Wi-Fi Catcher™ Network Locator" on any wireless devices such as a closed briefcase, while it to accumulate in the slot. ... or the computer. CAUTION: Do not block, push objects into, or allow dust to rapidly turn off or on page 94). About Your Computer 27 Lets you attach a commercially available antitheft device to create airflow through Dell QuickSet, this switch can damage the computer or cause a fire. W I R E L E S S S W I T Y C...

View
Page 32
You can connect the AC adapter with your computer turned on using the modem, see the online modem documentation supplied with your computer. 32 About Your Computer Using an incompatible cable or improperly connecting the ...
You can connect the AC adapter with your computer turned on using the modem, see the online modem documentation supplied with your computer. 32 About Your Computer Using an incompatible cable or improperly connecting the ...

View
Page 34
...in a low-airflow environment, such as a closed briefcase, while it is installed, you can damage the computer or cause a fire. The computer turns the fan on page 48). Stores software and data. 34 About Your Computer C E L L B A T T E R Y C O ...B memory module and the coin-cell battery. R I N - H A R D D R I R - Restricting the airflow can use the computer without connecting the computer to be controlled by the Dell Travel Remote. To adjust the volume of the integrated speaker, press the volume control buttons or the mute button. A port on page 137. B A T T E R Y R E L E ...
...in a low-airflow environment, such as a closed briefcase, while it is installed, you can damage the computer or cause a fire. The computer turns the fan on page 48). Stores software and data. 34 About Your Computer C E L L B A T T E R Y C O ...B memory module and the coin-cell battery. R I N - H A R D D R I R - Restricting the airflow can use the computer without connecting the computer to be controlled by the Dell Travel Remote. To adjust the volume of the integrated speaker, press the volume control buttons or the mute button. A port on page 137. B A T T E R Y R E L E ...

View
Page 38
... connects to your computer with your computer, the cable may not come with a printer cable, so if you purchase a cable separately, ensure that it is turned on. 1 Complete the operating system setup if you purchased your printer and computer. Connecting a USB Printer NOTE: You can connect USB devices while the computer...
... connects to your computer with your computer, the cable may not come with a printer cable, so if you purchase a cable separately, ensure that it is turned on. 1 Complete the operating system setup if you purchased your printer and computer. Connecting a USB Printer NOTE: You can connect USB devices while the computer...

View
Page 39
... (UPS) Surge Protectors Surge protectors and power strips equipped with surge protection help prevent damage to determine the relative effectiveness of damage. 3 Turn on the printer, and then turn on page 130 and the documentation that can occur during electrical storms. Setting Up Your Computer 39 If the Add New Hardware Wizard...
... (UPS) Surge Protectors Surge protectors and power strips equipped with surge protection help prevent damage to determine the relative effectiveness of damage. 3 Turn on the printer, and then turn on page 130 and the documentation that can occur during electrical storms. Setting Up Your Computer 39 If the Add New Hardware Wizard...

View
Page 45
... the computer with an external device attached (such as an external monitor or projector) and turned on, the image may appear on either the computer display or the external device. Using the Display Adjusting Brightness When a Dell™ computer is connected to an external monitor and you change the resolution to one...
... the computer with an external device attached (such as an external monitor or projector) and turned on, the image may appear on either the computer display or the external device. Using the Display Adjusting Brightness When a Dell™ computer is connected to an external monitor and you change the resolution to one...

View
Page 51
... not charge when you connect the computer to your hard drive, and then returns you like. If the battery is longer with the computer turned on how you connect the computer to an electrical outlet or install a battery while the computer is connected to conserve power. NOTICE: If ...is hot from overcharging. The battery's internal circuitry prevents the battery from being used in your computer or being in the Windows Power Options or Dell QuickSet, use the Sleep power state to an electrical outlet, the computer checks the battery charge and temperature. If necessary, the AC adapter ...
... not charge when you connect the computer to your hard drive, and then returns you like. If the battery is longer with the computer turned on how you connect the computer to an electrical outlet or install a battery while the computer is connected to conserve power. NOTICE: If ...is hot from overcharging. The battery's internal circuitry prevents the battery from being used in your computer or being in the Windows Power Options or Dell QuickSet, use the Sleep power state to an electrical outlet, the computer checks the battery charge and temperature. If necessary, the AC adapter ...

View
Page 52
...blue and amber. Do not use batteries from other external cables from the computer to work with your Dell computer. CAUTION: Before performing these procedures, turn off . 3 Turn the computer over. 4 Slide and click the battery release latches to replace the battery with a battery,... see "Power Problems" on page 122. Disconnect the computer from Dell. Replacing the Battery CAUTION: Using an incompatible battery ...
...blue and amber. Do not use batteries from other external cables from the computer to work with your Dell computer. CAUTION: Before performing these procedures, turn off . 3 Turn the computer over. 4 Slide and click the battery release latches to replace the battery with a battery,... see "Power Problems" on page 122. Disconnect the computer from Dell. Replacing the Battery CAUTION: Using an incompatible battery ...

View
Page 62
... button, located on multimedia playback mode for digital media. When your computer is an instant-on the hinge cover, to launch Dell MediaDirect. Using Dell MediaDirect™ Dell MediaDirect is turned off or in Sleep state, you that the current resolution and color depth are using too much memory and preventing media playback, adjust... the drop-down menu under Color quality, click Medium (16 bit). 5 Click OK. Adjusting the Picture If an error message notifies you can press the Dell MediaDirect button to start the computer and automatically launch the...
... button, located on multimedia playback mode for digital media. When your computer is an instant-on the hinge cover, to launch Dell MediaDirect. Using Dell MediaDirect™ Dell MediaDirect is turned off or in Sleep state, you that the current resolution and color depth are using too much memory and preventing media playback, adjust... the drop-down menu under Color quality, click Medium (16 bit). 5 Click OK. Adjusting the Picture If an error message notifies you can press the Dell MediaDirect button to start the computer and automatically launch the...

View
Page 66
S-Video and S/PDIF Digital Audio 1 2 1 S-video TV-out connector 66 Using Multimedia 2 composite video adapter 1 Turn off the computer and the TV and/or audio device that you connected (if applicable), and then turn on the computer. 7 See "Enabling the Display Settings for a TV" on the TV and any audio device that the.... 5 Plug the two RCA connectors on the other end of the audio cable into the audio input connectors on your TV or other audio device. 6 Turn on page 78 to ensure that you want to connect.
S-Video and S/PDIF Digital Audio 1 2 1 S-video TV-out connector 66 Using Multimedia 2 composite video adapter 1 Turn off the computer and the TV and/or audio device that you connected (if applicable), and then turn on the computer. 7 See "Enabling the Display Settings for a TV" on the TV and any audio device that the.... 5 Plug the two RCA connectors on the other end of the audio cable into the audio input connectors on your TV or other audio device. 6 Turn on page 78 to ensure that you want to connect.

View
Page 67
1 2 3 1 composite video adapter 3 S/PDIF digital audio cable 2 S-video cable 1 Turn off the computer and the TV and/or the audio device that you want to connect. 2 Connect the composite video adapter to the S-video TV-...
1 2 3 1 composite video adapter 3 S/PDIF digital audio cable 2 S-video cable 1 Turn off the computer and the TV and/or the audio device that you want to connect. 2 Connect the composite video adapter to the S-video TV-...

View
Page 68
1 2 1 composite video adapter 2 S/PDIF digital audio cable 6 Plug the other end of the S/PDIF digital audio cable into the audio input connector on your TV or audio device. 7 Turn on the TV, turn on any audio device that you connected (if applicable), and then turn on the computer. 8 See "Enabling the Display Settings for a TV" on page 78 to ensure that the computer recognizes and works properly with the TV. Composite Video and Standard Audio 1 2 3 1 audio input connector 3 composite video adapter 2 S-video TV-out connector 68 Using Multimedia
1 2 1 composite video adapter 2 S/PDIF digital audio cable 6 Plug the other end of the S/PDIF digital audio cable into the audio input connector on your TV or audio device. 7 Turn on the TV, turn on any audio device that you connected (if applicable), and then turn on the computer. 8 See "Enabling the Display Settings for a TV" on page 78 to ensure that the computer recognizes and works properly with the TV. Composite Video and Standard Audio 1 2 3 1 audio input connector 3 composite video adapter 2 S-video TV-out connector 68 Using Multimedia

View
Page 69
1 2 3 1 composite video adapter 3 standard audio cable 2 composite video cable 1 Turn off the computer and the TV and/or audio device that you want to connect. 2 Connect the composite video adapter to the S-video TV-out connector on your computer. 3 Plug one end of the composite video cable into the composite videooutput connector on the composite video adapter. 1 2 1 composite video adapter 2 composite video cable 4 Plug the other end of the composite video cable into the composite videoinput connector on the TV. Using Multimedia 69
1 2 3 1 composite video adapter 3 standard audio cable 2 composite video cable 1 Turn off the computer and the TV and/or audio device that you want to connect. 2 Connect the composite video adapter to the S-video TV-out connector on your computer. 3 Plug one end of the composite video cable into the composite videooutput connector on the composite video adapter. 1 2 1 composite video adapter 2 composite video cable 4 Plug the other end of the composite video cable into the composite videoinput connector on the TV. Using Multimedia 69

View
Page 70
Composite Video and S/PDIF Digital Audio 1 2 1 S-video TV-out connector 2 composite video cable 70 Using Multimedia 5 Plug the single-connector end of the audio cable into the headphone connector on the computer. 6 Plug the two RCA connectors on the other end of the audio cable into the audio input connectors on your TV or other audio device. 7 Turn on the TV, turn on any audio device that you connected (if applicable), and then turn on the computer. 8 See "Enabling the Display Settings for a TV" on page 78 to ensure that the computer recognizes and works properly with the TV.
Composite Video and S/PDIF Digital Audio 1 2 1 S-video TV-out connector 2 composite video cable 70 Using Multimedia 5 Plug the single-connector end of the audio cable into the headphone connector on the computer. 6 Plug the two RCA connectors on the other end of the audio cable into the audio input connectors on your TV or other audio device. 7 Turn on the TV, turn on any audio device that you connected (if applicable), and then turn on the computer. 8 See "Enabling the Display Settings for a TV" on page 78 to ensure that the computer recognizes and works properly with the TV.

View
Page 71
Using Multimedia 71 1 2 3 1 composite video adapter 3 standard audio cable 2 composite video cable 1 Turn off the computer and the TV and/or audio device that you want to connect. 2 Connect the composite video adapter to the S-video TV-out ...
Using Multimedia 71 1 2 3 1 composite video adapter 3 standard audio cable 2 composite video cable 1 Turn off the computer and the TV and/or audio device that you want to connect. 2 Connect the composite video adapter to the S-video TV-out ...


