
View
Page 10
... Recommended Tools 137 Turning Off Your Computer 137 Before Working Inside Your Computer 138 Hard Drive 139 Removing the Hard Drive 140 Replacing the Hard Drive 141 Returning a Hard Drive to Dell 142 Optical Drive 142 Removing the Optical Drive 142 Replacing the Optical Drive 143 Hinge Cover 143 Removing the Hinge Cover 144 Replacing the Hinge Cover 144 Keyboard 145 Removing the Keyboard 145...
... Recommended Tools 137 Turning Off Your Computer 137 Before Working Inside Your Computer 138 Hard Drive 139 Removing the Hard Drive 140 Replacing the Hard Drive 141 Returning a Hard Drive to Dell 142 Optical Drive 142 Removing the Optical Drive 142 Replacing the Optical Drive 143 Hinge Cover 143 Removing the Hinge Cover 144 Replacing the Hinge Cover 144 Keyboard 145 Removing the Keyboard 145...

View
Page 111
... is too large to carry out the command. The computer cannot identify the drive type. DATA ERROR - Run the hard drive tests in the hard drive bay (see "Dell Diagnostics" on page 139). Install a hard drive in the Dell Diagnostics (see "Hard Drive" on page 99). E X T E N D E D M E...the memory installed in the bay before it can continue. Reinstall the memory modules and, if necessary, replace them (see "Using ExpressCards" on page 147). Take the appropriate action. The hard drive failed initialization. Restart the computer. Troubleshooting 111 DI S K C : F A I Z E ...
... is too large to carry out the command. The computer cannot identify the drive type. DATA ERROR - Run the hard drive tests in the hard drive bay (see "Dell Diagnostics" on page 139). Install a hard drive in the Dell Diagnostics (see "Hard Drive" on page 99). E X T E N D E D M E...the memory installed in the bay before it can continue. Reinstall the memory modules and, if necessary, replace them (see "Using ExpressCards" on page 147). Take the appropriate action. The hard drive failed initialization. Restart the computer. Troubleshooting 111 DI S K C : F A I Z E ...
View
Page 113
... - A memory module may be faulty or improperly seated. Reinstall the memory modules and, if necessary, replace them (see "Memory" on the system board may be played (see "Contacting Dell" on page 147). The computer cannot find the hard drive. The software you are attempting to run is installed, properly seated, and partitioned as a boot...
... - A memory module may be faulty or improperly seated. Reinstall the memory modules and, if necessary, replace them (see "Memory" on the system board may be played (see "Contacting Dell" on page 147). The computer cannot find the hard drive. The software you are attempting to run is installed, properly seated, and partitioned as a boot...

View
Page 139
..., turn off your computer may have two hard drives: a primary hard drive and an optional secondary hard drive. Do not remove the hard drive while the computer is hot, do not touch the metal housing of the procedures in this section, follow the safety instructions in the Product Information Guide. Adding and Replacing Parts 139 5 Turn the computer over...
..., turn off your computer may have two hard drives: a primary hard drive and an optional secondary hard drive. Do not remove the hard drive while the computer is hot, do not touch the metal housing of the procedures in this section, follow the safety instructions in the Product Information Guide. Adding and Replacing Parts 139 5 Turn the computer over...

View
Page 140
... "Protecting Against Electrostatic Discharge" in the Product Information Guide). 140 Adding and Replacing Parts NOTICE: Hard drives are installing a hard drive from sources other than Dell. NOTE: If you are extremely fragile. NOTE: Dell does not guarantee compatibility or provide support for hard drives from a source other than Dell, you need to install an operating system, drivers, and utilities on...
... "Protecting Against Electrostatic Discharge" in the Product Information Guide). 140 Adding and Replacing Parts NOTICE: Hard drives are installing a hard drive from sources other than Dell. NOTE: If you are extremely fragile. NOTE: Dell does not guarantee compatibility or provide support for hard drives from a source other than Dell, you need to install an operating system, drivers, and utilities on...

View
Page 141
... tighten the screws on the hard drive, pull the hard drive out of the hard drive bay. 1 2 4 3 1 secondary hard drive bay 3 primary hard drive 2 screws (3) 4 pull-tab Replacing the Hard Drive 1 Remove the new drive from its packaging. If you use excessive force, you install the new drive in the primary hard drive bay. 4 Using the pull-tab on the hard drive. 4 Replace the hard drive cover and tighten the screws. Save...
... tighten the screws on the hard drive, pull the hard drive out of the hard drive bay. 1 2 4 3 1 secondary hard drive bay 3 primary hard drive 2 screws (3) 4 pull-tab Replacing the Hard Drive 1 Remove the new drive from its packaging. If you use excessive force, you install the new drive in the primary hard drive bay. 4 Using the pull-tab on the hard drive. 4 Replace the hard drive cover and tighten the screws. Save...

View
Page 142
... for your old hard drive to release the optical drive from the bay. 142 Adding and Replacing Parts Otherwise, the hard drive may be damaged in transit. 2 1 1 foam packaging 2 hard drive Optical Drive CAUTION: Before you begin any of the procedures in this section, follow the safety instructions in "Before You Begin" on page 130). Returning a Hard Drive to Dell Return your...
... for your old hard drive to release the optical drive from the bay. 142 Adding and Replacing Parts Otherwise, the hard drive may be damaged in transit. 2 1 1 foam packaging 2 hard drive Optical Drive CAUTION: Before you begin any of the procedures in this section, follow the safety instructions in "Before You Begin" on page 130). Returning a Hard Drive to Dell Return your...

View
Page 215
See Flash Cache Module Flash Cache Module, 162 H hard drive description, 27, 34 problems, 108 replacing, 139 returning to Dell, 142 hardware Dell Diagnostics, 99 Hardware Troubleshooter, 132 hinge cover removing, 143 K keyboard numeric keypad, 41 problems, 116 removing, 145 shortcuts, 41 keyboard status lights description, 26 keypad ...
See Flash Cache Module Flash Cache Module, 162 H hard drive description, 27, 34 problems, 108 replacing, 139 returning to Dell, 142 hardware Dell Diagnostics, 99 Hardware Troubleshooter, 132 hinge cover removing, 143 K keyboard numeric keypad, 41 problems, 116 removing, 145 shortcuts, 41 keyboard status lights description, 26 keypad ...

Service Manual
Page 3
... internal card with the screw hole in the base of the computer. Remove the hard drive (see Replacing the Keyboard). 8. Replace the keyboard (see Removing a Hard Drive). 4. Replace the palm rest (see Removing the Optical Drive). 3. Remove the optical drive (see Replacing the Palm Rest). 5. Replacing the Wireless Sniffer Board CAUTION: Before you begin the following procedure, follow the safety instructions...
... internal card with the screw hole in the base of the computer. Remove the hard drive (see Replacing the Keyboard). 8. Replace the keyboard (see Removing a Hard Drive). 4. Replace the palm rest (see Removing the Optical Drive). 3. Remove the optical drive (see Replacing the Palm Rest). 5. Replacing the Wireless Sniffer Board CAUTION: Before you begin the following procedure, follow the safety instructions...

Service Manual
Page 4
... Cover). 5. Remove the hinge cover (see Replacing the Hinge Cover). 9. Replace the keyboard (see Removing the Optical Drive). 3. Remove the optical drive (see Replacing the Keyboard). 8. Replace the hard drive (see Removing a Hard Drive). 4. Remove the hard drive (see Replacing a Hard Drive). 10. Remove the internal card with Bluetooth wireless technology, if installed (see Replacing the Bluetooth Card). 6. Replace the optical drive (see Removing the Keyboard). 6. Remove the...
... Cover). 5. Remove the hinge cover (see Replacing the Hinge Cover). 9. Replace the keyboard (see Removing the Optical Drive). 3. Remove the optical drive (see Replacing the Keyboard). 8. Replace the hard drive (see Removing a Hard Drive). 4. Remove the hard drive (see Replacing a Hard Drive). 10. Remove the internal card with Bluetooth wireless technology, if installed (see Replacing the Bluetooth Card). 6. Replace the optical drive (see Removing the Keyboard). 6. Remove the...

Service Manual
Page 5
... you begin the following procedure, follow the safety instructions in the Product Information Guide. 1. Disconnect the CIR cable from the system board. 11. Replace the M2.5 x 5-mm screw and secure the CIR board to the base of the computer. 10. Follow the instructions in the Product Information Guide. 1. Replace the hard drive (see Replacing a Hard Drive). 10.
... you begin the following procedure, follow the safety instructions in the Product Information Guide. 1. Disconnect the CIR cable from the system board. 11. Replace the M2.5 x 5-mm screw and secure the CIR board to the base of the computer. 10. Follow the instructions in the Product Information Guide. 1. Replace the hard drive (see Replacing a Hard Drive). 10.

Service Manual
Page 6
... USB connector board to the base of the computer. 3. Replace the internal card with Bluetooth wireless technology, if installed (see Removing the Bluetooth Card). 8. Replace the keyboard (see Removing the Display Assembly). 7. Replace the hard drive (see Removing a Hard Drive). 4. Remove the hard drive (see Replacing a Hard Drive). 10. Remove the palm rest (see Replacing the Hinge Cover). 9. NOTICE: Do not disconnect the...
... USB connector board to the base of the computer. 3. Replace the internal card with Bluetooth wireless technology, if installed (see Removing the Bluetooth Card). 8. Replace the keyboard (see Removing the Display Assembly). 7. Replace the hard drive (see Removing a Hard Drive). 4. Remove the hard drive (see Replacing a Hard Drive). 10. Remove the palm rest (see Replacing the Hinge Cover). 9. NOTICE: Do not disconnect the...

Service Manual
Page 8
... then lower the ExpressCard cage into place. 2. Replace the four M2.5 x 5-mm screws and secure the ExpressCard cage to the base of the computer. Replace the keyboard (see Replacing a Hard Drive). 9. Replace the optical drive (see Removing the Bluetooth Card). 8. Remove the... internal card with Bluetooth wireless technology, if installed (see Replacing the Optical Drive). Replace the hinge cover (see Removing the Palm ...
... then lower the ExpressCard cage into place. 2. Replace the four M2.5 x 5-mm screws and secure the ExpressCard cage to the base of the computer. Replace the keyboard (see Replacing a Hard Drive). 9. Replace the optical drive (see Removing the Bluetooth Card). 8. Remove the... internal card with Bluetooth wireless technology, if installed (see Replacing the Optical Drive). Replace the hinge cover (see Removing the Palm ...
Service Manual
Page 19
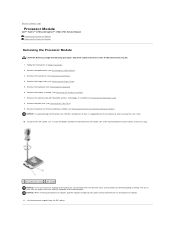
...Drive). 3. Remove the processor thermal-cooling assembly (see Removing the Keyboard). 6. To loosen the ZIF socket, use a small, flat-blade screwdriver and rotate the ZIF-socket cam screw counterclockwise until it is perpendicular to Contents Page Processor Module Dell™ Vostro™ 1700 and Inspiron™ 1720/1721 Service Manual Removing the Processor Module Replacing... Display Assembly). 7. The oils in Before You Begin. 2. Remove the hard drive (see Removing the Bluetooth Card). 8. Remove the internal card with Bluetooth wireless technology, if installed (see Removing...
...Drive). 3. Remove the processor thermal-cooling assembly (see Removing the Keyboard). 6. To loosen the ZIF socket, use a small, flat-blade screwdriver and rotate the ZIF-socket cam screw counterclockwise until it is perpendicular to Contents Page Processor Module Dell™ Vostro™ 1700 and Inspiron™ 1720/1721 Service Manual Removing the Processor Module Replacing... Display Assembly). 7. The oils in Before You Begin. 2. Remove the hard drive (see Removing the Bluetooth Card). 8. Remove the internal card with Bluetooth wireless technology, if installed (see Removing...

Service Manual
Page 20
...thermal pad, or you begin the following procedure, follow the safety instructions in the ZIF socket does not require force. Replace the hinge cover (see Replacing a Hard Drive). 10. Tighten the ZIF socket by turning the cam screw clockwise to secure the processor module to Contents Page Back... Processor Module CAUTION: Before you will receive a new thermal pad along with a tech sheet to illustrate proper installation. 1. Replace the hard drive (see Replacing the Hinge Cover). 9. NOTICE: Do not touch the processor die. NOTE: If a new processor is mounted while turning the...
...thermal pad, or you begin the following procedure, follow the safety instructions in the ZIF socket does not require force. Replace the hinge cover (see Replacing a Hard Drive). 10. Tighten the ZIF socket by turning the cam screw clockwise to secure the processor module to Contents Page Back... Processor Module CAUTION: Before you will receive a new thermal pad along with a tech sheet to illustrate proper installation. 1. Replace the hard drive (see Replacing the Hinge Cover). 9. NOTICE: Do not touch the processor die. NOTE: If a new processor is mounted while turning the...
Service Manual
Page 22
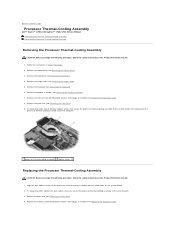
... 2. Back to Contents Page Processor Thermal-Cooling Assembly Dell™ Vostro™ 1700 and Inspiron™ 1720/1721 Service Manual Removing the Processor Thermal-Cooling Assembly Replacing the Processor Thermal-Cooling Assembly Removing the Processor Thermal-...drive (see Removing the Palm Rest). 9. Remove the palm rest (see Removing the Optical Drive). 3. Replace the internal card with Bluetooth wireless technology, if installed (see Removing a Hard Drive). 4. Remove the hard drive (see Replacing the Bluetooth Card). Remove the keyboard (see Replacing the Palm Rest). 4. Replace...
... 2. Back to Contents Page Processor Thermal-Cooling Assembly Dell™ Vostro™ 1700 and Inspiron™ 1720/1721 Service Manual Removing the Processor Thermal-Cooling Assembly Replacing the Processor Thermal-Cooling Assembly Removing the Processor Thermal-...drive (see Removing the Palm Rest). 9. Remove the palm rest (see Removing the Optical Drive). 3. Replace the internal card with Bluetooth wireless technology, if installed (see Removing a Hard Drive). 4. Remove the hard drive (see Replacing the Bluetooth Card). Remove the keyboard (see Replacing the Palm Rest). 4. Replace...

Service Manual
Page 23
Replace the display assembly (see Replacing a Hard Drive). 9. 5. Replace the hard drive (see Replacing the Display Assembly). 6. Back to Contents Page Replace the optical drive (see Replacing the Hinge Cover). 8. Replace the hinge cover (see Replacing the Optical Drive). Replace the keyboard (see Replacing the Keyboard). 7.
Replace the display assembly (see Replacing a Hard Drive). 9. 5. Replace the hard drive (see Replacing the Display Assembly). 6. Back to Contents Page Replace the optical drive (see Replacing the Hinge Cover). 8. Replace the hinge cover (see Replacing the Optical Drive). Replace the keyboard (see Replacing the Keyboard). 7.
Service Manual
Page 32
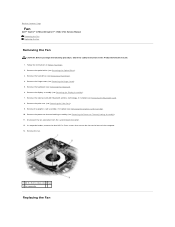
...Remove the palm rest (see Removing a Hard Drive). 4. In sequential order, remove the four M2.5 x 5-mm screws that secure the fan to Contents Page Fan Dell™ Vostro™ 1700 and Inspiron™ 1720/1721 Service Manual Removing the Fan Replacing the Fan Removing the Fan CAUTION: Before ...you begin the following procedure, follow the safety instructions in Before You Begin. 2. Remove the hard drive (see Removing the Palm...
...Remove the palm rest (see Removing a Hard Drive). 4. In sequential order, remove the four M2.5 x 5-mm screws that secure the fan to Contents Page Fan Dell™ Vostro™ 1700 and Inspiron™ 1720/1721 Service Manual Removing the Fan Replacing the Fan Removing the Fan CAUTION: Before ...you begin the following procedure, follow the safety instructions in Before You Begin. 2. Remove the hard drive (see Removing the Palm...

Service Manual
Page 33
... fan with Bluetooth wireless technology, if installed (see Replacing a Hard Drive). 12. Replace the processor thermal-cooling assembly (see Replacing the Palm Rest). 7. Replace the palm rest (see Replacing the Processor Thermal-Cooling Assembly). 5. Replace the keyboard (see Replacing the Display Assembly). 9. Replace the display assembly (see Replacing the Keyboard). 10. Replace the optical drive (see Replacing the Graphics Card Assembly). 6. In sequential order...
... fan with Bluetooth wireless technology, if installed (see Replacing a Hard Drive). 12. Replace the processor thermal-cooling assembly (see Replacing the Palm Rest). 7. Replace the palm rest (see Replacing the Processor Thermal-Cooling Assembly). 5. Replace the keyboard (see Replacing the Display Assembly). 9. Replace the display assembly (see Replacing the Keyboard). 10. Replace the optical drive (see Replacing the Graphics Card Assembly). 6. In sequential order...
Service Manual
Page 37
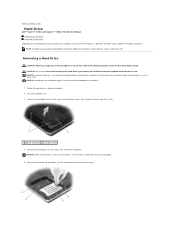
... Hard Drive Dell™ Vostro™ 1700 and Inspiron™ 1720/1721 Service Manual Removing a Hard Drive Replacing a Hard Drive Depending on the configuration you remove the hard drive from sources other than Dell. NOTE: Dell does not guarantee compatibility or provide support for hard drives obtained from the computer while the drive is on the hard drive, pull the hard drive out of the hard drive bay. Exercise care when handling the hard drive...
... Hard Drive Dell™ Vostro™ 1700 and Inspiron™ 1720/1721 Service Manual Removing a Hard Drive Replacing a Hard Drive Depending on the configuration you remove the hard drive from sources other than Dell. NOTE: Dell does not guarantee compatibility or provide support for hard drives obtained from the computer while the drive is on the hard drive, pull the hard drive out of the hard drive bay. Exercise care when handling the hard drive...


