
Dell™ Technology Guide
Page 91
The NVIDIA Delete Array Wizard screen appears. 4 Click Next. NOTICE: If your computer currently boots to RAID and you delete the RAID volume, your computer will not boot. 1 Launch Nvidia MediaShield. 2 Click to select the array you want to keep before continuing. without losing any data. NOTICE: ...Click Convert Array in the System Tasks pane. The NVIDIA Convert Array Wizard screen appears. 5 Click Next. The MediaShield RAID management utility window appears and lists any remaining arrays along with the name and size of the array that all data on several factors, such as the ...
The NVIDIA Delete Array Wizard screen appears. 4 Click Next. NOTICE: If your computer currently boots to RAID and you delete the RAID volume, your computer will not boot. 1 Launch Nvidia MediaShield. 2 Click to select the array you want to keep before continuing. without losing any data. NOTICE: ...Click Convert Array in the System Tasks pane. The NVIDIA Convert Array Wizard screen appears. 5 Click Next. The MediaShield RAID management utility window appears and lists any remaining arrays along with the name and size of the array that all data on several factors, such as the ...
Dell™ Technology Guide
Page 268
...you do not want to continue reformatting the hard drive and restoring the system software to access the Vista Advanced Boot Options window. 2 Select Repair Your Computer. The System Recovery Options window appears. 3 Select a keyboard layout and click Next. 4 To access the recovery options, log on the... to factory condition. 8 Click Finish to the operating state it was in the User name field, then click OK. 5 Click Dell Factory Image Restore. NOTE: Depending upon your configuration, you received your hard drive to reboot the system. 268 Restoring Your Operating System...
...you do not want to continue reformatting the hard drive and restoring the system software to access the Vista Advanced Boot Options window. 2 Select Repair Your Computer. The System Recovery Options window appears. 3 Select a keyboard layout and click Next. 4 To access the recovery options, log on the... to factory condition. 8 Click Finish to the operating state it was in the User name field, then click OK. 5 Click Dell Factory Image Restore. NOTE: Depending upon your configuration, you received your hard drive to reboot the system. 268 Restoring Your Operating System...
Dell™ Technology Guide
Page 270
... system setup program. 5 When the boot device list appears, highlight CD/DVD/CD-RW Drive and press . 6 Press any key to Boot from CD-ROM. 7 Follow the instructions on the screen to wait until you see the Microsoft® Windows® desktop; When the DELL logo appears, press immediately. NOTE: ...The next steps change the boot sequence for one time only. 3 Click Exit if ...
... system setup program. 5 When the boot device list appears, highlight CD/DVD/CD-RW Drive and press . 6 Press any key to Boot from CD-ROM. 7 Follow the instructions on the screen to wait until you see the Microsoft® Windows® desktop; When the DELL logo appears, press immediately. NOTE: ...The next steps change the boot sequence for one time only. 3 Click Exit if ...
Dell™ Technology Guide
Page 272
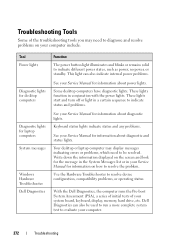
...Troubleshooting Some desktop computers have diagnostic lights. These lights function in your Service Manual for laptop computers System messages Windows Hardware Troubleshooter Dell Diagnostics Function The power button light illuminates and blinks or remains solid to diagnose and resolve problems on your...information about diagnostic lights. Write down the information displayed on how to resolve the problem. With the Dell Diagnostics, the computer runs the Pre-boot System Assessment (PSA), a series of initial tests of the troubleshooting tools you may display messages indicating ...
...Troubleshooting Some desktop computers have diagnostic lights. These lights function in your Service Manual for laptop computers System messages Windows Hardware Troubleshooter Dell Diagnostics Function The power button light illuminates and blinks or remains solid to diagnose and resolve problems on your...information about diagnostic lights. Write down the information displayed on how to resolve the problem. With the Dell Diagnostics, the computer runs the Pre-boot System Assessment (PSA), a series of initial tests of the troubleshooting tools you may display messages indicating ...
Dell™ Technology Guide
Page 282
... and press . 282 Troubleshooting then, shut down your computer cannot display a screen image, see the Microsoft® Windows® desktop; The computer runs the Pre-boot System Assessment (PSA), a series of initial tests of your system board, keyboard, display, memory, hard drive,... no diagnostics utility partition has been found, run . 6 Continue with "Using the Dell Diagnostics Main Menu" on . If the Pre-boot System Assessment completes successfully, the following message appears: "Booting Dell Diagnostic Utility Partition. Press any key to continue." 4 Press any questions that is ...
... and press . 282 Troubleshooting then, shut down your computer cannot display a screen image, see the Microsoft® Windows® desktop; The computer runs the Pre-boot System Assessment (PSA), a series of initial tests of your system board, keyboard, display, memory, hard drive,... no diagnostics utility partition has been found, run . 6 Continue with "Using the Dell Diagnostics Main Menu" on . If the Pre-boot System Assessment completes successfully, the following message appears: "Booting Dell Diagnostic Utility Partition. Press any key to continue." 4 Press any questions that is ...
Dell™ Technology Guide
Page 283
... down and restart the computer. When the DELL logo appears, press immediately. NOTE: If you wait too long and the operating system logo appears, continue to wait until you see the Microsoft Windows desktop; NOTE: The next steps change the boot sequence for your computer and try again. If... multiple versions are listed, select the version appropriate for one time only. then, shut down your hard drive. 5 When the Dell Diagnostics Main Menu appears, select...
... down and restart the computer. When the DELL logo appears, press immediately. NOTE: If you wait too long and the operating system logo appears, continue to wait until you see the Microsoft Windows desktop; NOTE: The next steps change the boot sequence for your computer and try again. If... multiple versions are listed, select the version appropriate for one time only. then, shut down your hard drive. 5 When the Dell Diagnostics Main Menu appears, select...
Dell™ Technology Guide
Page 308
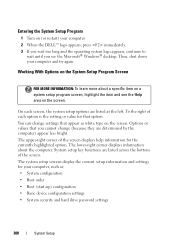
... item on a system setup program screen, highlight the item and see the Microsoft® Windows® desktop. The system setup screens display the current setup information and settings for your.... Entering the System Setup Program 1 Turn on (or restart) your computer. 2 When the DELL™ logo appears, press immediately. 3 If you wait too long and the operating system logo...wait until you cannot change settings that appear as : • System configuration • Boot order • Boot (start-up) configuration • Basic device configuration settings • System security and hard...
... item on a system setup program screen, highlight the item and see the Microsoft® Windows® desktop. The system setup screens display the current setup information and settings for your.... Entering the System Setup Program 1 Turn on (or restart) your computer. 2 When the DELL™ logo appears, press immediately. 3 If you wait too long and the operating system logo...wait until you cannot change settings that appear as : • System configuration • Boot order • Boot (start-up) configuration • Basic device configuration settings • System security and hard...
Dell™ Technology Guide
Page 310
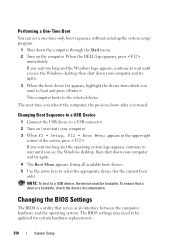
... press . To ensure that serves as an interface between the computer hardware and the operating system. When the DELL logo appears, press immediately. Changing Boot Sequence to a USB Device 1 Connect the USB device to a USB connector. 2 Turn on the computer. If you wait too long and the ...operating system logo appears, continue to wait until you see the Windows desktop, then shut down your computer and try again. 3 When the boot device list appears, highlight the device from which you want to the selected device.
... press . To ensure that serves as an interface between the computer hardware and the operating system. When the DELL logo appears, press immediately. Changing Boot Sequence to a USB Device 1 Connect the USB device to a USB connector. 2 Turn on the computer. If you wait too long and the ...operating system logo appears, continue to wait until you see the Windows desktop, then shut down your computer and try again. 3 When the boot device list appears, highlight the device from which you want to the selected device.

Setup Guide
Page 52
...: If you want to run the Dell Diagnostics from the boot menu and press . b. Turn on your hard drive. then, shut down your computer cannot display a screen image, contact Dell (see the Microsoft® Windows® desktop; Using Support Tools Starting Dell Diagnostics From Your Hard Drive The Dell Diagnostics is known to be working properly...
...: If you want to run the Dell Diagnostics from the boot menu and press . b. Turn on your hard drive. then, shut down your computer cannot display a screen image, contact Dell (see the Microsoft® Windows® desktop; Using Support Tools Starting Dell Diagnostics From Your Hard Drive The Dell Diagnostics is known to be working properly...

Setup Guide
Page 53
... press . Shut down the error code and problem description and contact Dell (see the Microsoft® Windows® desktop; If you see "Contacting Dell" on your hard drive and to go to the Choose An Option window. 4. When the tests complete, close the test screen to return to... the Choose An Option window. Using Support Tools c. If PSA is displayed: "Booting Dell Diagnostic Utility...
... press . Shut down the error code and problem description and contact Dell (see the Microsoft® Windows® desktop; If you see "Contacting Dell" on your hard drive and to go to the Choose An Option window. 4. When the tests complete, close the test screen to return to... the Choose An Option window. Using Support Tools c. If PSA is displayed: "Booting Dell Diagnostic Utility...

Setup Guide
Page 54
... to restart the computer, click Exit. 11. The Service Tag helps you want to the Choose An Option window. 10. When the boot device list appears, highlight CD/DVD/CD-RW and press . 4. If multiple versions are listed, select the version appropriate for your computer when you ... screen to return to run. 8. Using Support Tools NOTE: The next steps change the boot sequence for your screen. Select Run the 32 Bit Dell Diagnostics from the menu that appears and press . 5. If you contact Dell. 9. Remove the Drivers and Utilities disc. 52 Write down the error code and problem...
... to restart the computer, click Exit. 11. The Service Tag helps you want to the Choose An Option window. 10. When the boot device list appears, highlight CD/DVD/CD-RW and press . 4. If multiple versions are listed, select the version appropriate for your computer when you ... screen to return to run. 8. Using Support Tools NOTE: The next steps change the boot sequence for your screen. Select Run the 32 Bit Dell Diagnostics from the menu that appears and press . 5. If you contact Dell. 9. Remove the Drivers and Utilities disc. 52 Write down the error code and problem...

Setup Guide
Page 58
... schedule automatic backup of the data to be restored. Turn off your computer and try again. 5. Select Repair Your Computer. 6. Double-click the Dell DataSafe Local icon on the screen. Remove any recently added internal hardware and disconnect devices such as a USB drive, printer, and so on your.... Turn on . To restore data: 1. NOTE: If you wait too long and the operating system logo appears, continue to access the Advanced Boot Options window. then, shut down your computer. 2. NOTE: The restoration process might take an hour or more information, see the Microsoft®...
... schedule automatic backup of the data to be restored. Turn off your computer and try again. 5. Select Repair Your Computer. 6. Double-click the Dell DataSafe Local icon on the screen. Remove any recently added internal hardware and disconnect devices such as a USB drive, printer, and so on your.... Turn on . To restore data: 1. NOTE: If you wait too long and the operating system logo appears, continue to access the Advanced Boot Options window. then, shut down your computer. 2. NOTE: The restoration process might take an hour or more information, see the Microsoft®...

Setup Guide
Page 59
...the hard drive. Select Repair Your Computer. 3. The System Recovery Options window appears. 57 Use Dell Factory Image Restore only if System Restore did not resolve your computer and try again. 2. NOTE: Dell Factory Image Restore may not be available in when you purchased the computer.... and removes any programs or drivers installed after you received your operating system. Turn on . Use Dell Factory Image Restore only as the last method to access the Advanced Boot Options window. Data files include documents, spreadsheets, e-mail messages, digital photos, music files, and so on ...
...the hard drive. Select Repair Your Computer. 3. The System Recovery Options window appears. 57 Use Dell Factory Image Restore only if System Restore did not resolve your computer and try again. 2. NOTE: Dell Factory Image Restore may not be available in when you purchased the computer.... and removes any programs or drivers installed after you received your operating system. Turn on . Use Dell Factory Image Restore only as the last method to access the Advanced Boot Options window. Data files include documents, spreadsheets, e-mail messages, digital photos, music files, and so on ...

Setup Guide
Page 63
Restoring Your Operating System 61 When the DELL logo appears, press immediately. NOTE: The next steps change the boot sequence for one time only. Press any key to the devices specified in the system setup program. 6. On the next start-up, the computer boots according to Boot from CD-ROM. NOTE: If you ...wait too long and the operating system logo appears, continue to complete the installation. When the boot device list appears, highlight CD/DVD/CD-RW Drive and press . 7. 5. then, shut down your computer and try again. Follow the instructions on the...
Restoring Your Operating System 61 When the DELL logo appears, press immediately. NOTE: The next steps change the boot sequence for one time only. Press any key to the devices specified in the system setup program. 6. On the next start-up, the computer boots according to Boot from CD-ROM. NOTE: If you ...wait too long and the operating system logo appears, continue to complete the installation. When the boot device list appears, highlight CD/DVD/CD-RW Drive and press . 7. 5. then, shut down your computer and try again. Follow the instructions on the...


