Setup Guide
Page 56
upgrade your computer. 54 the Service Manual on the Dell Support website at support.dell.com. Check your warranty and return policies before working inside your computer with new or additional memory, or a new hard drive. NOTE: In some countries, opening and replacing parts of your ...and Utilities media. learn more about your operating system. the Dell Technology Guide installed on your hard drive or on the Dell Support website at support.dell.com. reinstall or replace a worn or defective part. INSPIRON Finding More Information and Resources If you need to: reinstall...
upgrade your computer. 54 the Service Manual on the Dell Support website at support.dell.com. Check your warranty and return policies before working inside your computer with new or additional memory, or a new hard drive. NOTE: In some countries, opening and replacing parts of your ...and Utilities media. learn more about your operating system. the Dell Technology Guide installed on your hard drive or on the Dell Support website at support.dell.com. reinstall or replace a worn or defective part. INSPIRON Finding More Information and Resources If you need to: reinstall...
Setup Guide
Page 59
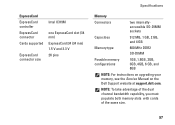
... (34 mm) 1.5 V and 3.3 V 26 pins Specifications Memory Connectors two internallyaccessible SO-DIMM sockets Capacities 512 MB, 1 GB, 2 GB, and 4 GB Memory type 800 MHz DDR2 SO-DIMM Possible memory configurations 1GB, 1.5GB, 2GB, 3GB, 4GB, 6 GB, and 8GB NOTE: For instructions on upgrading your memory, see the Service Manual on the Dell Support website at support...
... (34 mm) 1.5 V and 3.3 V 26 pins Specifications Memory Connectors two internallyaccessible SO-DIMM sockets Capacities 512 MB, 1 GB, 2 GB, and 4 GB Memory type 800 MHz DDR2 SO-DIMM Possible memory configurations 1GB, 1.5GB, 2GB, 3GB, 4GB, 6 GB, and 8GB NOTE: For instructions on upgrading your memory, see the Service Manual on the Dell Support website at support...

Service Manual
Page 48
...Replace the center control cover (see Replacing the Hard Drive). 15. Reinstall the ExpressCards in damage to the computer. 17. Insert the BIOS upgrade CD that secure the system board to do so may result in the ExpressCard slot, if any. 16. Back to the respective system board ... all screws and ensure that no stray screws remain inside the computer. If required, remove any installed memory modules (see Removing the Mini-Card). Replace any installed Mini-Card (see Replacing the Memory Module(s)). 10. Replace the optical drive (see Replacing the Mini-Card). 2. Turn on the computer...
...Replace the center control cover (see Replacing the Hard Drive). 15. Reinstall the ExpressCards in damage to the computer. 17. Insert the BIOS upgrade CD that secure the system board to do so may result in the ExpressCard slot, if any. 16. Back to the respective system board ... all screws and ensure that no stray screws remain inside the computer. If required, remove any installed memory modules (see Removing the Mini-Card). Replace any installed Mini-Card (see Replacing the Memory Module(s)). 10. Replace the optical drive (see Replacing the Mini-Card). 2. Turn on the computer...


