Dell™ Technology Guide
Page 44
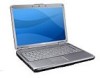
... printers and other devices • Perform maintenance to enhance performance HINT: A list of the items you can: • Add and monitor hardware • Add or remove programs • Change hardware settings • Set network and Internet preferences • Customize the appearance of your computer. Hold your cursor over each item to... • Set up text box that explains its function. 44 Microsoft Windows Desktop Through the Control Panel, you can customize appears in the Control Panel screen.
... printers and other devices • Perform maintenance to enhance performance HINT: A list of the items you can: • Add and monitor hardware • Add or remove programs • Change hardware settings • Set network and Internet preferences • Customize the appearance of your computer. Hold your cursor over each item to... • Set up text box that explains its function. 44 Microsoft Windows Desktop Through the Control Panel, you can customize appears in the Control Panel screen.
Dell™ Technology Guide
Page 59
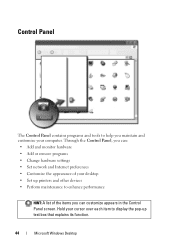
... with a cloth moistened with a mild cleaning solution. 2 Turn the retainer ring on the underside of your mouse counterclockwise, and then remove the ball. 3 Wipe the ball with each notch on your screen cursor (mouse pointer) skips or moves abnormally, clean the mouse. Windows® XP 1 Click Start → Control Panel→ Printers...→ Mouse. 2 On the Wheel tab in the Mouse Properties window, set the options for how the scroll wheel on the wheel, or click One screen at a time. 3 Click OK. Cleaning a Non-Optical Mouse If your mouse operates. 3 Click OK.
... with a cloth moistened with a mild cleaning solution. 2 Turn the retainer ring on the underside of your mouse counterclockwise, and then remove the ball. 3 Wipe the ball with each notch on your screen cursor (mouse pointer) skips or moves abnormally, clean the mouse. Windows® XP 1 Click Start → Control Panel→ Printers...→ Mouse. 2 On the Wheel tab in the Mouse Properties window, set the options for how the scroll wheel on the wheel, or click One screen at a time. 3 Click OK. Cleaning a Non-Optical Mouse If your mouse operates. 3 Click OK.
Dell™ Technology Guide
Page 63
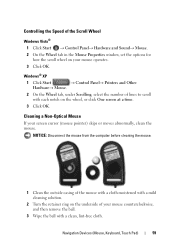
Do not allow water from their electrical outlets. 3 Remove any attached devices from the computer and from the cloth to seep between the touch pad and the surrounding palm rest. Cleaning the Touch Pad 1 ... across the surface of your computer. 2 Disconnect any installed batteries. 4 Moisten a soft, lint-free cloth with items on the screen check box. 3 Click OK. To change the zoom settings, double-click the Dell Touch Pad icon in and out by spreading two fingers or by bringing the two fingers together). Windows®...
Do not allow water from their electrical outlets. 3 Remove any attached devices from the computer and from the cloth to seep between the touch pad and the surrounding palm rest. Cleaning the Touch Pad 1 ... across the surface of your computer. 2 Disconnect any installed batteries. 4 Moisten a soft, lint-free cloth with items on the screen check box. 3 Click OK. To change the zoom settings, double-click the Dell Touch Pad icon in and out by spreading two fingers or by bringing the two fingers together). Windows®...
Dell™ Technology Guide
Page 75
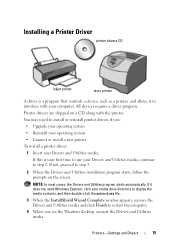
...your media drive directory to display the media contents, and then double-click the autorcd.exe file. 3 When the InstallShield Wizard Complete window appears, remove the Drivers and Utilities media and click Finish to restart the computer. 4 When you : • Upgrade your operating system • Reinstall ...your first time to use your Drivers and Utilities media, continue to step 2. Printers-Settings and Drivers 75 Printer drivers are shipped on the screen. You may need to step 5. 2 When the Drivers and Utilities installation program starts, follow the prompts on a CD along with your...
...your media drive directory to display the media contents, and then double-click the autorcd.exe file. 3 When the InstallShield Wizard Complete window appears, remove the Drivers and Utilities media and click Finish to restart the computer. 4 When you : • Upgrade your operating system • Reinstall ...your first time to use your Drivers and Utilities media, continue to step 2. Printers-Settings and Drivers 75 Printer drivers are shipped on the screen. You may need to step 5. 2 When the Drivers and Utilities installation program starts, follow the prompts on a CD along with your...
Dell™ Technology Guide
Page 80
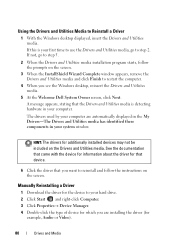
Manually Reinstalling a Driver 1 Download the driver for the device to reinstall and follow the prompts on the screen. 3 When the InstallShield Wizard Complete window appears, remove the Drivers and Utilities media and click Finish to restart the computer. 4 When you want to your computer. HINT... driver (for additionally installed devices may not be included on the screen. A message appears, stating that you see the Windows desktop, reinsert the Drivers and Utilities media. 5 At the Welcome Dell System Owner screen, click Next. See the documentation that came with the device for...
Manually Reinstalling a Driver 1 Download the driver for the device to reinstall and follow the prompts on the screen. 3 When the InstallShield Wizard Complete window appears, remove the Drivers and Utilities media and click Finish to restart the computer. 4 When you want to your computer. HINT... driver (for additionally installed devices may not be included on the screen. A message appears, stating that you see the Windows desktop, reinsert the Drivers and Utilities media. 5 At the Welcome Dell System Owner screen, click Next. See the documentation that came with the device for...
Dell™ Technology Guide
Page 97
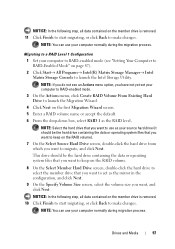
...→ All Programs→ Intel(R) Matrix Storage Manager→ Intel Matrix Storage Console to launch the Migration Wizard. 4 Click Next on the first Migration Wizard screen. 5 Enter a RAID volume name or accept the default. 6 From the drop-down box, select RAID 1 as your source hard drive (it should be... and click Next. NOTE: You can use as the RAID level. NOTICE: In the following step, all data contained on the member drive is removed. 11 Click Finish to start migrating, or click Back to make changes. Drives and Media 97 NOTICE: In the following step, all data contained on...
...→ All Programs→ Intel(R) Matrix Storage Manager→ Intel Matrix Storage Console to launch the Migration Wizard. 4 Click Next on the first Migration Wizard screen. 5 Enter a RAID volume name or accept the default. 6 From the drop-down box, select RAID 1 as your source hard drive (it should be... and click Next. NOTE: You can use as the RAID level. NOTICE: In the following step, all data contained on the member drive is removed. 11 Click Finish to start migrating, or click Back to make changes. Drives and Media 97 NOTICE: In the following step, all data contained on...
Dell™ Technology Guide
Page 105
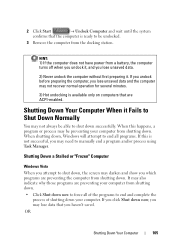
... from shutting down. • Click Shut down now to force all programs. If this happens, a program or process may be able to shut down, the screen may darken and show you lose unsaved data and the computer may lose data that you lose unsaved data. 2) Never undock the computer without first...; Undock Computer and wait until the system confirms that the computer is ready to end and complete the process of the programs to be undocked. 3 Remove the computer from a battery, the computer turns off when you undock it . Shutting Down Your Computer When it Fails to Shut Down Normally You may...
... from shutting down. • Click Shut down now to force all programs. If this happens, a program or process may be able to shut down, the screen may darken and show you lose unsaved data and the computer may lose data that you lose unsaved data. 2) Never undock the computer without first...; Undock Computer and wait until the system confirms that the computer is ready to end and complete the process of the programs to be undocked. 3 Remove the computer from a battery, the computer turns off when you undock it . Shutting Down Your Computer When it Fails to Shut Down Normally You may...
Dell™ Technology Guide
Page 107
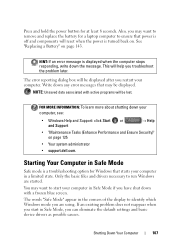
...Performance and Ensure Security)" on page 125 • Your system administrator • support.dell.com. If an existing problem does not reappear when you start your computer in Safe Mode, you may want to remove and replace the battery for a laptop computer to ensure that may want to start...in Safe Mode Safe mode is turned back on page 143. See "Replacing a Battery" on . NOTE: Unsaved data associated with a frozen blue screen. You may be lost. The words "Safe Mode" appear in Safe Mode if you troubleshoot the problem later. Press and hold the power button ...
...Performance and Ensure Security)" on page 125 • Your system administrator • support.dell.com. If an existing problem does not reappear when you start your computer in Safe Mode, you may want to remove and replace the battery for a laptop computer to ensure that may want to start...in Safe Mode Safe mode is turned back on page 143. See "Replacing a Battery" on . NOTE: Unsaved data associated with a frozen blue screen. You may be lost. The words "Safe Mode" appear in Safe Mode if you troubleshoot the problem later. Press and hold the power button ...
Dell™ Technology Guide
Page 122
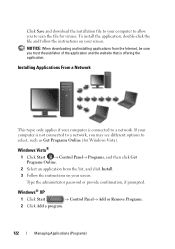
... Programs Online (for viruses. NOTICE: When downloading and installing applications from the list, and click Install. 3 Follow the instructions on your screen. If your computer is offering the application. Windows Vista® 1 Click Start → Control Panel→ Programs, and then click ...Windows® XP 1 Click Start → Control Panel→ Add or Remove Programs. 2 Click Add a program. 122 Managing Applications (Programs) Click Save and download the installation file to your screen. To install the application, double-click the file and follow the instructions on...
... Programs Online (for viruses. NOTICE: When downloading and installing applications from the list, and click Install. 3 Follow the instructions on your screen. If your computer is offering the application. Windows Vista® 1 Click Start → Control Panel→ Programs, and then click ...Windows® XP 1 Click Start → Control Panel→ Add or Remove Programs. 2 Click Add a program. 122 Managing Applications (Programs) Click Save and download the installation file to your screen. To install the application, double-click the file and follow the instructions on...

Dell™ Technology Guide
Page 123
...Type the administrator password or provide confirmation, if prompted. Managing Applications (Programs) 123 3 If your screen. Windows XP 1 Click Start → Control Panel→ Add or Remove Programs. 2 Click Remove a program, and select the application you want to add. 4 Select an application from the ...programs into categories, you may need to select a different option in Category to see the program you want to remove. 3 Click Remove. Removing Applications From Your Computer Windows Vista 1 Click Start → Control Panel→ Programs→ Programs and Features. 2...
...Type the administrator password or provide confirmation, if prompted. Managing Applications (Programs) 123 3 If your screen. Windows XP 1 Click Start → Control Panel→ Add or Remove Programs. 2 Click Remove a program, and select the application you want to add. 4 Select an application from the ...programs into categories, you may need to select a different option in Category to see the program you want to remove. 3 Click Remove. Removing Applications From Your Computer Windows Vista 1 Click Start → Control Panel→ Programs→ Programs and Features. 2...

Dell™ Technology Guide
Page 124
... also end (or close) the application by using the Add or Remove Programs utility, you may accidentally delete drivers needed by using Task Manager: 1 Right-click the taskbar and select Task Manager. 2 On the Applications tab of the Windows Task Manager screen, click the application that is not responding, and then click... button If an application stops responding, Windows tries to find the problem and fix it from your computer. HINT: Simply deleting a program does not completely remove it automatically.
... also end (or close) the application by using the Add or Remove Programs utility, you may accidentally delete drivers needed by using Task Manager: 1 Right-click the taskbar and select Task Manager. 2 On the Applications tab of the Windows Task Manager screen, click the application that is not responding, and then click... button If an application stops responding, Windows tries to find the problem and fix it from your computer. HINT: Simply deleting a program does not completely remove it automatically.
Dell™ Technology Guide
Page 271
...(s). 4 If an error message occurs in this document were written for the Windows default view, and may not apply if you added or removed a part before the problem started, review the installation procedures and ensure that the part is correctly installed. 2 If a peripheral device does ...not work, ensure that the device is properly connected. 3 If an error message appears on the screen, write down the exact message. NOTE: The procedures in a program, see the program's documentation. Troubleshooting HINT: Save time by following these basic...
...(s). 4 If an error message occurs in this document were written for the Windows default view, and may not apply if you added or removed a part before the problem started, review the installation procedures and ensure that the part is correctly installed. 2 If a peripheral device does ...not work, ensure that the device is properly connected. 3 If an error message appears on the screen, write down the exact message. NOTE: The procedures in a program, see the program's documentation. Troubleshooting HINT: Save time by following these basic...
Dell™ Technology Guide
Page 285
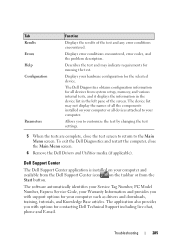
... to customize the test by changing the test settings. 5 When the tests are complete, close the Main Menu screen. 6 Remove the Dell Drivers and Utilities media (if applicable). The device list may indicate requirements for contacting Dell Technical Support including live chat, phone and E-mail. The software automatically identifies your Service Tag Number, PC...
... to customize the test by changing the test settings. 5 When the tests are complete, close the Main Menu screen. 6 Remove the Dell Drivers and Utilities media (if applicable). The device list may indicate requirements for contacting Dell Technical Support including live chat, phone and E-mail. The software automatically identifies your Service Tag Number, PC...
Dell™ Technology Guide
Page 289
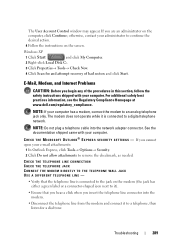
...or a connector-shaped icon next to it). • Ensure that the telephone line is connected to remove the checkmark, as needed. Troubleshooting 289 If you insert the telephone line connector into the network adapter ... User Account Control window may appear. E-Mail, Modem, and Internet Problems CAUTION: Before you are an administrator on the screen. For additional safety best practices information, see the Regulatory Compliance Homepage at www.dell.com/regulatory_compliance. C H E C K T H E M I C R O S O F T O U T L O O K ® E X P R E S S S E C U R I T Y S E T T I N G S - ...
...or a connector-shaped icon next to it). • Ensure that the telephone line is connected to remove the checkmark, as needed. Troubleshooting 289 If you insert the telephone line connector into the network adapter ... User Account Control window may appear. E-Mail, Modem, and Internet Problems CAUTION: Before you are an administrator on the screen. For additional safety best practices information, see the Regulatory Compliance Homepage at www.dell.com/regulatory_compliance. C H E C K T H E M I C R O S O F T O U T L O O K ® E X P R E S S S E C U R I T Y S E T T I N G S - ...

Dell™ Technology Guide
Page 290
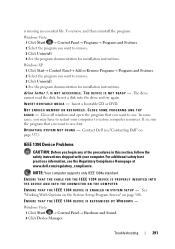
.... If the error message is not available on the screen to identify and resolve modem problems. Modem Helper is not listed, see the Regulatory Compliance Homepage at www.dell.com/regulatory_compliance. E N S U R E T H A T Y O U A R E C O N N E C T E D T O T H E I N T E R N E T - If Work Offline has a checkmark next to it, click the checkmark to remove it and connect to open , click File. If you...
.... If the error message is not available on the screen to identify and resolve modem problems. Modem Helper is not listed, see the Regulatory Compliance Homepage at www.dell.com/regulatory_compliance. E N S U R E T H A T Y O U A R E C O N N E C T E D T O T H E I N T E R N E T - If Work Offline has a checkmark next to it, click the checkmark to remove it and connect to open , click File. If you...
Dell™ Technology Guide
Page 291
... you want to use first. For additional safety best practices information, see "Contacting Dell" on page 308. IEEE 1394 Device Problems CAUTION: Before you may have to restart your computer. See "Working With Options on the System Setup Program Screen" on page 337). is missing an essential file. I N S E R T B O O T A B L ...COMPUTER E N S U R E T H A T T H E I E E E 1 3 9 4 D E V I C E I S E N A B L E D I N - To remove and then reinstall the program: Windows Vista 1 Click Start → Control Panel→ Programs→ Programs and Features. 2 Select the program you want to...
... you want to use first. For additional safety best practices information, see "Contacting Dell" on page 308. IEEE 1394 Device Problems CAUTION: Before you may have to restart your computer. See "Working With Options on the System Setup Program Screen" on page 337). is missing an essential file. I N S E R T B O O T A B L ...COMPUTER E N S U R E T H A T T H E I E E E 1 3 9 4 D E V I C E I S E N A B L E D I N - To remove and then reinstall the program: Windows Vista 1 Click Start → Control Panel→ Programs→ Programs and Features. 2 Select the program you want to...
Dell™ Technology Guide
Page 302
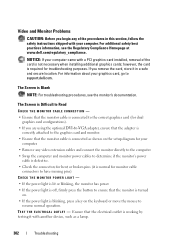
...- • Ensure that the monitor is turned on. • If the power light is connected as a lamp. 302 Troubleshooting The Screen is normal for bent or broken pins (it in this section, follow the safety instructions shipped with another device, such as shown on ...to the correct graphics card (for dual graphics card configurations). • If you remove the card, store it is Blank NOTE: For troubleshooting procedures, see the Regulatory Compliance Homepage at www.dell.com/regulatory_compliance. however, the card is not necessary when installing additional graphics cards; For...
...- • Ensure that the monitor is turned on. • If the power light is connected as a lamp. 302 Troubleshooting The Screen is normal for bent or broken pins (it in this section, follow the safety instructions shipped with another device, such as shown on ...to the correct graphics card (for dual graphics card configurations). • If you remove the card, store it is Blank NOTE: For troubleshooting procedures, see the Regulatory Compliance Homepage at www.dell.com/regulatory_compliance. however, the card is not necessary when installing additional graphics cards; For...
Dell™ Technology Guide
Page 348
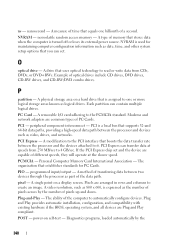
... are arranged in rows and columns to the PCMCIA standard. PCI Express - PCMCIA - PIO - programmed input/output - pixel - Plug-and-Play - power-on a display screen. NVRAM - A removable I/O card adhering to create an image. PCI is turned off or loses its external power source. Pixels are capable of optical drives include CD drives...
... are arranged in rows and columns to the PCMCIA standard. PCI Express - PCMCIA - PIO - programmed input/output - pixel - Plug-and-Play - power-on a display screen. NVRAM - A removable I/O card adhering to create an image. PCI is turned off or loses its external power source. Pixels are capable of optical drives include CD drives...


