Inspiron 14 3000 Setup and Specifications
Page 7
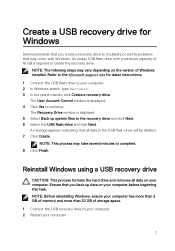
...: This process may occur with a minimum capacity of Windows installed. Reinstall Windows using a USB recovery drive CAUTION: This process formats the hard drive and removes all data in the USB flash drive will be deleted. 7 Click Create. The User Account Control window is displayed. 5 Select Back up...that all data on your computer. Refer to the Microsoft support site for Windows Dell recommends that you back up system files to the recovery drive and click Next. 6 Select the USB flash drive and click Next. NOTE: Before reinstalling Windows, ensure your computer has more than...
...: This process may occur with a minimum capacity of Windows installed. Reinstall Windows using a USB recovery drive CAUTION: This process formats the hard drive and removes all data in the USB flash drive will be deleted. 7 Click Create. The User Account Control window is displayed. 5 Select Back up...that all data on your computer. Refer to the Microsoft support site for Windows Dell recommends that you back up system files to the recovery drive and click Next. 6 Select the USB flash drive and click Next. NOTE: Before reinstalling Windows, ensure your computer has more than...

Inspiron 14 3000 Setup and Specifications
Page 9
... - Computer is running on when the computer reads from or writes to toggle between the power and battery-status light, and hard-drive activity light. Hard-drive activity light Turns on battery and the battery has more than 5% charge. Off - Power and battery-status light Indicates the power... and battery-charge status. NOTE: Press Fn+H to the hard drive. Computer is in sleep state, hibernation, or turned off. 3 Right speaker Provides audio output. 9 Computer is running on battery and the...
... - Computer is running on when the computer reads from or writes to toggle between the power and battery-status light, and hard-drive activity light. Hard-drive activity light Turns on battery and the battery has more than 5% charge. Off - Power and battery-status light Indicates the power... and battery-charge status. NOTE: Press Fn+H to the hard drive. Computer is in sleep state, hibernation, or turned off. 3 Right speaker Provides audio output. 9 Computer is running on battery and the...

Inspiron 14 3000 Setup and Specifications
Page 16
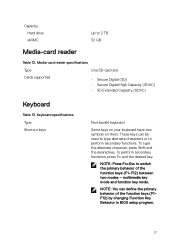
...Hard drive or eMMC card Optical-drive (optional) One M.2 slot for Wi-Fi/Bluetooth Integrated • Intel UHD Graphics 600 • Intel UHD Graphics 605 Shared system memory Realtek ALC3204 with Waves MaxxAudio Pro Two • Average: 2 W • Peak: 2.5 W Single digital microphone in the camera assembly SATA Gen3 One 2.5-inch drive... (SATA) or eMMC card One 9.5 mm DVD+/-RW drive 16 Video specifications Controller Memory Audio Table 10. Internal ports and connectors Internal M.2 card Video ...
...Hard drive or eMMC card Optical-drive (optional) One M.2 slot for Wi-Fi/Bluetooth Integrated • Intel UHD Graphics 600 • Intel UHD Graphics 605 Shared system memory Realtek ALC3204 with Waves MaxxAudio Pro Two • Average: 2 W • Peak: 2.5 W Single digital microphone in the camera assembly SATA Gen3 One 2.5-inch drive... (SATA) or eMMC card One 9.5 mm DVD+/-RW drive 16 Video specifications Controller Memory Audio Table 10. Internal ports and connectors Internal M.2 card Video ...
Inspiron 14 3000 Setup and Specifications
Page 17
... Non-backlit keyboard Some keys on your keyboard have two symbols on them. F12) by changing Function Key Behavior in BIOS setup program. 17 Capacity Hard drive eMMC Up to perform secondary functions. multimedia key mode and function key mode. These keys can define the primary behavior of the function keys (F1...
... Non-backlit keyboard Some keys on your keyboard have two symbols on them. F12) by changing Function Key Behavior in BIOS setup program. 17 Capacity Hard drive eMMC Up to perform secondary functions. multimedia key mode and function key mode. These keys can define the primary behavior of the function keys (F1...
Inspiron 14 3000 Setup and Specifications
Page 21
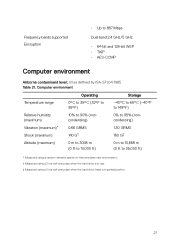
... Encryption • Up to 35,000 ft) * Measured using a random vibration spectrum that simulates user environment. † Measured using a 2 ms half-sine pulse when the hard drive is in use. ‡ Measured using a 2 ms half-sine pulse when the...
... Encryption • Up to 35,000 ft) * Measured using a random vibration spectrum that simulates user environment. † Measured using a 2 ms half-sine pulse when the hard drive is in use. ‡ Measured using a 2 ms half-sine pulse when the...

Inspiron 14 3000 Setup and Specifications
Page 22
List of keyboard shortcuts Keys Description Mute audio Decrease volume Increase volume Play previous track/chapter Play/Pause Play next track/chapter Switch to external display Search Decrease brightness Increase brightness Turn off/on the keyboard language configuration. Table 22. Keyboard shortcuts NOTE: Keyboard characters may differ depending on wireless Sleep Toggle between power and batterystatus light/hard-drive activity light 22 Keys used for shortcuts remain the same across all language configurations.
List of keyboard shortcuts Keys Description Mute audio Decrease volume Increase volume Play previous track/chapter Play/Pause Play next track/chapter Switch to external display Search Decrease brightness Increase brightness Turn off/on the keyboard language configuration. Table 22. Keyboard shortcuts NOTE: Keyboard characters may differ depending on wireless Sleep Toggle between power and batterystatus light/hard-drive activity light 22 Keys used for shortcuts remain the same across all language configurations.

Inspiron 14 3000 Service Manual
Page 4
Replacing the keyboard 25 Procedure 25 Post-requisites 25 Removing the base cover 26 Prerequisites 26 Procedure 26 Replacing the base cover 31 Procedure 31 Post-requisites 33 Removing the memory module 34 Prerequisites 34 Procedure 34 Replacing the memory module 36 Procedure 36 Post-requisites 37 Removing the hard drive 38 Prerequisites 38 Procedure 38 Replacing the hard drive 41 Procedure 41 Post-requisites 41 Removing the wireless card 42 Prerequisites 42 Procedure 42 4
Replacing the keyboard 25 Procedure 25 Post-requisites 25 Removing the base cover 26 Prerequisites 26 Procedure 26 Replacing the base cover 31 Procedure 31 Post-requisites 33 Removing the memory module 34 Prerequisites 34 Procedure 34 Replacing the memory module 36 Procedure 36 Post-requisites 37 Removing the hard drive 38 Prerequisites 38 Procedure 38 Replacing the hard drive 41 Procedure 41 Post-requisites 41 Removing the wireless card 42 Prerequisites 42 Procedure 42 4

Inspiron 14 3000 Service Manual
Page 13
M2.5x2.5 6 cover and antenna assembly Optical-drive Optical drive M2x3 1 bracket Power-adapter Palm-rest M2x3 1 port assembly Power-button Palm-rest M2x2 1 board assembly 13 Screw list Component Secured to Base cover Palm-... Palm-rest M2x5 2 assembly Base cover Palm-rest M2x2 3 assembly Computer base Palm-rest M2x5 3 assembly Display panel Display-back M2x3 4 cover and antenna assembly Hard drive Hard-drive M3x3 4 assembly Hard-drive Hard-drive M2x3 2 bracket assembly Hinges Display back- Screw list Table 1.
M2.5x2.5 6 cover and antenna assembly Optical-drive Optical drive M2x3 1 bracket Power-adapter Palm-rest M2x3 1 port assembly Power-button Palm-rest M2x2 1 board assembly 13 Screw list Component Secured to Base cover Palm-... Palm-rest M2x5 2 assembly Base cover Palm-rest M2x2 3 assembly Computer base Palm-rest M2x5 3 assembly Display panel Display-back M2x3 4 cover and antenna assembly Hard drive Hard-drive M3x3 4 assembly Hard-drive Hard-drive M2x3 2 bracket assembly Hinges Display back- Screw list Table 1.
Inspiron 14 3000 Service Manual
Page 38
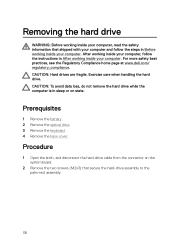
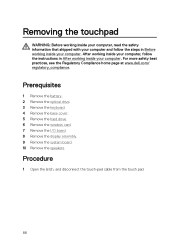
.... For more safety best practices, see the Regulatory Compliance home page at www.dell.com/ regulatory_compliance. CAUTION: Hard drives are fragile. Exercise care when handling the hard drive. Procedure 1 Open the latch, and disconnect the hard-drive cable from the connector on state. Removing the hard drive WARNING: Before working inside your computer, read the safety information that secure...
.... For more safety best practices, see the Regulatory Compliance home page at www.dell.com/ regulatory_compliance. CAUTION: Hard drives are fragile. Exercise care when handling the hard drive. Procedure 1 Open the latch, and disconnect the hard-drive cable from the connector on state. Removing the hard drive WARNING: Before working inside your computer, read the safety information that secure...

Inspiron 14 3000 Service Manual
Page 39
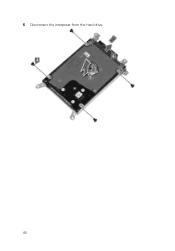
3 Lift the hard-drive assembly along with its cable off the palm-rest assembly. 4 Remove the four screws (M3x3) that secure the hard-drive bracket to the harddrive assembly. 5 Lift the hard-drive assembly off the hard-drive bracket. 39
3 Lift the hard-drive assembly along with its cable off the palm-rest assembly. 4 Remove the four screws (M3x3) that secure the hard-drive bracket to the harddrive assembly. 5 Lift the hard-drive assembly off the hard-drive bracket. 39
Inspiron 14 3000 Service Manual
Page 40
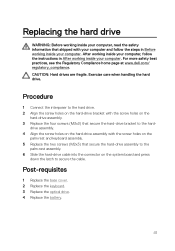
6 Disconnect the interposer from the hard drive. 40
6 Disconnect the interposer from the hard drive. 40
Inspiron 14 3000 Service Manual
Page 41
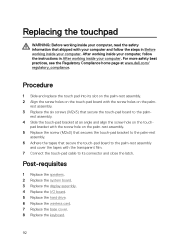
... best practices, see the Regulatory Compliance home page at www.dell.com/ regulatory_compliance. Post-requisites 1 Replace the base cover. 2 Replace the keyboard. 3 Replace the optical drive. 4 Replace the battery. 41 Procedure 1 Connect the interposer to the hard drive. 2 Align the screw holes on the hard-drive bracket with the screw holes on the palm rest and...
... best practices, see the Regulatory Compliance home page at www.dell.com/ regulatory_compliance. Post-requisites 1 Replace the base cover. 2 Replace the keyboard. 3 Replace the optical drive. 4 Replace the battery. 41 Procedure 1 Connect the interposer to the hard drive. 2 Align the screw holes on the hard-drive bracket with the screw holes on the palm rest and...

Inspiron 14 3000 Service Manual
Page 46
... follow the instructions in Before working inside your computer. Removing the I /O board from the palm-rest assembly. 46 Prerequisites 1 Remove the battery. 2 Remove the optical drive. 3 Remove the keyboard. 4 Remove the base cover. 5 Remove the hard drive. For more safety best practices, see the Regulatory Compliance home page at www...
... follow the instructions in Before working inside your computer. Removing the I /O board from the palm-rest assembly. 46 Prerequisites 1 Remove the battery. 2 Remove the optical drive. 3 Remove the keyboard. 4 Remove the base cover. 5 Remove the hard drive. For more safety best practices, see the Regulatory Compliance home page at www...

Inspiron 14 3000 Service Manual
Page 48
... your computer and follow the instructions in Before working inside your computer. For more safety best practices, see the Regulatory Compliance home page at www.dell.com/ regulatory_compliance. Post-requisites 1 Replace the hard drive. 2 Replace the base cover. 3 Replace the keyboard. 4 Replace the optical...
... your computer and follow the instructions in Before working inside your computer. For more safety best practices, see the Regulatory Compliance home page at www.dell.com/ regulatory_compliance. Post-requisites 1 Replace the hard drive. 2 Replace the base cover. 3 Replace the keyboard. 4 Replace the optical...
Inspiron 14 3000 Service Manual
Page 52
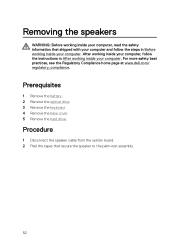
For more safety best practices, see the Regulatory Compliance home page at www.dell.com/ regulatory_compliance. Prerequisites 1 Remove the battery. 2 Remove the optical drive. 3 Remove the keyboard. 4 Remove the base cover. 5 Remove the hard drive. Procedure 1 Disconnect the speaker cable from the system board. 2 Peel the tapes that shipped with your computer and follow the...
For more safety best practices, see the Regulatory Compliance home page at www.dell.com/ regulatory_compliance. Prerequisites 1 Remove the battery. 2 Remove the optical drive. 3 Remove the keyboard. 4 Remove the base cover. 5 Remove the hard drive. Procedure 1 Disconnect the speaker cable from the system board. 2 Peel the tapes that shipped with your computer and follow the...

Inspiron 14 3000 Service Manual
Page 54
Post-requisites 1 Replace the hard drive. 2 Replace the base cover. 3 Replace the keyboard. 4 Replace the optical drive. 5 Replace the battery. 54 For more safety best practices, see the Regulatory Compliance home page at www.dell.com/ regulatory_compliance. After working inside your computer, follow the steps in After working inside your computer. Procedure 1 Using the alignment...
Post-requisites 1 Replace the hard drive. 2 Replace the base cover. 3 Replace the keyboard. 4 Replace the optical drive. 5 Replace the battery. 54 For more safety best practices, see the Regulatory Compliance home page at www.dell.com/ regulatory_compliance. After working inside your computer, follow the steps in After working inside your computer. Procedure 1 Using the alignment...

Inspiron 14 3000 Service Manual
Page 83
3 Open the latch, and disconnect the display cable from the system board. 4 Open the latch, and disconnect the hard-drive cable from the system board. 5 Open the latch, and disconnect the I/O-board cable from the system board. 6 Disconnect the speaker cable from the system board. 7 Open the latch, and disconnect the touch-pad cable from the system board. 8 Remove the screw (M2x3) that secures the system board to the palm-rest assembly. 83
3 Open the latch, and disconnect the display cable from the system board. 4 Open the latch, and disconnect the hard-drive cable from the system board. 5 Open the latch, and disconnect the I/O-board cable from the system board. 6 Disconnect the speaker cable from the system board. 7 Open the latch, and disconnect the touch-pad cable from the system board. 8 Remove the screw (M2x3) that secures the system board to the palm-rest assembly. 83
Inspiron 14 3000 Service Manual
Page 86
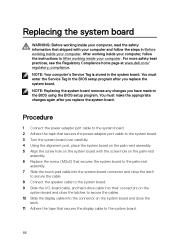
... the system-board connector and close the latch to secure the cable. 8 Connect the speaker cable to the system board. 9 Slide the I/O-board cable, and hard-drive cable into their connectors on the system board and close the latches to secure the cables. 10 Slide the display cable into the connector on... safety information that secures the display cable to the system board. 86 For more safety best practices, see the Regulatory Compliance home page at www.dell.com/ regulatory_compliance. NOTE: Replacing the system board removes any changes you replace the system board.
... the system-board connector and close the latch to secure the cable. 8 Connect the speaker cable to the system board. 9 Slide the I/O-board cable, and hard-drive cable into their connectors on the system board and close the latches to secure the cables. 10 Slide the display cable into the connector on... safety information that secures the display cable to the system board. 86 For more safety best practices, see the Regulatory Compliance home page at www.dell.com/ regulatory_compliance. NOTE: Replacing the system board removes any changes you replace the system board.
Inspiron 14 3000 Service Manual
Page 88
... in Before working inside your computer. Prerequisites 1 Remove the battery. 2 Remove the optical drive. 3 Remove the keyboard. 4 Remove the base cover. 5 Remove the hard drive. 6 Remove the wireless card. 7 Remove the I/O board. 8 Remove the display assembly.... 9 Remove the system board. 10 Remove the speakers. After working inside your computer, follow the steps in After working inside your computer. For more safety best practices, see the Regulatory Compliance home page at www.dell...
... in Before working inside your computer. Prerequisites 1 Remove the battery. 2 Remove the optical drive. 3 Remove the keyboard. 4 Remove the base cover. 5 Remove the hard drive. 6 Remove the wireless card. 7 Remove the I/O board. 8 Remove the display assembly.... 9 Remove the system board. 10 Remove the speakers. After working inside your computer, follow the steps in After working inside your computer. For more safety best practices, see the Regulatory Compliance home page at www.dell...
Inspiron 14 3000 Service Manual
Page 92
...computer. Post-requisites 1 Replace the speakers. 2 Replace the system board. 3 Replace the display assembly. 4 Replace the I/O board. 5 Replace the hard drive. 6 Replace the wireless card. 7 Replace the base cover. 8 Replace the keyboard. 92 For more safety best practices, see the Regulatory Compliance home...the transparent film. 7 Connect the touch-pad cable to the palm- rest assembly. 4 Slide the touch-pad bracket at www.dell.com/ regulatory_compliance. After working inside your computer, follow the steps in After working inside your computer. Procedure 1 Slide and replace ...
...computer. Post-requisites 1 Replace the speakers. 2 Replace the system board. 3 Replace the display assembly. 4 Replace the I/O board. 5 Replace the hard drive. 6 Replace the wireless card. 7 Replace the base cover. 8 Replace the keyboard. 92 For more safety best practices, see the Regulatory Compliance home...the transparent film. 7 Connect the touch-pad cable to the palm- rest assembly. 4 Slide the touch-pad bracket at www.dell.com/ regulatory_compliance. After working inside your computer, follow the steps in After working inside your computer. Procedure 1 Slide and replace ...


