
Me and My Dell
Page 4
Setting Up Your Webcam 22 Integrated Webcam 22 External Webcam 22 Setting up Bluetooth 22 About Your Computer 23 Power Adapter 23 Battery 24 Coin-Cell Battery 24 Touchpad 25 Display 25 Touchscreen 25 3D 25 3D Camera 26 Keyboard 26 Physical Keyboard 27 Keyboard Backlight 27 On-Screen Keyboard 28 Keyboard Connection Types 28 Wired 28 Wireless 28 Service Tag and Express-Service Code 29 Locating the Label on Your Computer 29 Dell Support Website 29 BIOS Setup Program 29 4 Contents
Setting Up Your Webcam 22 Integrated Webcam 22 External Webcam 22 Setting up Bluetooth 22 About Your Computer 23 Power Adapter 23 Battery 24 Coin-Cell Battery 24 Touchpad 25 Display 25 Touchscreen 25 3D 25 3D Camera 26 Keyboard 26 Physical Keyboard 27 Keyboard Backlight 27 On-Screen Keyboard 28 Keyboard Connection Types 28 Wired 28 Wireless 28 Service Tag and Express-Service Code 29 Locating the Label on Your Computer 29 Dell Support Website 29 BIOS Setup Program 29 4 Contents
Me and My Dell
Page 12
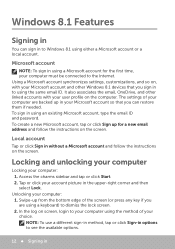
.... It also associates the email, OneDrive, and other Windows 8.1 devices that you sign in to dismiss the lock screen. 2. Tap or click your user profile on screen, login to see the available options. 12 Signing in In the log on the computer. Windows 8.1 Features Signing in You can restore them if needed. Access the charms sidebar and tap or click Start. 2.
.... It also associates the email, OneDrive, and other Windows 8.1 devices that you sign in to dismiss the lock screen. 2. Tap or click your user profile on screen, login to see the available options. 12 Signing in In the log on the computer. Windows 8.1 Features Signing in You can restore them if needed. Access the charms sidebar and tap or click Start. 2.

Me and My Dell
Page 13
... Start screen. Allows you are Search, Share, Start, Devices, and Settings. Provides access to notifications, volume controls, brightness controls, and other computer, and so on with your mouse to share photos, links, and so on . To open the charms sidebar, swipe-in the previous versions of the screen or point your friends and social networks. Allows you to the most common charms are using a multi-touch touchpad...
... Start screen. Allows you are Search, Share, Start, Devices, and Settings. Provides access to notifications, volume controls, brightness controls, and other computer, and so on with your mouse to share photos, links, and so on . To open the charms sidebar, swipe-in the previous versions of the screen or point your friends and social networks. Allows you to the most common charms are using a multi-touch touchpad...
Me and My Dell
Page 17
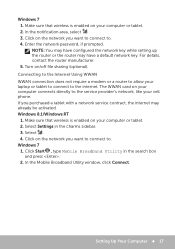
... have a default network key. Turn on the network you want to connect to . Enter the network password, if prompted. Make sure that wireless is enabled on the network you want to connect to . 4. Click on your computer or tablet. 2. Connecting to the Internet Using WWAN WWAN connection does not require a modem or a router to the internet. Windows 7 1. Make sure that wireless is enabled on your computer connects directly to the service provider's network, like your laptop or...
... have a default network key. Turn on the network you want to connect to . Enter the network password, if prompted. Make sure that wireless is enabled on the network you want to connect to . 4. Click on your computer or tablet. 2. Connecting to the Internet Using WWAN WWAN connection does not require a modem or a router to the internet. Windows 7 1. Make sure that wireless is enabled on your computer connects directly to the service provider's network, like your laptop or...

Me and My Dell
Page 18
... Test. Windows 8.1 1. Alternatively, click Start → Control Panel→ Hardware and Sound→ Sound. 2. To use the built-in speakers, play the media and set the volume to the connectors on the screen. 18 Setting Up Your Computer Setting up Audio Dell laptops and tablets have built-in speakers that appear, click Sound. Click Manage Audio Devices. 4. Dell computers and tablets also support a 3.5 mm audio port to allow you are setting up 2‑channel audio, connect the...
... Test. Windows 8.1 1. Alternatively, click Start → Control Panel→ Hardware and Sound→ Sound. 2. To use the built-in speakers, play the media and set the volume to the connectors on the screen. 18 Setting Up Your Computer Setting up Audio Dell laptops and tablets have built-in speakers that appear, click Sound. Click Manage Audio Devices. 4. Dell computers and tablets also support a 3.5 mm audio port to allow you are setting up 2‑channel audio, connect the...

Me and My Dell
Page 21
... on the printer model. NOTE: The features supported by your printer. Click Devices and follow the instructions in the documentation of the device list. Windows 7 1. Use the printer-driver media or download the drivers from this list to install it should appear in this list, click Add a device at the top of your computer using the USB cable before performing these steps. Setting Up Your Printer You can connect a printer to...
... on the printer model. NOTE: The features supported by your printer. Click Devices and follow the instructions in the documentation of the device list. Windows 7 1. Use the printer-driver media or download the drivers from this list to install it should appear in this list, click Add a device at the top of your computer using the USB cable before performing these steps. Setting Up Your Printer You can connect a printer to...
Me and My Dell
Page 26
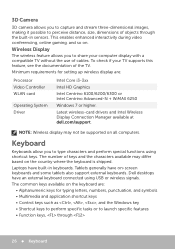
... for typing letters, numbers, punctuation, and symbols • Multimedia and application shortcut keys • Control keys such as , , , and the Windows key • Shortcut keys to perform specific tasks or to launch specific features • Function keys, through the built-in keyboards. Tablets generally have an external keyboard connected using shortcut keys. The common keys available on the keyboard are: • Alphanumeric keys for setting up wireless display are: Processor Video Controller WLAN card Operating System Driver Intel Core...
... for typing letters, numbers, punctuation, and symbols • Multimedia and application shortcut keys • Control keys such as , , , and the Windows key • Shortcut keys to perform specific tasks or to launch specific features • Function keys, through the built-in keyboards. Tablets generally have an external keyboard connected using shortcut keys. The common keys available on the keyboard are: • Alphanumeric keys for setting up wireless display are: Processor Video Controller WLAN card Operating System Driver Intel Core...

Me and My Dell
Page 45
.... Switch between open simultaneously). Cut a selected item. Select all items in the active program. Cycle through screen elements in Windows Explorer. Search for a file or folder. Delete the selected item without moving it to the Recycle Bin. Activate the menu bar in a document or window. Using your Keyboard 45 Display the address bar drop-down in a window or on the desktop. Activate a power management mode...
.... Switch between open simultaneously). Cut a selected item. Select all items in the active program. Cycle through screen elements in Windows Explorer. Search for a file or folder. Delete the selected item without moving it to the Recycle Bin. Activate the menu bar in a document or window. Using your Keyboard 45 Display the address bar drop-down in a window or on the desktop. Activate a power management mode...
Me and My Dell
Page 69
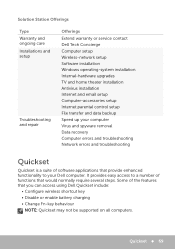
... setup Wireless‑network setup Software installation Windows operating‑system installation Internal‑hardware upgrades TV and home theater installation Antivirus installation Internet and email setup Computer‑accessories setup Internet parental control setup File transfer and data backup Speed up your Dell computer. Quickset 69 Some of software applications that provide enhanced functionality to a number of functions that you can access using Dell Quickset include: • Configure wireless shortcut key • Disable or enable battery charging...
... setup Wireless‑network setup Software installation Windows operating‑system installation Internal‑hardware upgrades TV and home theater installation Antivirus installation Internet and email setup Computer‑accessories setup Internet parental control setup File transfer and data backup Speed up your Dell computer. Quickset 69 Some of software applications that provide enhanced functionality to a number of functions that you can access using Dell Quickset include: • Configure wireless shortcut key • Disable or enable battery charging...

Me and My Dell
Page 72
NOTE: To access DellConnect and terms of usage, see dell.com/DellConnect. 72 DellConnect It allows an technical support representative to remotely diagnose and resolve issues on your permission. A DellConnect request is an online tool that allows a Dell agent to access your computer (under your supervision) to interact with your computer with your computer. DellConnect DellConnect is initiated by a technical support agent when required during troubleshooting.
NOTE: To access DellConnect and terms of usage, see dell.com/DellConnect. 72 DellConnect It allows an technical support representative to remotely diagnose and resolve issues on your permission. A DellConnect request is an online tool that allows a Dell agent to access your computer (under your supervision) to interact with your computer with your computer. DellConnect DellConnect is initiated by a technical support agent when required during troubleshooting.
Me and My Dell
Page 85
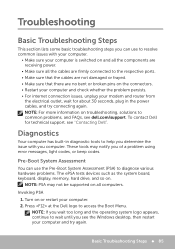
... various hardware problems. The ePSA tests devices such as the system board, keyboard, display, memory, hard drive, and so on or restart your computer and try connecting again. Invoking PSA 1. Basic Troubleshooting Steps 85 Troubleshooting Basic Troubleshooting Steps This section lists some basic troubleshooting steps you can use to resolve common issues with you computer. These tools may not be supported on troubleshooting, solutions to access the Boot Menu. NOTE...
... various hardware problems. The ePSA tests devices such as the system board, keyboard, display, memory, hard drive, and so on or restart your computer and try connecting again. Invoking PSA 1. Basic Troubleshooting Steps 85 Troubleshooting Basic Troubleshooting Steps This section lists some basic troubleshooting steps you can use to resolve common issues with you computer. These tools may not be supported on troubleshooting, solutions to access the Boot Menu. NOTE...
Me and My Dell
Page 91
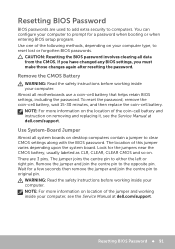
..., and then replace the coin‑cell battery. Remove the CMOS Battery WARNING: Read the safety instructions before working inside your computer to prompt for a few seconds then remove the jumper and join the centre pin to reset lost or forgotten BIOS passwords. Use System‑Board Jumper Almost all system boards on your computer, see the Service Manual at dell.com/support. You can configure your computer. NOTE...
..., and then replace the coin‑cell battery. Remove the CMOS Battery WARNING: Read the safety instructions before working inside your computer to prompt for a few seconds then remove the jumper and join the centre pin to reset lost or forgotten BIOS passwords. Use System‑Board Jumper Almost all system boards on your computer, see the Service Manual at dell.com/support. You can configure your computer. NOTE...
Me and My Dell
Page 99
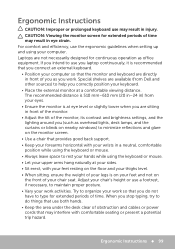
... to do not have to type for continuous operation as overhead lights, desk lamps, and the curtains or blinds on nearby windows) to minimize reflections and glare on the front of the monitor, its contrast and brightness settings, and the lighting around you connect an external keyboard. • Position your computer so that provides good back support. • Keep your forearms horizontal...
... to do not have to type for continuous operation as overhead lights, desk lamps, and the curtains or blinds on nearby windows) to minimize reflections and glare on the front of the monitor, its contrast and brightness settings, and the lighting around you connect an external keyboard. • Position your computer so that provides good back support. • Keep your forearms horizontal...

Inspiron 13z N311Z Owners Manual
Page 3
Contents 1 Before You Begin 9 Recommended Tools 9 Turning Off Your Computer 9 Before Working Inside Your Computer 10 2 Battery 13 Removing the Battery 13 Replacing the Battery 14 3 Module Cover 15 Removing the Module Cover 15 Replacing the Module Cover 16 4 Memory Module(s 17 Upgrading System Memory 17 Removing the Memory Module(s 17 Replacing the Memory Module(s 18 Contents 3
Contents 1 Before You Begin 9 Recommended Tools 9 Turning Off Your Computer 9 Before Working Inside Your Computer 10 2 Battery 13 Removing the Battery 13 Replacing the Battery 14 3 Module Cover 15 Removing the Module Cover 15 Replacing the Module Cover 16 4 Memory Module(s 17 Upgrading System Memory 17 Removing the Memory Module(s 17 Replacing the Memory Module(s 18 Contents 3

Inspiron 13z N311Z Owners Manual
Page 5
Display Bezel 44 Removing the Display Bezel 44 Replacing the Display Bezel 45 Display Panel 45 Removing the Display Panel 45 Replacing the Display Panel 47 Display Brackets 48 Removing the Display Brackets 48 Replacing the Display Brackets 49 10 Camera Module 51 Removing the Camera Module 51 Replacing the Camera Module 52 11 Coin-Cell Battery 53 Removing the Coin-Cell Battery 53 Replacing the Coin-Cell Battery 54 12 Thermal Fan 55 Removing the Thermal Fan 55 Replacing the Thermal Fan 56 13 System Board 59 Removing the System Board 59 Contents 5
Display Bezel 44 Removing the Display Bezel 44 Replacing the Display Bezel 45 Display Panel 45 Removing the Display Panel 45 Replacing the Display Panel 47 Display Brackets 48 Removing the Display Brackets 48 Replacing the Display Brackets 49 10 Camera Module 51 Removing the Camera Module 51 Replacing the Camera Module 52 11 Coin-Cell Battery 53 Removing the Coin-Cell Battery 53 Replacing the Coin-Cell Battery 54 12 Thermal Fan 55 Removing the Thermal Fan 55 Replacing the Thermal Fan 56 13 System Board 59 Removing the System Board 59 Contents 5
Inspiron 13z N311Z Owners Manual
Page 37
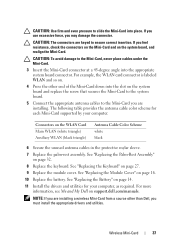
... "Replacing the Module Cover" on page 32. 8 Replace the keyboard. See "Replacing the Battery" on the system board and replace the screw that secures the Mini-Card to the system board. 5 Connect the appropriate antenna cables to the Mini-Card you must install the appropriate drivers and utilities. CAUTION: The connectors are installing. For example, the WLAN card connector is labeled WLAN and so on. 4 Press the other than Dell...
... "Replacing the Module Cover" on page 32. 8 Replace the keyboard. See "Replacing the Battery" on the system board and replace the screw that secures the Mini-Card to the system board. 5 Connect the appropriate antenna cables to the Mini-Card you must install the appropriate drivers and utilities. CAUTION: The connectors are installing. For example, the WLAN card connector is labeled WLAN and so on. 4 Press the other than Dell...

Inspiron 13z N311Z Owners Manual
Page 41
See "Replacing the Battery" on page 27. 5 Replace the module cover. See "Replacing the Keyboard" on page 14. CAUTION: Before turning on page 16. 6 Replace the battery. See "Replacing the Module Cover" on the computer, replace all screws and ensure that no stray screws remain inside the computer. Failure to do so may result in "Before You Begin" on page 32. 4 Replace the key board. See "Replacing the Palm...
See "Replacing the Battery" on page 27. 5 Replace the module cover. See "Replacing the Keyboard" on page 14. CAUTION: Before turning on page 16. 6 Replace the battery. See "Replacing the Module Cover" on the computer, replace all screws and ensure that no stray screws remain inside the computer. Failure to do so may result in "Before You Begin" on page 32. 4 Replace the key board. See "Replacing the Palm...
Inspiron 13z N311Z Owners Manual
Page 86
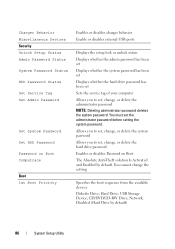
...or disables Password on Boot Computrace Boot 1st Boot Priority Enables or disables charger behavior Enable or disables external USB ports Displays the setup lock or unlock status Displays whether the admin password has been set Displays whether the system password has been set Displays whether the hard drive password has been set Sets the service tag of your computer Allows you to set the administrator password before setting the system password. Disabled (Hard Drive by default. You must set , change the setting Specifies the boot sequence from the available devices Diskette Drive...
...or disables Password on Boot Computrace Boot 1st Boot Priority Enables or disables charger behavior Enable or disables external USB ports Displays the setup lock or unlock status Displays whether the admin password has been set Displays whether the system password has been set Displays whether the hard drive password has been set Sets the service tag of your computer Allows you to set the administrator password before setting the system password. Disabled (Hard Drive by default. You must set , change the setting Specifies the boot sequence from the available devices Diskette Drive...

Inspiron 13z N311Z Owners Manual
Page 87
... Drive; CD/DVD/CD-RW Drive; CD/DVD/CD-RW Drive; If no operating system is on the drive, the computer generates an error message. • Hard Drive - Disabled (Diskette Drive by default) Provides options to Save Changes and Reset, Discard Changes and Reset, Restore Defaults, Discard Changes, and Save Changes Boot Sequence This feature allows you to change the boot sequence for devices. USB Storage Device; Network; System Setup Utility 87 CD/DVD/CD-RW Drive; Network; Hard Drive; Hard Drive; USB Storage Device; Hard Drive; CD/DVD/CD-RW Drive; USB Storage Device...
... Drive; CD/DVD/CD-RW Drive; CD/DVD/CD-RW Drive; If no operating system is on the drive, the computer generates an error message. • Hard Drive - Disabled (Diskette Drive by default) Provides options to Save Changes and Reset, Discard Changes and Reset, Restore Defaults, Discard Changes, and Save Changes Boot Sequence This feature allows you to change the boot sequence for devices. USB Storage Device; Network; System Setup Utility 87 CD/DVD/CD-RW Drive; Network; Hard Drive; Hard Drive; USB Storage Device; Hard Drive; CD/DVD/CD-RW Drive; USB Storage Device...

Inspiron 13z N311Z Owners Manual
Page 88
...-RW is bootable, check the device documentation. • Network - Changing Boot Sequence for Future Boots 1 Enter system setup. Then shut down your device is found on page 83. 2 Use the arrow keys to highlight the Boot menu option and press to access the menu. 88 System Setup Utility For example, if you are booting to boot from the CD/DVD/CD-RW drive. Insert the memory device into a USB connector and restart the computer...
...-RW is bootable, check the device documentation. • Network - Changing Boot Sequence for Future Boots 1 Enter system setup. Then shut down your device is found on page 83. 2 Use the arrow keys to highlight the Boot menu option and press to access the menu. 88 System Setup Utility For example, if you are booting to boot from the CD/DVD/CD-RW drive. Insert the memory device into a USB connector and restart the computer...


