
Owner's Manual
Page 5
... Tray 42 Display Functions 42 Radios (Including Wireless Networking 42 Power Management 42 Speaker Functions 43 Microsoft® Windows® Logo Key Functions 43 Touch Pad 44 Customizing the Touch Pad 44 7 Using PC Cards PC Card Types 45 Extended PC Cards 45 Installing a PC Card 45 Removing a PC Card or Blank 46 8 Setting Up a Network Connecting to a Network Adapter 47 Network Setup Wizard 47 Connecting to a Wireless Local Area Network 48 Determining Your Network Type 48 Connecting to a Wireless Network in Microsoft® Windows® XP . . . . . 48 9 Solving Problems Dell...
... Tray 42 Display Functions 42 Radios (Including Wireless Networking 42 Power Management 42 Speaker Functions 43 Microsoft® Windows® Logo Key Functions 43 Touch Pad 44 Customizing the Touch Pad 44 7 Using PC Cards PC Card Types 45 Extended PC Cards 45 Installing a PC Card 45 Removing a PC Card or Blank 46 8 Setting Up a Network Connecting to a Network Adapter 47 Network Setup Wizard 47 Connecting to a Wireless Local Area Network 48 Determining Your Network Type 48 Connecting to a Wireless Network in Microsoft® Windows® XP . . . . . 48 9 Solving Problems Dell...
Owner's Manual
Page 11
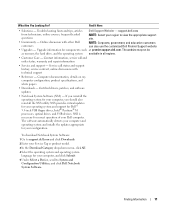
... and Configuration Utilities, and click Dell Notebook System Software. The software automatically detects your configuration. Find It Here • Solutions - NSS provides critical updates for your operating system and support for your computer and operating system and installs the updates appropriate for Dell™ 3.5-inch USB floppy drives, Intel® Pentium® M processors, optical drives, and USB devices. Finding Information 11 Troubleshooting hints and tips, articles Dell Support Website - Service call and order status...
... and Configuration Utilities, and click Dell Notebook System Software. The software automatically detects your configuration. Find It Here • Solutions - NSS provides critical updates for your operating system and support for your computer and operating system and installs the updates appropriate for Dell™ 3.5-inch USB floppy drives, Intel® Pentium® M processors, optical drives, and USB devices. Finding Information 11 Troubleshooting hints and tips, articles Dell Support Website - Service call and order status...
Owner's Manual
Page 21
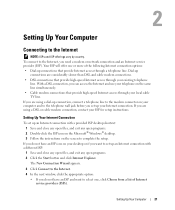
... open programs. 2 Double-click the ISP icon on the Microsoft® Windows® desktop. 3 Follow the instructions on the same line simultaneously. • Cable modem connections that provide high-speed Internet access through your ISP for setup instructions. The New Connection Wizard appears. 3 Click Connect to the Internet. 4 In the next window, click the appropriate option: • If you want to the Internet, you set up your Internet connection...
... open programs. 2 Double-click the ISP icon on the Microsoft® Windows® desktop. 3 Follow the instructions on the same line simultaneously. • Cable modem connections that provide high-speed Internet access through your ISP for setup instructions. The New Connection Wizard appears. 3 Click Connect to the Internet. 4 In the next window, click the appropriate option: • If you want to the Internet, you set up your Internet connection...
Owner's Manual
Page 22
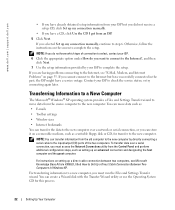
... I /O) ports of connection to select, contact your ISP. 6 Click the appropriate option under How do you cannot connect to complete the setup. NOTE: You can create a Wizard disk with the Transfer Wizard utility or use the Operating System CD for transfer to the new computer over a serial connection, you can store it on a removable medium, such as : • E-mails • Toolbar settings • Window sizes • Internet...
... I /O) ports of connection to select, contact your ISP. 6 Click the appropriate option under How do you cannot connect to complete the setup. NOTE: You can create a Wizard disk with the Transfer Wizard utility or use the Operating System CD for transfer to the new computer over a serial connection, you can store it on a removable medium, such as : • E-mails • Toolbar settings • Window sizes • Internet...

Owner's Manual
Page 25
... and install updated drivers. • Connect the printer to the computer. • Load paper and install the toner or ink cartridge. • Consult the printer Owner's Manual for technical assistance, or call the printer manufacturer. See the documentation that it is turned on. 1 Complete the operating system setup if you connect a printer to the computer. Connecting a USB Printer NOTE: You can connect USB devices while the...
... and install updated drivers. • Connect the printer to the computer. • Load paper and install the toner or ink cartridge. • Consult the printer Owner's Manual for technical assistance, or call the printer manufacturer. See the documentation that it is turned on. 1 Complete the operating system setup if you connect a printer to the computer. Connecting a USB Printer NOTE: You can connect USB devices while the...
Owner's Manual
Page 26
... the relative effectiveness of damage. See the UPS manufacturer documentation for modem connection instructions. Power Protection Devices Several devices are designed to a UPS. A device with your computer from the electrical outlet. www.dell.com | support.dell.com 3 Turn on the printer and then turn on battery operating time and to connected devices when AC power is approved by nearby lightning strikes. When lightning occurs in data...
... the relative effectiveness of damage. See the UPS manufacturer documentation for modem connection instructions. Power Protection Devices Several devices are designed to a UPS. A device with your computer from the electrical outlet. www.dell.com | support.dell.com 3 Turn on the printer and then turn on battery operating time and to connected devices when AC power is approved by nearby lightning strikes. When lightning occurs in data...
Owner's Manual
Page 27
... following: • Using optical drives, such as DVD or CD drives • Using wireless communications devices, PC Cards, or USB devices • Using high-brightness display settings, 3D screen savers, or other computers with your Dell computer. Operating time is recommended that shipped with the main battery installed at all times. Replace the battery only with household waste. CAUTION: Do not dispose of batteries with a compatible battery purchased from other power-intensive programs such...
... following: • Using optical drives, such as DVD or CD drives • Using wireless communications devices, PC Cards, or USB devices • Using high-brightness display settings, 3D screen savers, or other computers with your Dell computer. Operating time is recommended that shipped with the main battery installed at all times. Replace the battery only with household waste. CAUTION: Do not dispose of batteries with a compatible battery purchased from other power-intensive programs such...
Owner's Manual
Page 36
... your operating system. You cannot make the computer exit hibernate mode by pressing a key or touching the touch pad. Press the power button. - To access the Windows Power Options Properties window, click the Start button→ Control Panel→ Performance and Maintenance→ Power Options. Your computer enters hibernate mode if the battery charge level becomes critically low. or • Depending on how you set the options on the Advanced tab (see page 35) in the Power Options Properties window, use...
... your operating system. You cannot make the computer exit hibernate mode by pressing a key or touching the touch pad. Press the power button. - To access the Windows Power Options Properties window, click the Start button→ Control Panel→ Performance and Maintenance→ Power Options. Your computer enters hibernate mode if the battery charge level becomes critically low. or • Depending on how you set the options on the Advanced tab (see page 35) in the Power Options Properties window, use...
Owner's Manual
Page 43
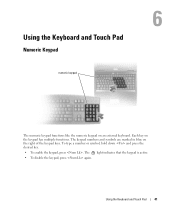
The keypad numbers and symbols are marked in blue on the keypad has multiple functions. Using the Keyboard and Touch Pad 41 The 9 light indicates that the keypad is active. • To disable the keypad, press again. Each key on the right of the keypad keys. To type a number or symbol, hold down and press the desired key. • To enable the keypad, press . Using the Keyboard and Touch Pad Numeric Keypad numeric keypad The numeric keypad functions like the numeric keypad on an external keyboard.
The keypad numbers and symbols are marked in blue on the keypad has multiple functions. Using the Keyboard and Touch Pad 41 The 9 light indicates that the keypad is active. • To disable the keypad, press again. Each key on the right of the keypad keys. To type a number or symbol, hold down and press the desired key. • To enable the keypad, press . Using the Keyboard and Touch Pad Numeric Keypad numeric keypad The numeric keypad functions like the numeric keypad on an external keyboard.
Owner's Manual
Page 58
... problems connecting to the Internet, your computer might be infected with Windows. S C A N T H E C O M P U T E R F O R S P Y W A R E - Use an antivirus program that includes anti-spyware protection (your Internet service provider. See page 53. The hard drive cannot read the data. For help, contact your program may require an upgrade) to scan the computer and remove spyware. For more information, go to support.dell.com and search for the operating...
... problems connecting to the Internet, your computer might be infected with Windows. S C A N T H E C O M P U T E R F O R S P Y W A R E - Use an antivirus program that includes anti-spyware protection (your Internet service provider. See page 53. The hard drive cannot read the data. For help, contact your program may require an upgrade) to scan the computer and remove spyware. For more information, go to support.dell.com and search for the operating...
Owner's Manual
Page 70
... up-arrow key to increase the brightness and and the down your external speaker system includes a subwoofer, ensure that controls a device such as a printer, mouse, or keyboard. E L I M I N A T E P O S S I B L E I O N - ADJUST THE WINDOWS DISPLAY SETTINGS - 1 Click the Start button and then click Control Panel. 2 Click Appearance and Themes. 3 Click the area you want to change or click the Display icon. 4 Try different settings for Color quality and Screen resolution. Contact Dell (see page...
... up-arrow key to increase the brightness and and the down your external speaker system includes a subwoofer, ensure that controls a device such as a printer, mouse, or keyboard. E L I M I N A T E P O S S I B L E I O N - ADJUST THE WINDOWS DISPLAY SETTINGS - 1 Click the Start button and then click Control Panel. 2 Click Appearance and Themes. 3 Click the area you want to change or click the Display icon. 4 Try different settings for Color quality and Screen resolution. Contact Dell (see page...

Owner's Manual
Page 71
... driver is the source of your problem and, if necessary, update the driver. 1 Click the Start button and click Control Panel. 2 Under Pick a Category, click Performance and Maintenance. 3 Click System. 4 In the System Properties window, click the Hardware tab. 5 Click Device Manager. 6 Scroll down the list to replace the driver with a [!]) on your operating system. You may need to reinstall the driver or install a new driver, see if any other programs that use Windows XP Device Driver...
... driver is the source of your problem and, if necessary, update the driver. 1 Click the Start button and click Control Panel. 2 Under Pick a Category, click Performance and Maintenance. 3 Click System. 4 In the System Properties window, click the Hardware tab. 5 Click Device Manager. 6 Scroll down the list to replace the driver with a [!]) on your operating system. You may need to reinstall the driver or install a new driver, see if any other programs that use Windows XP Device Driver...
Owner's Manual
Page 72
... to start the search. 3 Click Hardware Troubleshooter in the Search Results list. 4 In the Hardware Troubleshooter list, click I need to resolve the incompatibility. Manually Reinstalling Drivers NOTICE: The Dell Support website at support.dell.com provides approved drivers for which you can use System Restore (see page 71) to the operating state that existed before you installed the new driver. If Device Driver Rollback does not resolve the problem, then use the Hardware Troubleshooter to resolve a hardware conflict...
... to start the search. 3 Click Hardware Troubleshooter in the Search Results list. 4 In the Hardware Troubleshooter list, click I need to resolve the incompatibility. Manually Reinstalling Drivers NOTICE: The Dell Support website at support.dell.com provides approved drivers for which you can use System Restore (see page 71) to the operating state that existed before you installed the new driver. If Device Driver Rollback does not resolve the problem, then use the Hardware Troubleshooter to resolve a hardware conflict...
Owner's Manual
Page 73
... System Restore The Microsoft Windows XP operating system provides System Restore to allow you set your data files or recover them. Creating a Restore Point 1 Click the Start button and click Help and Support. 2 Click System Restore. 3 Follow the instructions on using System Restore. See the Windows Help and Support Center for the Windows default view, so they may not work if you to return your computer. NOTICE: Before you install a device driver, use System Restore...
... System Restore The Microsoft Windows XP operating system provides System Restore to allow you set your data files or recover them. Creating a Restore Point 1 Click the Start button and click Help and Support. 2 Click System Restore. 3 Follow the instructions on using System Restore. See the Windows Help and Support Center for the Windows default view, so they may not work if you to return your computer. NOTICE: Before you install a device driver, use System Restore...

Owner's Manual
Page 82
.... For instructions, see "Reinstalling Drivers and Utilities" on page 75. 2 Turn the computer over, and remove the hard drive cover screws. 3 Lift the hard drive cover and remove the screws used to slide the drive into the bay until it in the computer, store it is fully seated. 7 Replace and tighten the screws. 8 Install the operating system for your computer with your Operating System CD. 9 Install the drivers and utilities for...
.... For instructions, see "Reinstalling Drivers and Utilities" on page 75. 2 Turn the computer over, and remove the hard drive cover screws. 3 Lift the hard drive cover and remove the screws used to slide the drive into the bay until it in the computer, store it is fully seated. 7 Replace and tighten the screws. 8 Install the operating system for your computer with your Operating System CD. 9 Install the drivers and utilities for...
Owner's Manual
Page 90
..., it stops searching and starts the operating system. To the right of the screen displays help information for new settings to the following: • USB Diskette Drive • Hard Drive • ATAPI CD-ROM Drive • Network • Diagnostics NOTE: You can control the boot sequence and enable/disable devices using the Boot Order page of the screen. NOTE: To change (because they are listed at the top of the bootable devices that appear as a fixed drive.
..., it stops searching and starts the operating system. To the right of the screen displays help information for new settings to the following: • USB Diskette Drive • Hard Drive • ATAPI CD-ROM Drive • Network • Diagnostics NOTE: You can control the boot sequence and enable/disable devices using the Boot Order page of the screen. NOTE: To change (because they are listed at the top of the bootable devices that appear as a fixed drive.
Owner's Manual
Page 100
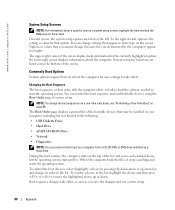
... Greece Website: support.euro.dell.com International Access Code: 00 E-mail: support.euro.dell.com/gr/en/emaildell/ Country Code: 30 Technical Support Gold Service Technical Support Switchboard Gold Service Switchboard Sales Fax Grenada General Support Guatemala General Support Guyana General Support Hong Kong Website: support.ap.dell.com International Access Code: 001 Technical Support E-mail: apsupport@dell.com Country Code: 852 Technical Support (Dimension and Inspiron) Technical Support (OptiPlex, Latitude, and Dell Precision) Technical Support (PowerApp™...
... Greece Website: support.euro.dell.com International Access Code: 00 E-mail: support.euro.dell.com/gr/en/emaildell/ Country Code: 30 Technical Support Gold Service Technical Support Switchboard Gold Service Switchboard Sales Fax Grenada General Support Guatemala General Support Guyana General Support Hong Kong Website: support.ap.dell.com International Access Code: 001 Technical Support E-mail: apsupport@dell.com Country Code: 852 Technical Support (Dimension and Inspiron) Technical Support (OptiPlex, Latitude, and Dell Precision) Technical Support (PowerApp™...
Owner's Manual
Page 102
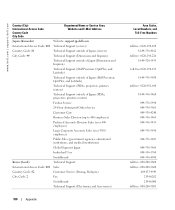
..., educational institutions, and medical institutions) Global Segment Japan Individual User Switchboard Korea (Seoul) Technical Support International Access Code: 001 Sales Country Code: 82 Customer Service (Penang, Malaysia) City Code: 2 Fax Switchboard Technical Support (Electronics and Accessories) 100 Appendix Area Codes, Local Numbers, and Toll-Free Numbers toll-free: 0120-198-498 81-44-556-4162 toll-free: 0120-198-226 81-44-520-1435 toll...
..., educational institutions, and medical institutions) Global Segment Japan Individual User Switchboard Korea (Seoul) Technical Support International Access Code: 001 Sales Country Code: 82 Customer Service (Penang, Malaysia) City Code: 2 Fax Switchboard Technical Support (Electronics and Accessories) 100 Appendix Area Codes, Local Numbers, and Toll-Free Numbers toll-free: 0120-198-498 81-44-556-4162 toll-free: 0120-198-226 81-44-520-1435 toll...
Owner's Manual
Page 106
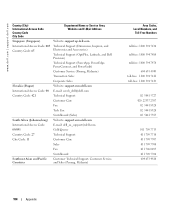
... Africa (Johannesburg) Website: support.euro.dell.com International Access Code: E-mail: dell_za_support@dell.com 09/091 Gold Queue Country Code: 27 Technical Support City Code: 11 Customer Care Sales Fax Switchboard Southeast Asian and Pacific Countries Customer Technical Support, Customer Service, and Sales (Penang, Malaysia) Area Codes, Local Numbers, and Toll-Free Numbers toll-free: 1800 394 7430 toll-free: 1800 394 7488 toll-free: 1800 394 7478...
... Africa (Johannesburg) Website: support.euro.dell.com International Access Code: E-mail: dell_za_support@dell.com 09/091 Gold Queue Country Code: 27 Technical Support City Code: 11 Customer Care Sales Fax Switchboard Southeast Asian and Pacific Countries Customer Technical Support, Customer Service, and Sales (Penang, Malaysia) Area Codes, Local Numbers, and Toll-Free Numbers toll-free: 1800 394 7430 toll-free: 1800 394 7488 toll-free: 1800 394 7478...
Owner's Manual
Page 112
... PC Cards blanks, 46 CardBus technology, 45 extended, 45 installing, 45 removing, 46 slot, 45 types, 45 wireless network adapter, 45 110 Index See display N network Network Setup Wizard, 47 problems, 61 setting up , 21 IRQ conflicts, 70 K keyboard description, 14 numeric keypad, 41 problems, 57 shortcuts, 42 system view, 14 keyboard status lights description, 15 system view, 15 keypad numeric, 41 L labels Microsoft Windows, 10 Service Tag, 10 M memory removing, 78 memory module cover...
... PC Cards blanks, 46 CardBus technology, 45 extended, 45 installing, 45 removing, 46 slot, 45 types, 45 wireless network adapter, 45 110 Index See display N network Network Setup Wizard, 47 problems, 61 setting up , 21 IRQ conflicts, 70 K keyboard description, 14 numeric keypad, 41 problems, 57 shortcuts, 42 system view, 14 keyboard status lights description, 15 system view, 15 keypad numeric, 41 L labels Microsoft Windows, 10 Service Tag, 10 M memory removing, 78 memory module cover...


