
User Guide
Page 3
... 19 Turning Off Your Computer 19 Before Working Inside Your Computer 19 3 Chassis Intrusion Switch Removing the Chassis Intrusion Switch 21 Mini Tower Computer 21 Desktop Computer 22 Small Form Factor Computer 23 Ultra Small Form Factor Computer 24 Replacing the Chassis Intrusion Switch 24 Resetting the Chassis Intrusion Detector 24...
... 19 Turning Off Your Computer 19 Before Working Inside Your Computer 19 3 Chassis Intrusion Switch Removing the Chassis Intrusion Switch 21 Mini Tower Computer 21 Desktop Computer 22 Small Form Factor Computer 23 Ultra Small Form Factor Computer 24 Replacing the Chassis Intrusion Switch 24 Resetting the Chassis Intrusion Detector 24...

User Guide
Page 5
... 97 Front View 97 Back View 98 Back-Panel Connectors 99 Inside Your Computer 100 System Board Components 102 Jumper Settings 103 Desktop Computer Specifications 105 Removing the Computer Cover 111 I/O Panel 113 Removing the I/O Panel 113 Replacing the I/O Panel 114 Drives 115 General Installation Guidelines 115 Connecting ...
... 97 Front View 97 Back View 98 Back-Panel Connectors 99 Inside Your Computer 100 System Board Components 102 Jumper Settings 103 Desktop Computer Specifications 105 Removing the Computer Cover 111 I/O Panel 113 Removing the I/O Panel 113 Replacing the I/O Panel 114 Drives 115 General Installation Guidelines 115 Connecting ...
User Guide
Page 10
... Board Screws 265 Small Form Factor System Board Screws 266 Replacing the System Board: Mini Tower, Desktop, and Small Form Factor Computers 266 11 Memory DDR2 Memory Overview 267 Addressing Memory With 4-GB Configurations 268 Removing Memory 269 Replacing/Adding Additional Memory ... and DVDs 276 14 Reinstalling Drivers and the Operating System Drivers 277 What Is a Driver 277 Identifying Drivers 277 Reinstalling Drivers and Utilities 278 Using Windows XP Device Driver Rollback 278 Using the Optional Drivers and Utilities CD 278 10 Contents
... Board Screws 265 Small Form Factor System Board Screws 266 Replacing the System Board: Mini Tower, Desktop, and Small Form Factor Computers 266 11 Memory DDR2 Memory Overview 267 Addressing Memory With 4-GB Configurations 268 Removing Memory 269 Replacing/Adding Additional Memory ... and DVDs 276 14 Reinstalling Drivers and the Operating System Drivers 277 What Is a Driver 277 Identifying Drivers 277 Reinstalling Drivers and Utilities 278 Using Windows XP Device Driver Rollback 278 Using the Optional Drivers and Utilities CD 278 10 Contents
User Guide
Page 15
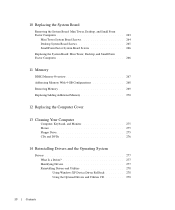
...available as ResourceCD) Documentation and drivers are already installed on your CD to provide last-minute updates about technical changes to run the Dell Diagnostics • Error codes and diagnostic lights • Tools and utilities • How to remove and install parts NOTE: Drivers...Drivers for my computer • My computer documentation • My device documentation • Desktop System Software (DSS) Find It Here Drivers and Utilities CD (also known as a PDF at support.dell.com. Readme files may be included on your documentation. NOTE: This document is optional and...
...available as ResourceCD) Documentation and drivers are already installed on your CD to provide last-minute updates about technical changes to run the Dell Diagnostics • Error codes and diagnostic lights • Tools and utilities • How to remove and install parts NOTE: Drivers...Drivers for my computer • My computer documentation • My device documentation • Desktop System Software (DSS) Find It Here Drivers and Utilities CD (also known as a PDF at support.dell.com. Readme files may be included on your documentation. NOTE: This document is optional and...

User Guide
Page 17
...and software updates • Desktop System Software (DSS) - The software automatically detects your computer and operating system and installs the updates appropriate for your region to use the customized Dell Premier Support website at premier.support.dell.com. The website may...NOTE: Corporate, government, and education customers can also use Windows XP • Documentation for my computer • Documentation for correct operation of your computer, you should also reinstall the DSS utility. support.dell.com technicians, online courses, frequently asked questions NOTE: Select...
...and software updates • Desktop System Software (DSS) - The software automatically detects your computer and operating system and installs the updates appropriate for your region to use the customized Dell Premier Support website at premier.support.dell.com. The website may...NOTE: Corporate, government, and education customers can also use Windows XP • Documentation for my computer • Documentation for correct operation of your computer, you should also reinstall the DSS utility. support.dell.com technicians, online courses, frequently asked questions NOTE: Select...
User Guide
Page 20
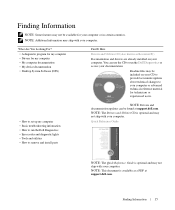
..., perform the following steps before removing the cover. 5 Remove the computer cover: • Remove the mini tower computer cover. • Remove the desktop computer cover. • Remove the small form factor computer cover. • Remove the ultra small form factor computer. NOTICE: To disconnect a network ... tabs before you disconnect a cable, pull on its connector or on its strain-relief loop, not on the cable itself. www.dell.com | support.dell.com CAUTION: Many repairs may only be done by the online or telephone service and support team. Some cables have a connector with...
..., perform the following steps before removing the cover. 5 Remove the computer cover: • Remove the mini tower computer cover. • Remove the desktop computer cover. • Remove the small form factor computer cover. • Remove the ultra small form factor computer. NOTICE: To disconnect a network ... tabs before you disconnect a cable, pull on its connector or on its strain-relief loop, not on the cable itself. www.dell.com | support.dell.com CAUTION: Many repairs may only be done by the online or telephone service and support team. Some cables have a connector with...
User Guide
Page 24
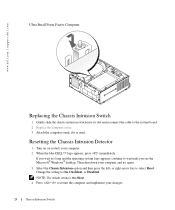
or right-arrow key to wait until you see the Microsoft® Windows® desktop. www.dell.com | support.dell.com Ultra Small Form Factor Computer Replacing the Chassis Intrusion Switch 1 Gently slide the chassis intrusion switch into its slot and reconnect the ... Intrusion Switch If you wait too long and the operating system logo appears, continue to select Reset. Then shut down your computer. 2 When the blue DELL™ logo appears, press immediately. Resetting the Chassis Intrusion Detector 1 Turn on (or restart) your computer and try again. 3 Select the Chassis Intrusion...
or right-arrow key to wait until you see the Microsoft® Windows® desktop. www.dell.com | support.dell.com Ultra Small Form Factor Computer Replacing the Chassis Intrusion Switch 1 Gently slide the chassis intrusion switch into its slot and reconnect the ... Intrusion Switch If you wait too long and the operating system logo appears, continue to select Reset. Then shut down your computer. 2 When the blue DELL™ logo appears, press immediately. Resetting the Chassis Intrusion Detector 1 Turn on (or restart) your computer and try again. 3 Select the Chassis Intrusion...

User Guide
Page 97
www.dell.com | support.dell.com Desktop Computer About Your Desktop Computer Front View 1 2 3 11 10 9 8 76 5 4 1 USB 2.0 connectors (2) 2 LAN indicator light 3 power button 4 Dell badge Use the front USB connectors for devices that typically remain connected, such as joysticks or cameras, or for bootable USB devices (see "System Setup" ...
www.dell.com | support.dell.com Desktop Computer About Your Desktop Computer Front View 1 2 3 11 10 9 8 76 5 4 1 USB 2.0 connectors (2) 2 LAN indicator light 3 power button 4 Dell badge Use the front USB connectors for devices that typically remain connected, such as joysticks or cameras, or for bootable USB devices (see "System Setup" ...

User Guide
Page 98
www.dell.com | support.dell.com 5 power light 6 diagnostic lights 7 hard-drive activity... Insert a CD or DVD (if applicable) into the appropriate connector. Insert the power cable. 98 Desktop Computer Use the lights to attach headphones and most kinds of light codes that can help you troubleshoot problems... 6 1 card slots 2 back-panel connectors 3 power connector Access connectors for a description of speakers. The computer is in the Windows Device Manager. The computer is configured as a wake device in a normal operating state. • Blinking green - See "Diagnostic Lights...
www.dell.com | support.dell.com 5 power light 6 diagnostic lights 7 hard-drive activity... Insert a CD or DVD (if applicable) into the appropriate connector. Insert the power cable. 98 Desktop Computer Use the lights to attach headphones and most kinds of light codes that can help you troubleshoot problems... 6 1 card slots 2 back-panel connectors 3 power connector Access connectors for a description of speakers. The computer is in the Windows Device Manager. The computer is configured as a wake device in a normal operating state. • Blinking green - See "Diagnostic Lights...

User Guide
Page 99
... must be set the switch for the voltage that your location. A good connection exists between a 1-Gbps (or 1000-Mbps) network and the computer. • Off - Desktop Computer 99 A good connection exists between a 100-Mbps network and the computer. • Yellow - For more information, see "System Setup Options." • Green - To help...
... must be set the switch for the voltage that your location. A good connection exists between a 1-Gbps (or 1000-Mbps) network and the computer. • Off - Desktop Computer 99 A good connection exists between a 100-Mbps network and the computer. • Yellow - For more information, see "System Setup Options." • Green - To help...

User Guide
Page 100
...the computer cover. Do not remove the cap. CAUTION: To avoid electrical shock, always unplug your computer from the system board. 100 Desktop Computer For more information, see "System Setup Options." A click indicates that supports dual monitors, use the connector on the card. NOTE:..., use Category 3 wiring, force the network speed to 10 Mbps to either a network jack or your network or broadband device. www.dell.com | support.dell.com 3 network adapter connector To attach your computer to a network or broadband device, connect one end of a network cable to ensure ...
...the computer cover. Do not remove the cap. CAUTION: To avoid electrical shock, always unplug your computer from the system board. 100 Desktop Computer For more information, see "System Setup Options." A click indicates that supports dual monitors, use the connector on the card. NOTE:..., use Category 3 wiring, force the network speed to 10 Mbps to either a network jack or your network or broadband device. www.dell.com | support.dell.com 3 network adapter connector To attach your computer to a network or broadband device, connect one end of a network cable to ensure ...

User Guide
Page 101
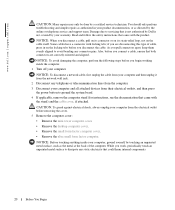
2 1 3 4 5 7 6 1 drives bay (CD/DVD, floppy, 5 card slots and hard drive) 2 power supply 6 heat sink assembly 3 chassis intrusion switch 7 front I/O panel 4 system board Desktop Computer 101
2 1 3 4 5 7 6 1 drives bay (CD/DVD, floppy, 5 card slots and hard drive) 2 power supply 6 heat sink assembly 3 chassis intrusion switch 7 front I/O panel 4 system board Desktop Computer 101

User Guide
Page 103
... board speaker (BEEP) 10 RTC reset jumper (RTCRST) 21 internal speaker (INT_SPKR) 11 intrusion switch connector (INTRUDER) Jumper Settings The jumper locations are shown below. Desktop Computer Desktop Computer 103
... board speaker (BEEP) 10 RTC reset jumper (RTCRST) 21 internal speaker (INT_SPKR) 11 intrusion switch connector (INTRUDER) Jumper Settings The jumper locations are shown below. Desktop Computer Desktop Computer 103

User Guide
Page 104
The real-time clock is being reset (jumpered temporarily). www.dell.com | support.dell.com Jumper PSWD Setting RTCRST jumpered Description Password features are disabled. The real-time clock has not been reset. unjumpered 104 Desktop Computer Password features are enabled (default).
The real-time clock is being reset (jumpered temporarily). www.dell.com | support.dell.com Jumper PSWD Setting RTCRST jumpered Description Password features are disabled. The real-time clock has not been reset. unjumpered 104 Desktop Computer Password features are enabled (default).

User Guide
Page 105
Desktop Computer Specifications Microprocessor Microprocessor type Level 1 (L1) cache Level 2 (L2) cache Memory Type Memory connectors Memory modules supported Minimum memory Maximum memory BIOS address Computer ...
Desktop Computer Specifications Microprocessor Microprocessor type Level 1 (L1) cache Level 2 (L2) cache Memory Type Memory connectors Memory modules supported Minimum memory Maximum memory BIOS address Computer ...

User Guide
Page 113
NOTE: Note the routing of all cables before removing the cover. Carelessness may result in damage to the desktop computer. CAUTION: To guard against electrical shock, always unplug your computer from the electrical outlet before disconnecting them correctly when installing the new I /O panel to ...
NOTE: Note the routing of all cables before removing the cover. Carelessness may result in damage to the desktop computer. CAUTION: To guard against electrical shock, always unplug your computer from the electrical outlet before disconnecting them correctly when installing the new I /O panel to ...

User Guide
Page 201
... support.dell.com Ultra Small Form Factor Computer About Your Ultra Small Form Factor Computer NOTICE: When setting up your computer, ensure that the computer has at least 6 cm (2 inches) of airflow space on the front and the back of your work area to orient your computer under a desktop or on... a wall surface, use the optional wall-mount bracket. To order this bracket, contact Dell. NOTICE: To ensure proper ventilation, do not block the cooling vents. NOTICE: When setting up your...
... support.dell.com Ultra Small Form Factor Computer About Your Ultra Small Form Factor Computer NOTICE: When setting up your computer, ensure that the computer has at least 6 cm (2 inches) of airflow space on the front and the back of your work area to orient your computer under a desktop or on... a wall surface, use the optional wall-mount bracket. To order this bracket, contact Dell. NOTICE: To ensure proper ventilation, do not block the cooling vents. NOTICE: When setting up your...

User Guide
Page 245
... computer • To set or change a user-selectable option such as follows: • To change , or remove any hardware in your computer. 2 When the blue DELL™ logo appears, press immediately. If you wait too long and the operating system logo appears, continue to wait until you add, change the system... list, active options field, and key functions. Disabling a Forgotten Password and Setting a New Password To reset system and/or administrator passwords, see the Microsoft® Windows® desktop.
... computer • To set or change a user-selectable option such as follows: • To change , or remove any hardware in your computer. 2 When the blue DELL™ logo appears, press immediately. If you wait too long and the operating system logo appears, continue to wait until you add, change the system... list, active options field, and key functions. Disabling a Forgotten Password and Setting a New Password To reset system and/or administrator passwords, see the Microsoft® Windows® desktop.
User Guide
Page 247
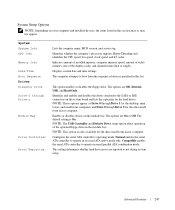
... the ultra small form factor computer. System System Info CPU Info Memory Info Date/Time Boot Sequence Drives Diskette Drive Drive 0 through Drive 3 for the desktop, mini tower, and small form computers and Drive 0 though Drive 5 for the ultra small form factor computer. Indicates amount of installed memory, computer memory speed...
... the ultra small form factor computer. System System Info CPU Info Memory Info Date/Time Boot Sequence Drives Diskette Drive Drive 0 through Drive 3 for the desktop, mini tower, and small form computers and Drive 0 though Drive 5 for the ultra small form factor computer. Indicates amount of installed memory, computer memory speed...

User Guide
Page 253
... have a checkmark.) 5 Press or to a USB memory key, highlight USB Device and press . To ensure that appears next to wait until you see the Microsoft Windows desktop. The BIOS detects the device and adds the USB device option to the boot menu. 3 From the boot menu, select the number that your computer...
... have a checkmark.) 5 Press or to a USB memory key, highlight USB Device and press . To ensure that appears next to wait until you see the Microsoft Windows desktop. The BIOS detects the device and adds the USB device option to the boot menu. 3 From the boot menu, select the number that your computer...


