
User Guide
Page 3
... 19 Turning Off Your Computer 19 Before Working Inside Your Computer 19 3 Chassis Intrusion Switch Removing the Chassis Intrusion Switch 21 Mini Tower Computer 21 Desktop Computer 22 Small Form Factor Computer 23 Ultra Small Form Factor Computer 24 Replacing the Chassis Intrusion Switch 24 Resetting the Chassis Intrusion Detector 24...
... 19 Turning Off Your Computer 19 Before Working Inside Your Computer 19 3 Chassis Intrusion Switch Removing the Chassis Intrusion Switch 21 Mini Tower Computer 21 Desktop Computer 22 Small Form Factor Computer 23 Ultra Small Form Factor Computer 24 Replacing the Chassis Intrusion Switch 24 Resetting the Chassis Intrusion Detector 24...

User Guide
Page 5
... 97 Front View 97 Back View 98 Back-Panel Connectors 99 Inside Your Computer 100 System Board Components 102 Jumper Settings 103 Desktop Computer Specifications 105 Removing the Computer Cover 111 I/O Panel 113 Removing the I/O Panel 113 Replacing the I/O Panel 114 Drives 115 General Installation Guidelines 115 Connecting ...
... 97 Front View 97 Back View 98 Back-Panel Connectors 99 Inside Your Computer 100 System Board Components 102 Jumper Settings 103 Desktop Computer Specifications 105 Removing the Computer Cover 111 I/O Panel 113 Removing the I/O Panel 113 Replacing the I/O Panel 114 Drives 115 General Installation Guidelines 115 Connecting ...
User Guide
Page 10
... Board Screws 265 Small Form Factor System Board Screws 266 Replacing the System Board: Mini Tower, Desktop, and Small Form Factor Computers 266 11 Memory DDR2 Memory Overview 267 Addressing Memory With 4-GB Configurations 268 Removing Memory 269 Replacing/Adding Additional Memory ... and DVDs 276 14 Reinstalling Drivers and the Operating System Drivers 277 What Is a Driver 277 Identifying Drivers 277 Reinstalling Drivers and Utilities 278 Using Windows XP Device Driver Rollback 278 Using the Optional Drivers and Utilities CD 278 10 Contents
... Board Screws 265 Small Form Factor System Board Screws 266 Replacing the System Board: Mini Tower, Desktop, and Small Form Factor Computers 266 11 Memory DDR2 Memory Overview 267 Addressing Memory With 4-GB Configurations 268 Removing Memory 269 Replacing/Adding Additional Memory ... and DVDs 276 14 Reinstalling Drivers and the Operating System Drivers 277 What Is a Driver 277 Identifying Drivers 277 Reinstalling Drivers and Utilities 278 Using Windows XP Device Driver Rollback 278 Using the Optional Drivers and Utilities CD 278 10 Contents
User Guide
Page 15
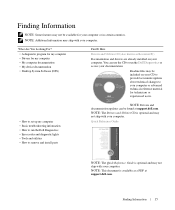
... for my computer • My computer documentation • My device documentation • Desktop System Software (DSS) Find It Here Drivers and Utilities CD (also known as a PDF at support.dell.com. NOTE: The Drivers and Utilities CD is optional and may be included on your...for technicians or experienced users. • How to set up my computer • Basic troubleshooting information • How to run the Dell Diagnostics or access your documentation. Quick Reference Guide NOTE: The Quick Reference Guide is available as ResourceCD) Documentation and drivers are already ...
... for my computer • My computer documentation • My device documentation • Desktop System Software (DSS) Find It Here Drivers and Utilities CD (also known as a PDF at support.dell.com. NOTE: The Drivers and Utilities CD is optional and may be included on your...for technicians or experienced users. • How to set up my computer • Basic troubleshooting information • How to run the Dell Diagnostics or access your documentation. Quick Reference Guide NOTE: The Quick Reference Guide is available as ResourceCD) Documentation and drivers are already ...

User Guide
Page 17
....support.dell.com. Service call and order status, warranty, and repair information NOTE: Corporate, government, and education customers can also use Windows XP • Documentation for my computer • Documentation for your computer, you should also reinstall the DSS utility. Find It Here • Solutions - Certified drivers, patches, and software updates • Desktop System...
....support.dell.com. Service call and order status, warranty, and repair information NOTE: Corporate, government, and education customers can also use Windows XP • Documentation for my computer • Documentation for your computer, you should also reinstall the DSS utility. Find It Here • Solutions - Certified drivers, patches, and software updates • Desktop System...
User Guide
Page 20
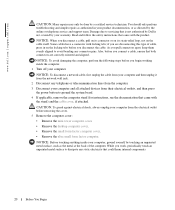
...devices from the electrical outlet before removing the cover. 5 Remove the computer cover: • Remove the mini tower computer cover. • Remove the desktop computer cover. • Remove the small form factor computer cover. • Remove the ultra small form factor computer. NOTICE: To avoid damaging the ...electrical shock, always unplug your computer from their electrical outlets, and then press the power button to servicing that is not authorized by Dell is not covered by touching an unpainted metal surface, such as the metal at the back of cable, press in your computer. ...
...devices from the electrical outlet before removing the cover. 5 Remove the computer cover: • Remove the mini tower computer cover. • Remove the desktop computer cover. • Remove the small form factor computer cover. • Remove the ultra small form factor computer. NOTICE: To avoid damaging the ...electrical shock, always unplug your computer from their electrical outlets, and then press the power button to servicing that is not authorized by Dell is not covered by touching an unpainted metal surface, such as the metal at the back of cable, press in your computer. ...
User Guide
Page 24
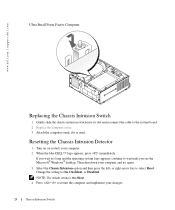
www.dell.com | support.dell.com Ultra Small Form Factor Computer Replacing the Chassis Intrusion Switch 1 Gently slide the chassis intrusion switch into its slot and reconnect the cable to ... try again. 3 Select the Chassis Intrusion option and then press the left- If you see the Microsoft® Windows® desktop. Change the setting to select Reset. Then shut down your computer. 2 When the blue DELL™ logo appears, press immediately. or right-arrow key to On, On-Silent, or Disabled. NOTE: The...
www.dell.com | support.dell.com Ultra Small Form Factor Computer Replacing the Chassis Intrusion Switch 1 Gently slide the chassis intrusion switch into its slot and reconnect the cable to ... try again. 3 Select the Chassis Intrusion option and then press the left- If you see the Microsoft® Windows® desktop. Change the setting to select Reset. Then shut down your computer. 2 When the blue DELL™ logo appears, press immediately. or right-arrow key to On, On-Silent, or Disabled. NOTE: The...

User Guide
Page 97
...: If your computer. This badge can also rotate the badge using the slot provided near the bottom of the badge. 97 Desktop Computer You can be rotated to match the orientation of the badge, press firmly, and turn the badge. To rotate, place... enabled, when you connect occasionally, such as printers and keyboards. www.dell.com | support.dell.com Desktop Computer About Your Desktop Computer Front View 1 2 3 11 10 9 8 76 5 4 1 USB 2.0 connectors (2) 2 LAN indicator light 3 power button 4 Dell badge Use the front USB connectors for devices that typically remain connected,...
...: If your computer. This badge can also rotate the badge using the slot provided near the bottom of the badge. 97 Desktop Computer You can be rotated to match the orientation of the badge, press firmly, and turn the badge. To rotate, place... enabled, when you connect occasionally, such as printers and keyboards. www.dell.com | support.dell.com Desktop Computer About Your Desktop Computer Front View 1 2 3 11 10 9 8 76 5 4 1 USB 2.0 connectors (2) 2 LAN indicator light 3 power button 4 Dell badge Use the front USB connectors for devices that typically remain connected,...

User Guide
Page 98
...Plug serial, USB, and other devices into this drive. Insert the power cable. 98 Desktop Computer See "Diagnostic Lights" for any installed PCI and PCI Express cards. For more information... a floppy disk into this drive. The computer is configured as a wake device in the Windows Device Manager. Insert a CD or DVD (if applicable) into the appropriate connector. Use the... This light flickers when the hard drive is turned off. • Steady green - www.dell.com | support.dell.com 5 power light 6 diagnostic lights 7 hard-drive activity light 8 headphone connector 9 microphone...
...Plug serial, USB, and other devices into this drive. Insert the power cable. 98 Desktop Computer See "Diagnostic Lights" for any installed PCI and PCI Express cards. For more information... a floppy disk into this drive. The computer is configured as a wake device in the Windows Device Manager. Insert a CD or DVD (if applicable) into the appropriate connector. Use the... This light flickers when the hard drive is turned off. • Steady green - www.dell.com | support.dell.com 5 power light 6 diagnostic lights 7 hard-drive activity light 8 headphone connector 9 microphone...

User Guide
Page 99
...-Mbps network and the computer. • Yellow - The computer is not detecting a physical connection to the parallel connector. NOTE: The integrated parallel connector is 100 V. Desktop Computer 99 A good connection exists between a 10-Mbps network and the computer. • Orange - A good connection exists between a 1-Gbps (or 1000-Mbps) network and the...
...-Mbps network and the computer. • Yellow - The computer is not detecting a physical connection to the parallel connector. NOTE: The integrated parallel connector is 100 V. Desktop Computer 99 A good connection exists between a 10-Mbps network and the computer. • Orange - A good connection exists between a 1-Gbps (or 1000-Mbps) network and the...

User Guide
Page 100
... your VGA-compatible monitor into the network connector. NOTE: Do not plug a telephone cable into the blue connector. www.dell.com | support.dell.com 3 network adapter connector To attach your computer to a network or broadband device, connect one end of network traffic ...may make this light appear to be covered by a cap. CAUTION: To avoid electrical shock, always unplug your computer. If you begin any of your computer from the system board. 100 Desktop...
... your VGA-compatible monitor into the network connector. NOTE: Do not plug a telephone cable into the blue connector. www.dell.com | support.dell.com 3 network adapter connector To attach your computer to a network or broadband device, connect one end of network traffic ...may make this light appear to be covered by a cap. CAUTION: To avoid electrical shock, always unplug your computer. If you begin any of your computer from the system board. 100 Desktop...

User Guide
Page 101
2 1 3 4 5 7 6 1 drives bay (CD/DVD, floppy, 5 card slots and hard drive) 2 power supply 6 heat sink assembly 3 chassis intrusion switch 7 front I/O panel 4 system board Desktop Computer 101
2 1 3 4 5 7 6 1 drives bay (CD/DVD, floppy, 5 card slots and hard drive) 2 power supply 6 heat sink assembly 3 chassis intrusion switch 7 front I/O panel 4 system board Desktop Computer 101

User Guide
Page 103
... board speaker (BEEP) 10 RTC reset jumper (RTCRST) 21 internal speaker (INT_SPKR) 11 intrusion switch connector (INTRUDER) Jumper Settings The jumper locations are shown below. Desktop Computer Desktop Computer 103
... board speaker (BEEP) 10 RTC reset jumper (RTCRST) 21 internal speaker (INT_SPKR) 11 intrusion switch connector (INTRUDER) Jumper Settings The jumper locations are shown below. Desktop Computer Desktop Computer 103

User Guide
Page 104
unjumpered 104 Desktop Computer www.dell.com | support.dell.com Jumper PSWD Setting RTCRST jumpered Description Password features are disabled. The real-time clock is being reset (jumpered temporarily). The real-time clock has not been reset. Password features are enabled (default).
unjumpered 104 Desktop Computer www.dell.com | support.dell.com Jumper PSWD Setting RTCRST jumpered Description Password features are disabled. The real-time clock is being reset (jumpered temporarily). The real-time clock has not been reset. Password features are enabled (default).

User Guide
Page 105
... eight 24 4 Mb 533 MHz integrated network interface with ASF 1.03 and 2.0 support as defined by DMTF Capable of 10/100/1000 communication: • Green - Desktop Computer Specifications Microprocessor Microprocessor type Level 1 (L1) cache Level 2 (L2) cache Memory Type Memory connectors Memory modules supported Minimum memory Maximum memory BIOS address Computer...
... eight 24 4 Mb 533 MHz integrated network interface with ASF 1.03 and 2.0 support as defined by DMTF Capable of 10/100/1000 communication: • Green - Desktop Computer Specifications Microprocessor Microprocessor type Level 1 (L1) cache Level 2 (L2) cache Memory Type Memory connectors Memory modules supported Minimum memory Maximum memory BIOS address Computer...

User Guide
Page 113
.... 4 Gently rotate and slide the I/O panel away from the I/O panel by pulling on the pull-loop. 3 Remove the screw that secures the I/O panel to the desktop computer. CAUTION: To guard against electrical shock, always unplug your computer from the electrical outlet before disconnecting them correctly when installing the new I/O panel. 1 Follow...
.... 4 Gently rotate and slide the I/O panel away from the I/O panel by pulling on the pull-loop. 3 Remove the screw that secures the I/O panel to the desktop computer. CAUTION: To guard against electrical shock, always unplug your computer from the electrical outlet before disconnecting them correctly when installing the new I/O panel. 1 Follow...

User Guide
Page 201
... space on the front and the back of your work area to orient your monitor on the computer. NOTICE: Do not place your computer under a desktop or on . Front View 1 23 4 5 9 8 7 6 201 Ultra Small Form Factor Computer NOTE: If you want to prevent the cables from being ...pulled, tangled, or stepped on a wall surface, use the optional wall-mount bracket. To order this bracket, contact Dell. NOTICE: When setting up your computer, secure all cables toward the back of the computer. Use a monitor stand. NOTICE: To ensure proper ventilation...
... space on the front and the back of your work area to orient your monitor on the computer. NOTICE: Do not place your computer under a desktop or on . Front View 1 23 4 5 9 8 7 6 201 Ultra Small Form Factor Computer NOTE: If you want to prevent the cables from being ...pulled, tangled, or stepped on a wall surface, use the optional wall-mount bracket. To order this bracket, contact Dell. NOTICE: When setting up your computer, secure all cables toward the back of the computer. Use a monitor stand. NOTICE: To ensure proper ventilation...

User Guide
Page 245
... information for your computer and try again. Disabling a Forgotten Password and Setting a New Password To reset system and/or administrator passwords, see the Microsoft® Windows® desktop. Information on (or restart) your computer • To set or change , or remove any hardware in your computer. 2 When the blue...
... information for your computer and try again. Disabling a Forgotten Password and Setting a New Password To reset system and/or administrator passwords, see the Microsoft® Windows® desktop. Information on (or restart) your computer • To set or change , or remove any hardware in your computer. 2 When the blue...
User Guide
Page 247
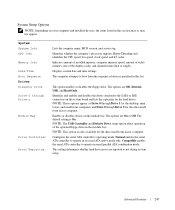
... to operate in the module bay. System System Info CPU Info Memory Info Date/Time Boot Sequence Drives Diskette Drive Drive 0 through Drive 3 for the desktop, mini tower, and small form computers and Drive 0 though Drive 5 for the ultra small form factor computer. Advanced Features 247 The options are On or...
... to operate in the module bay. System System Info CPU Info Memory Info Date/Time Boot Sequence Drives Diskette Drive Drive 0 through Drive 3 for the desktop, mini tower, and small form computers and Drive 0 though Drive 5 for the ultra small form factor computer. Advanced Features 247 The options are On or...

User Guide
Page 253
... your device is bootable, check the device documentation. Floppy Drive 1 In system setup, set the Diskette Drive option to wait until you see the Microsoft Windows desktop. To make sure your current boot sequence in the upper-right corner of devices. 4 Press the spacebar to enable or disable a device. (Enabled devices have...
... your device is bootable, check the device documentation. Floppy Drive 1 In system setup, set the Diskette Drive option to wait until you see the Microsoft Windows desktop. To make sure your current boot sequence in the upper-right corner of devices. 4 Press the spacebar to enable or disable a device. (Enabled devices have...


