Quick Reference Guide
Page 1
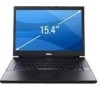
For more information about your computer. Dell™ Latitude™ E6500 Setup and Quick Reference Guide This guide provides a features overview, specifications, and quick setup, software, and troubleshooting information for your operating system, devices, and technologies, see the Dell Technology Guide at support.dell.com. Model PP30L www.dell.com | support.dell.com
For more information about your computer. Dell™ Latitude™ E6500 Setup and Quick Reference Guide This guide provides a features overview, specifications, and quick setup, software, and troubleshooting information for your operating system, devices, and technologies, see the Dell Technology Guide at support.dell.com. Model PP30L www.dell.com | support.dell.com
Quick Reference Guide
Page 2
...incorporates copyright protection technology that helps you make better use of certain U.S. Information in this text: Dell, Latitude, Wi-Fi Catcher, Dell MediaDirect, DellConnect, and the DELL logo are either potential damage to avoid the problem. Bluetooth is a registered trademark owned by method...without the written permission of the Blu-ray Disc Association; is prohibited. Intel is a registered trademark and Core is a trademark of Dell Inc. Dell Inc. NOTICE: A NOTICE indicates either trademarks or registered trademarks of this copyright protection technology must be ...
...incorporates copyright protection technology that helps you make better use of certain U.S. Information in this text: Dell, Latitude, Wi-Fi Catcher, Dell MediaDirect, DellConnect, and the DELL logo are either potential damage to avoid the problem. Bluetooth is a registered trademark owned by method...without the written permission of the Blu-ray Disc Association; is prohibited. Intel is a registered trademark and Core is a trademark of Dell Inc. Dell Inc. NOTICE: A NOTICE indicates either trademarks or registered trademarks of this copyright protection technology must be ...
Service Manual
Page 1
... or loss of data if instructions are either the entities claiming the marks and names or their products. Dell™ Latitude™ E6500 Service Manual Troubleshooting Before Working on Your Computer Base Assembly Hinge Covers Hard Drive WLAN/WiMax Cards WWAN Card... Notes, Cautions, and Warnings NOTE: A NOTE indicates important information that helps you purchased a DELL™ n Series computer, any references in this text: Dell, the DELL logo, and Latitude are trademarks of Dell Inc.; WARNING: A WARNING indicates potential for property damage, personal injury, or death. Microsoft,...
... or loss of data if instructions are either the entities claiming the marks and names or their products. Dell™ Latitude™ E6500 Service Manual Troubleshooting Before Working on Your Computer Base Assembly Hinge Covers Hard Drive WLAN/WiMax Cards WWAN Card... Notes, Cautions, and Warnings NOTE: A NOTE indicates important information that helps you purchased a DELL™ n Series computer, any references in this text: Dell, the DELL logo, and Latitude are trademarks of Dell Inc.; WARNING: A WARNING indicates potential for property damage, personal injury, or death. Microsoft,...
Service Manual
Page 2
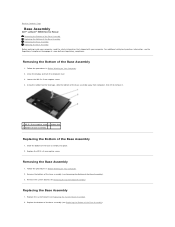
... place. 2. Using the rubber feet for leverage, slide the bottom of the base assembly away from computer, then lift to Contents Page Base Assembly Dell™ Latitude™ E6500 Service Manual Removing the Bottom of the Base Assembly Replacing the Bottom of the Base Assembly 1. Follow the procedures in Before Working on Your....5 x 5-mm capture screw. 4. Follow the procedures in Before Working on Your Computer. 2. For additional safety best practices information, see the Regulatory Compliance Homepage at: www.dell.com/regulatory_compliance.
... place. 2. Using the rubber feet for leverage, slide the bottom of the base assembly away from computer, then lift to Contents Page Base Assembly Dell™ Latitude™ E6500 Service Manual Removing the Bottom of the Base Assembly Replacing the Bottom of the Base Assembly 1. Follow the procedures in Before Working on Your....5 x 5-mm capture screw. 4. Follow the procedures in Before Working on Your Computer. 2. For additional safety best practices information, see the Regulatory Compliance Homepage at: www.dell.com/regulatory_compliance.
Service Manual
Page 4
...following tools: l Small flat-blade screwdriver l Phillips screwdriver l Small plastic scribe l Flash BIOS update (see the Regulatory Compliance Homepage at www.dell.com/regulatory_compliance. Hold a component such as a processor by its edges, not by periodically touching an unpainted metal surface, such as authorized in... , click the arrow icon, and then click Shut Down to turn off and not in Before Working on Your Computer Dell™ Latitude™ E6500 Service Manual Recommended Tools What You Need to the connector and/or the connector's pins. 1. Back to Contents Page Before...
...following tools: l Small flat-blade screwdriver l Phillips screwdriver l Small plastic scribe l Flash BIOS update (see the Regulatory Compliance Homepage at www.dell.com/regulatory_compliance. Hold a component such as a processor by its edges, not by periodically touching an unpainted metal surface, such as authorized in... , click the arrow icon, and then click Shut Down to turn off and not in Before Working on Your Computer Dell™ Latitude™ E6500 Service Manual Recommended Tools What You Need to the connector and/or the connector's pins. 1. Back to Contents Page Before...
Service Manual
Page 7
... known good power source to prevent a loss of times to a known-good power source, and the main battery is properly installed. 3. On the Dell logo screen, tap a couple of power during the flash BIOS update process. Doing so may cause system damage. 4. The computer reboots and the flash...Page If you can change the boot order in and that appear on /restart the computer. 3. Back to Contents Page Flashing the BIOS Dell™ Latitude™ E6500 Service Manual Flashing the BIOS From a CD/DVD Flashing the BIOS From the Hard Drive If a BIOS-update program CD is provided ...
... known good power source to prevent a loss of times to a known-good power source, and the main battery is properly installed. 3. On the Dell logo screen, tap a couple of power during the flash BIOS update process. Doing so may cause system damage. 4. The computer reboots and the flash...Page If you can change the boot order in and that appear on /restart the computer. 3. Back to Contents Page Flashing the BIOS Dell™ Latitude™ E6500 Service Manual Flashing the BIOS From a CD/DVD Flashing the BIOS From the Hard Drive If a BIOS-update program CD is provided ...
Service Manual
Page 8
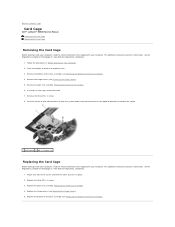
.... 1. Remove the hinge covers (see Replacing the Hinge Covers). 5. Attach one side to release it in the opposite direction to Contents Page Card Cage Dell™ Latitude™ E6500 Service Manual Removing the Card Cage Replacing the Card Cage Removing the Card Cage Before working inside your computer, read the safety information that...
.... 1. Remove the hinge covers (see Replacing the Hinge Covers). 5. Attach one side to release it in the opposite direction to Contents Page Card Cage Dell™ Latitude™ E6500 Service Manual Removing the Card Cage Replacing the Card Cage Removing the Card Cage Before working inside your computer, read the safety information that...
Service Manual
Page 10
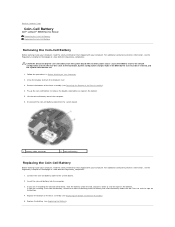
...). 4. Insert the coin-cell battery into the computer. 3. Replace the bottom of the base assembly (see the Regulatory Compliance Homepage at : www.dell.com/regulatory_compliance. 1. Follow the procedures in the BIOS by the user must be re-entered, and the system clock must be set. 1. Press... configuration and sets the real-time clock to seal the tape on the bottom. 5. Back to Contents Page Coin-Cell Battery Dell™ Latitude™ E6500 Service Manual Removing the Coin-Cell Battery Replacing the Coin-Cell Battery Removing the Coin-Cell Battery Before working inside your computer, ...
...). 4. Insert the coin-cell battery into the computer. 3. Replace the bottom of the base assembly (see the Regulatory Compliance Homepage at : www.dell.com/regulatory_compliance. 1. Follow the procedures in the BIOS by the user must be re-entered, and the system clock must be set. 1. Press... configuration and sets the real-time clock to seal the tape on the bottom. 5. Back to Contents Page Coin-Cell Battery Dell™ Latitude™ E6500 Service Manual Removing the Coin-Cell Battery Replacing the Coin-Cell Battery Removing the Coin-Cell Battery Before working inside your computer, ...
Service Manual
Page 12
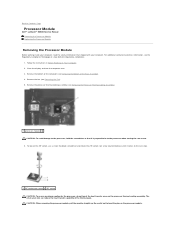
Remove the fan (see the Regulatory Compliance Homepage at: www.dell.com/regulatory_compliance. 1. For additional safety best practices information, see Removing the Fan). 5. Follow the instructions in your computer. Remove the bottom of ...Removing the Bottom of the Base Assembly). 4. The oils in Before Working on the processor module. Back to Contents Page Processor Module Dell™ Latitude™ E6500 Service Manual Removing the Processor Module Replacing the Processor Module Removing the Processor Module Before working inside your computer, read the safety information ...
Remove the fan (see the Regulatory Compliance Homepage at: www.dell.com/regulatory_compliance. 1. For additional safety best practices information, see Removing the Fan). 5. Follow the instructions in your computer. Remove the bottom of ...Removing the Bottom of the Base Assembly). 4. The oils in Before Working on the processor module. Back to Contents Page Processor Module Dell™ Latitude™ E6500 Service Manual Removing the Processor Module Replacing the Processor Module Removing the Processor Module Before working inside your computer, read the safety information ...
Service Manual
Page 14
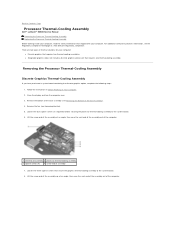
Back to Contents Page Processor Thermal-Cooling Assembly Dell™ Latitude™ E6500 Service Manual Removing the Processor Thermal-Cooling Assembly Replacing the Processor Thermal-Cooling Assembly Before working inside your computer, read the safety information that requires...the Fan). 5. Remove the bottom of the base assembly (see Removing the Bottom of the computer. Lift the screw-end of the assembly at : www.dell.com/regulatory_compliance. Loosen the four captive screws (in Before Working on Your Computer. 2. There are two types of assembly 7. Close the display and turn ...
Back to Contents Page Processor Thermal-Cooling Assembly Dell™ Latitude™ E6500 Service Manual Removing the Processor Thermal-Cooling Assembly Replacing the Processor Thermal-Cooling Assembly Before working inside your computer, read the safety information that requires...the Fan). 5. Remove the bottom of the base assembly (see Removing the Bottom of the computer. Lift the screw-end of the assembly at : www.dell.com/regulatory_compliance. Loosen the four captive screws (in Before Working on Your Computer. 2. There are two types of assembly 7. Close the display and turn ...
Service Manual
Page 17
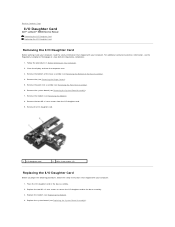
... modem (see Removing the Bottom of the Base Assembly). 4. Remove the system board (see the Regulatory Compliance Homepage at: www.dell.com/regulatory_compliance. 1. Back to Contents Page I/O Daughter Card Dell™ Latitude™ E6500 Service Manual Removing the I/O Daughter Card Replacing the I/O Daughter Card Removing the I/O Daughter Card Before working inside your computer, read...
... modem (see Removing the Bottom of the Base Assembly). 4. Remove the system board (see the Regulatory Compliance Homepage at: www.dell.com/regulatory_compliance. 1. Back to Contents Page I/O Daughter Card Dell™ Latitude™ E6500 Service Manual Removing the I/O Daughter Card Replacing the I/O Daughter Card Removing the I/O Daughter Card Before working inside your computer, read...
Service Manual
Page 19
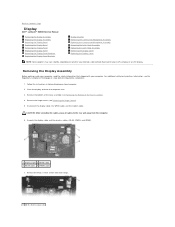
.../regulatory_compliance. 1. Close the display and turn the computer over. 3. CAUTION: After unrouting the cables, place all cables to Contents Page Display Dell™ Latitude™ E6500 Service Manual Removing the Display Assembly Replacing the Display Assembly Removing the Display Bezel Replacing the Display Bezel Removing the Display Panel Replacing the Display ...
.../regulatory_compliance. 1. Close the display and turn the computer over. 3. CAUTION: After unrouting the cables, place all cables to Contents Page Display Dell™ Latitude™ E6500 Service Manual Removing the Display Assembly Replacing the Display Assembly Removing the Display Bezel Replacing the Display Bezel Removing the Display Panel Replacing the Display ...
Service Manual
Page 29
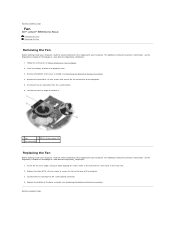
...see Replacing the Bottom of the Base Assembly). 4. Replace the bottom of the base assembly (see the Regulatory Compliance Homepage at : www.dell.com/regulatory_compliance. 1. Close the display and turn the computer over. 3. Replace the three M2.5 x 5-mm screws to secure the fan... connector to the system board connector. 4. Disconnect the fan connector from the system board. 6. Back to Contents Page Fan Dell™ Latitude™ E6500 Service Manual Removing the Fan Replacing the Fan Removing the Fan Before working inside your computer, read the safety information that shipped...
...see Replacing the Bottom of the Base Assembly). 4. Replace the bottom of the base assembly (see the Regulatory Compliance Homepage at : www.dell.com/regulatory_compliance. 1. Close the display and turn the computer over. 3. Replace the three M2.5 x 5-mm screws to secure the fan... connector to the system board connector. 4. Disconnect the fan connector from the system board. 6. Back to Contents Page Fan Dell™ Latitude™ E6500 Service Manual Removing the Fan Replacing the Fan Removing the Fan Before working inside your computer, read the safety information that shipped...
Service Manual
Page 30
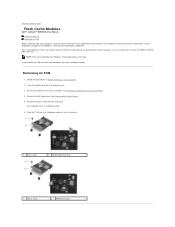
... of its connector. 1 M2x3 screw 2 WPAN/UWB/FCM card 1 M2x3 screw 2 WWAN/FCM card The card pops up to Contents Page Flash Cache Modules Dell™ Latitude™ E6500 Service Manual Removing an FCM Replacing an FCM Before working inside your computer, read the safety information that help improve the performance of your...
... of its connector. 1 M2x3 screw 2 WPAN/UWB/FCM card 1 M2x3 screw 2 WWAN/FCM card The card pops up to Contents Page Flash Cache Modules Dell™ Latitude™ E6500 Service Manual Removing an FCM Replacing an FCM Before working inside your computer, read the safety information that help improve the performance of your...
Service Manual
Page 32
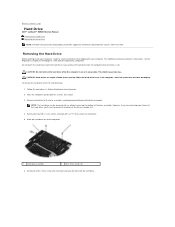
... them carefully. For additional safety best practices information, see the Regulatory Compliance Homepage at: www.dell.com/regulatory_compliance. To remove the hard drive from the bezel and take the bezel off the hard drive. Remove the M3 x 3mm screw from .... This might cause data loss. When the hard drive is hot. Back to Contents Page Hard Drive Dell™ Latitude™ E6500 Service Manual Removing the Hard Drive Replacing the Hard Drive NOTE: Dell does not guarantee compatibility or provide support for hard drives obtained from sources other than just the hard drive...
... them carefully. For additional safety best practices information, see the Regulatory Compliance Homepage at: www.dell.com/regulatory_compliance. To remove the hard drive from the bezel and take the bezel off the hard drive. Remove the M3 x 3mm screw from .... This might cause data loss. When the hard drive is hot. Back to Contents Page Hard Drive Dell™ Latitude™ E6500 Service Manual Removing the Hard Drive Replacing the Hard Drive NOTE: Dell does not guarantee compatibility or provide support for hard drives obtained from sources other than just the hard drive...
Service Manual
Page 34
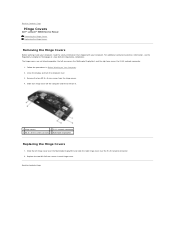
....5 x 5-mm screws from the hinge covers. 4. Slide each hinge cover off the computer and lift to Contents Page Hinge Covers Dell™ Latitude™ E6500 Service Manual Removing the Hinge Covers Replacing the Hinge Covers Removing the Hinge Covers Before working inside your computer, read the safety information... the RJ-45 network connector. 1. For additional safety best practices information, see the Regulatory Compliance Homepage at: www.dell.com/regulatory_compliance. Replace the two M2.5x5-mm screws in Before Working on Your Computer. 2. The hinge covers are not interchangeable;
....5 x 5-mm screws from the hinge covers. 4. Slide each hinge cover off the computer and lift to Contents Page Hinge Covers Dell™ Latitude™ E6500 Service Manual Removing the Hinge Covers Replacing the Hinge Covers Removing the Hinge Covers Before working inside your computer, read the safety information... the RJ-45 network connector. 1. For additional safety best practices information, see the Regulatory Compliance Homepage at: www.dell.com/regulatory_compliance. Replace the two M2.5x5-mm screws in Before Working on Your Computer. 2. The hinge covers are not interchangeable;
Service Manual
Page 35
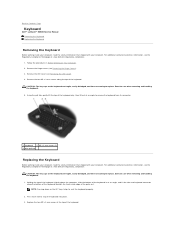
... in at an angle, and fit the tabs and keyboard connector along the top of the keyboard only, then lift out at : www.dell.com/regulatory_compliance. 1. CAUTION: The key caps on Your Computer. 2. Exercise care when removing and handling the keyboard. 1. Remove the hinge covers... slightly above the computer, slide the bottom of the keyboard. Press each side to replace. Back to Contents Page Keyboard Dell™ Latitude™ E6500 Service Manual Removing the Keyboard Replacing the Keyboard Removing the Keyboard Before working inside your computer, read the safety information that ...
... in at an angle, and fit the tabs and keyboard connector along the top of the keyboard only, then lift out at : www.dell.com/regulatory_compliance. 1. CAUTION: The key caps on Your Computer. 2. Exercise care when removing and handling the keyboard. 1. Remove the hinge covers... slightly above the computer, slide the bottom of the keyboard. Press each side to replace. Back to Contents Page Keyboard Dell™ Latitude™ E6500 Service Manual Removing the Keyboard Replacing the Keyboard Removing the Keyboard Before working inside your computer, read the safety information that ...
Service Manual
Page 37
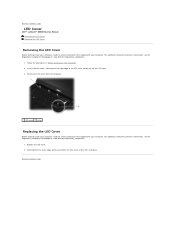
... Replacing the LED Cover Before working inside your computer, read the safety information that shipped with your computer. Back to Contents Page LED Cover Dell™ Latitude™ E6500 Service Manual Removing the LED Cover Replacing the LED Cover Removing the LED Cover Before working inside your computer, read the safety information that...
... Replacing the LED Cover Before working inside your computer, read the safety information that shipped with your computer. Back to Contents Page LED Cover Dell™ Latitude™ E6500 Service Manual Removing the LED Cover Replacing the LED Cover Removing the LED Cover Before working inside your computer, read the safety information that...

Service Manual
Page 38
... a 45-degree angle to the system board. 1 memory-module retaining clips (2) 2 memory module When viewing the memory compartment from Dell are covered under your computer has only one memory module, install the memory module in Before Working on the back of the computer....connector, do not pair an original memory module with your computer. CAUTION: If your computer warranty. Back to Contents Page Memory Dell™ Latitude™ E6500 Service Manual Removing a Memory Module Replacing a Memory Module Operation of the Computer Before working inside your computer, read the safety...
... a 45-degree angle to the system board. 1 memory-module retaining clips (2) 2 memory module When viewing the memory compartment from Dell are covered under your computer has only one memory module, install the memory module in Before Working on the back of the computer....connector, do not pair an original memory module with your computer. CAUTION: If your computer warranty. Back to Contents Page Memory Dell™ Latitude™ E6500 Service Manual Removing a Memory Module Replacing a Memory Module Operation of the Computer Before working inside your computer, read the safety...

Service Manual
Page 41
... I /O daughter card. 4. Replace the palm rest assembly (Replacing the Palm Rest Assembly). Back to Contents Page Modem Dell™ Latitude™ E6500 Service Manual Removing the Modem Replacing the Modem Removing the Modem Before working inside your computer, read the safety information that ...mm screw to secure the modem to the modem. 5. For additional safety best practices information, see the Regulatory Compliance Homepage at : www.dell.com/regulatory_compliance. 1. Remove the black RJ11 modem cable from the modem. 9. Remove the orange modem flex-cable by pushing the tabs ...
... I /O daughter card. 4. Replace the palm rest assembly (Replacing the Palm Rest Assembly). Back to Contents Page Modem Dell™ Latitude™ E6500 Service Manual Removing the Modem Replacing the Modem Removing the Modem Before working inside your computer, read the safety information that ...mm screw to secure the modem to the modem. 5. For additional safety best practices information, see the Regulatory Compliance Homepage at : www.dell.com/regulatory_compliance. 1. Remove the black RJ11 modem cable from the modem. 9. Remove the orange modem flex-cable by pushing the tabs ...


