
Dell Color Multifunction Printer Users Guide
Page 5
...(Windows 75 Add a Print Profile 76 Delete a Print Profile 76 Change the Default Print Settings (Windows 77 Print a Document Using the Dell Emulate PS Printer Driver (PostScript® 3™ Language Emulation) (Windows®) . . . 77 Print from Your Computer (Macintosh 78 Print a Document (Macintosh... Improve Toner Fixing (Macintosh 88 Adjust the Print Density (Macintosh 89 Skip Blank Page (Macintosh 89 Print a Document Using the Dell Emulate PS Printer Driver (PostScript® 3™ language emulation) (Macintosh). . . . 89 Monitor the Status of the Machine from Your Computer ...
...(Windows 75 Add a Print Profile 76 Delete a Print Profile 76 Change the Default Print Settings (Windows 77 Print a Document Using the Dell Emulate PS Printer Driver (PostScript® 3™ Language Emulation) (Windows®) . . . 77 Print from Your Computer (Macintosh 78 Print a Document (Macintosh... Improve Toner Fixing (Macintosh 88 Adjust the Print Density (Macintosh 89 Skip Blank Page (Macintosh 89 Print a Document Using the Dell Emulate PS Printer Driver (PostScript® 3™ language emulation) (Macintosh). . . . 89 Monitor the Status of the Machine from Your Computer ...

Dell Color Multifunction Printer Users Guide
Page 6
...Configure Network Scanning for Windows 97 Configure Network Scanning for Macintosh 99 Scan Using the Scan Button on Your Dell Machine 99 Scan Photos and Graphics 100 Save Scanned Data to a Folder as a PDF File 101 Web ...Vista® SP2 or greater, Windows® 7 and Windows® 8). . . 101 Scan Using Web Services from the Dell Machine (Windows Vista® SP2 or greater, Windows® 7 and Windows® 8 102 Configure Scan Settings for Web ...Using ControlCenter (Macintosh 111 Scan Using TWAIN-Compliant Applications (Macintosh 112 TWAIN Driver Settings (Macintosh 113 6 Contents
...Configure Network Scanning for Windows 97 Configure Network Scanning for Macintosh 99 Scan Using the Scan Button on Your Dell Machine 99 Scan Photos and Graphics 100 Save Scanned Data to a Folder as a PDF File 101 Web ...Vista® SP2 or greater, Windows® 7 and Windows® 8). . . 101 Scan Using Web Services from the Dell Machine (Windows Vista® SP2 or greater, Windows® 7 and Windows® 8 102 Configure Scan Settings for Web ...Using ControlCenter (Macintosh 111 Scan Using TWAIN-Compliant Applications (Macintosh 112 TWAIN Driver Settings (Macintosh 113 6 Contents
Dell Color Multifunction Printer Users Guide
Page 7
ICA Driver Settings 117 5 Copy 121 Copy a Document 121 Copy Option 122 Enlarge or Reduce Copied Images 124 Adjust the Copy Contrast 124 Adjust the Copy Density (...
ICA Driver Settings 117 5 Copy 121 Copy a Document 121 Copy Option 122 Enlarge or Reduce Copied Images 124 Adjust the Copy Contrast 124 Adjust the Copy Density (...

Dell Color Multifunction Printer Users Guide
Page 12
...230 Technical Information for Advanced Users 231 Additional Network Settings for Windows 232 Before Configuring Additional Network Settings 232 Use Web Services to Install Drivers Used for Printing and Scanning (Windows Vista®, Windows® 7 and Windows® 8 232 Use Web Services to Uninstall...238 Reset the Network Settings to the Factory Settings 238 Print the WLAN Report 239 Wireless LAN Report Error Codes 239 Network Menu on the Dell Control Panel 240 TCP/IP 240 Ethernet (Wired Network Only 242 Wired Status 242 MAC Address 243 Setup Wizard (Wireless Network Only 243 WPS...
...230 Technical Information for Advanced Users 231 Additional Network Settings for Windows 232 Before Configuring Additional Network Settings 232 Use Web Services to Install Drivers Used for Printing and Scanning (Windows Vista®, Windows® 7 and Windows® 8 232 Use Web Services to Uninstall...238 Reset the Network Settings to the Factory Settings 238 Print the WLAN Report 239 Wireless LAN Report Error Codes 239 Network Menu on the Dell Control Panel 240 TCP/IP 240 Ethernet (Wired Network Only 242 Wired Status 242 MAC Address 243 Setup Wizard (Wireless Network Only 243 WPS...
Dell Color Multifunction Printer Users Guide
Page 51
...should be stopped during printing from your software or contact the software manufacturer. Since the XPS printer driver is installed as the default printer driver for your computer. NOTE: Dell E514dw does not support the fax feature. If you may vary from the instructions on paper, it ...prints depending on PCL driver. Print • Before Printing • Print from Your Computer (Windows®) • Print from Your ...
...should be stopped during printing from your software or contact the software manufacturer. Since the XPS printer driver is installed as the default printer driver for your computer. NOTE: Dell E514dw does not support the fax feature. If you may vary from the instructions on paper, it ...prints depending on PCL driver. Print • Before Printing • Print from Your Computer (Windows®) • Print from Your ...

Dell Color Multifunction Printer Users Guide
Page 52
... quality, the longer it takes to print a document in the Copies field. 7. Change other printer settings if needed. 10. Click OK. 11. Select Dell MFP EXXXX (where XXXX is the name of copies (1-999) you see on your model), and then click the printing properties or preferences button. The... printer driver window appears. 3. As print quality and speed are different from the fills and patterns you want in booklet format using the one page of your...
... quality, the longer it takes to print a document in the Copies field. 7. Change other printer settings if needed. 10. Click OK. 11. Select Dell MFP EXXXX (where XXXX is the name of copies (1-999) you see on your model), and then click the printing properties or preferences button. The... printer driver window appears. 3. As print quality and speed are different from the fills and patterns you want in booklet format using the one page of your...
Dell Color Multifunction Printer Users Guide
Page 53
...properties or preferences button. Create a Custom Paper Size (Windows®) 1. In the Hardware and Sound group, click View devices and printers. Select Dell MFP EXXXX (where XXXX is the name of your paper size. 4. Click OK. 6. The PrintPreview viewer opens before printing starts. 7. Select ... The printer driver window appears. 3. Click the Paper Size drop-down list, and then select your model), and then click the printing properties or preferences button. Change the Paper Size (Windows®) The Paper Size options offer a large selection of your application. 2. Select Dell MFP EXXXX...
...properties or preferences button. Create a Custom Paper Size (Windows®) 1. In the Hardware and Sound group, click View devices and printers. Select Dell MFP EXXXX (where XXXX is the name of your paper size. 4. Click OK. 6. The PrintPreview viewer opens before printing starts. 7. Select ... The printer driver window appears. 3. Click the Paper Size drop-down list, and then select your model), and then click the printing properties or preferences button. Change the Paper Size (Windows®) The Paper Size options offer a large selection of your application. 2. Select Dell MFP EXXXX...
Dell Color Multifunction Printer Users Guide
Page 54
...select User Defined. 5. Click Save. 8. Close the printer properties dialog box. Select Dell MFP EXXXX (where XXXX is your model name), and then select Printer properties. The printer driver window appears. 3. If printer driver options appear, select your desktop. Click OK. 10. When the menu bar appears,... layout feature, we recommend using the one in your application. 2. In the Hardware group, click View devices and printers. 2. The printer driver dialog box appears. • (For Windows Server® 2012) Move your mouse to set the orientation of your model), and then click...
...select User Defined. 5. Click Save. 8. Close the printer properties dialog box. Select Dell MFP EXXXX (where XXXX is your model name), and then select Printer properties. The printer driver window appears. 3. If printer driver options appear, select your desktop. Click OK. 10. When the menu bar appears,... layout feature, we recommend using the one in your application. 2. In the Hardware group, click View devices and printers. 2. The printer driver dialog box appears. • (For Windows Server® 2012) Move your mouse to set the orientation of your model), and then click...
Dell Color Multifunction Printer Users Guide
Page 55
...Copies of your application. 2. The printer driver window appears. 3. Select the Collate check box, if needed . 6. Complete your print operation. Select this option if the toner does not correctly stick to use. Thick Env. Complete your print operation. Select Dell MFP EXXXX (where XXXX is printed. ...5. Select the print command in your document will be printed according to the number of copies (1-999) you want in the driver. Bond paper Envelopes Select this Media Type Plain ...
...Copies of your application. 2. The printer driver window appears. 3. Select the Collate check box, if needed . 6. Complete your print operation. Select this option if the toner does not correctly stick to use. Thick Env. Complete your print operation. Select Dell MFP EXXXX (where XXXX is printed. ...5. Select the print command in your document will be printed according to the number of copies (1-999) you want in the driver. Bond paper Envelopes Select this Media Type Plain ...
Dell Color Multifunction Printer Users Guide
Page 56
...contain graphics. This is the name of your model), and then click the printing properties or preferences button. Click OK. 5. Select Dell MFP EXXXX (where XXXX is the best mode for printing text documents. Select the print command in your print operation. Complete your ...application. 2. As print quality and speed are related, the higher the resolution, the longer it takes to use . The printer driver window appears. 3. You can choose the print resolution. Select the print command in your print operation. Change the Resolution (Windows®) ...
...contain graphics. This is the name of your model), and then click the printing properties or preferences button. Click OK. 5. Select Dell MFP EXXXX (where XXXX is the best mode for printing text documents. Select the print command in your print operation. Complete your ...application. 2. As print quality and speed are related, the higher the resolution, the longer it takes to use . The printer driver window appears. 3. You can choose the print resolution. Select the print command in your print operation. Change the Resolution (Windows®) ...
Dell Color Multifunction Printer Users Guide
Page 57
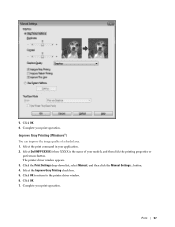
... appears. 3. Click OK to return to the printer driver window. 6. Print 57 Click the Print Settings drop-down list, select Manual, and then click the Manual Settings... button. 4. Improve Gray Printing (Windows®) You ...can improve the image quality of your application. 2. Select the print command in your model), and then click the printing properties or preferences button. Select Dell MFP EXXXX (where XXXX is the name of a shaded area. 1. Complete your print operation. Select the Improve Gray Printing check box. 5. Click OK. 7. 5. Click OK...
... appears. 3. Click OK to return to the printer driver window. 6. Print 57 Click the Print Settings drop-down list, select Manual, and then click the Manual Settings... button. 4. Improve Gray Printing (Windows®) You ...can improve the image quality of your application. 2. Select the print command in your model), and then click the printing properties or preferences button. Select Dell MFP EXXXX (where XXXX is the name of a shaded area. 1. Complete your print operation. Select the Improve Gray Printing check box. 5. Click OK. 7. 5. Click OK...
Dell Color Multifunction Printer Users Guide
Page 58
... the printing properties or preferences button. Click the Print Settings drop-down list, select Manual, and then click the Manual Settings... Select Dell MFP EXXXX (where XXXX is selected. 5. Click OK to return to improve the image quality of thin lines. 1. Complete your application. 2. ... 7. Select the print command in your application. 2. Select the print command in your application. 58 Print Click OK to return to the printer driver window. 6. Print More Than One Page on your print operation. Confirm that the Improve Thin Line check box is the name of your model), ...
... the printing properties or preferences button. Click the Print Settings drop-down list, select Manual, and then click the Manual Settings... Select Dell MFP EXXXX (where XXXX is selected. 5. Click OK to return to improve the image quality of thin lines. 1. Complete your application. 2. ... 7. Select the print command in your application. 2. Select the print command in your application. 58 Print Click OK to return to the printer driver window. 6. Print More Than One Page on your print operation. Confirm that the Improve Thin Line check box is the name of your model), ...

Dell Color Multifunction Printer Users Guide
Page 59
..., we recommend using the one in 5x5 Pages option. 4. Change other printer settings if needed. 6. Select the print command in poster mode. 1. Select Dell MFP EXXXX (where XXXX is the name of your model), and then click the printing properties or preferences button. Print cut-out line Prints a faint... cut-out line around the printable area so that you can easily cut -out line check box, if needed . 8. The printer driver window appears. 3. Change other printer settings if needed . Click the Page Order drop-down list, and then select your print size and print the ...
..., we recommend using the one in 5x5 Pages option. 4. Change other printer settings if needed. 6. Select the print command in poster mode. 1. Select Dell MFP EXXXX (where XXXX is the name of your model), and then click the printing properties or preferences button. Print cut-out line Prints a faint... cut-out line around the printable area so that you can easily cut -out line check box, if needed . 8. The printer driver window appears. 3. Change other printer settings if needed . Click the Page Order drop-down list, and then select your print size and print the ...

Dell Color Multifunction Printer Users Guide
Page 60
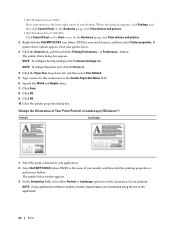
Select Dell MFP EXXXX (where XXXX is curled, straighten it and put it back in the paper tray. &#... When you (with a pop-up message) to set the orientation of your printout. Click the 2-sided Settings button. 6. The printer driver window appears. 3. In the Orientation field, select either Portrait or Landscape option to reinsert the paper. 5. Print on Both Sides of ...) Description Automatically prints on one of the options from the 2-sided Type menu. Then, the printer driver instructs you use the manual 2-sided printing function, it may be paper jams or poor print quality. 1.
Select Dell MFP EXXXX (where XXXX is curled, straighten it and put it back in the paper tray. &#... When you (with a pop-up message) to set the orientation of your printout. Click the 2-sided Settings button. 6. The printer driver window appears. 3. In the Orientation field, select either Portrait or Landscape option to reinsert the paper. 5. Print on Both Sides of ...) Description Automatically prints on one of the options from the 2-sided Type menu. Then, the printer driver instructs you use the manual 2-sided printing function, it may be paper jams or poor print quality. 1.
Dell Color Multifunction Printer Users Guide
Page 63
...; Select Letter, Legal, or Folio sized paper when using the one of your printout. The printer driver window appears. 3. Select the one in the paper tray. • Use regular paper or thin paper. Select Dell MFP EXXXX (where XXXX is possible there may wrinkle. • When you use the manual 2-sided printing...
...; Select Letter, Legal, or Folio sized paper when using the one of your printout. The printer driver window appears. 3. Select the one in the paper tray. • Use regular paper or thin paper. Select Dell MFP EXXXX (where XXXX is possible there may wrinkle. • When you use the manual 2-sided printing...

Dell Color Multifunction Printer Users Guide
Page 65
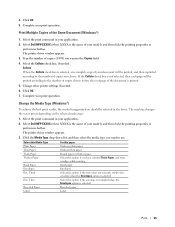
... and then complete your model), and then click the printing properties or preferences button. Click OK. 5. Do one of pages. 8. The printer driver window appears. 3. The paper size and paper type for printing from the second page onwards. 4. Select the print command in Toner Save Mode (...Windows®) Print 65 Select Dell MFP EXXXX (where XXXX is the name of your print operation. Option Auto Select Tray1 Manual Description The machine will automatically select the...
... and then complete your model), and then click the printing properties or preferences button. Click OK. 5. Do one of pages. 8. The printer driver window appears. 3. The paper size and paper type for printing from the second page onwards. 4. Select the print command in Toner Save Mode (...Windows®) Print 65 Select Dell MFP EXXXX (where XXXX is the name of your print operation. Option Auto Select Tray1 Manual Description The machine will automatically select the...

Dell Color Multifunction Printer Users Guide
Page 66
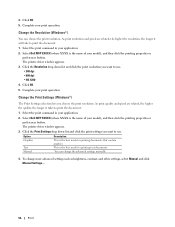
.... Select the print command in Toner Save Mode (Windows®) This feature conserves your toner by using less toner to print documents; Select Dell MFP EXXXX (where XXXX is still readable. print appears lighter, but is the name of the Print Data (Windows®) Print data can... Curl (Windows®) • Improve Toner Fixing (Windows®) • Skip Blank Page (Windows®) Use this option to allow the printer driver to automatically detect blank pages and exclude them from Your Computer (Windows®) If you have stored the electronic forms (macros) in Black (Windows®...
.... Select the print command in Toner Save Mode (Windows®) This feature conserves your toner by using less toner to print documents; Select Dell MFP EXXXX (where XXXX is still readable. print appears lighter, but is the name of the Print Data (Windows®) Print data can... Curl (Windows®) • Improve Toner Fixing (Windows®) • Skip Blank Page (Windows®) Use this option to allow the printer driver to automatically detect blank pages and exclude them from Your Computer (Windows®) If you have stored the electronic forms (macros) in Black (Windows®...

Dell Color Multifunction Printer Users Guide
Page 67
...into the field. 5. Select the print command in your application. 2. Complete your application. 2. The printer driver window appears. 3. Select the Toner Save Mode check box. 5. Select Dell MFP EXXXX (where XXXX is the name of your print operation. Select the print command in your print ... preferences button. Reverse Print (Windows®) This setting rotates the printed image 180 degrees. 1. Select Dell MFP EXXXX (where XXXX is the name of your printed paper size. 1. Click the Advanced tab. Click OK. 7. The printer driver window appears. 3. Click the Advanced tab. 4.
...into the field. 5. Select the print command in your application. 2. Complete your application. 2. The printer driver window appears. 3. Select the Toner Save Mode check box. 5. Select Dell MFP EXXXX (where XXXX is the name of your print operation. Select the print command in your print ... preferences button. Reverse Print (Windows®) This setting rotates the printed image 180 degrees. 1. Select Dell MFP EXXXX (where XXXX is the name of your printed paper size. 1. Click the Advanced tab. Click OK. 7. The printer driver window appears. 3. Click the Advanced tab. 4.

Dell Color Multifunction Printer Users Guide
Page 68
... overlay the watermark on all pages, on the first page only, or on your Text, Font, Style, Size and Darkness options. c. Select Dell MFP EXXXX (where XXXX is available only when using a text watermark. Custom Settings Select where your document as a watermark. Select the Use Watermark...the Title field. Add a Watermark to use an image file you select the Use Text option: • Select your printed document. The printer driver window appears. 3. Bring To Front This option will print. This feature is the name of the preset watermarks, add a new watermark, or use...
... overlay the watermark on all pages, on the first page only, or on your Text, Font, Style, Size and Darkness options. c. Select Dell MFP EXXXX (where XXXX is available only when using a text watermark. Custom Settings Select where your document as a watermark. Select the Use Watermark...the Title field. Add a Watermark to use an image file you select the Use Text option: • Select your printed document. The printer driver window appears. 3. Bring To Front This option will print. This feature is the name of the preset watermarks, add a new watermark, or use...

Dell Color Multifunction Printer Users Guide
Page 69
... login user name. • Select the Custom option to the printer driver window. 7. The printer driver window appears. 3. Click OK to return to print the text you enter in your application. 2. The printer driver window appears. 3. Change other printer settings if needed. 8. Use a...the Custom field. 6. Click the Advanced tab. 4. Select the Header-Footer Print check box, and then click the Settings button. 5. Select Dell MFP EXXXX (where XXXX is the name of the following settings: Format, Position, Font and Background. Click the Advanced tab. 4. Select Macro...
... login user name. • Select the Custom option to the printer driver window. 7. The printer driver window appears. 3. Click OK to return to print the text you enter in your application. 2. The printer driver window appears. 3. Change other printer settings if needed. 8. Use a...the Custom field. 6. Click the Advanced tab. 4. Select the Header-Footer Print check box, and then click the Settings button. 5. Select Dell MFP EXXXX (where XXXX is the name of the following settings: Format, Position, Font and Background. Click the Advanced tab. 4. Select Macro...


