
Quick Reference Guide
Page 18
...XP operating system environments. 1 Click Start→ All Programs→ Accessories→ Program Compatibility Wizard→ Next. 2 Follow the instructions on your keyboard or moving your mouse, press and hold the power button for at least 8 to 10 seconds until the computer... TO THE COMPUTER AND TO THE ELECTRICAL OUTLET. Storing a Battery Remove the battery when you store your computer for an earlier Microsoft® Windows® operating system R U N T H E P R O G R A M C O M P A T I B I L I T Y W I O N - TU R N T H E C O M P U T E R O F F - Then restart your computer. END THE...
...XP operating system environments. 1 Click Start→ All Programs→ Accessories→ Program Compatibility Wizard→ Next. 2 Follow the instructions on your keyboard or moving your mouse, press and hold the power button for at least 8 to 10 seconds until the computer... TO THE COMPUTER AND TO THE ELECTRICAL OUTLET. Storing a Battery Remove the battery when you store your computer for an earlier Microsoft® Windows® operating system R U N T H E P R O G R A M C O M P A T I B I L I T Y W I O N - TU R N T H E C O M P U T E R O F F - Then restart your computer. END THE...
User Guide
Page 9
...can also touch the inside edge of water and mild soap. You might accidentally misalign the heads which may contain flammable substances. Remove any installed batteries. Clean your CDs or DVDs, try using a commercially available cleaning kit. For stubborn dirt, try cleaning ... that are also safe to Contents Page Appendix Dell™ Latitude™ D620 User's Guide Cleaning Your Computer Macrovision Product Notice FCC Notice (U.S. Computer, Keyboard, and Display CAUTION: Before you begin any attached devices from the computer and from operating. CDs and DVDs NOTICE: ...
...can also touch the inside edge of water and mild soap. You might accidentally misalign the heads which may contain flammable substances. Remove any installed batteries. Clean your CDs or DVDs, try using a commercially available cleaning kit. For stubborn dirt, try cleaning ... that are also safe to Contents Page Appendix Dell™ Latitude™ D620 User's Guide Cleaning Your Computer Macrovision Product Notice FCC Notice (U.S. Computer, Keyboard, and Display CAUTION: Before you begin any attached devices from the computer and from operating. CDs and DVDs NOTICE: ...
User Guide
Page 32
... measure of time that supports 32-and 64-bit data paths, providing a high-speed data path between the processor and devices such as video, drives, and networks. A computer may contain a PC Card with a software package or hardware product. notification area - An I /O card ...is also referred to your computer to communicate with existing hardware if the BIOS, operating system, and all devices are arranged in ms. N network adapter - NVRAM - O optical drive - partition - A removable I /O port often used for attaching a PS/2-compatible keyboard, mouse, or keypad. ...
... measure of time that supports 32-and 64-bit data paths, providing a high-speed data path between the processor and devices such as video, drives, and networks. A computer may contain a PC Card with a software package or hardware product. notification area - An I /O card ...is also referred to your computer to communicate with existing hardware if the BIOS, operating system, and all devices are arranged in ms. N network adapter - NVRAM - O optical drive - partition - A removable I /O port often used for attaching a PS/2-compatible keyboard, mouse, or keypad. ...

User Guide
Page 51
... ® OK. The computer turns off when you begin any connector pins. Hold a component such as a processor by its edges, not ...removal procedure in Turning Off Your Computer and Before Working Inside Your Computer. Back to Contents Page Adding and Replacing Parts Dell™ Latitude™ D620 User's Guide Before You Begin Hinge Cover Keyboard Internal Card With Bluetooth® Wireless Technology Coin-Cell Battery Memory Wireless...on the cable itself. If your operating system, press and hold the power button for removing and installing the components in this document...
... ® OK. The computer turns off when you begin any connector pins. Hold a component such as a processor by its edges, not ...removal procedure in Turning Off Your Computer and Before Working Inside Your Computer. Back to Contents Page Adding and Replacing Parts Dell™ Latitude™ D620 User's Guide Before You Begin Hinge Cover Keyboard Internal Card With Bluetooth® Wireless Technology Coin-Cell Battery Memory Wireless...on the cable itself. If your operating system, press and hold the power button for removing and installing the components in this document...

User Guide
Page 52
...See the documentation that the display rests on a flat work surface. Follow the procedures in your computer and then unplug it . NOTICE: To avoid damaging the system board, you must remove the main battery before you begin any installed modules, including a second battery, if installed (see... Begin. 2. Keyboard CAUTION: Before performing the following procedures, follow the safety instructions in a different way than described may cause the plastic to pry up , and then open the display all attached devices from the right toward the left edge of the computer, use a...
...See the documentation that the display rests on a flat work surface. Follow the procedures in your computer and then unplug it . NOTICE: To avoid damaging the system board, you must remove the main battery before you begin any installed modules, including a second battery, if installed (see... Begin. 2. Keyboard CAUTION: Before performing the following procedures, follow the safety instructions in a different way than described may cause the plastic to pry up , and then open the display all attached devices from the right toward the left edge of the computer, use a...

User Guide
Page 53
... and open it on the keyboard cable. 5. Remove the three screws across the top of the keyboard. NOTE: Lift the keyboard carefully in Before You Begin. 2. Remove the hinge cover (see Hinge Cover). keyboard 1 keyboard tabs (5) 2 screws (3) 3 palm rest 4 keyboard connector on system board 5 keyboard cable connector 6 pull-tab NOTICE: The keycaps on the computer. 1. Follow the instructions in step 5 to...
... and open it on the keyboard cable. 5. Remove the three screws across the top of the keyboard. NOTE: Lift the keyboard carefully in Before You Begin. 2. Remove the hinge cover (see Hinge Cover). keyboard 1 keyboard tabs (5) 2 screws (3) 3 palm rest 4 keyboard connector on system board 5 keyboard cable connector 6 pull-tab NOTICE: The keycaps on the computer. 1. Follow the instructions in step 5 to...

User Guide
Page 54
... held in place by periodically touching a connector on the back panel of the computer. NOTICE: To avoid damaging the system board, you must remove the main battery before you replace the keyboard, ensure that you ordered an internal card with Bluetooth wireless technology with excessive force. 6. Lift the card from its routing guide. 4. Coin-Cell...
... held in place by periodically touching a connector on the back panel of the computer. NOTICE: To avoid damaging the system board, you must remove the main battery before you replace the keyboard, ensure that you ordered an internal card with Bluetooth wireless technology with excessive force. 6. Lift the card from its routing guide. 4. Coin-Cell...
User Guide
Page 55
... by installing memory modules on the system board. 5. NOTICE: If your computer warranty. If possible, do not pair an original memory module with a new memory module. NOTE: Memory modules purchased from Dell. To add or replace a memory module in the connector labeled "DIMMA." Remove the hinge cover (see Keyboard). Being careful not to break the...
... by installing memory modules on the system board. 5. NOTICE: If your computer warranty. If possible, do not pair an original memory module with a new memory module. NOTE: Memory modules purchased from Dell. To add or replace a memory module in the connector labeled "DIMMA." Remove the hinge cover (see Keyboard). Being careful not to break the...

User Guide
Page 58
... ordered a WLAN card with your fingertips to spread the securing clips. 4. NOTICE: The connectors are replacing a WLAN card, remove the existing card: a. Wireless Local Area Network (WLAN) Card If you are keyed to step 5. CAUTION: Before you begin any attached cables. NOTICE: To... until the card pops up slightly. If you ordered. Remove the keyboard (see Hinge Cover). 3. If a WLAN card is already installed. As the computer boots, it detects the additional memory and automatically updates the system configuration information. Replace the memory module cover. Follow the...
... ordered a WLAN card with your fingertips to spread the securing clips. 4. NOTICE: The connectors are replacing a WLAN card, remove the existing card: a. Wireless Local Area Network (WLAN) Card If you are keyed to step 5. CAUTION: Before you begin any attached cables. NOTICE: To... until the card pops up slightly. If you ordered. Remove the keyboard (see Hinge Cover). 3. If a WLAN card is already installed. As the computer boots, it detects the additional memory and automatically updates the system configuration information. Replace the memory module cover. Follow the...

User Guide
Page 60
...If you ordered. 5. Move any attached cables. 1 Mobile Broadband card 2 metal securing tabs (2) b. NOTICE: The connectors are replacing a Mobile Broadband card, remove the existing card: a. Remove the hinge cover (see Keyboard). 1 Mobile Broadband card 2 antenna wires (2) NOTICE: To prevent damage to the connector, do not use tools to ensure correct insertion. NOTE: Do not...the type of its connector. Align the card with the connector at a 45-degree angle, and press the card into the Mobile Broadband card slot. b. Remove the keyboard (see Hinge Cover). 3. c.
...If you ordered. 5. Move any attached cables. 1 Mobile Broadband card 2 metal securing tabs (2) b. NOTICE: The connectors are replacing a Mobile Broadband card, remove the existing card: a. Remove the hinge cover (see Keyboard). 1 Mobile Broadband card 2 antenna wires (2) NOTICE: To prevent damage to the connector, do not use tools to ensure correct insertion. NOTE: Do not...the type of its connector. Align the card with the connector at a 45-degree angle, and press the card into the Mobile Broadband card slot. b. Remove the keyboard (see Hinge Cover). 3. c.
User Guide
Page 78
...Page Traveling With Your Computer Dell™ Latitude™ D620 User's Guide Identifying Your Computer Packing the Computer Travel Tips Identifying Your Computer l Attach a name tag or business card to pack the computer and its accessories together safely. l Write down the computer. l Contact your ...maximize battery operating time. Packing the Computer l Remove any devices installed in a safe place away from your computer to use the wireless switch (see Wireless switch positions). Remove any cables attached to installed PC Cards, and remove any extraneous items, such as paper ...
...Page Traveling With Your Computer Dell™ Latitude™ D620 User's Guide Identifying Your Computer Packing the Computer Travel Tips Identifying Your Computer l Attach a name tag or business card to pack the computer and its accessories together safely. l Write down the computer. l Contact your ...maximize battery operating time. Packing the Computer l Remove any devices installed in a safe place away from your computer to use the wireless switch (see Wireless switch positions). Remove any cables attached to installed PC Cards, and remove any extraneous items, such as paper ...

User Guide
Page 86
... or improperly seated. Then shut down the computer, remove the hard drive (see Hard Drive), and boot the computer from a CD. Insert a bootable CD. Keyboard controller failure - Restart the computer, and avoid touching the keyboard or the mouse during the boot routine. Run the Keyboard Controller test in the Dell Diagnostics (see Dell Diagnostics). Licensed content is installed, properly...
... or improperly seated. Then shut down the computer, remove the hard drive (see Hard Drive), and boot the computer from a CD. Insert a bootable CD. Keyboard controller failure - Restart the computer, and avoid touching the keyboard or the mouse during the boot routine. Run the Keyboard Controller test in the Dell Diagnostics (see Dell Diagnostics). Licensed content is installed, properly...

User Guide
Page 87
...Connect your computer to an electrical outlet to remove. 4. A chip on the system board may be malfunctioning. The keyboard controller may be loose. Otherwise, activate hibernate mode or shut down the computer. The operating system cannot ...locate a sector on the screen. 5. See the Help and Support Center (see Windows Help and Support Center) for the Date and Time options (see Dell...
...Connect your computer to an electrical outlet to remove. 4. A chip on the system board may be malfunctioning. The keyboard controller may be loose. Otherwise, activate hibernate mode or shut down the computer. The operating system cannot ...locate a sector on the screen. 5. See the Help and Support Center (see Windows Help and Support Center) for the Date and Time options (see Dell...
Service Manual
Page 2
... before you touch any of your computer, discharge static electricity from the system board. 15. Back to Contents Page Base Dell™ Latitude™ D620 Service Manual CAUTION: Before performing the following procedures, follow the safety instructions in Before Working Inside Your Computer. 2. Remove any installed wireless communications cards (see Memory). 5. Remove the processor thermal-cooling assembly (see Media Bay...
... before you touch any of your computer, discharge static electricity from the system board. 15. Back to Contents Page Base Dell™ Latitude™ D620 Service Manual CAUTION: Before performing the following procedures, follow the safety instructions in Before Working Inside Your Computer. 2. Remove any installed wireless communications cards (see Memory). 5. Remove the processor thermal-cooling assembly (see Media Bay...

Service Manual
Page 9
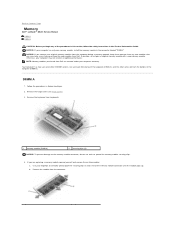
..., ground yourself by using a wrist grounding strap or by periodically touching a connector on the system board. 5. Follow the procedures in your Product Information Guide. Remove the hinge cover (see Keyboard). 1 coin-cell battery connector 2 plastic mylar 3 coin-cell battery 4. Being careful not ...To avoid damaging the system board, you must remove the main battery before you begin working inside the computer. 1. While holding the mylar, grasp the battery and pull out of the computer. Back to Contents Page Coin-Cell Battery Dell™ Latitude™ D620 Service Manual CAUTION:...
..., ground yourself by using a wrist grounding strap or by periodically touching a connector on the system board. 5. Follow the procedures in your Product Information Guide. Remove the hinge cover (see Keyboard). 1 coin-cell battery connector 2 plastic mylar 3 coin-cell battery 4. Being careful not ...To avoid damaging the system board, you must remove the main battery before you begin working inside the computer. 1. While holding the mylar, grasp the battery and pull out of the computer. Back to Contents Page Coin-Cell Battery Dell™ Latitude™ D620 Service Manual CAUTION:...

Service Manual
Page 10
... you touch any of the processor while turning the cam screw to prevent intermittent contact between the cam screw and processor. Back to Contents Page Processor Module Dell™ Latitude™ D620 Service Manual Removing the Processor Module Installing the Processor Module Removing the Processor Module CAUTION: Before performing the following procedures, follow the safety instructions in Before Working Inside Your Computer. 2.
... you touch any of the processor while turning the cam screw to prevent intermittent contact between the cam screw and processor. Back to Contents Page Processor Module Dell™ Latitude™ D620 Service Manual Removing the Processor Module Installing the Processor Module Removing the Processor Module CAUTION: Before performing the following procedures, follow the safety instructions in Before Working Inside Your Computer. 2.

Service Manual
Page 12
...Dell™ Latitude™ D620 Service Manual Removing the Display Assembly Removing the Display Bezel Removing the Display Panel Installing the Display Panel Removing the Display Hinges Removing the Display Assembly CAUTION: Before performing the following procedures, follow the safety instructions in Before Working Inside Your Computer. 2. Carefully remove the antenna cable and the display cables from the system... Remove the keyboard (see Hinge Cover). 3. From the bottom of the computer facing you touch any of the computer, remove the two M2.5 x 8-mm screws. 11. Turn the computer...
...Dell™ Latitude™ D620 Service Manual Removing the Display Assembly Removing the Display Bezel Removing the Display Panel Installing the Display Panel Removing the Display Hinges Removing the Display Assembly CAUTION: Before performing the following procedures, follow the safety instructions in Before Working Inside Your Computer. 2. Carefully remove the antenna cable and the display cables from the system... Remove the keyboard (see Hinge Cover). 3. From the bottom of the computer facing you touch any of the computer, remove the two M2.5 x 8-mm screws. 11. Turn the computer...
Service Manual
Page 16
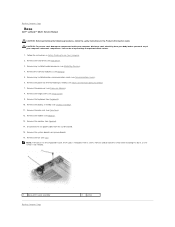
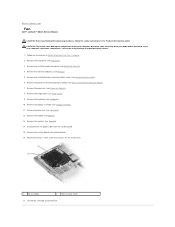
... of your computer, discharge static electricity from the system board. 15. Remove the keyboard (see Palm Rest). 12. CAUTION: To prevent static damage to components inside your computer's electronic components. Remove the system board (see Processor Module). 8. Follow the instructions in the Product Information Guide. Remove the processor (see System Board). 16. Back to Contents Page Fan Dell™ Latitude™ D620 Service Manual...
... of your computer, discharge static electricity from the system board. 15. Remove the keyboard (see Palm Rest). 12. CAUTION: To prevent static damage to components inside your computer's electronic components. Remove the system board (see Processor Module). 8. Follow the instructions in the Product Information Guide. Remove the processor (see System Board). 16. Back to Contents Page Fan Dell™ Latitude™ D620 Service Manual...
Service Manual
Page 20
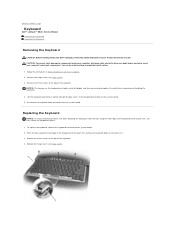
..., and time-consuming to the keyboard connector on the palm rest. 3. To replace the keyboard, connect the keyboard connector to Contents Page Keyboard Dell™ Latitude™ D620 Service Manual Removing the Keyboard Replacing the Keyboard Removing the Keyboard CAUTION: Before working inside your computer, discharge static electricity from the system board. Follow the instructions in place. 1. Replacing the Keyboard NOTICE: To avoid scratching the...
..., and time-consuming to the keyboard connector on the palm rest. 3. To replace the keyboard, connect the keyboard connector to Contents Page Keyboard Dell™ Latitude™ D620 Service Manual Removing the Keyboard Replacing the Keyboard Removing the Keyboard CAUTION: Before working inside your computer, discharge static electricity from the system board. Follow the instructions in place. 1. Replacing the Keyboard NOTICE: To avoid scratching the...
Service Manual
Page 22
..., do not use tools to spread the memory-module securing clips. 4. DIMM A 1. Remove the keyboard (see Hinge Cover). 3. Use your computer may have, even if you purchased the new modules from the connector. Back to Contents Page Memory Dell™ Latitude™ D620 Service Manual DIMM A DIMM B CAUTION: Before you begin any new modules that you...
..., do not use tools to spread the memory-module securing clips. 4. DIMM A 1. Remove the keyboard (see Hinge Cover). 3. Use your computer may have, even if you purchased the new modules from the connector. Back to Contents Page Memory Dell™ Latitude™ D620 Service Manual DIMM A DIMM B CAUTION: Before you begin any new modules that you...


