
Service Manual
Page 1
... is a registered trademark of Dell Inc. Model PP11L November 2005 Rev. and is used in trademarks and trade names other than its own. All rights reserved. is subject to avoid the problem. Dell Inc. Dell™ Latitude™ D610 Service Manual Before You Begin System... Components Internal Card With Bluetooth® Wireless Technology Hard Drive Center Control Cover Keyboard Memory Module, Modem, and Devices Coin-Cell Battery Mini ...
... is a registered trademark of Dell Inc. Model PP11L November 2005 Rev. and is used in trademarks and trade names other than its own. All rights reserved. is subject to avoid the problem. Dell Inc. Dell™ Latitude™ D610 Service Manual Before You Begin System... Components Internal Card With Bluetooth® Wireless Technology Hard Drive Center Control Cover Keyboard Memory Module, Modem, and Devices Coin-Cell Battery Mini ...
Service Manual
Page 10
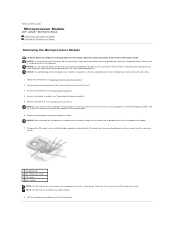
...microprocessor down on the substrate on which the die is perpendicular to the microprocessor when turning the cam screw. 1. Remove the keyboard (see "Removing the Display Assembly"). 5. NOTICE: When removing the microprocessor module, pull the module straight up. Be careful...the Center Control Cover"). 3. Lift the microprocessor module from the system board. Back to Contents Page Microprocessor Module Dell™ Latitude™ D610 Service Manual Removing the Microprocessor Module Installing the Microprocessor Module Removing the Microprocessor Module CAUTION: Before you cannot turn the...
...microprocessor down on the substrate on which the die is perpendicular to the microprocessor when turning the cam screw. 1. Remove the keyboard (see "Removing the Display Assembly"). 5. NOTICE: When removing the microprocessor module, pull the module straight up. Be careful...the Center Control Cover"). 3. Lift the microprocessor module from the system board. Back to Contents Page Microprocessor Module Dell™ Latitude™ D610 Service Manual Removing the Microprocessor Module Installing the Microprocessor Module Removing the Microprocessor Module CAUTION: Before you cannot turn the...
Service Manual
Page 12
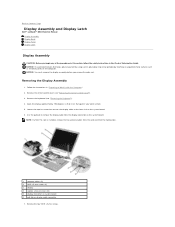
...display assembly before you begin any of the procedures in this section, follow the safety instructions in "Preparing to Work Inside the Computer." 2. Remove the keyboard (see "Removing the Center Control Cover"). 3. Use the pull-tab to remove the display cable from the routing clips. 1 antenna cables (2) 2...) on the system board. 6. Removing the Display Assembly 1. Back to Contents Page Display Assembly and Display Latch Dell™ Latitude™ D610 Service Manual Display Assembly Display Bezel Display Panel Display Latch Display Assembly CAUTION: Before you remove the palm rest.
...display assembly before you begin any of the procedures in this section, follow the safety instructions in "Preparing to Work Inside the Computer." 2. Remove the keyboard (see "Removing the Center Control Cover"). 3. Use the pull-tab to remove the display cable from the routing clips. 1 antenna cables (2) 2...) on the system board. 6. Removing the Display Assembly 1. Back to Contents Page Display Assembly and Display Latch Dell™ Latitude™ D610 Service Manual Display Assembly Display Bezel Display Panel Display Latch Display Assembly CAUTION: Before you remove the palm rest.
Service Manual
Page 18
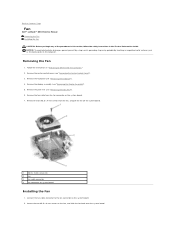
... in the Product Information Guide. Connect the fan cable connector to Work Inside the Computer." 2. Remove the display assembly (see "Removing the Keyboard"). 4. NOTICE: To avoid electrostatic discharge, ground yourself by using a wrist grounding strap or by periodically touching an unpainted metal surface (such...3. Remove the two M2.5 x 8-mm screws from the fan connector on the system board. 7. Back to Contents Page Fan Dell™ Latitude™ D610 Service Manual Removing the Fan Installing the Fan CAUTION: Before you begin any of the procedures in this section, follow the safety ...
... in the Product Information Guide. Connect the fan cable connector to Work Inside the Computer." 2. Remove the display assembly (see "Removing the Keyboard"). 4. NOTICE: To avoid electrostatic discharge, ground yourself by using a wrist grounding strap or by periodically touching an unpainted metal surface (such...3. Remove the two M2.5 x 8-mm screws from the fan connector on the system board. 7. Back to Contents Page Fan Dell™ Latitude™ D610 Service Manual Removing the Fan Installing the Fan CAUTION: Before you begin any of the procedures in this section, follow the safety ...
Service Manual
Page 23
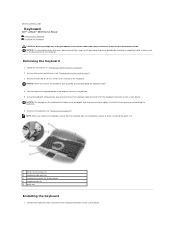
... rotate the keyboard clockwise 90 degrees to the keyboard connector on system board 4 keyboard tabs (5) 5 palm rest Installing the Keyboard 1. Be careful when removing and handling the keyboard. 6. Using the keyboard cable pull-tab, pull up gently to avoid damaging the keyboard cable. 4. Back to Contents Page Keyboard Dell™ Latitude™ D610 Service Manual Removing the Keyboard Installing the Keyboard CAUTION: Before...
... rotate the keyboard clockwise 90 degrees to the keyboard connector on system board 4 keyboard tabs (5) 5 palm rest Installing the Keyboard 1. Be careful when removing and handling the keyboard. 6. Using the keyboard cable pull-tab, pull up gently to avoid damaging the keyboard cable. 4. Back to Contents Page Keyboard Dell™ Latitude™ D610 Service Manual Removing the Keyboard Installing the Keyboard CAUTION: Before...
Service Manual
Page 25
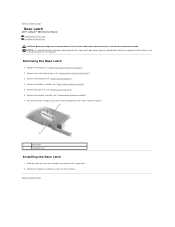
...unpainted metal surface (such as the back panel) on the computer. Remove the keyboard (see "Removing the Display Assembly"). 5. Removing the Base Latch 1. Remove the display assembly (see "Removing the Keyboard"). 4. Pull the base latch straight up and out of the computer base (no... the Center Control Cover"). 3. Remove the speaker assembly (see "Removing the Speaker Assembly"). 7. Back to Contents Page Base Latch Dell™ Latitude™ D610 Service Manual Removing the Base Latch Installing the Base Latch CAUTION: Before you begin any of the system base. 2. Replace the ...
...unpainted metal surface (such as the back panel) on the computer. Remove the keyboard (see "Removing the Display Assembly"). 5. Removing the Base Latch 1. Remove the display assembly (see "Removing the Keyboard"). 4. Pull the base latch straight up and out of the computer base (no... the Center Control Cover"). 3. Remove the speaker assembly (see "Removing the Speaker Assembly"). 7. Back to Contents Page Base Latch Dell™ Latitude™ D610 Service Manual Removing the Base Latch Installing the Base Latch CAUTION: Before you begin any of the system base. 2. Replace the ...
Service Manual
Page 26
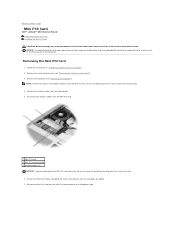
... antenna cables (2) NOTICE: To prevent damage to the Mini PCI card connector, do not use tools to Work Inside the Computer. 2. Remove the keyboard (see "Removing the Center Control Cover"). 3. NOTICE: To avoid electrostatic discharge, ground yourself by using a wrist grounding strap or by spreading the ...7. NOTE: If a Mini PCI card is not already installed, install the Mini PCI card. Back to Contents Page Mini PCI Card Dell™ Latitude™ D610 Service Manual Removing the Mini PCI Card Installing the Mini PCI Card CAUTION: Before you are replacing a Mini PCI card, remove the ...
... antenna cables (2) NOTICE: To prevent damage to the Mini PCI card connector, do not use tools to Work Inside the Computer. 2. Remove the keyboard (see "Removing the Center Control Cover"). 3. NOTICE: To avoid electrostatic discharge, ground yourself by using a wrist grounding strap or by spreading the ...7. NOTE: If a Mini PCI card is not already installed, install the Mini PCI card. Back to Contents Page Mini PCI Card Dell™ Latitude™ D610 Service Manual Removing the Mini PCI Card Installing the Mini PCI Card CAUTION: Before you are replacing a Mini PCI card, remove the ...
Service Manual
Page 29
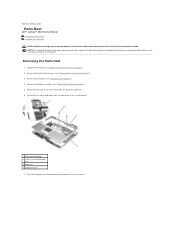
... over and remove the thirteen M2.5 x 8-mm screws. Remove the keyboard (see "Removing the Keyboard"). 4. Disconnect the touch pad cable from the top of the procedures in this section, follow the safety instructions in "Preparing to Contents Page Palm Rest Dell™ Latitude™ D610 Service Manual Removing the Palm Rest Installing the Palm Rest...
... over and remove the thirteen M2.5 x 8-mm screws. Remove the keyboard (see "Removing the Keyboard"). 4. Disconnect the touch pad cable from the top of the procedures in this section, follow the safety instructions in "Preparing to Contents Page Palm Rest Dell™ Latitude™ D610 Service Manual Removing the Palm Rest Installing the Palm Rest...
Service Manual
Page 33
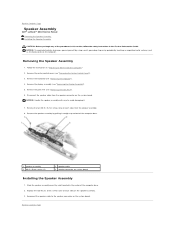
... Remove the palm rest (see "Removing the Display Assembly"). 5. Remove the center control cover (see "Removing the Keyboard"). 4. Remove the keyboard (see "Removing the Center Control Cover"). 3. Back to Contents Page Speaker Assembly Dell™ Latitude™ D610 Service Manual Removing the Speaker Assembly Installing the Speaker Assembly CAUTION: Before you begin any of the...
... Remove the palm rest (see "Removing the Display Assembly"). 5. Remove the center control cover (see "Removing the Keyboard"). 4. Remove the keyboard (see "Removing the Center Control Cover"). 3. Back to Contents Page Speaker Assembly Dell™ Latitude™ D610 Service Manual Removing the Speaker Assembly Installing the Speaker Assembly CAUTION: Before you begin any of the...
Service Manual
Page 35
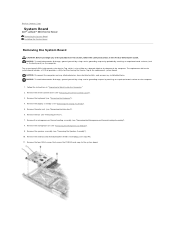
... 8. Remove the microprocessor thermal-cooling assembly (see "Removing the Palm Rest"). 6. Back to Contents Page System Board Dell™ Latitude™ D610 Service Manual Removing the System Board Installing the System Board Removing the System Board CAUTION: Before you begin any installed batteries... bottom of the procedures in this section, follow the safety instructions in "Preparing to Work Inside the Computer." 2. Remove the keyboard (see "Removing the Display Assembly"). 5. NOTICE: To avoid electrostatic discharge, ground yourself by using a wrist grounding strap or...
... 8. Remove the microprocessor thermal-cooling assembly (see "Removing the Palm Rest"). 6. Back to Contents Page System Board Dell™ Latitude™ D610 Service Manual Removing the System Board Installing the System Board Removing the System Board CAUTION: Before you begin any installed batteries... bottom of the procedures in this section, follow the safety instructions in "Preparing to Work Inside the Computer." 2. Remove the keyboard (see "Removing the Display Assembly"). 5. NOTICE: To avoid electrostatic discharge, ground yourself by using a wrist grounding strap or...
Service Manual
Page 38
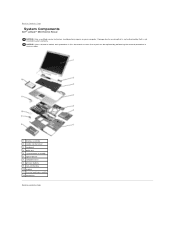
...Unless otherwise noted, each procedure in this document assumes that is not authorized by Dell is not covered by performing the removal procedure in reverse order. 1 display assembly 2 center control cover 3 keyboard 4 palm rest 5 system board assembly 6 optical device 7 computer base 8 ...primary battery 9 coin-cell battery 10 modem 11 thermal cooling assembly 12 hard drive Back to Contents Page Damage due to Contents Page System Components Dell™ Latitude™ D610 Service Manual NOTICE...
...Unless otherwise noted, each procedure in this document assumes that is not authorized by Dell is not covered by performing the removal procedure in reverse order. 1 display assembly 2 center control cover 3 keyboard 4 palm rest 5 system board assembly 6 optical device 7 computer base 8 ...primary battery 9 coin-cell battery 10 modem 11 thermal cooling assembly 12 hard drive Back to Contents Page Damage due to Contents Page System Components Dell™ Latitude™ D610 Service Manual NOTICE...

Service Manual
Page 39
... Guide. NOTICE: Disconnect the computer and any attached devices from the system board. Remove the display assembly (see "Removing the Keyboard"). 4. Back to Contents Page Microprocessor Thermal-Cooling Assembly Dell™ Latitude™ D610 Service Manual Removing the Microprocessor Thermal-Cooling Assembly Installing the Microprocessor Thermal-Cooling Assembly Removing the Microprocessor Thermal-Cooling Assembly...
... Guide. NOTICE: Disconnect the computer and any attached devices from the system board. Remove the display assembly (see "Removing the Keyboard"). 4. Back to Contents Page Microprocessor Thermal-Cooling Assembly Dell™ Latitude™ D610 Service Manual Removing the Microprocessor Thermal-Cooling Assembly Installing the Microprocessor Thermal-Cooling Assembly Removing the Microprocessor Thermal-Cooling Assembly...

Service Manual
Page 42
... from your body before you are covered under your computer. Your computer has two user-accessible SODIMM sockets, one accessed from beneath the keyboard (DIMM A), and the other accessed from the connector. Remove the module from the bottom of the computer (DIMM B). Removing the Memory.... NOTICE: Handle memory modules by touching an unpainted metal surface. Back to Contents Page Memory Module, Modem, and Devices Dell™ Latitude™ D610 Service Manual Memory Module Modem Devices Memory Module CAUTION: Before you begin any of your fingertips to carefully spread apart the ...
... from your body before you are covered under your computer. Your computer has two user-accessible SODIMM sockets, one accessed from beneath the keyboard (DIMM A), and the other accessed from the connector. Remove the module from the bottom of the computer (DIMM B). Removing the Memory.... NOTICE: Handle memory modules by touching an unpainted metal surface. Back to Contents Page Memory Module, Modem, and Devices Dell™ Latitude™ D610 Service Manual Memory Module Modem Devices Memory Module CAUTION: Before you begin any of your fingertips to carefully spread apart the ...
User Guide
Page 1
..., Inc. Other trademarks and trade names may not be used in this document is strictly forbidden. Dell™ Latitude™ D610 User's Guide Finding Information About Your Computer Using Microsoft® Windows® XP Dell™ QuickSet Using the Keyboard and Touch Pad Using the Display Using CDs, DVDs, and Other Multimedia Using a Battery Wireless Local...
..., Inc. Other trademarks and trade names may not be used in this document is strictly forbidden. Dell™ Latitude™ D610 User's Guide Finding Information About Your Computer Using Microsoft® Windows® XP Dell™ QuickSet Using the Keyboard and Touch Pad Using the Display Using CDs, DVDs, and Other Multimedia Using a Battery Wireless Local...
User Guide
Page 2
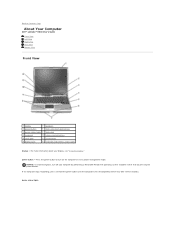
...® operating system shutdown rather than by pressing the power button. Press the power button to Contents Page About Your Computer Dell™ Latitude™ D610 User's Guide Front View Left View Right View Back View Bottom View Front View 1 display 7 speakers 2 power button 8... track stick/touch pad buttons 3 device status lights 9 track stick 4 keyboard 10 volume control buttons 5 touch pad 11 mute button 6 display latch 12 keyboard ...
...® operating system shutdown rather than by pressing the power button. Press the power button to Contents Page About Your Computer Dell™ Latitude™ D610 User's Guide Front View Left View Right View Back View Bottom View Front View 1 display 7 speakers 2 power button 8... track stick/touch pad buttons 3 device status lights 9 track stick 4 keyboard 10 volume control buttons 5 touch pad 11 mute button 6 display latch 12 keyboard ...
User Guide
Page 26
... their electrical outlets. 2. l Moisten a soft, lint-free cloth with water and wipe the computer and keyboard. l Moisten a soft, lint-free cloth with either water or an LCD cleaner, and wipe the display until it gently across the surface of the touch pad. Remove any installed batteries...compressed air. Never touch the lens in a circular motion around the disc. 2. Back to Contents Page Cleaning Your Computer Dell™ Latitude™ D610 User's Guide Computer, Keyboard, and Display Floppy Drive CDs and DVDs CAUTION: Before you begin any of the procedures in this section, follow the ...
... their electrical outlets. 2. l Moisten a soft, lint-free cloth with water and wipe the computer and keyboard. l Moisten a soft, lint-free cloth with either water or an LCD cleaner, and wipe the display until it gently across the surface of the touch pad. Remove any installed batteries...compressed air. Never touch the lens in a circular motion around the disc. 2. Back to Contents Page Cleaning Your Computer Dell™ Latitude™ D610 User's Guide Computer, Keyboard, and Display Floppy Drive CDs and DVDs CAUTION: Before you begin any of the procedures in this section, follow the ...

User Guide
Page 28
...Dell Diagnostics Dell™ Latitude™ D610 User's Guide Dell Diagnostics CAUTION: Before you begin any of your system board, keyboard, hard drive, and display. Shut down the mute button and press the computer's power button to start the Dell Diagnostics from the diagnostics utility partition on to Use the Dell...a series of initial tests of the procedures in this section, follow the safety instructions in "Solving Problems" and run the Dell Diagnostics from the optional Drivers and Utilities CD (also known as the ResourceCD). Press any key to wait until you wait ...
...Dell Diagnostics Dell™ Latitude™ D610 User's Guide Dell Diagnostics CAUTION: Before you begin any of your system board, keyboard, hard drive, and display. Shut down the mute button and press the computer's power button to start the Dell Diagnostics from the diagnostics utility partition on to Use the Dell...a series of initial tests of the procedures in this section, follow the safety instructions in "Solving Problems" and run the Dell Diagnostics from the optional Drivers and Utilities CD (also known as the ResourceCD). Press any key to wait until you wait ...

User Guide
Page 31
.... 2. NOTICE: You can attach an external monitor or projector to pan up - Back to Contents Page Using the Display Dell™ Latitude™ D610 User's Guide Adjusting Brightness Switching the Video Image Setting Display Resolution and Refresh Rate Dual Independent Display Mode Swapping Primary and Secondary... and Refresh Rate To display a program at one time. NOTE: As the resolution increases, icons and text appear smaller on the keyboard. For example, the taskbar that is higher than that you try to your portable computer, not monitors or projectors that supported by ...
.... 2. NOTICE: You can attach an external monitor or projector to pan up - Back to Contents Page Using the Display Dell™ Latitude™ D610 User's Guide Adjusting Brightness Switching the Video Image Setting Display Resolution and Refresh Rate Dual Independent Display Mode Swapping Primary and Secondary... and Refresh Rate To display a program at one time. NOTE: As the resolution increases, icons and text appear smaller on the keyboard. For example, the taskbar that is higher than that you try to your portable computer, not monitors or projectors that supported by ...

User Guide
Page 33
...device name, you may contain drivers for Dell™ computers. Many drivers, such as a printer, mouse, or keyboard. Click System. 4. Scroll down the list to Contents Page Reinstalling Software Dell™ Latitude™ D610 User's Guide Drivers Resolving Software and Hardware... Incompatibilities Using Microsoft® Windows® XP System Restore Reinstalling Microsoft® Windows® XP NOTE: The...
...device name, you may contain drivers for Dell™ computers. Many drivers, such as a printer, mouse, or keyboard. Click System. 4. Scroll down the list to Contents Page Reinstalling Software Dell™ Latitude™ D610 User's Guide Drivers Resolving Software and Hardware... Incompatibilities Using Microsoft® Windows® XP System Restore Reinstalling Microsoft® Windows® XP NOTE: The...

User Guide
Page 53
...span - A disk that allows you can use to start your computer. cache - L2 cache - Back to Contents Page Glossary Dell™ Latitude™ D610 User's Guide Terms in standby or hibernate mode to conserve the amount of electrical power allocated to each other devices with your ... computer. The standard unit for video-related tasks. An international customs document that powers your computer when you can use a monitor, keyboard, mouse, and other . Primary cache stored inside the processor. Secondary cache which can either a reserved section of main memory or...
...span - A disk that allows you can use to start your computer. cache - L2 cache - Back to Contents Page Glossary Dell™ Latitude™ D610 User's Guide Terms in standby or hibernate mode to conserve the amount of electrical power allocated to each other devices with your ... computer. The standard unit for video-related tasks. An international customs document that powers your computer when you can use a monitor, keyboard, mouse, and other . Primary cache stored inside the processor. Secondary cache which can either a reserved section of main memory or...


