
User Manual
Page 2
... by models 6 Useful to know 7 About this user's guide 8 Safety information 9 Machine overview 14 Control panel overview 16 Turning on the machine 17 Installing the driver locally 18 Reinstalling the driver 20 2. Appendix Specifications 56 Dell technical support policy 64 Contacting Dell 65 Warranty and return policy 66 Copyright 67 2
... by models 6 Useful to know 7 About this user's guide 8 Safety information 9 Machine overview 14 Control panel overview 16 Turning on the machine 17 Installing the driver locally 18 Reinstalling the driver 20 2. Appendix Specifications 56 Dell technical support policy 64 Contacting Dell 65 Warranty and return policy 66 Copyright 67 2
User Manual
Page 3
Introduction This chapter provides information you need to know before using the machine. • Key benefits 4 • Features by models 6 • Useful to know 7 • About this user's guide 8 • Safety information 9 • Machine overview 14 • Control panel overview 16 • Turning on the machine 17 • Installing the driver locally 18 • Reinstalling the driver 20 1.
Introduction This chapter provides information you need to know before using the machine. • Key benefits 4 • Features by models 6 • Useful to know 7 • About this user's guide 8 • Safety information 9 • Machine overview 14 • Control panel overview 16 • Turning on the machine 17 • Installing the driver locally 18 • Reinstalling the driver 20 1.
User Manual
Page 6
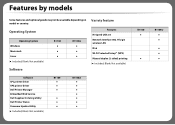
... (2-sided) printing (●: Included, Blank: Not available) Software SPL printer driver XPS printer driver Dell Printer Manager Embedded Web Service Dell Supplies Ordering Utility Dell Printer Status Firmware Update Utility (●: Included, Blank: Not available) B1160 ● ● ● ● ● ● B1160w B1160 ● ● B1160w ● ● ● ● ● Features by models Some features...
... (2-sided) printing (●: Included, Blank: Not available) Software SPL printer driver XPS printer driver Dell Printer Manager Embedded Web Service Dell Supplies Ordering Utility Dell Printer Status Firmware Update Utility (●: Included, Blank: Not available) B1160 ● ● ● ● ● ● B1160w B1160 ● ● B1160w ● ● ● ● ● Features by models Some features...
User Manual
Page 7
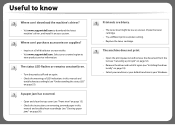
... the list (see "Canceling a print job" on page 32). • Remove the driver and install it on your Windows. Useful to know Where can I download the machine's driver? • Visit www.support.dell.com to view product service information. A paper jam has occurred. • Open and... low or uneven. Where can I purchase accessories or supplies? • Inquire at a Dell distributor or your country/region to download the latest machine's driver, and install it again (see "Installing the driver locally" on page 18). • Select your machine as your default machine in this...
... the list (see "Canceling a print job" on page 32). • Remove the driver and install it on your Windows. Useful to know Where can I download the machine's driver? • Visit www.support.dell.com to view product service information. A paper jam has occurred. • Open and... low or uneven. Where can I purchase accessories or supplies? • Inquire at a Dell distributor or your country/region to download the latest machine's driver, and install it again (see "Installing the driver locally" on page 18). • Select your machine as your default machine in this...

User Manual
Page 8
... may differ from your basic understanding of the machine function and feature. 1 Conventions Some terms in this guide are mainly based on the machine's firmware/driver version. • The procedures in this user's guide This user's guide provides information for your machine depending on Windows 7. 2 General icons Icon Text Description Gives...
... may differ from your basic understanding of the machine function and feature. 1 Conventions Some terms in this guide are mainly based on the machine's firmware/driver version. • The procedures in this user's guide This user's guide provides information for your machine depending on Windows 7. 2 General icons Icon Text Description Gives...
User Manual
Page 14
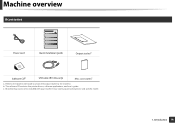
c. b. Introduction 14 Refer to the Quick Install Guide to attach the output stacker to the machine. Miscellaneous accessories included with your machine may vary by country of purchase and specific model. 1. The software CD contains the printer drivers, software applications, and user's guide. accessoriesc a. Machine overview 9 Accessories Power cord Quick installation guide Output stackera Software CDb USB cable (B1160w only) Misc.
c. b. Introduction 14 Refer to the Quick Install Guide to attach the output stacker to the machine. Miscellaneous accessories included with your machine may vary by country of purchase and specific model. 1. The software CD contains the printer drivers, software applications, and user's guide. accessoriesc a. Machine overview 9 Accessories Power cord Quick installation guide Output stackera Software CDb USB cable (B1160w only) Misc.
User Manual
Page 16
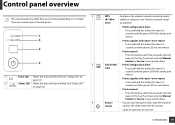
Press and hold this button for Source in your printer driver. • You can turn the power off or wake the machine up from your machine (see "Status LED" on page 53). 4 WPS (B1160w only) Info (B1160 only) Power/ Cancel Configures the wireless network connection easily without a ... green LED blinks slowly, and release. • Prints supplies info report / error report - Press and hold this button for Source in your printer driver. • Prints configuration sheet - Press this button each time you load a sheet of your machine depending on , and release. • Prints...
Press and hold this button for Source in your printer driver. • You can turn the power off or wake the machine up from your machine (see "Status LED" on page 53). 4 WPS (B1160w only) Info (B1160 only) Power/ Cancel Configures the wireless network connection easily without a ... green LED blinks slowly, and release. • Prints supplies info report / error report - Press and hold this button for Source in your printer driver. • Prints configuration sheet - Press this button each time you load a sheet of your machine depending on , and release. • Prints...
User Manual
Page 18
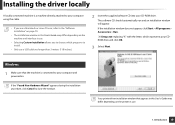
If the "Found New Hardware Wizard" appears during the installation procedure, click Cancel to close the window. Your printer driver installation window that the machine is connected to your computer and powered on the machine and interface in use. 1. Introduction 18 X:\Setup....8226; Only use a USB cable no longer than 3 meters (118 inches). 2 Insert the supplied software CD into your CD-ROM drive. Installing the driver locally A locally connected machine is a machine directly attached to your computer using the cable. • If you to choose which represents your CDROM drive and...
If the "Found New Hardware Wizard" appears during the installation procedure, click Cancel to close the window. Your printer driver installation window that the machine is connected to your computer and powered on the machine and interface in use. 1. Introduction 18 X:\Setup....8226; Only use a USB cable no longer than 3 meters (118 inches). 2 Insert the supplied software CD into your CD-ROM drive. Installing the driver locally A locally connected machine is a machine directly attached to your computer using the cable. • If you to choose which represents your CDROM drive and...
User Manual
Page 19
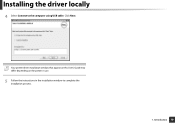
Click Next. Your printer driver installation window that appears in this User's Guide may differ depending on the printer in use. 5 Follow the instructions in the installation window to the computer using USB cable. Introduction 19 Installing the driver locally 4 Select Connect to complete the installation process. 1.
Click Next. Your printer driver installation window that appears in this User's Guide may differ depending on the printer in use. 5 Follow the instructions in the installation window to the computer using USB cable. Introduction 19 Installing the driver locally 4 Select Connect to complete the installation process. 1.
User Manual
Page 20
Introduction 20 Reinstalling the driver If the printer driver does not work properly, follow the steps below to reinstall the driver. 13 Windows 1 Make sure that the machine is connected to your computer and powered on. 2 From the Start menu, select Programs or All Programs > Dell > Dell Printers > your printer driver name > Maintenance. 3 Select Repair and click Next. 4 Follow the instructions in the repair window. 5 Insert the software CD into your CD-ROM drive and install the driver again (see "Installing the driver locally" on page 18). 1.
Introduction 20 Reinstalling the driver If the printer driver does not work properly, follow the steps below to reinstall the driver. 13 Windows 1 Make sure that the machine is connected to your computer and powered on. 2 From the Start menu, select Programs or All Programs > Dell > Dell Printers > your printer driver name > Maintenance. 3 Select Repair and click Next. 4 Follow the instructions in the repair window. 5 Insert the software CD into your CD-ROM drive and install the driver again (see "Installing the driver locally" on page 18). 1.
User Manual
Page 25
... for the tray (see "Opening printing preferences" on the control panel. e Start printing in paper source, then press OK. The settings made from the machine driver override the settings on page 32). Media and tray 4 Squeeze the paper width guide and slide it to the edge of the paper stack without...
... for the tray (see "Opening printing preferences" on the control panel. e Start printing in paper source, then press OK. The settings made from the machine driver override the settings on page 32). Media and tray 4 Squeeze the paper width guide and slide it to the edge of the paper stack without...
User Manual
Page 33
To save a Favorites item, follow these steps: 1 Change the settings as needed on each preferences tab except for the Dell tab, allows you to save Favorites, all current driver settings are saved. 2. The machine is visible on your keyboard. 3 Click (Add). Learning the Basic Usage 33 To delete saved settings, select it ...Using a favorites setting The Favorites option, which is now set to print according to the settings you have selected. You can also restore the printer driver's default settings by selecting Default Favorite from the Favorites dropdown list and click (Delete).
To save a Favorites item, follow these steps: 1 Change the settings as needed on each preferences tab except for the Dell tab, allows you to save Favorites, all current driver settings are saved. 2. The machine is visible on your keyboard. 3 Click (Add). Learning the Basic Usage 33 To delete saved settings, select it ...Using a favorites setting The Favorites option, which is now set to print according to the settings you have selected. You can also restore the printer driver's default settings by selecting Default Favorite from the Favorites dropdown list and click (Delete).

User Manual
Page 64
... troubleshooting process and provides for restoration of the printer and all Dell-installed hardware. In addition to the original default configuration as shipped from Dell, as well as the verification of appropriate functionality of the Operating System, application software, and hardware drivers to this technician assisted technical support, online technical support is provided...
... troubleshooting process and provides for restoration of the printer and all Dell-installed hardware. In addition to the original default configuration as shipped from Dell, as well as the verification of appropriate functionality of the Operating System, application software, and hardware drivers to this technician assisted technical support, online technical support is provided...

User Manual
Page 69
... Linux 74 2. Useful Management Tools Using Firmware Update Utility 121 Using Dell Supplies Ordering Utility 122 Using Embedded Web Service (B1160w only) 123 Using Dell Printer Manager 125 Using Dell Printer Status 127 Using the Linux Unified Driver Configurator 129 5. Using a Network-Connected Machine (B1160w only) Useful network program 76 Printing a network configuration report 77 Installing...
... Linux 74 2. Useful Management Tools Using Firmware Update Utility 121 Using Dell Supplies Ordering Utility 122 Using Embedded Web Service (B1160w only) 123 Using Dell Printer Manager 125 Using Dell Printer Status 127 Using the Linux Unified Driver Configurator 129 5. Using a Network-Connected Machine (B1160w only) Useful network program 76 Printing a network configuration report 77 Installing...

User Manual
Page 70
A locally connected machine is connected via a cable. Software Installation This chapter provides instructions for installing essential and helpful software for installing the machine's driver. • Only use in an environment where the machine is a machine directly attached to your computer using the cable. • Installation for Macintosh 71 &#... 72 • Installation for Linux 73 • Reinstallation for Linux 74 • If you are a Windows OS user, refer to the "Installing the driver locally" on page 18 for use a USB cable no longer then 3 meter (118 inches). 1.
A locally connected machine is connected via a cable. Software Installation This chapter provides instructions for installing essential and helpful software for installing the machine's driver. • Only use in an environment where the machine is a machine directly attached to your computer using the cable. • Installation for Macintosh 71 &#... 72 • Installation for Linux 73 • Reinstallation for Linux 74 • If you are a Windows OS user, refer to the "Installing the driver locally" on page 18 for use a USB cable no longer then 3 meter (118 inches). 1.
User Manual
Page 71
... that all applications will close on your machine name in Model. • For Mac OS X 10.5-10.7, if Auto Select does not work properly, select Dell in Print Using. All components necessary for Macintosh 1 Make sure that the machine is set as the default machine. 18 Click Add. 1. Software Installation 71... Mac OS X 10.5-10.7, click Default and find the USB connection. 17 For Mac OS X 10.4, if Auto Select does not work properly, select Select a driver to use...
... that all applications will close on your machine name in Model. • For Mac OS X 10.5-10.7, if Auto Select does not work properly, select Dell in Print Using. All components necessary for Macintosh 1 Make sure that the machine is set as the default machine. 18 Click Add. 1. Software Installation 71... Mac OS X 10.5-10.7, click Default and find the USB connection. 17 For Mac OS X 10.4, if Auto Select does not work properly, select Select a driver to use...
User Manual
Page 72
Software Installation 72 If a machine has already been added, delete it . 1 Make sure that the machine is connected to your computer and powered on. 2 Insert the supplied software CD into your CD-ROM drive. 3 Double-click the CD-ROM icon that appears on your Macintosh desktop. 4 Double-click the MAC_Installer folder > Uninstaller OS X icon. 5 Enter the password and click OK. 6 When the uninstall is done, click OK. Reinstallation for Macintosh If the printer driver does not work properly, uninstall the driver and reinstall it from the Print Setup Utility or Print & Fax. 1.
Software Installation 72 If a machine has already been added, delete it . 1 Make sure that the machine is connected to your computer and powered on. 2 Insert the supplied software CD into your CD-ROM drive. 3 Double-click the CD-ROM icon that appears on your Macintosh desktop. 4 Double-click the MAC_Installer folder > Uninstaller OS X icon. 5 Enter the password and click OK. 6 When the uninstall is done, click OK. Reinstallation for Macintosh If the printer driver does not work properly, uninstall the driver and reinstall it from the Print Setup Utility or Print & Fax. 1.
User Manual
Page 73
... the machine software. You must log in as Unified Driver Configurator or Image Manager. 1 Make sure that is available through your system menu or from the Dell website to install the printer software (www.dell.com or support.dell.com > find your product > Support or Downloads).... 1 Installing the Unified Linux Driver The installation program added the Unified Driver Configurator desktop icon and the Unified Driver group to your convenience....
... the machine software. You must log in as Unified Driver Configurator or Image Manager. 1 Make sure that is available through your system menu or from the Dell website to install the printer software (www.dell.com or support.dell.com > find your product > Support or Downloads).... 1 Installing the Unified Linux Driver The installation program added the Unified Driver Configurator desktop icon and the Unified Driver group to your convenience....

User Manual
Page 74
... reinstall it. 1 Make sure that the machine is connected to uninstall the printer driver. Software Installation 74 If you are not a super user, ask your computer and powered on. 2 When the Administrator Login window appears, type "root" in as a ... must log in the Login field and enter the system password. When the Terminal screen appears, type in the following. [root@localhost root]#cd /opt/Dell/mfp/uninstall/ [root@localhost uninstall]#./uninstall.sh 4 Click Uninstall. 5 Click Next. 6 Click Finish. 1.
... reinstall it. 1 Make sure that the machine is connected to uninstall the printer driver. Software Installation 74 If you are not a super user, ask your computer and powered on. 2 When the Administrator Login window appears, type "root" in as a ... must log in the Login field and enter the system password. When the Terminal screen appears, type in the following. [root@localhost root]#cd /opt/Dell/mfp/uninstall/ [root@localhost uninstall]#./uninstall.sh 4 Click Uninstall. 5 Click Next. 6 Click Finish. 1.
User Manual
Page 75
Using a NetworkConnected Machine (B1160w only) This chapter gives you step-by-step instructions for setting up a network connected machine and software. • Useful network program 76 • Printing a network configuration report 77 • Installing driver over the network 78 • IPv6 configuration 82 • Wireless network setup 83 Supported optional devices and features may differ according to your model (see "Features by models" on page 6). 2.
Using a NetworkConnected Machine (B1160w only) This chapter gives you step-by-step instructions for setting up a network connected machine and software. • Useful network program 76 • Printing a network configuration report 77 • Installing driver over the network 78 • IPv6 configuration 82 • Wireless network setup 83 Supported optional devices and features may differ according to your model (see "Features by models" on page 6). 2.


