
User Manual
Page 2
... on the machine 17 Installing the driver locally 18 Reinstalling the driver 20 2. BASIC 1. Troubleshooting Tips for moving & storing your machine 46 4. Appendix Specifications 56 Dell technical support policy 64 Contacting Dell 65 Warranty and return policy 66 Copyright 67 2 Learning the Basic Usage Printing a test page 22 Media and tray 23 Basic...
... on the machine 17 Installing the driver locally 18 Reinstalling the driver 20 2. BASIC 1. Troubleshooting Tips for moving & storing your machine 46 4. Appendix Specifications 56 Dell technical support policy 64 Contacting Dell 65 Warranty and return policy 66 Copyright 67 2 Learning the Basic Usage Printing a test page 22 Media and tray 23 Basic...
User Manual
Page 4
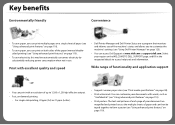
...can then be taped together to form a poster (see "Using advanced print features" on page 110). • Print posters: The text and pictures of each page of your region on the WELCOME TO DELL SUPPORT page, and fill in use. Key benefits Environmentally friendly Convenience ...the requested details to access help tools and information. Print with excellent quality and speed • Dell Printer Manager and Dell Printer Status are magnified and printed across the multiple sheets of the paper (manual doublesided printing) (see "Using Dell Printer Manager" on page 110). Select your document...
...can then be taped together to form a poster (see "Using advanced print features" on page 110). • Print posters: The text and pictures of each page of your region on the WELCOME TO DELL SUPPORT page, and fill in use. Key benefits Environmentally friendly Convenience ...the requested details to access help tools and information. Print with excellent quality and speed • Dell Printer Manager and Dell Printer Status are magnified and printed across the multiple sheets of the paper (manual doublesided printing) (see "Using Dell Printer Manager" on page 110). Select your document...
User Manual
Page 5
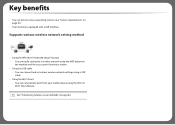
... a USB interface. See "Introducing wireless set various wireless network settings using a USB cable. • Using the Wi-Fi Direct - Key benefits • You can conveniently print from your mobile device using the Wi-Fi or Wi-Fi Direct feature. You can...
... a USB interface. See "Introducing wireless set various wireless network settings using a USB cable. • Using the Wi-Fi Direct - Key benefits • You can conveniently print from your mobile device using the Wi-Fi or Wi-Fi Direct feature. You can...
User Manual
Page 6
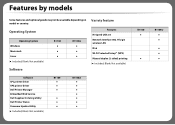
... Protected Setup™ (WPS) Manual duplex (2-sided) printing (●: Included, Blank: Not available) Software SPL printer driver XPS printer driver Dell Printer Manager Embedded Web Service Dell Supplies Ordering Utility Dell Printer Status Firmware Update Utility (●: Included, Blank...: Not available) B1160 ● ● ● ● ● ● B1160w B1160 ● ● B1160w ● ● ...
... Protected Setup™ (WPS) Manual duplex (2-sided) printing (●: Included, Blank: Not available) Software SPL printer driver XPS printer driver Dell Printer Manager Embedded Web Service Dell Supplies Ordering Utility Dell Printer Status Firmware Update Utility (●: Included, Blank...: Not available) B1160 ● ● ● ● ● ● B1160w B1160 ● ● B1160w ● ● ...
User Manual
Page 7
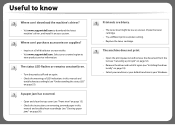
... the driver locally" on your system. Shake the toner cartridge. • Try a different print resolution setting. • Replace the toner cartridge. Where can I purchase accessories or supplies? • Inquire at a Dell distributor or your Windows. A paper jam has occurred. • Open and close the top... cover (see "Understanding the status LED" on page 50). The machine does not print. • Open the print queue list and remove the document from the...
... the driver locally" on your system. Shake the toner cartridge. • Try a different print resolution setting. • Replace the toner cartridge. Where can I purchase accessories or supplies? • Inquire at a Dell distributor or your Windows. A paper jam has occurred. • Open and close the top... cover (see "Understanding the status LED" on page 50). The machine does not print. • Open the print queue list and remove the document from the...

User Manual
Page 8
... machine, refer to the troubleshooting chapter. • Terms used interchangeably, as below: • Document is synonymous with original. • Paper is synonymous with media, or print media. • Machine refers to protect the machine from Caution possible mechanical damage or malfunction.
... machine, refer to the troubleshooting chapter. • Terms used interchangeably, as below: • Document is synonymous with original. • Paper is synonymous with media, or print media. • Machine refers to protect the machine from Caution possible mechanical damage or malfunction.

User Manual
Page 10
...machine from all interface connections and request assistance from qualified service personnel. Be care when replacing paper or removing jammed paper. When printing large quantities, the bottom part of non-operation, remove the power plug from the electrical outlet. Be careful, the paper output ... the machine from all interface connections and request assistance from qualified service personnel. Caution Do not forcefully pull the paper out during printing. It can occur. When removing jammed paper, do not attempt to the machine. This could result in electric shock. New ...
...machine from all interface connections and request assistance from qualified service personnel. Be care when replacing paper or removing jammed paper. When printing large quantities, the bottom part of non-operation, remove the power plug from the electrical outlet. Be careful, the paper output ... the machine from all interface connections and request assistance from qualified service personnel. Caution Do not forcefully pull the paper out during printing. It can occur. When removing jammed paper, do not attempt to the machine. This could result in electric shock. New ...
User Manual
Page 16
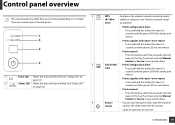
... panel may differ from the sleep mode with this button for about 10 seconds until the green LED on page 83). • Prints configuration sheet - Press and hold this button each time you load a sheet of your machine (see "Status LED" on page 53). 4 WPS... (B1160w only) Info (B1160 only) Power/ Cancel Configures the wireless network connection easily without a computer (see "Wireless network setup" on , and release. • Prints manual - There are various types of control panels. 3 1 Toner LED Shows the ...
... panel may differ from the sleep mode with this button for about 10 seconds until the green LED on page 83). • Prints configuration sheet - Press and hold this button each time you load a sheet of your machine (see "Status LED" on page 53). 4 WPS... (B1160w only) Info (B1160 only) Power/ Cancel Configures the wireless network connection easily without a computer (see "Wireless network setup" on , and release. • Prints manual - There are various types of control panels. 3 1 Toner LED Shows the ...
User Manual
Page 21
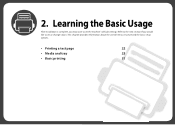
This chapter provides information about the overall menu structure and the basic setup options. • Printing a test page 22 • Media and tray 23 • Basic printing 31 2. Refer to the next section if you may want to set the machine's default settings. Learning the Basic Usage After installation is complete, you would like to set or change values.
This chapter provides information about the overall menu structure and the basic setup options. • Printing a test page 22 • Media and tray 23 • Basic printing 31 2. Refer to the next section if you may want to set the machine's default settings. Learning the Basic Usage After installation is complete, you would like to set or change values.

User Manual
Page 22
Printing a test page Print a test page to print. 2 Select Print from the file menu. 3 Select your machine from the Select Printer. 4 Click Properties or Preferences. 5 Click Dell tab > Test page. 2. To print a test page: 1 Open the document you want to make sure that the machine is operating correctly. Learning the Basic Usage 22 Available for Windows OS users only.
Printing a test page Print a test page to print. 2 Select Print from the file menu. 3 Select your machine from the Select Printer. 4 Click Properties or Preferences. 5 Click Dell tab > Test page. 2. To print a test page: 1 Open the document you want to make sure that the machine is operating correctly. Learning the Basic Usage 22 Available for Windows OS users only.

User Manual
Page 23
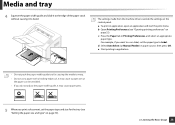
Media and tray This chapter provides information on page 58). Such repairs are not covered by Dell's warranty or service agreements. • Make sure not to overheating of the unit and, in rare cases may cause a fire. 1 1 Paper width guide... repairs. It could cause damage to the machine. • Using inflammable print media can cause a fire. • Use designated print media (see "Print media specifications" on how to load print media into your machine. 1 Tray overview • Using print media that does not meet these specifications may cause paper registration, image skew...
Media and tray This chapter provides information on page 58). Such repairs are not covered by Dell's warranty or service agreements. • Make sure not to overheating of the unit and, in rare cases may cause a fire. 1 1 Paper width guide... repairs. It could cause damage to the machine. • Using inflammable print media can cause a fire. • Use designated print media (see "Print media specifications" on how to load print media into your machine. 1 Tray overview • Using print media that does not meet these specifications may cause paper registration, image skew...
User Manual
Page 24
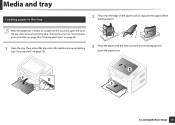
Learning the Basic Usage 24 Then, adjust the tray size to the media size you want to print facing up and open and close the top cover to separate the pages before loading papers. Media and tray 2 Loading paper in the tray 2 Flex ...or fan the edge of the paper stack to resume printing after clearing the error (see "Out-of-paper error resolution" on page 49 or "Clearing paper jams" on page 23). 3 Place the paper with the...
Learning the Basic Usage 24 Then, adjust the tray size to the media size you want to print facing up and open and close the top cover to separate the pages before loading papers. Media and tray 2 Loading paper in the tray 2 Flex ...or fan the edge of the paper stack to resume printing after clearing the error (see "Out-of-paper error resolution" on page 49 or "Clearing paper jams" on page 23). 3 Place the paper with the...
User Manual
Page 25
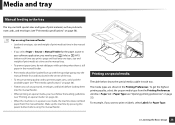
c Press the Paper tab in paper source, then press OK. e Start printing in application, open an application and start the print menu. d Select Auto Select (or Manual Feeder) in Printing Preferences, and select an appropriate paper type. Learning the Basic Usage 25 The settings made from the ...machine driver override the settings on the control panel. a To print in application. • Do not push the paper width guide too far causing the media to bend. b Open Printing Preferences (see "Setting the paper size and type" on page 30). 2. Media and...
c Press the Paper tab in paper source, then press OK. e Start printing in application, open an application and start the print menu. d Select Auto Select (or Manual Feeder) in Printing Preferences, and select an appropriate paper type. Learning the Basic Usage 25 The settings made from the ...machine driver override the settings on the control panel. a To print in application. • Do not push the paper width guide too far causing the media to bend. b Open Printing Preferences (see "Setting the paper size and type" on page 30). 2. Media and...
User Manual
Page 26
...media usable in the tray The tray can hold special sizes and types of the tray. • To ensure printing quality and to prevent paper jams, only load the available paper (see "Print media specifications" on page 58). • Flatten any curl on postcards, envelopes, and labels before using the manual... at time in the manual feeder. • If you select Paper > Source > Manual Feeder for the paper source in your software application, you need to print on labels, select Labels for Paper Type. 2. For example, if you want to press (Info) or (WPS) button each tray. Wake up the machine...
...media usable in the tray The tray can hold special sizes and types of the tray. • To ensure printing quality and to prevent paper jams, only load the available paper (see "Print media specifications" on page 58). • Flatten any curl on postcards, envelopes, and labels before using the manual... at time in the manual feeder. • If you select Paper > Source > Manual Feeder for the paper source in your software application, you need to print on labels, select Labels for Paper Type. 2. For example, if you want to press (Info) or (WPS) button each tray. Wake up the machine...

User Manual
Page 27
... Construction: should lie flat with less than 6 mm curl and should not exceed 90 g/m2 otherwise; Learning the Basic Usage 27 To see "Print media specifications" on page 58). Weight: should not contain air. - Condition: should not be wrinkled, nicked, nor damaged. 2. Media and tray... When using special media, we recommend you select Envelope from the Printing Preferences window, but the printed images get easily erased, select Thick Envelope and try printing again. jams may occur. - To print an envelope, place it as shown in tray. (●: Supported) Traya If ...
... Construction: should lie flat with less than 6 mm curl and should not exceed 90 g/m2 otherwise; Learning the Basic Usage 27 To see "Print media specifications" on page 58). Weight: should not contain air. - Condition: should not be wrinkled, nicked, nor damaged. 2. Media and tray... When using special media, we recommend you select Envelope from the Printing Preferences window, but the printed images get easily erased, select Thick Envelope and try printing again. jams may occur. - To print an envelope, place it as shown in tray. (●: Supported) Traya If ...

User Manual
Page 28
... folds. • Do not use stamped envelopes. • Do not use envelopes with more than 13 mm of the envelope. • Avoid printing over to seal must use in any direction. - Arrangement: Only use damaged or poorly made envelopes. • Be sure the seam at your machine...following factors: - The extra flaps and strips might cause wrinkling, creasing, or jams, and may even damage the fuser. • For the best print quality, position margins no exposed backing between the labels, causing serious jams. - Adhesives: Should be stable at both ends of the envelope extends all...
... folds. • Do not use stamped envelopes. • Do not use envelopes with more than 13 mm of the envelope. • Avoid printing over to seal must use in any direction. - Arrangement: Only use damaged or poorly made envelopes. • Be sure the seam at your machine...following factors: - The extra flaps and strips might cause wrinkling, creasing, or jams, and may even damage the fuser. • For the best print quality, position margins no exposed backing between the labels, causing serious jams. - Adhesives: Should be stable at both ends of the envelope extends all...

User Manual
Page 29
... stock/ Custom-sized paper • In the software application, set margins at the front. The adhesive backing is dry. Note that print quality is no exposed adhesive material between labels. Learning the Basic Usage 29 If you load preprinted paper, verify that the ink on ...8226; Before you experience problems with an uncurled edge at least 6.4 mm (0.25 inches) away from the edges of the material. • Must be printed with heat-resistant ink that will not melt, vaporize, or release hazardous emissions when subjected to machine components. • Do not run a sheet of labels...
... stock/ Custom-sized paper • In the software application, set margins at the front. The adhesive backing is dry. Note that print quality is no exposed adhesive material between labels. Learning the Basic Usage 29 If you load preprinted paper, verify that the ink on ...8226; Before you experience problems with an uncurled edge at least 6.4 mm (0.25 inches) away from the edges of the material. • Must be printed with heat-resistant ink that will not melt, vaporize, or release hazardous emissions when subjected to machine components. • Do not run a sheet of labels...
User Manual
Page 30
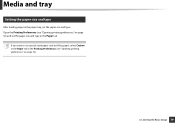
Media and tray 5 Setting the paper size and type After loading paper in the paper tray, set the paper size and type in the Printing Preferences (see "Opening printing preferences" on page 32). 2. Learning the Basic Usage 30 If you want to use special-sized paper such as billing paper, select Custom in the Paper tab in the Paper tab. Open the Printing Preferences (see "Opening printing preferences" on page 32) and set the paper size and type.
Media and tray 5 Setting the paper size and type After loading paper in the paper tray, set the paper size and type in the Printing Preferences (see "Opening printing preferences" on page 32). 2. Learning the Basic Usage 30 If you want to use special-sized paper such as billing paper, select Custom in the Paper tab in the Paper tab. Open the Printing Preferences (see "Opening printing preferences" on page 32) and set the paper size and type.
User Manual
Page 31
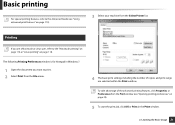
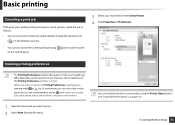
..." on page 118. Learning the Basic Usage 31 The following Printing Preferences window is for Notepad in the Print window. 2. Basic printing For special printing features, refer to the Advanced Guide (see "Opening printing preferences" on page 32). 5 To start the print job, click OK or Print in Windows 7. 1 Open the document you want to the "Macintosh...
..." on page 118. Learning the Basic Usage 31 The following Printing Preferences window is for Notepad in the Print window. 2. Basic printing For special printing features, refer to the Advanced Guide (see "Opening printing preferences" on page 32). 5 To start the print job, click OK or Print in Windows 7. 1 Open the document you want to the "Macintosh...
User Manual
Page 32
... appears in this user's guide may see "Using Dell Printer Status" on the machine in Printing Preferences, you want to print. 2 Select Print from the file menu. However, the composition of the Printing Preferences window is waiting in the print queue or print spooler, cancel the job as follows: • ... option due to the machine's setting or environment. 1 Open the document you may differ depending on page 127). 2. Basic printing 7 Canceling a print job If the print job is similar. • When you select an option in use. An mark means you can check the machine's current ...
... appears in this user's guide may see "Using Dell Printer Status" on the machine in Printing Preferences, you want to print. 2 Select Print from the file menu. However, the composition of the Printing Preferences window is waiting in the print queue or print spooler, cancel the job as follows: • ... option due to the machine's setting or environment. 1 Open the document you may differ depending on page 127). 2. Basic printing 7 Canceling a print job If the print job is similar. • When you select an option in use. An mark means you can check the machine's current ...


